Author: onlinefoodrecipes

  • Southwestern Salad Recipe Chicken: A Fiesta in a Bowl!

    Southwestern Salad Recipe Chicken: A Fiesta in a Bowl!

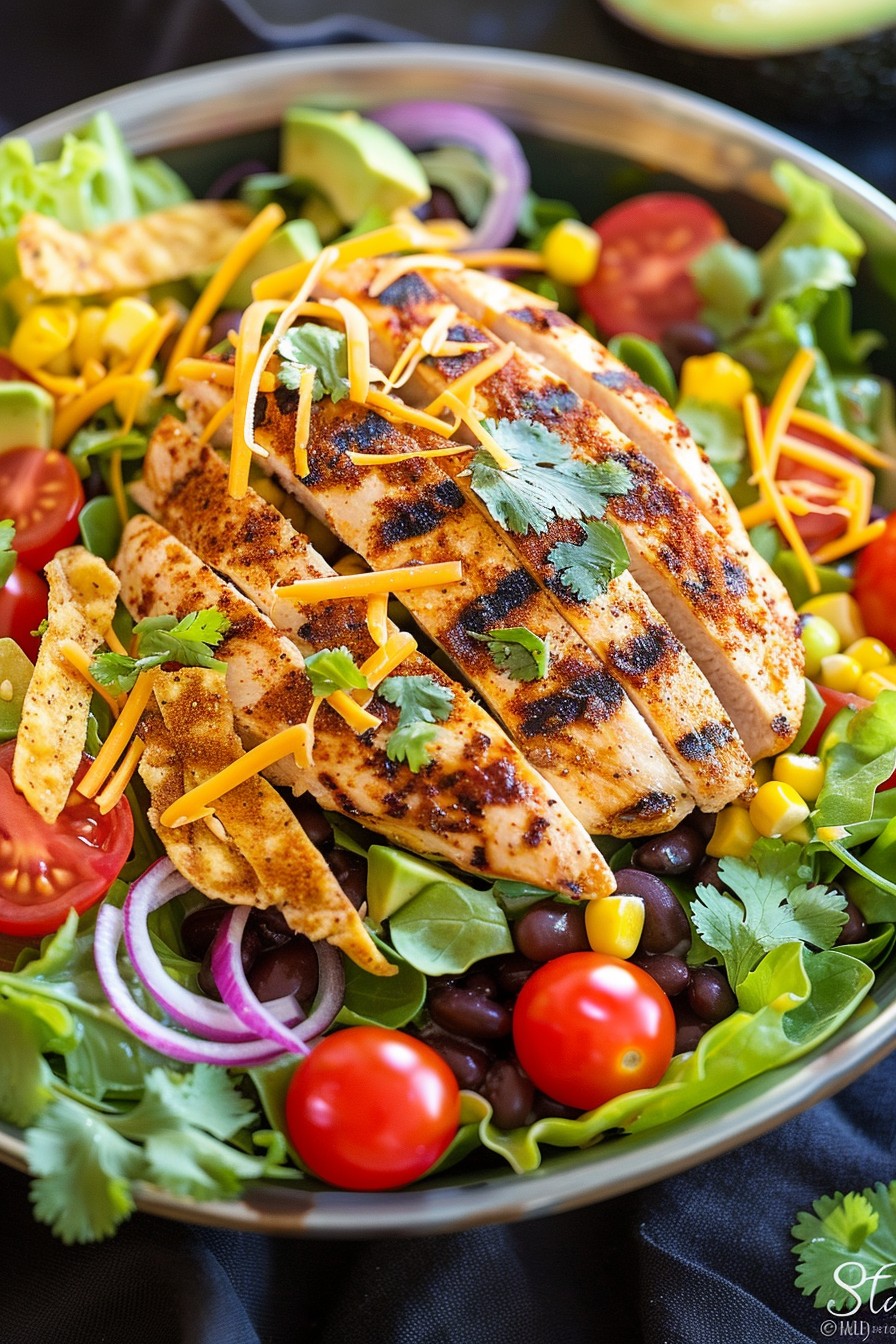
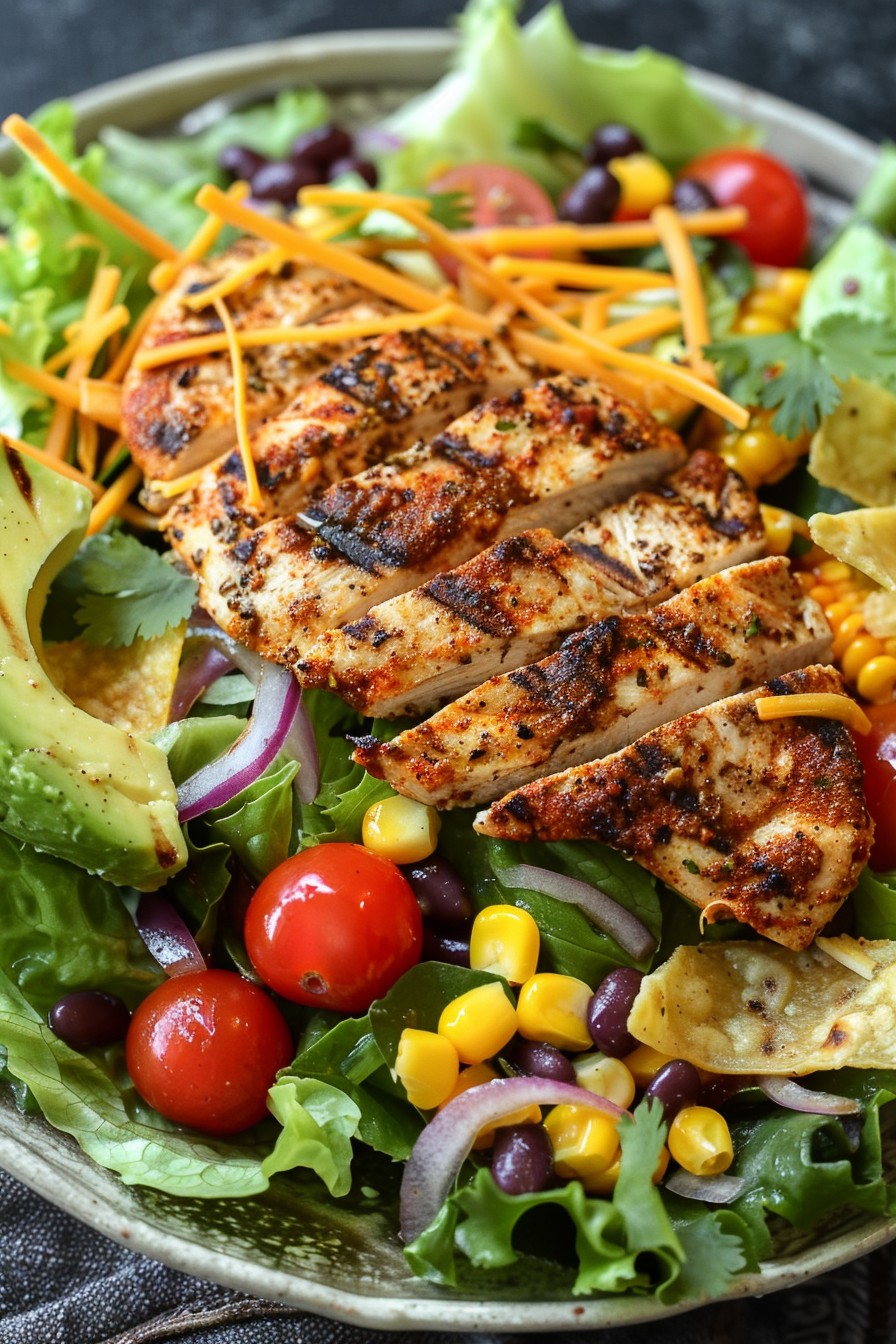
    Now, let’s taco ’bout a salad that’s anything but boring. This Southwestern Salad with Chicken is packed with bold flavors, vibrant colors, and a whole lot of crunch. It’s the perfect dish for those who love a little spice in their life and a lot of freshness in their bowl.

    Why This Recipe Works

    • The combination of grilled chicken and fresh veggies provides a satisfying crunch and a protein punch.
    • A homemade southwestern dressing adds a creamy, tangy, and slightly spicy kick that ties all the ingredients together.
    • It’s versatile! Serve it as a main dish, a side, or even as a filling for wraps or tacos.
    • Prep ahead friendly. Most components can be made in advance, making it a great option for meal prep or busy weeknights.
    • It’s a crowd-pleaser. With its vibrant colors and flavors, this salad is sure to be a hit at any gathering.

    Ingredients

    • 2 boneless, skinless chicken breasts (about 1 pound)
    • 1 tbsp olive oil
    • 1 tsp chili powder
    • 1/2 tsp cumin
    • 1/2 tsp garlic powder
    • Salt and pepper to taste
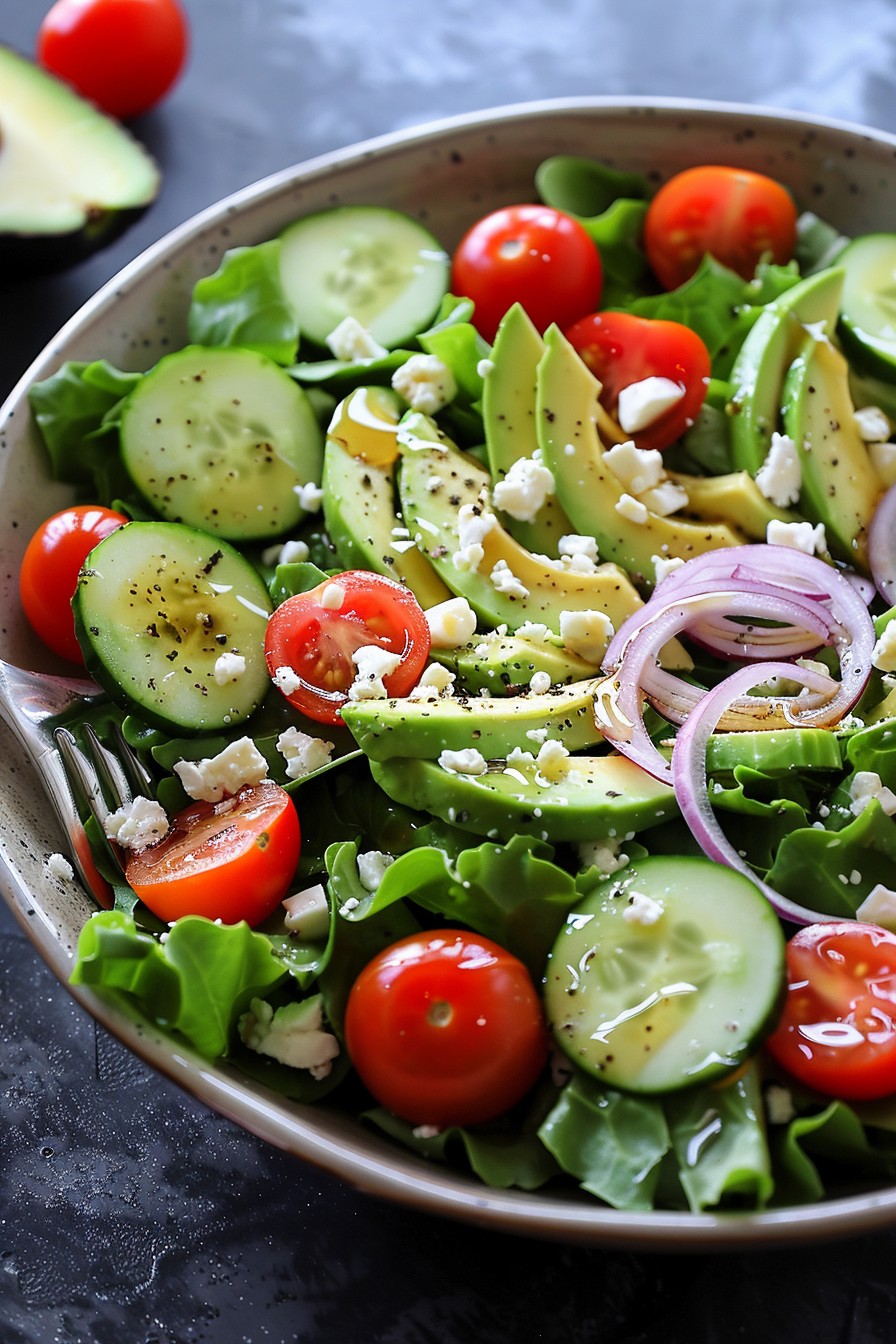
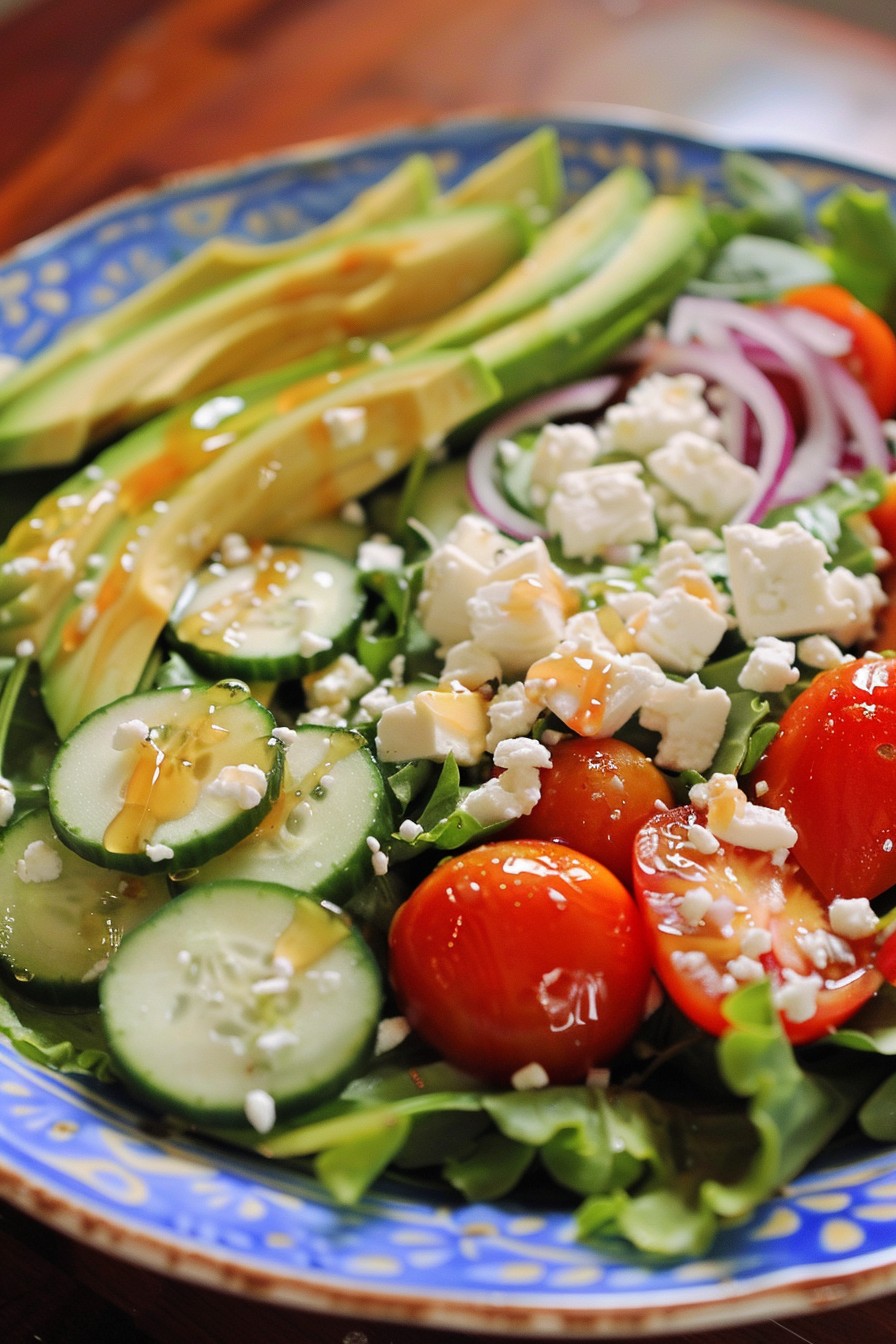
    • 6 cups mixed greens (romaine, spinach, or your favorite blend)
    • 1 cup cherry tomatoes, halved
    • 1 avocado, diced
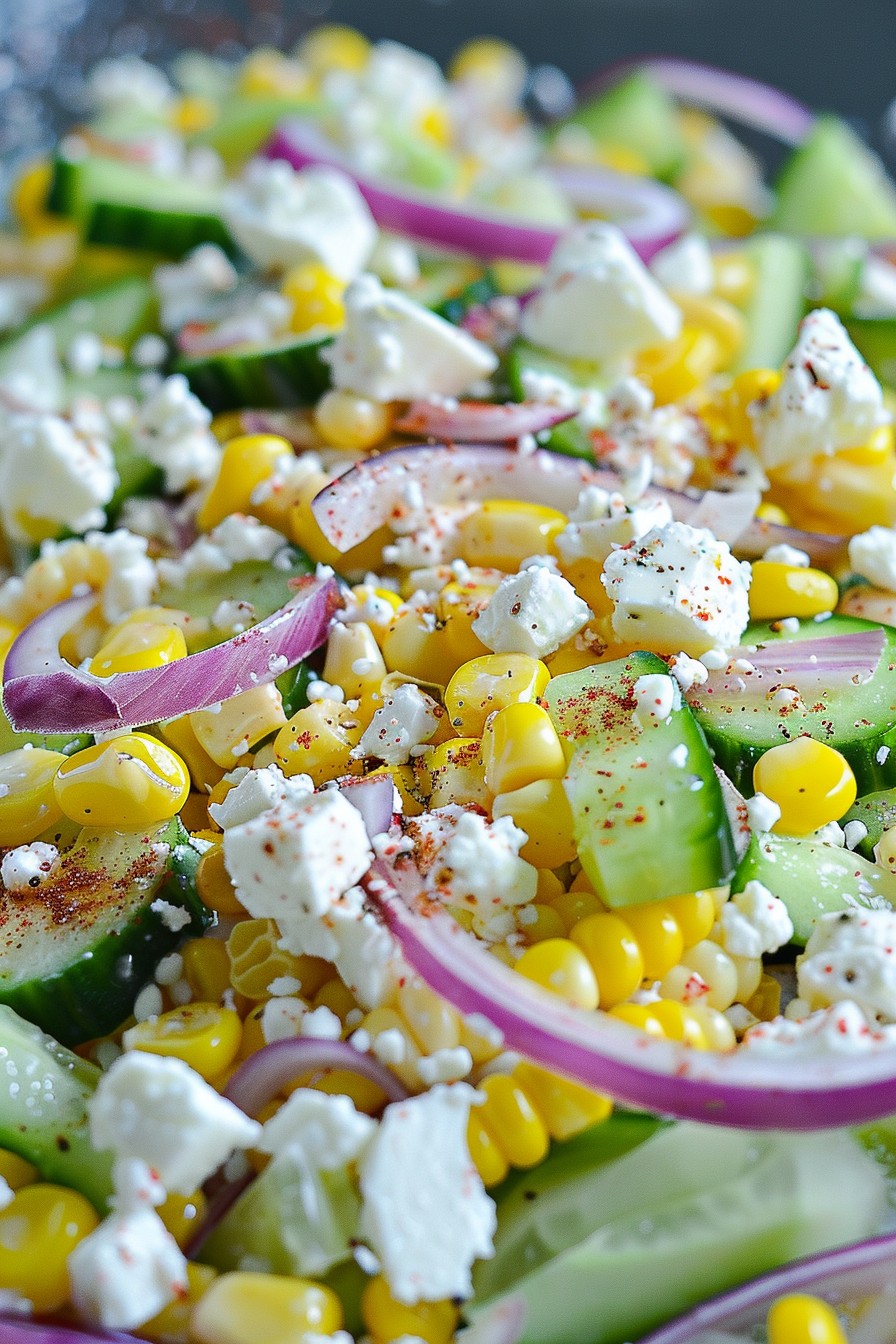
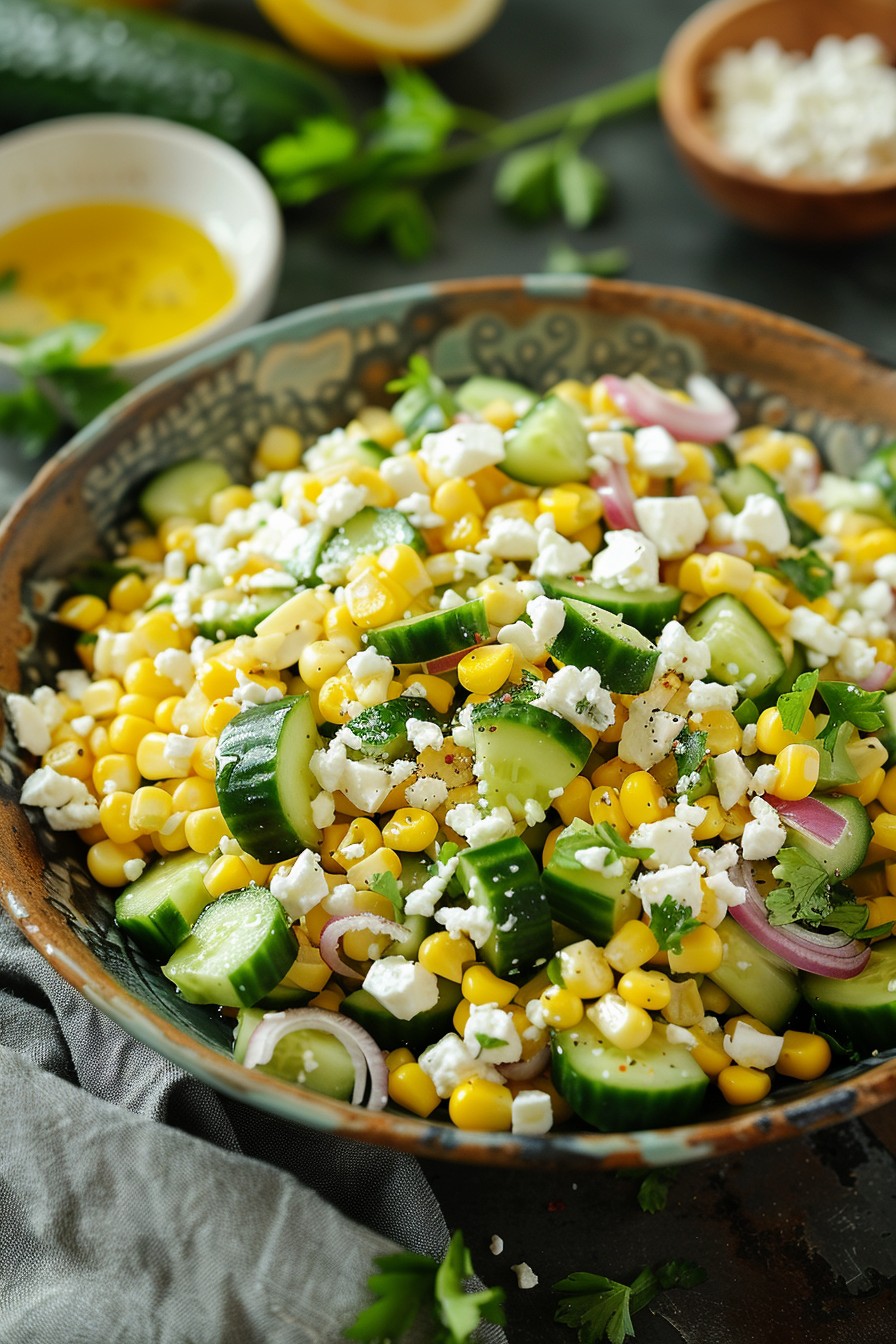
    • 1/2 cup corn kernels (fresh, frozen, or canned)
    • 1/2 cup black beans, rinsed and drained
    • 1/4 cup red onion, thinly sliced
    • 1/4 cup cilantro, chopped
    • 1/2 cup shredded cheddar cheese
    • 1/2 cup tortilla strips

    Equipment Needed

    • Grill or grill pan
    • Mixing bowls
    • Whisk
    • Measuring cups and spoons
    • Knife and cutting board

    Instructions

    Southwestern Salad Recipe Chicken

    Step 1: Season and Grill the Chicken

    Start by preheating your grill or grill pan to medium-high heat. While the grill heats up, rub the chicken breasts with olive oil, then season both sides with chili powder, cumin, garlic powder, salt, and pepper. Grill the chicken for about 6-7 minutes per side, or until the internal temperature reaches 165°F. Let it rest for 5 minutes before slicing. Tip: For extra flavor, marinate the chicken in the seasoning mix for an hour before grilling.

    Step 2: Prepare the Dressing

    In a small bowl, whisk together 1/4 cup of olive oil, 2 tablespoons of lime juice, 1 teaspoon of honey, 1/2 teaspoon of chili powder, 1/4 teaspoon of cumin, and salt and pepper to taste. Adjust the seasoning as needed. Tip: For a creamier dressing, add a tablespoon of Greek yogurt or sour cream.

    Step 3: Assemble the Salad

    In a large bowl, combine the mixed greens, cherry tomatoes, avocado, corn, black beans, red onion, and cilantro. Add the sliced grilled chicken on top. Drizzle with the dressing and toss gently to combine. Tip: Add the avocado last to prevent it from getting mushy.

    Step 4: Add the Finishing Touches

    Sprinkle the shredded cheddar cheese and tortilla strips over the top of the salad for an extra crunch and cheesy goodness. Serve immediately.

    Tips and Tricks

    For those looking to elevate their Southwestern Salad, consider these advanced tips. First, char your corn on the grill for a smoky flavor that complements the spices in the chicken. Second, make your own tortilla strips by cutting corn tortillas into thin strips, tossing them with a bit of oil and salt, and baking until crispy. Third, for a dairy-free version, skip the cheese or use a vegan alternative. Lastly, if you’re short on time, a store-bought rotisserie chicken can be a great shortcut.

    Recipe Variations

    • Swap the chicken for shrimp or steak for a different protein option.
    • Add quinoa or brown rice to make the salad more filling.
    • Use a different dressing, such as a chipotle ranch or avocado lime, to change up the flavors.
    • Include additional veggies like bell peppers or cucumbers for extra crunch and nutrition.
    • For a low-carb option, serve the salad in lettuce wraps instead of on a bed of greens.

    Frequently Asked Questions

    Can I make this salad ahead of time?

    Yes, you can prepare most components ahead of time. Grill the chicken, chop the veggies, and make the dressing up to 2 days in advance. Store everything separately in the fridge and assemble the salad just before serving to keep it fresh and crisp.

    How can I make this salad spicier?

    To kick up the heat, add diced jalapeños to the salad or increase the amount of chili powder in the dressing. You can also use a hotter variety of chili powder or add a pinch of cayenne pepper.

    What’s the best way to store leftovers?

    Store any leftovers in an airtight container in the fridge for up to 2 days. Keep in mind that the greens may wilt and the avocado may brown, so it’s best enjoyed fresh.

    Summary

    This Southwestern Salad with Chicken is a vibrant, flavorful dish that’s perfect for any occasion. With its combination of grilled chicken, fresh veggies, and a tangy dressing, it’s a satisfying meal that’s both nutritious and delicious. Plus, it’s customizable to suit your taste preferences and dietary needs.

  • Corn Salad Recipe with Feta: A Summer Delight

    Corn Salad Recipe with Feta: A Summer Delight

    Perfect for those warm summer evenings, this corn salad with feta is a refreshing twist on a classic. Packed with flavors and textures, it’s a dish that promises to be a hit at any gathering.

    Why This Recipe Works

    • The sweetness of fresh corn balances perfectly with the tanginess of feta cheese.
    • Adding a variety of textures from crisp vegetables to creamy cheese makes every bite interesting.
    • It’s versatile enough to serve as a side dish or a main for vegetarians.
    • The dressing is light yet flavorful, enhancing the natural tastes of the ingredients.
    • Quick and easy to prepare, it’s perfect for last-minute plans.

    Ingredients

    • 4 cups fresh corn kernels (about 4 ears)
    • 1 cup diced cucumber
    • 1/2 cup crumbled feta cheese
    • 1/4 cup finely chopped red onion
    • 2 tablespoons olive oil
    • 1 tablespoon lemon juice
    • Salt and pepper to taste

    Equipment Needed

    • Large mixing bowl
    • Sharp knife
    • Cutting board
    • Measuring cups and spoons

    Instructions

    Corn Salad Recipe With Feta

    Prepare the Vegetables

    Start by shucking the corn and removing the kernels from the cob. Dice the cucumber into small, bite-sized pieces and finely chop the red onion. Combine these in a large mixing bowl. Tip: For an extra crisp texture, chill the cucumber before dicing.

    Make the Dressing

    In a small bowl, whisk together the olive oil and lemon juice until well combined. Season with salt and pepper to taste. This simple dressing brings out the freshness of the vegetables.

    Combine Ingredients

    Pour the dressing over the vegetables in the mixing bowl. Gently toss to ensure everything is evenly coated. The key here is to mix lightly to keep the vegetables crisp.

    Add the Feta

    Sprinkle the crumbled feta cheese over the salad. Fold it in gently to distribute it throughout the salad without breaking the cheese down too much. Tip: For the best flavor, use high-quality feta cheese.

    Chill and Serve

    Cover the salad and refrigerate for at least 30 minutes before serving. This allows the flavors to meld together beautifully. Serve chilled for a refreshing taste.

    Tips and Tricks

    For those looking to elevate this dish, consider grilling the corn before cutting off the kernels for a smoky flavor. If you’re short on time, frozen corn can be a quick substitute, just be sure to thaw and drain it well. Adding a handful of fresh herbs like basil or cilantro can introduce a new layer of flavor. For a creamier texture, a dollop of Greek yogurt can be mixed into the dressing. Lastly, if you’re serving this salad at a picnic, keep it chilled in a cooler until it’s time to eat to maintain freshness.

    Recipe Variations

    • Add avocado for a creamy texture and healthy fats.
    • Include black beans and a dash of cumin for a Southwestern twist.
    • Swap feta for goat cheese for a different tangy flavor profile.
    • Mix in some quinoa to turn this side dish into a hearty main.
    • For a spicy kick, add diced jalapeños or a sprinkle of chili flakes.

    Frequently Asked Questions

    Can I use canned corn instead of fresh?

    Yes, canned corn can be used in a pinch. Just be sure to drain and rinse it well to remove any excess sodium and canning liquid. However, fresh corn will give you the best texture and flavor, especially when it’s in season.

    How long can I store this salad?

    This salad is best enjoyed within 1-2 days of making it. The vegetables will start to lose their crispness, and the feta may begin to break down after that. Store it in an airtight container in the refrigerator to keep it fresh as long as possible.

    Is there a vegan alternative to feta?

    Absolutely! There are several vegan feta cheeses available on the market made from tofu or nuts that can mimic the tangy flavor and crumbly texture of traditional feta. You can also try using nutritional yeast for a cheesy flavor without the dairy.

    Summary

    This corn salad with feta is a vibrant, flavorful dish that’s perfect for summer. Easy to make and customizable, it’s sure to be a crowd-pleaser. Whether you’re looking for a light side or a vegetarian main, this recipe has you covered.

  • Super Salad Recipe: The Ultimate Bowl of Goodness

    Super Salad Recipe: The Ultimate Bowl of Goodness

    Many times, we overlook the power of a good salad. Not only is it a fantastic way to pack in your daily veggies, but it’s also a canvas for creativity and flavor. This Super Salad recipe is here to change the game with its perfect balance of crunch, creaminess, and zest.

    Why This Recipe Works

    • It’s a perfect mix of textures and flavors, from the crisp lettuce to the creamy avocado.
    • Packed with nutrients, it’s a guilt-free meal that satisfies.
    • Easy to customize based on what’s in your fridge or your dietary preferences.
    • The homemade dressing elevates it from good to unforgettable.
    • Quick to assemble, making it perfect for busy weeknights or meal prep.

    Ingredients

    • 2 cups mixed greens (washed and dried)
    • 1 ripe avocado (diced)
    • 1 cup cherry tomatoes (halved)
    • 1/2 cucumber (sliced)
    • 1/4 cup red onion (thinly sliced)
    • 1/4 cup feta cheese (crumbled)
    • 1/4 cup olive oil
    • 2 tbsp lemon juice
    • 1 tsp honey
    • Salt and pepper to taste

    Equipment Needed

    • Large salad bowl
    • Small mixing bowl
    • Whisk
    • Knife
    • Cutting board

    Instructions

    Super Salad Recipe

    Step 1: Prep Your Veggies

    Start by washing all your vegetables under cold water. Dry them thoroughly to ensure your salad isn’t watery. Chop the mixed greens if they’re too large, halve the cherry tomatoes, slice the cucumber into thin rounds, and thinly slice the red onion. Place all these in your large salad bowl. Tip: For less bite from the onion, soak the slices in cold water for 10 minutes before adding to the salad.

    Step 2: Add the Creamy Elements

    Dice the avocado and crumble the feta cheese over the prepared veggies. The avocado adds a creamy texture that contrasts beautifully with the crisp vegetables, while the feta brings a salty tang. Tip: To prevent the avocado from browning, toss it lightly in lemon juice before adding to the salad.

    Step 3: Whisk Up the Dressing

    In a small bowl, whisk together the olive oil, lemon juice, honey, salt, and pepper until well combined. The honey balances the acidity of the lemon, creating a dressing that’s both bright and slightly sweet. Tip: For an extra flavor boost, add a pinch of garlic powder or dried herbs to the dressing.

    Step 4: Dress the Salad

    Drizzle the dressing over the salad and toss gently to coat all the ingredients evenly. Be careful not to overmix, as this can make the greens wilt and the avocado mushy.

    Step 5: Serve Immediately

    This salad is best enjoyed fresh, so serve it right away. If you need to prepare it in advance, keep the dressing separate and add it just before serving to maintain the best texture.

    Tips and Tricks

    To take your Super Salad to the next level, consider these advanced tips. First, toast some nuts or seeds (like almonds or sunflower seeds) for added crunch and nutrition. Second, incorporate grains like quinoa or farro for a heartier meal. Third, experiment with different dressings, such as a tahini-lemon or balsamic vinaigrette, to keep things interesting. Remember, the key to a great salad is balancing flavors and textures, so don’t be afraid to get creative.

    Recipe Variations

    • Protein Power: Add grilled chicken, shrimp, or tofu for a protein boost.
    • Mediterranean Twist: Swap feta for goat cheese and add olives and artichoke hearts.
    • Winter Version: Use roasted squash or sweet potatoes instead of tomatoes and cucumber.
    • Fruitful: Add slices of apple or pear for a sweet contrast.
    • Spicy Kick: Include jalapeños or a dash of chili flakes for heat.

    Frequently Asked Questions

    Q: Can I make this salad ahead of time?
    A: Yes, but for the best texture, keep the dressing separate and add it just before serving. Prep all the ingredients and store them in airtight containers in the fridge.

    Q: What can I use instead of honey in the dressing?
    A: Maple syrup or agave nectar are great vegan alternatives that will still give you that sweet balance to the lemon’s acidity.

    Q: How can I add more protein to this salad?
    A: Grilled chicken, shrimp, tofu, or even hard-boiled eggs are excellent additions that will make the salad more filling and protein-rich.

    Summary

    This Super Salad recipe is a vibrant, nutritious, and customizable dish that’s perfect for any occasion. With its mix of fresh veggies, creamy avocado, and tangy dressing, it’s a surefire way to enjoy your greens.

  • Creamy Veg Mayonnaise Salad Recipe: A Cool & Crunchy Delight

    Creamy Veg Mayonnaise Salad Recipe: A Cool & Crunchy Delight

    Perfect for those sweltering summer days or when you’re craving something light yet satisfying, this veg mayonnaise salad is a breeze to whip up. Packed with crisp veggies and enveloped in a creamy, tangy mayo dressing, it’s a versatile dish that’s sure to please.

    Why This Recipe Works

    • The combination of fresh, crunchy vegetables provides a satisfying texture contrast.
    • Homemade mayonnaise dressing offers a richer flavor than store-bought versions.
    • It’s incredibly versatile, easily adapted to include your favorite veggies or proteins.
    • Quick to prepare, making it perfect for last-minute gatherings or meals.
    • The creamy dressing coats every piece evenly, ensuring every bite is flavorful.

    Ingredients

    • 2 cups chopped mixed vegetables (carrots, cucumbers, bell peppers)
    • 1/2 cup mayonnaise
    • 1 tbsp lemon juice
    • 1 tsp mustard
    • Salt and pepper to taste
    • 1/4 cup chopped fresh herbs (dill, parsley, or cilantro)

    Equipment Needed

    • Large mixing bowl
    • Whisk
    • Measuring cups and spoons
    • Chopping board and knife

    Instructions

    Veg Mayonnaise Salad Recipe

    Step 1: Prep Your Veggies

    Start by washing all your vegetables thoroughly under cold running water. Chop them into bite-sized pieces for easy eating. Uniform sizes ensure even coating with the dressing. Tip: For extra crunch, you can chill the chopped veggies in the fridge for about 30 minutes before mixing.

    Step 2: Make the Dressing

    In a large mixing bowl, whisk together the mayonnaise, lemon juice, and mustard until smooth. Season with salt and pepper to taste. The lemon juice adds a bright tanginess that balances the richness of the mayo. Tip: For a lighter version, you can substitute half of the mayonnaise with Greek yogurt.

    Step 3: Combine and Toss

    Add the chopped vegetables to the bowl with the dressing. Gently toss until all the veggies are evenly coated. Be careful not to overmix to keep the vegetables crisp. Tip: Adding the herbs at this stage ensures they’re evenly distributed throughout the salad.

    Step 4: Chill Before Serving

    Cover the bowl with plastic wrap and refrigerate the salad for at least 1 hour before serving. This step allows the flavors to meld together beautifully. The salad can be served chilled for a refreshing taste.

    Tips and Tricks

    For an extra layer of flavor, consider roasting some of the vegetables before adding them to the salad. Roasted bell peppers or carrots add a sweet, smoky depth. If you’re short on time, using pre-chopped vegetables from the store can be a huge time-saver. Always taste and adjust the seasoning after the salad has chilled, as flavors can mellow out in the fridge. For a dairy-free version, use vegan mayonnaise. To add a protein boost, toss in some chickpeas or grilled chicken pieces.

    Recipe Variations

    • Add some diced apples or grapes for a sweet contrast.
    • Incorporate cooked pasta or quinoa to turn it into a hearty main dish.
    • Spice it up with a dash of cayenne pepper or hot sauce.
    • For a Mediterranean twist, add olives and feta cheese.
    • Use avocado mayo for a healthier, creamy alternative.

    Frequently Asked Questions

    Can I make this salad ahead of time?

    Absolutely! This salad actually tastes better after it’s had time to chill in the fridge, making it perfect for meal prep or parties. Just be sure to give it a good stir before serving to redistribute the dressing.

    How long will it last in the fridge?

    Stored in an airtight container, the salad will stay fresh for up to 3 days. However, the vegetables may start to lose their crunch after the first day, so it’s best enjoyed within 24 hours for optimal texture.

    Can I use frozen vegetables?

    While fresh is best for crunch and flavor, you can use thawed frozen vegetables in a pinch. Just be sure to drain them well to avoid watering down the dressing.

    Summary

    This veg mayonnaise salad is a creamy, crunchy, and utterly delicious dish that’s perfect for any occasion. Easy to make and customizable, it’s sure to become a staple in your recipe collection.

  • Cucumber Onion Salad Recipe Vinegar: A Crunchy, Tangy Delight

    Cucumber Onion Salad Recipe Vinegar: A Crunchy, Tangy Delight

    Tantalize your taste buds with this refreshing cucumber onion salad, a perfect blend of crisp cucumbers, sharp onions, and a tangy vinegar dressing. This dish is not only easy to whip up but also brings a burst of flavor to any meal, making it a must-try for salad lovers.

    Why This Recipe Works

    • The combination of cucumbers and onions offers a delightful crunch and sharpness that’s balanced by the tangy vinegar dressing.
    • It’s incredibly versatile, serving as a perfect side dish for barbecues, picnics, or a light lunch.
    • This salad is a quick fix, requiring minimal prep time and no cooking, making it ideal for busy days.
    • The vinegar not only adds flavor but also helps in preserving the salad, allowing it to stay fresh longer.
    • It’s a healthy option, low in calories but high in hydration and nutrients, thanks to the cucumbers.

    Ingredients

    • 2 large cucumbers, thinly sliced
    • 1 medium red onion, thinly sliced
    • 1/2 cup white vinegar
    • 1/4 cup water
    • 2 tbsp sugar
    • 1 tsp salt
    • 1/2 tsp black pepper

    Equipment Needed

    • Large mixing bowl
    • Measuring cups and spoons
    • Sharp knife
    • Cutting board

    Instructions

    Cucumber Onion Salad Recipe Vinegar

    Prepare the Vegetables

    Start by washing the cucumbers thoroughly under cold water. Using a sharp knife and a cutting board, slice the cucumbers into thin rounds, about 1/8 inch thick. Peel the red onion and slice it into thin half-moons. Combine the cucumbers and onions in a large mixing bowl.

    Make the Vinegar Dressing

    In a small bowl, whisk together the white vinegar, water, sugar, salt, and black pepper until the sugar and salt are completely dissolved. This dressing is the heart of the salad, so take your time to ensure it’s well mixed.

    Combine and Marinate

    Pour the vinegar dressing over the sliced cucumbers and onions. Gently toss the salad to ensure all the pieces are evenly coated with the dressing. Let the salad marinate in the refrigerator for at least 30 minutes before serving. This allows the flavors to meld together beautifully.

    Serve and Enjoy

    After marinating, give the salad a quick toss to redistribute the dressing. Serve chilled for the best flavor and texture. This salad pairs wonderfully with grilled meats or can be enjoyed on its own for a light, refreshing snack.

    Tips and Tricks

    For an extra crunch, consider adding a handful of sunflower seeds or chopped walnuts to the salad before serving. If you prefer a sweeter salad, adjust the amount of sugar in the dressing to taste. To make the salad ahead of time, prepare the vegetables and dressing separately and combine them a few hours before serving to maintain the cucumbers’ crispness.

    Recipe Variations

    • Add diced tomatoes or bell peppers for a colorful twist and extra vitamins.
    • For a creamy version, mix in a tablespoon of mayonnaise or Greek yogurt to the dressing.
    • Spice it up with a pinch of red pepper flakes or a dash of hot sauce for those who like it hot.
    • Incorporate fresh herbs like dill or parsley for an aromatic flavor boost.
    • Swap the white vinegar for apple cider vinegar or balsamic vinegar for a different tangy profile.

    Frequently Asked Questions

    Can I make this salad ahead of time?

    Absolutely! This salad actually gets better as it marinates, making it a great make-ahead dish. Just keep it refrigerated and give it a good toss before serving to refresh the flavors.

    How long does this salad last in the fridge?

    Stored in an airtight container, the salad can last up to 3 days in the refrigerator. The vinegar helps preserve the vegetables, but the cucumbers may start to lose their crunch after the first day.

    Can I use other types of vinegar?

    Yes, feel free to experiment with different vinegars like apple cider, rice, or balsamic vinegar. Each will bring a unique flavor profile to the salad.

    Summary

    This cucumber onion salad with vinegar dressing is a simple, refreshing dish that’s perfect for any occasion. With its crisp texture and tangy flavor, it’s sure to be a hit. Plus, it’s easy to customize with your favorite add-ins or variations.

  • Cold Noodle Salad with Spicy Peanut Sauce Recipe – A Refreshing Twist on a Classic

    Cold Noodle Salad with Spicy Peanut Sauce Recipe – A Refreshing Twist on a Classic

    Forget the oven, this cold noodle salad is your ticket to a refreshing, flavorful meal that’s perfect for those hot summer days. Packed with a spicy peanut sauce that’s to die for, this dish is a game-changer for your picnic or potluck lineup.

    Why This Recipe Works

    • The spicy peanut sauce is a perfect balance of heat and sweetness, making every bite irresistible.
    • Cold noodles are incredibly refreshing, especially when paired with crisp vegetables for that extra crunch.
    • This recipe is versatile, allowing for endless variations to suit your taste or what you have in your fridge.
    • It’s quick to prepare, making it ideal for last-minute gatherings or a fuss-free dinner.
    • The combination of textures and flavors ensures that this dish is anything but boring.

    Ingredients

    • 8 oz rice noodles – cooked according to package instructions and cooled
    • 1/2 cup creamy peanut butter
    • 2 tbsp soy sauce
    • 1 tbsp sesame oil
    • 2 tbsp honey
    • 1 tbsp sriracha – adjust to taste
    • 1 clove garlic – minced
    • 1 tbsp lime juice
    • 1/4 cup water – to thin the sauce
    • 1 cup shredded carrots
    • 1 cup thinly sliced cucumber
    • 1/4 cup chopped cilantro
    • 2 tbsp chopped peanuts – for garnish

    Equipment Needed

    • Large mixing bowl
    • Whisk
    • Measuring cups and spoons
    • Pot for boiling noodles
    • Colander

    Instructions

    Cold Noodle Salad With Spicy Peanut Sauce Recipe

    Prepare the Noodles

    Start by cooking the rice noodles according to the package instructions. Once cooked, drain them in a colander and rinse under cold water to stop the cooking process and cool them down. Let them drain thoroughly to avoid a watery salad. Tip: Tossing the noodles with a little sesame oil can prevent them from sticking together.

    Make the Spicy Peanut Sauce

    In a large mixing bowl, whisk together the peanut butter, soy sauce, sesame oil, honey, sriracha, minced garlic, and lime juice until smooth. Gradually add water until the sauce reaches your desired consistency. The sauce should be creamy but pourable. Tip: Taste the sauce and adjust the seasoning or heat level to your preference.

    Combine Noodles and Sauce

    Add the cooled noodles to the bowl with the peanut sauce. Using tongs or a large spoon, toss the noodles until they are evenly coated with the sauce. This ensures every strand is flavorful.

    Add the Vegetables

    Fold in the shredded carrots, sliced cucumber, and chopped cilantro into the noodle mixture. The vegetables add a fresh crunch and color to the dish, making it as visually appealing as it is delicious.

    Garnish and Serve

    Transfer the salad to a serving dish and sprinkle with chopped peanuts for an extra crunch. Serve immediately, or chill in the refrigerator for an hour to let the flavors meld together even more. Tip: For an extra kick, drizzle a little more sriracha on top before serving.

    Tips and Tricks

    For those looking to elevate their cold noodle salad, consider these advanced tips. First, toasting the peanuts before chopping them for garnish adds a deeper flavor. Second, if you’re meal prepping, keep the sauce separate until you’re ready to eat to prevent the noodles from absorbing all the sauce and becoming too soft. Third, for a protein boost, add grilled chicken or tofu. The key is to experiment and make the recipe your own.

    Recipe Variations

    • Swap the rice noodles for soba noodles or whole wheat spaghetti for a different texture.
    • Add a protein like shrimp, chicken, or tofu to make it a more substantial meal.
    • For a vegetarian version, use tamari instead of soy sauce and ensure all other ingredients are vegan-friendly.
    • Incorporate different vegetables like bell peppers or snap peas for added color and crunch.
    • Adjust the level of spiciness by varying the amount of sriracha or adding chili flakes.

    Frequently Asked Questions

    Can I make this recipe ahead of time?

    Absolutely! This salad is perfect for making ahead. Just keep the sauce separate until you’re ready to serve to maintain the best texture. The flavors actually improve as they meld together in the fridge.

    Is there a substitute for peanut butter?

    Yes, if you’re allergic to peanuts or just not a fan, almond butter or sunflower seed butter are great alternatives. The flavor will be slightly different but still delicious.

    How long does this salad last in the fridge?

    Stored properly in an airtight container, the salad will last up to 3 days. However, the noodles may soften over time, so it’s best enjoyed within the first day or two.

    Summary

    This cold noodle salad with spicy peanut sauce is a refreshing, flavorful dish that’s perfect for summer. Easy to make and customizable, it’s sure to become a favorite in your recipe collection.

  • Indian-Inspired Fruit Salad: A Burst of Flavor in Every Bite

    Indian-Inspired Fruit Salad: A Burst of Flavor in Every Bite

    Kickstart your day with this vibrant Indian-inspired fruit salad that’s not just a feast for the eyes but a carnival of flavors in your mouth. Perfect for breakfast, a snack, or a dessert, this recipe is a delightful way to enjoy the freshest fruits with a twist of Indian spices.

    Why This Recipe Works

    • The combination of sweet and tangy fruits with a hint of spice creates a unique flavor profile that’s irresistibly delicious.
    • It’s incredibly versatile, allowing you to use whatever fruits are in season or your personal favorites.
    • This recipe is a powerhouse of vitamins, minerals, and antioxidants, making it as healthy as it is tasty.
    • Quick and easy to prepare, it’s perfect for those busy mornings or when you need a quick snack.
    • The addition of chaat masala and black salt gives it an authentic Indian touch that elevates the dish.

    Ingredients

    • 2 cups mixed fruits (mango, banana, apple, pomegranate seeds, grapes), chopped
    • 1 tbsp lemon juice
    • 1/2 tsp chaat masala
    • 1/4 tsp black salt
    • 1 tbsp honey (optional)
    • 2 tbsp fresh mint leaves, chopped

    Equipment Needed

    • Large mixing bowl
    • Knife and cutting board
    • Measuring spoons

    Instructions

    Fruit Salad Recipe Indian

    Step 1: Prepare Your Fruits

    Start by washing all your fruits thoroughly under running water. Peel and chop the mango, banana, and apple into bite-sized pieces. If you’re using grapes, halve them to make them easier to eat. The pomegranate seeds can be added as they are. This variety ensures every spoonful is a surprise.

    Step 2: Mix the Fruits

    In a large mixing bowl, combine all the chopped fruits. Gently toss them together to ensure an even distribution. This is where the magic begins, as the colors and textures start to come together.

    Step 3: Add the Flavors

    Drizzle the lemon juice over the fruits to prevent browning and add a zesty kick. Sprinkle the chaat masala and black salt over the top. If you like it sweeter, drizzle honey over the salad. These ingredients are key to achieving that authentic Indian taste.

    Step 4: Garnish and Serve

    Finally, sprinkle the chopped mint leaves over the salad for a fresh aroma and a pop of color. Give it one final gentle toss to mix everything well. Serve immediately to enjoy the crispness and freshness of the fruits.

    Tips and Tricks

    For the best flavor, let the salad sit for about 10 minutes before serving. This allows the spices to meld with the fruits. If you’re preparing it ahead of time, add the bananas and apples last to prevent them from browning. Always use ripe but firm fruits to ensure the salad holds its texture. Experiment with different fruits based on the season for a new experience every time.

    Recipe Variations

    • Add a scoop of vanilla yogurt to make it a creamy fruit salad.
    • Include nuts like almonds or walnuts for added crunch and nutrition.
    • For a tropical twist, add pineapple and coconut flakes.
    • Spice it up with a pinch of red chili powder for those who love heat.
    • Make it a dessert by serving it with a scoop of ice cream.

    Frequently Asked Questions

    Can I make this salad ahead of time?

    Yes, you can prepare the salad a few hours in advance, but it’s best to add the bananas and apples just before serving to keep them from turning brown. The lemon juice helps, but for the freshest taste, serve it as soon as possible.

    What other spices can I use?

    If you don’t have chaat masala, you can use a pinch of cumin powder and coriander powder as a substitute. The key is to balance the sweet and tangy flavors with a hint of spice.

    Is this recipe kid-friendly?

    Absolutely! Kids love the sweet and colorful fruits. You can adjust the amount of spice or leave it out entirely for younger children. The honey adds a natural sweetness that’s always a hit.

    Summary

    This Indian-inspired fruit salad is a quick, healthy, and delicious way to enjoy a variety of fruits with a spicy twist. Perfect for any time of the day, it’s sure to become a favorite in your household.

  • Cucumber Corn Salad Recipe: A Refreshing Summer Delight

    Cucumber Corn Salad Recipe: A Refreshing Summer Delight

    Very few dishes scream summer quite like a crisp cucumber corn salad. It’s the perfect blend of crunchy, sweet, and tangy, making it an ideal side dish for your next barbecue or a light lunch on a hot day. Let’s dive into how you can whip up this easy, flavorful salad in no time.

    Why This Recipe Works

    • The combination of crisp cucumbers and sweet corn creates a delightful contrast in textures and flavors.
    • It’s incredibly versatile, allowing for numerous variations to suit your taste.
    • This salad is a breeze to prepare, requiring no cooking and just a few minutes of your time.
    • It’s a healthy option, packed with vitamins and low in calories.
    • The dressing is light yet flavorful, enhancing the natural tastes of the vegetables without overpowering them.

    Ingredients

    • 2 cups of fresh corn kernels (about 3 ears)
    • 1 large cucumber, diced
    • 1/4 cup red onion, finely chopped
    • 2 tablespoons olive oil
    • 1 tablespoon apple cider vinegar
    • Salt and pepper to taste
    • 1/4 cup fresh cilantro, chopped

    Equipment Needed

    • Large mixing bowl
    • Knife and cutting board
    • Measuring cups and spoons
    • Whisk

    Instructions

    Cucumber Corn Salad Recipe

    Step 1: Prepare the Vegetables

    Start by shucking the corn and cutting the kernels off the cob. Dice the cucumber into small, bite-sized pieces, and finely chop the red onion. The key here is uniformity in size to ensure every bite is perfect. Tip: For an extra crisp cucumber, let the diced pieces sit in ice water for 10 minutes before draining.

    Step 2: Make the Dressing

    In a small bowl, whisk together the olive oil and apple cider vinegar until well combined. Season with salt and pepper to taste. This simple dressing brings out the natural flavors of the vegetables without overwhelming them.

    Step 3: Combine Everything

    In a large mixing bowl, combine the corn, cucumber, red onion, and cilantro. Drizzle the dressing over the top and gently toss to coat all the vegetables evenly. Tip: Let the salad sit for 10 minutes before serving to allow the flavors to meld together beautifully.

    Step 4: Serve and Enjoy

    Transfer the salad to a serving dish and enjoy immediately, or refrigerate for up to 2 hours before serving for a chilled option. This salad is best enjoyed fresh but can be stored in the refrigerator for up to 2 days.

    Tips and Tricks

    For those looking to elevate their cucumber corn salad, consider these advanced tips. First, grilling the corn before cutting it off the cob adds a smoky depth to the salad. Second, adding a pinch of sugar to the dressing can balance the acidity if you find the vinegar too sharp. Lastly, for a creamier version, mix in a tablespoon of Greek yogurt to the dressing. These small tweaks can transform the salad into something even more special.

    Recipe Variations

    • Add diced avocado for a creamy texture and healthy fats.
    • Include cherry tomatoes for a pop of color and sweetness.
    • Swap the cilantro for basil or mint for a different herbal note.
    • Add crumbled feta or goat cheese for a tangy, salty element.
    • For a spicy kick, mix in diced jalapeño or a dash of hot sauce.

    Frequently Asked Questions

    Can I use frozen corn instead of fresh?

    Absolutely! While fresh corn is ideal for its crisp texture and sweetness, frozen corn is a convenient and still tasty alternative. Just be sure to thaw and drain it well before using to avoid excess water in your salad.

    How long can I store this salad?

    This salad is best enjoyed within 2 days of making it. After that, the cucumbers may start to lose their crunch, and the flavors can become muted. Store it in an airtight container in the refrigerator to maintain freshness.

    Can I make this salad ahead of time?

    Yes, you can prepare the salad a few hours before serving. In fact, letting it sit for a bit allows the flavors to meld together more cohesively. Just hold off on adding the dressing until you’re ready to serve to keep the vegetables crisp.

    Summary

    This cucumber corn salad is a refreshing, easy-to-make dish perfect for summer gatherings. With its crisp textures and light dressing, it’s a healthy and flavorful option that can be customized in countless ways. Whether you’re looking for a quick side dish or a light lunch, this salad is sure to impress.

  • 7 Cup Fruit Salad Recipe: A Burst of Freshness in Every Bite

    7 Cup Fruit Salad Recipe: A Burst of Freshness in Every Bite

    Very few desserts can claim to be as refreshing and easy to make as this 7 Cup Fruit Salad. Perfect for picnics, potlucks, or just a sweet treat at home, this recipe is a colorful medley of fruits bound together with a creamy, dreamy dressing. Let’s dive into making this crowd-pleaser!

    Why This Recipe Works

    • It’s incredibly versatile, allowing you to use whatever fruits are in season or your favorites.
    • The combination of creamy and fruity textures makes every bite interesting.
    • It’s a no-bake recipe, meaning more time enjoying and less time sweating over the stove.
    • Perfect for making ahead, as the flavors meld beautifully overnight.
    • It’s a hit with both kids and adults, making it a universal crowd-pleaser.

    Ingredients

    • 1 cup pineapple chunks, drained
    • 1 cup mandarin oranges, drained
    • 1 cup maraschino cherries, drained and halved
    • 1 cup mini marshmallows
    • 1 cup shredded coconut
    • 1 cup sour cream
    • 1/2 cup whipped topping

    Equipment Needed

    • Large mixing bowl
    • Rubber spatula
    • Measuring cups
    • Serving bowl

    Instructions

    7 Cup Fruit Salad Recipe

    Step 1: Prepare Your Fruits

    Start by draining your pineapple chunks and mandarin oranges well to prevent the salad from becoming too watery. If you’re using fresh fruits, make sure they’re cut into bite-sized pieces for easy mixing and eating. This step is crucial for achieving the perfect texture in your salad.

    Step 2: Mix the Creamy Components

    In your large mixing bowl, combine the sour cream and whipped topping until smooth. This mixture will act as the glue that holds all your delicious fruits together, so make sure it’s well blended for even distribution.

    Step 3: Combine Fruits and Cream

    Gently fold in the pineapple chunks, mandarin oranges, maraschino cherries, mini marshmallows, and shredded coconut into the creamy mixture. Be careful not to overmix to keep the fruits from breaking apart and the marshmallows from deflating.

    Step 4: Chill to Perfection

    Cover the bowl with plastic wrap and refrigerate for at least 2 hours, though overnight is better. This chilling time allows the flavors to meld together and the salad to set, making it even more delicious.

    Step 5: Serve and Enjoy

    Once chilled, give the salad a gentle stir before transferring it to your serving bowl. This ensures that the creamy dressing is evenly distributed. Serve cold and watch it disappear!

    Tips and Tricks

    For an extra touch of flavor, consider adding a teaspoon of vanilla extract to the creamy mixture. If you’re not a fan of shredded coconut, toasted coconut flakes can add a nice crunch. For a lighter version, Greek yogurt can be substituted for sour cream. Always drain canned fruits well to avoid a watery salad. Lastly, adding a handful of chopped nuts can introduce a delightful crunch and nutty flavor.

    Recipe Variations

    • Swap out the fruits based on the season—berries in the summer, apples and pears in the fall.
    • For a tropical twist, add diced mango and kiwi.
    • Make it nutty by adding chopped pecans or walnuts.
    • For a sweeter version, drizzle with honey or maple syrup before serving.
    • Turn it into a dessert by serving it over pound cake or ice cream.

    Frequently Asked Questions

    Can I make this salad ahead of time?

    Absolutely! In fact, making it ahead allows the flavors to meld together beautifully. Just be sure to keep it covered in the refrigerator until you’re ready to serve.

    How long does this salad last in the fridge?

    This salad is best enjoyed within 2-3 days of making it. After that, the fruits may start to release more juices, and the texture can become less appealing.

    Can I use fresh fruit instead of canned?

    Yes, fresh fruit can be used and is a great way to customize the salad to your taste or what’s in season. Just make sure to cut the fruit into uniform pieces for the best texture.

    Summary

    This 7 Cup Fruit Salad is a simple, versatile, and delicious dessert that’s perfect for any occasion. With its creamy dressing and colorful array of fruits, it’s sure to be a hit with everyone. Plus, it’s easy to customize based on your preferences or what you have on hand.

  • Japanese Tuna Salad Recipe: A Fresh Twist on a Classic

    Japanese Tuna Salad Recipe: A Fresh Twist on a Classic

    How about we take your tuna salad game to the next level? This Japanese-inspired version is packed with umami, crunch, and a hint of sweetness, making it anything but ordinary. Perfect for sandwiches, sushi rolls, or just by itself, this recipe is a must-try for anyone looking to spice up their lunch routine.

    Why This Recipe Works

    • The combination of soy sauce and sesame oil adds a depth of flavor that’s hard to resist.
    • Crunchy cucumbers and carrots provide a refreshing contrast to the tender tuna.
    • It’s incredibly versatile—serve it as a salad, in a sandwich, or even as a sushi filling.
    • Quick and easy to make, perfect for meal prep or a last-minute lunch.
    • Healthy and packed with protein, making it a great option for fitness enthusiasts.

    Ingredients

    • 2 cans (5 oz each) tuna in water, drained
    • 1/4 cup mayonnaise
    • 1 tbsp soy sauce
    • 1 tsp sesame oil
    • 1/2 cup cucumber, finely diced
    • 1/2 cup carrot, finely grated
    • 2 green onions, thinly sliced
    • 1 tsp sugar
    • 1/2 tsp grated ginger

    Equipment Needed

    • Mixing bowl
    • Measuring cups and spoons
    • Grater
    • Knife and cutting board

    Instructions

    Japanese Tuna Salad Recipe

    Step 1: Prepare the Vegetables

    Start by finely dicing the cucumber and grating the carrot. Thinly slice the green onions. The key here is to get all your veggies prepped and ready to go, ensuring a smooth cooking process. Tip: For extra crunch, you can leave the cucumber seeds in, but removing them will prevent your salad from getting too watery.

    Step 2: Mix the Dressing

    In a small bowl, whisk together the mayonnaise, soy sauce, sesame oil, sugar, and grated ginger until smooth. This dressing is the heart of the recipe, so make sure it’s well combined. The sesame oil adds a nutty flavor that’s signature to Japanese cuisine, so don’t skip it!

    Step 3: Combine Tuna and Vegetables

    In a large mixing bowl, flake the drained tuna with a fork. Add the prepared cucumber, carrot, and green onions. Gently toss to combine. The goal is to keep the tuna in nice, bite-sized pieces, so avoid overmixing.

    Step 4: Add the Dressing

    Pour the dressing over the tuna and vegetable mixture. Fold everything together until evenly coated. The dressing should lightly coat every piece, but there shouldn’t be any pooling at the bottom of the bowl. Tip: If you prefer a creamier salad, you can add an extra tablespoon of mayonnaise.

    Step 5: Chill and Serve

    Cover the bowl and refrigerate the salad for at least 30 minutes before serving. This allows the flavors to meld together beautifully. Serve chilled as a salad, in a sandwich, or as a filling for sushi rolls. The salad will keep in the fridge for up to 2 days, making it a great make-ahead option.

    Tips and Tricks

    For those looking to elevate their Japanese tuna salad even further, consider these tips. First, toasting sesame seeds and sprinkling them on top before serving adds a lovely texture and nutty flavor. Second, if you’re using the salad as a sushi filling, mix in a bit of sushi vinegar to the dressing for an authentic taste. Lastly, for a spicier kick, a dash of sriracha or wasabi can be mixed into the dressing. These small tweaks can make a big difference in the overall flavor profile of your dish.

    Recipe Variations

    • For a low-carb version, serve the tuna salad in lettuce wraps instead of bread.
    • Add diced avocado for a creamy texture and healthy fats.
    • Swap the tuna for cooked salmon or chicken for a different protein option.
    • Incorporate seaweed salad or nori strips for an extra Japanese touch.
    • Use Greek yogurt instead of mayonnaise for a lighter dressing.

    Frequently Asked Questions

    Can I use fresh tuna instead of canned?

    Absolutely! If you have access to fresh tuna, you can cook it to your liking (medium-rare is recommended for the best texture), then flake it and use it in place of canned. Just make sure it’s cooled before mixing with the other ingredients.

    How long does this salad last in the fridge?

    This Japanese tuna salad will stay fresh in the refrigerator for up to 2 days when stored in an airtight container. After that, the vegetables may start to lose their crunch, and the flavors won’t be as vibrant.

    Can I make this recipe vegan?

    Yes, you can! Substitute the tuna with mashed chickpeas or jackfruit for a similar texture, and use vegan mayonnaise. The rest of the ingredients are already plant-based, so you’ll have a delicious vegan version of this salad.

    Summary

    This Japanese Tuna Salad is a flavorful, versatile dish that’s perfect for any occasion. With its unique blend of ingredients and easy preparation, it’s sure to become a staple in your recipe collection. Whether you’re looking for a quick lunch or a creative sushi filling, this recipe has you covered.