Author: onlinefoodrecipes

  • Russian Vinaigrette Salad Recipe: A Colorful Veggie Delight

    Russian Vinaigrette Salad Recipe: A Colorful Veggie Delight

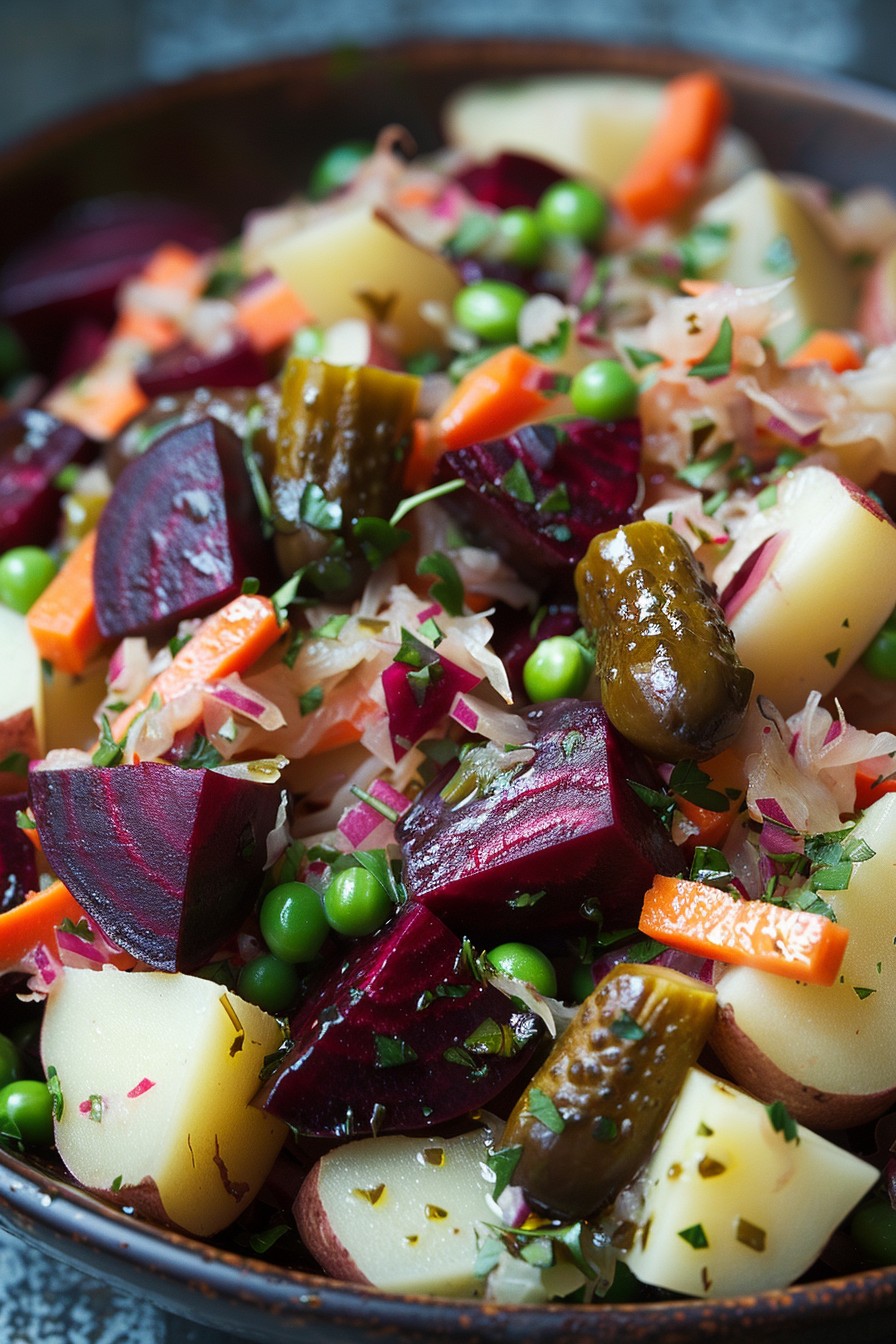
    Today, we’re diving into the vibrant world of Russian cuisine with a classic that’s as fun to say as it is to eat: Vinaigrette Salad. This beet-based dish is a rainbow on a plate, packed with flavors and textures that’ll make your taste buds dance.

    Why This Recipe Works

    • It’s a perfect balance of sweet, tangy, and earthy flavors, thanks to the beets, pickles, and a simple vinaigrette.
    • The combination of cooked and raw vegetables offers a delightful contrast in textures.
    • It’s incredibly versatile, allowing for numerous variations to suit any palate.
    • This salad is a great make-ahead dish, as the flavors meld and improve overnight.
    • It’s a visually stunning dish that’s sure to impress at any gathering.
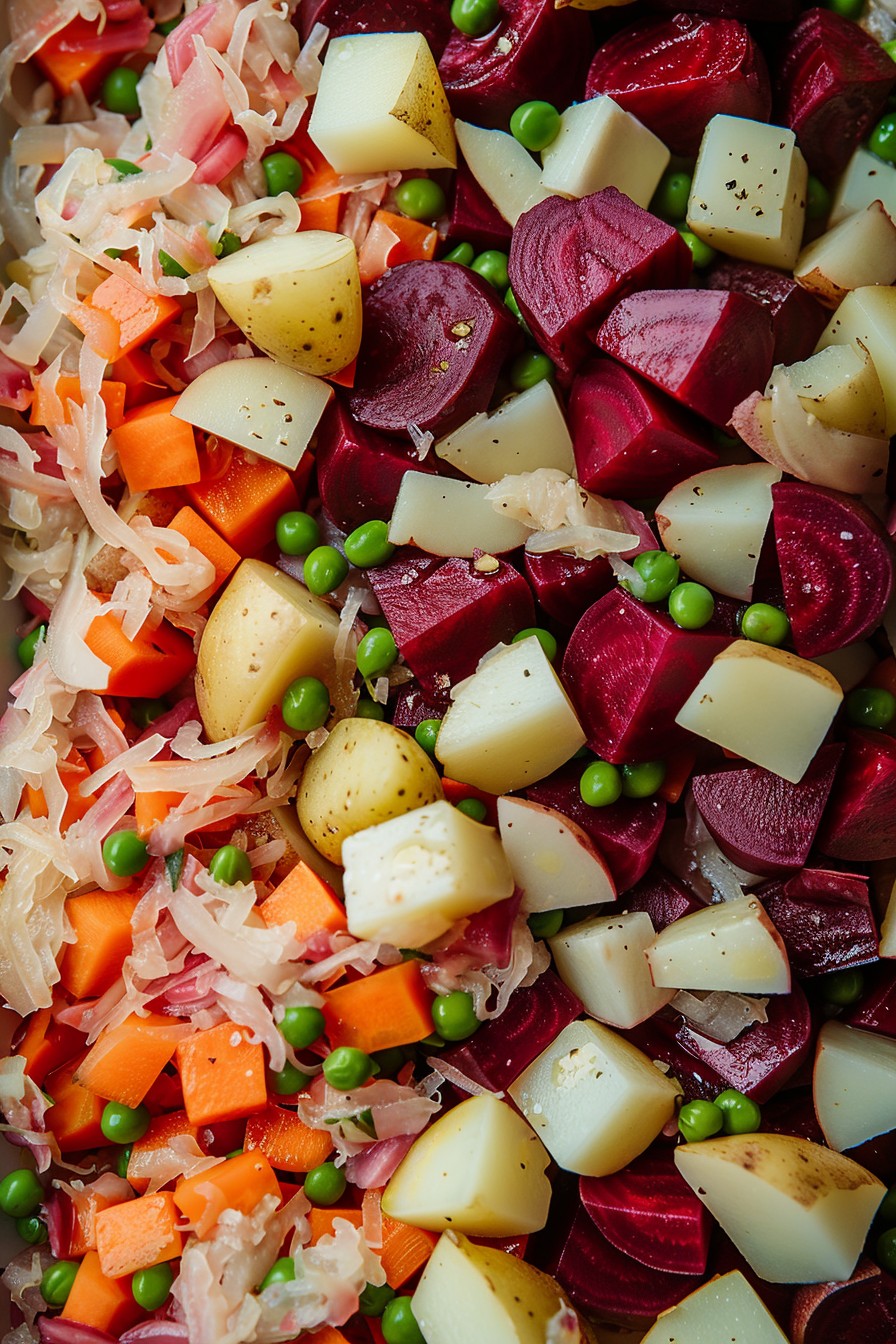
    Ingredients

    • 2 medium beets, peeled and diced into 1/2-inch cubes
    • 2 medium potatoes, peeled and diced into 1/2-inch cubes
    • 1 large carrot, peeled and diced into 1/2-inch cubes
    • 1/2 cup pickles, diced
    • 1/2 cup sauerkraut, drained
    • 1/4 cup green peas, cooked
    • 1/4 cup olive oil
    • 2 tbsp vinegar
    • Salt and pepper to taste

    Equipment Needed

    • Large pot
    • Mixing bowl
    • Sharp knife
    • Cutting board
    • Measuring cups and spoons

    Instructions

    Russian Vinaigrette Salad Recipe

    Step 1: Cook the Vegetables

    Start by cooking the beets, potatoes, and carrot. Place them in a large pot, cover with water, and bring to a boil. Reduce the heat and simmer until the vegetables are tender but still firm, about 20 minutes for the potatoes and carrot, and 30 minutes for the beets. Drain and let them cool to room temperature.

    Step 2: Dice and Mix

    Once cooled, dice all the cooked vegetables into 1/2-inch cubes. In a large mixing bowl, combine them with the pickles, sauerkraut, and green peas. The key here is uniformity in size for a perfect bite every time.

    Step 3: Prepare the Dressing

    In a small bowl, whisk together the olive oil and vinegar until well combined. Season with salt and pepper to taste. This simple dressing brings all the flavors together beautifully.

    Step 4: Combine and Chill

    Pour the dressing over the vegetable mixture and gently toss to coat. Cover the bowl and refrigerate for at least 2 hours, or overnight, to allow the flavors to meld. This step is crucial for achieving the signature taste of vinaigrette salad.

    Step 5: Serve and Enjoy

    Before serving, give the salad a good stir and adjust the seasoning if necessary. Serve chilled for a refreshing and flavorful side dish that’s sure to be a hit.

    Tips and Tricks

    For an extra layer of flavor, consider adding a teaspoon of mustard to the dressing. If you’re short on time, you can use pre-cooked beets from the store, but the flavor won’t be as deep. To make this salad even more colorful, add some diced red onion or bell pepper. Remember, the salad tastes better the longer it sits, so don’t skip the chilling time. For a smoother texture, you can grate the vegetables instead of dicing them.

    Recipe Variations

    • Add some protein: Mix in some diced ham or hard-boiled eggs for a heartier version.
    • Go vegan: Ensure all your ingredients are plant-based, and you’ve got a delicious vegan option.
    • Spice it up: Add a pinch of cayenne pepper or some diced jalapeños for a spicy kick.
    • Sweet twist: Include some diced apples or raisins for a sweet contrast to the tangy flavors.
    • Herb it up: Fresh dill or parsley can add a refreshing herbal note to the salad.

    Frequently Asked Questions

    Can I make this salad ahead of time?

    Absolutely! In fact, this salad is best made a day in advance. The flavors have time to meld together, making it even more delicious. Just keep it covered in the refrigerator until you’re ready to serve.

    How long does it last in the fridge?

    This salad will keep well in the refrigerator for up to 3 days. Just make sure it’s stored in an airtight container to maintain freshness.

    Can I use canned vegetables?

    While you can use canned beets or carrots for convenience, the texture and flavor won’t be quite the same as using fresh, cooked vegetables. If you’re in a pinch, though, they’ll do.

    Summary

    This Russian Vinaigrette Salad is a colorful, flavorful dish that’s perfect for any occasion. With its balance of sweet, tangy, and earthy flavors, it’s sure to be a hit. Plus, it’s incredibly versatile, allowing for endless variations to suit any taste.

  • Farfalle Pasta Salad: A Bow-Tie Affair to Remember

    Farfalle Pasta Salad: A Bow-Tie Affair to Remember

    Just when you thought pasta salads couldn’t get any more delightful, here comes the farfalle pasta salad to prove you wrong. Perfect for picnics, potlucks, or just because, this recipe is a testament to the joy of simple ingredients coming together in harmony.

    Why This Recipe Works

    • The farfalle pasta, with its unique bow-tie shape, holds onto the dressing and ingredients beautifully, ensuring every bite is flavorful.
    • A vibrant mix of vegetables adds crunch and color, making the salad as pleasing to the eye as it is to the palate.
    • The homemade dressing strikes the perfect balance between tangy and sweet, elevating the entire dish.
    • It’s incredibly versatile, allowing for endless variations to suit any taste or dietary preference.
    • Prep ahead friendly, this salad tastes even better after the flavors have had time to meld.

    Ingredients

    • 1 lb farfalle pasta
    • 1 cup cherry tomatoes, halved
    • 1 cucumber, diced
    • 1/2 red onion, thinly sliced
    • 1/2 cup black olives, sliced
    • 1/4 cup fresh basil, chopped
    • 1/4 cup olive oil
    • 2 tbsp balsamic vinegar
    • 1 tbsp honey
    • 1 tsp Dijon mustard
    • Salt and pepper to taste

    Equipment Needed

    • Large pot
    • Colander
    • Large mixing bowl
    • Whisk
    • Measuring cups and spoons

    Instructions

    Recipe For Farfalle Pasta Salad

    Boil the Pasta to Al Dente Perfection

    Bring a large pot of salted water to a rolling boil. Add the farfalle pasta and cook according to package instructions until al dente, usually about 11 minutes. Drain in a colander and rinse under cold water to stop the cooking process. Tip: Salting the water like the sea ensures your pasta is flavorful from the inside out.

    Chop and Prepare Your Veggies

    While the pasta cooks, halve the cherry tomatoes, dice the cucumber, thinly slice the red onion, and slice the black olives. Chop the fresh basil. Having all your veggies prepped and ready to go makes assembling the salad a breeze. Tip: For less bite, soak the sliced red onion in cold water for 10 minutes before adding to the salad.

    Whisk Together the Dressing

    In a small bowl, whisk together the olive oil, balsamic vinegar, honey, and Dijon mustard until well combined. Season with salt and pepper to taste. This dressing is the secret weapon that brings all the flavors together.

    Combine Everything in a Large Bowl

    In a large mixing bowl, combine the cooled pasta, prepared vegetables, and chopped basil. Drizzle the dressing over the top and toss gently to coat everything evenly. Tip: Letting the salad sit for at least 30 minutes before serving allows the flavors to meld beautifully.

    Serve and Enjoy

    Give the salad a final toss before serving to redistribute the dressing. This farfalle pasta salad is perfect on its own or as a side dish to grilled meats or fish.

    Tips and Tricks

    For an extra layer of flavor, consider adding grilled chicken, shrimp, or tofu to make the salad a hearty main dish. If you’re making this salad ahead of time, hold off on adding the basil until just before serving to keep it fresh and vibrant. For a creamier version, stir in a dollop of mayonnaise or Greek yogurt to the dressing. Always taste and adjust the seasoning before serving, as pasta can sometimes dull flavors. Lastly, don’t be afraid to experiment with different vegetables or add-ins like cheese or nuts for added texture and taste.

    Recipe Variations

    • Mediterranean Twist: Add feta cheese, sun-dried tomatoes, and kalamata olives for a Greek-inspired version.
    • Protein-Packed: Mix in grilled chicken, chickpeas, or hard-boiled eggs for an extra protein boost.
    • Veggie Delight: Throw in roasted bell peppers, artichoke hearts, and spinach for a more vegetable-forward salad.
    • Cheesy Goodness: Stir in cubes of mozzarella or shreds of Parmesan for a cheesy delight.
    • Spicy Kick: Add a pinch of red pepper flakes or diced jalapeños for those who like it hot.

    Frequently Asked Questions

    Can I make this pasta salad ahead of time? Absolutely! In fact, it tastes better after the flavors have had time to meld. Just keep it refrigerated and give it a good stir before serving. If you’re adding fresh herbs or delicate veggies, you might want to add those just before serving to keep them fresh.

    How long will this pasta salad keep in the fridge? Stored in an airtight container, this pasta salad will keep for up to 3 days in the refrigerator. Beyond that, the pasta may start to soften too much, and the veggies will lose their crunch.

    Can I use a different type of pasta? While farfalle is recommended for its ability to hold onto the dressing and ingredients, you can certainly use any short pasta you have on hand. Penne, rotini, or even elbow macaroni would work well.

    Summary

    This farfalle pasta salad is a colorful, flavorful, and versatile dish that’s perfect for any occasion. With its simple ingredients and easy preparation, it’s sure to become a go-to recipe in your collection.

  • Old Fashioned Frozen Fruit Salad Recipe: A Cool Blast from the Past

    Old Fashioned Frozen Fruit Salad Recipe: A Cool Blast from the Past

    Nothing says summer like a refreshing frozen fruit salad. This old-fashioned recipe is a delightful throwback to simpler times, combining the sweetness of fruit with the creamy texture of a classic salad. Perfect for picnics, potlucks, or just a cool treat on a hot day.

    Why This Recipe Works

    • It’s a perfect make-ahead dessert that saves you time on the day of your event.
    • The combination of fruits and creamy ingredients creates a delightful contrast in textures.
    • It’s incredibly versatile, allowing for endless variations based on your favorite fruits or dietary needs.

    Ingredients

    • 2 cups mixed fruit (peaches, strawberries, and pineapple recommended), diced
    • 1 cup heavy cream, whipped to stiff peaks
    • 1/2 cup mayonnaise
    • 1/4 cup honey
    • 1 tbsp lemon juice
    • 1/2 cup chopped nuts (optional)

    Equipment Needed

    • Mixing bowl
    • Electric mixer
    • Freezer-safe container
    • Spatula

    Instructions

    Old Fashioned Frozen Fruit Salad Recipe

    Step 1: Prepare Your Fruits

    Start by dicing your selected fruits into bite-sized pieces. This ensures every spoonful of your frozen fruit salad has a perfect mix of flavors. Tip: For an extra burst of freshness, use fruits that are in season.

    Step 2: Whip the Cream

    Using an electric mixer, whip the heavy cream until it forms stiff peaks. This will give your salad its light and airy texture. Be careful not to overmix, as this can turn your cream into butter.

    Step 3: Combine Ingredients

    In a large mixing bowl, gently fold the whipped cream, mayonnaise, honey, and lemon juice together. Then, add the diced fruits and nuts (if using). The key here is to fold, not stir, to maintain the airiness of the cream.

    Step 4: Freeze to Perfection

    Transfer the mixture into a freezer-safe container. Cover and freeze for at least 4 hours, or until firm. Tip: For easier serving, you can freeze the salad in individual portions.

    Step 5: Serve and Enjoy

    Let the salad sit at room temperature for about 5 minutes before serving to soften slightly. This makes it easier to scoop and enhances the flavors.

    Tips and Tricks

    For those looking to elevate their frozen fruit salad, consider these advanced tips. First, toasting the nuts before adding them to the salad can bring out a deeper flavor. Second, layering the salad with different fruits can create a visually stunning effect when sliced. Lastly, incorporating a splash of vanilla extract into the cream mixture can add a subtle depth of flavor that complements the fruit beautifully.

    Recipe Variations

    • For a tropical twist, use mango, papaya, and coconut flakes instead of the suggested fruits.
    • To make it dairy-free, substitute the heavy cream with coconut cream whipped to stiff peaks.
    • Add a layer of crushed graham crackers at the bottom for a crunchy texture contrast.
    • Incorporate a bit of citrus zest into the cream mixture for an extra zing.
    • For a more indulgent version, drizzle melted chocolate over the top before freezing.

    Frequently Asked Questions

    Can I use frozen fruits instead of fresh? Absolutely! Just make sure to thaw and drain them well to avoid excess water in your salad.

    How long can I keep the frozen fruit salad in the freezer? It’s best enjoyed within a month, as the texture may change over time.

    Can I make this recipe without nuts? Yes, the nuts are optional and can be omitted for those with allergies or preferences.

    Summary

    This old-fashioned frozen fruit salad is a delightful, make-ahead treat that’s perfect for cooling down on hot summer days. With its creamy texture and sweet fruit flavors, it’s sure to be a hit at any gathering.

  • Sushi Cucumber Salad Recipe: A Crunchy, Refreshing Delight

    Sushi Cucumber Salad Recipe: A Crunchy, Refreshing Delight

    Delight your taste buds with this sushi cucumber salad recipe, a perfect blend of crunch and freshness that’s as fun to make as it is to eat. Ideal for those hot summer days or when you’re craving something light yet satisfying.

    Why This Recipe Works

    • The combination of crisp cucumbers and the umami flavor from sushi vinegar creates a refreshing and flavorful dish.
    • It’s incredibly easy to make, requiring no cooking, just some chopping and mixing.
    • This salad is versatile, serving as a great side dish, a topping for sushi bowls, or a standalone snack.
    • It’s a healthy option, low in calories but high in hydration and nutrients.
    • The recipe is customizable, allowing you to adjust the sweetness or tanginess to your liking.

    Ingredients

    • 2 large cucumbers, thinly sliced
    • 1/4 cup sushi vinegar
    • 1 tbsp sugar
    • 1 tsp salt
    • 1 tbsp sesame seeds, toasted
    • 1/2 tsp red pepper flakes (optional)

    Equipment Needed

    • Mixing bowl
    • Sharp knife
    • Measuring cups and spoons
    • Salad spinner (optional, for drying cucumbers)

    Instructions

    Sushi Cucumber Salad Recipe

    Prepare the Cucumbers

    Start by washing the cucumbers thoroughly under cold water. Slice them as thinly as possible for the best texture. If you have a mandoline, now’s the time to use it for even slices. Place the sliced cucumbers in a colander, sprinkle with salt, and let them sit for about 10 minutes to draw out excess moisture.

    Make the Dressing

    While the cucumbers are resting, whisk together the sushi vinegar and sugar in a small bowl until the sugar is completely dissolved. This creates a sweet and tangy base for your salad. For an extra kick, consider adding a pinch of red pepper flakes to the mix.

    Combine and Marinate

    After the cucumbers have rested, rinse them under cold water to remove the excess salt and pat them dry with a clean towel. Transfer the cucumbers to a mixing bowl, pour the dressing over them, and toss gently to ensure every slice is coated. Let the salad marinate in the refrigerator for at least 30 minutes to allow the flavors to meld.

    Add the Final Touches

    Just before serving, sprinkle the toasted sesame seeds over the salad for a nutty flavor and a bit of crunch. If you’re feeling adventurous, a few slices of avocado or a sprinkle of nori strips can add an extra layer of flavor and texture.

    Serve and Enjoy

    This sushi cucumber salad is best served chilled. It makes a fantastic side dish for grilled fish or can be enjoyed on its own as a light and refreshing snack. Remember, the longer it marinates, the more flavorful it becomes, so feel free to make it ahead of time.

    Tips and Tricks

    For the crispiest cucumbers, opt for English or Persian cucumbers, which have fewer seeds and thinner skins. If you’re short on time, skipping the salting step is okay, but your salad might be a bit more watery. Toasting the sesame seeds before adding them to the salad enhances their flavor significantly. If you’re not a fan of spicy food, you can omit the red pepper flakes or replace them with a dash of black pepper for a milder taste.

    Recipe Variations

    • Add sliced avocado for a creamy texture and healthy fats.
    • Incorporate shredded carrots or daikon radish for additional crunch and color.
    • For a protein boost, toss in some cooked shrimp or crab meat.
    • Replace the sushi vinegar with rice vinegar and a bit of mirin for a slightly different flavor profile.
    • Top with crispy fried onions or garlic for an extra crunch.

    Frequently Asked Questions

    Can I make this salad ahead of time?

    Absolutely! This salad actually benefits from sitting in the fridge for a few hours as it allows the flavors to meld together beautifully. Just hold off on adding the sesame seeds until you’re ready to serve to keep them crunchy.

    Is there a substitute for sushi vinegar?

    Yes, if you don’t have sushi vinegar on hand, you can make a quick substitute by mixing rice vinegar with a bit of sugar and salt. The ratio is typically 1 cup rice vinegar to 1 tablespoon sugar and 1 teaspoon salt, adjusted to taste.

    How long will this salad keep in the fridge?

    Stored in an airtight container, this salad will stay fresh for up to 2 days. However, the cucumbers will start to lose their crunch after the first day, so it’s best enjoyed within 24 hours.

    Summary

    This sushi cucumber salad is a crunchy, refreshing dish that’s perfect for any occasion. Easy to make and customizable, it’s a healthy option that doesn’t skimp on flavor. Whether as a side or a snack, it’s sure to delight.

  • Cherry Jello Salad: A Sweet and Vibrant Delight

    Cherry Jello Salad: A Sweet and Vibrant Delight

    Nothing says celebration like a vibrant Cherry Jello Salad. This easy-to-make dish is a crowd-pleaser, combining the sweetness of cherries with a creamy texture that’s perfect for any gathering. Let’s dive into making this colorful treat!

    Why This Recipe Works

    • The combination of cherry jello and crushed pineapple creates a perfect balance of sweetness and tanginess.
    • Adding whipped topping gives the salad a light and creamy texture that contrasts beautifully with the fruit.
    • It’s incredibly versatile, allowing for numerous variations to suit any taste or occasion.
    • This recipe requires no baking, making it a quick and easy option for last-minute gatherings.
    • The vibrant red color makes it a visually appealing addition to any table.

    Ingredients

    • 1 package (3 oz) cherry flavored gelatin
    • 1 cup boiling water
    • 1 cup cold water
    • 1 can (20 oz) crushed pineapple, drained
    • 1 cup whipped topping
    • 1/2 cup mini marshmallows (optional)

    Equipment Needed

    • Mixing bowl
    • Whisk
    • Measuring cups
    • Spatula
    • Refrigerator

    Instructions

    Recipe For Cherry Jello Salad

    Step 1: Dissolve the Gelatin

    In a large mixing bowl, dissolve the cherry flavored gelatin in 1 cup of boiling water. Stir continuously with a whisk for about 2 minutes until the gelatin is completely dissolved. This ensures a smooth base for your salad.

    Step 2: Add Cold Water

    After the gelatin has dissolved, add 1 cup of cold water to the bowl. Stir well to combine. This step cools down the mixture, preparing it for the next ingredients.

    Step 3: Incorporate the Pineapple

    Gently fold in the drained crushed pineapple into the gelatin mixture. Make sure the pineapple is evenly distributed for a consistent flavor in every bite.

    Step 4: Chill the Mixture

    Pour the mixture into a serving dish and refrigerate for at least 4 hours, or until set. The longer it chills, the firmer it will become.

    Step 5: Add the Finishing Touches

    Once the gelatin is set, spread the whipped topping evenly over the top. For an extra touch of sweetness, sprinkle mini marshmallows on top before serving.

    Tips and Tricks

    For a smoother texture, you can blend the crushed pineapple before adding it to the gelatin. If you’re in a hurry, placing the gelatin in the freezer for about 30 minutes can speed up the setting process, but keep an eye on it to prevent freezing. To make the salad even more festive, consider adding a layer of cream cheese mixed with whipped topping before the final chill.

    Recipe Variations

    • For a tropical twist, substitute the cherry gelatin with pineapple or mango flavored gelatin and add chunks of fresh fruit.
    • Create a layered salad by alternating flavors of gelatin and adding different fruits in each layer.
    • For a richer version, mix in cottage cheese or sour cream with the whipped topping.
    • Add nuts or granola for a crunchy texture contrast.
    • Use sugar-free gelatin and low-fat whipped topping for a lighter version.

    Frequently Asked Questions

    Can I use fresh cherries instead of cherry gelatin?

    While fresh cherries can add a nice touch, cherry gelatin provides the signature flavor and consistency of the salad. If you prefer, you can add pitted and chopped fresh cherries in addition to the gelatin for extra fruitiness.

    How long can I store the Cherry Jello Salad?

    The salad can be stored in the refrigerator for up to 3 days. Make sure it’s covered to prevent it from absorbing other flavors from the fridge.

    Can I make this recipe vegan?

    Yes, you can use agar-agar instead of gelatin and a plant-based whipped topping to make a vegan-friendly version of this salad.

    Summary

    This Cherry Jello Salad is a delightful and easy-to-make dish that’s perfect for any occasion. With its sweet and tangy flavor, creamy texture, and vibrant color, it’s sure to be a hit. Plus, it’s versatile enough to customize to your liking. Give it a try and watch it disappear!

  • Caesar Salad Dressing Original Recipe: The Classic That Never Fails

    Caesar Salad Dressing Original Recipe: The Classic That Never Fails

    Zesty, creamy, and packed with umami, this Caesar salad dressing original recipe is a game-changer for your salad game. Perfect for those who appreciate the classics but want to make it from scratch with a personal touch.

    Why This Recipe Works

    • Authentic Flavor: Stays true to the original with anchovies and raw egg yolk for that signature taste.
    • Perfect Consistency: Achieves the ideal balance between creamy and tangy, coating every leaf evenly.
    • Quick to Make: Ready in under 10 minutes, it’s faster than ordering takeout.
    • Versatile: Beyond salads, it’s a fantastic marinade or dip.

    Ingredients

    • 2 cloves garlic, minced
    • 2 anchovy fillets, finely chopped
    • 1 large egg yolk
    • 2 tablespoons lemon juice, freshly squeezed
    • 1 teaspoon Dijon mustard
    • 1/2 cup extra virgin olive oil
    • 1/4 cup grated Parmesan cheese
    • Salt and freshly ground black pepper, to taste

    Equipment Needed

    • Mixing bowl
    • Whisk
    • Measuring cups and spoons
    • Microplane or grater

    Instructions

    Caesar Salad Dressing Original Recipe

    Step 1: Combine the Base Ingredients

    In a medium mixing bowl, whisk together the minced garlic, chopped anchovies, egg yolk, lemon juice, and Dijon mustard until well combined. The mixture should start to look slightly creamy. Tip: For an extra smooth dressing, you can mash the anchovies and garlic into a paste before adding the other ingredients.

    Step 2: Slowly Incorporate the Olive Oil

    While continuously whisking, slowly drizzle in the extra virgin olive oil. This gradual addition helps emulsify the dressing, ensuring it’s smooth and not separated. The dressing should thicken as you whisk. Tip: If the dressing is too thick, a teaspoon of warm water can loosen it up.

    Step 3: Add the Parmesan and Season

    Stir in the grated Parmesan cheese until fully incorporated. Season with salt and freshly ground black pepper to taste. Remember, the anchovies and Parmesan already add saltiness, so taste before adding more salt. Tip: For a sharper flavor, add a bit more lemon juice or Parmesan.

    Step 4: Let It Rest

    Allow the dressing to sit for at least 5 minutes before using. This resting period lets the flavors meld together beautifully. The dressing can be used immediately, but it’s even better after a short rest.

    Step 5: Serve and Enjoy

    Toss the dressing with crisp romaine lettuce, croutons, and extra Parmesan for a classic Caesar salad. Or, get creative and use it as a marinade for chicken or a dip for veggies.

    Tips and Tricks

    For those looking to elevate their Caesar dressing, consider these advanced tips. First, using a high-quality extra virgin olive oil can significantly enhance the flavor profile. Second, for a smoother texture, blend all the ingredients except the oil in a food processor, then slowly add the oil while the processor is running. Third, if you’re concerned about raw eggs, you can use pasteurized eggs or a tablespoon of mayonnaise as a substitute. Lastly, storing the dressing in an airtight container in the fridge can help it last up to a week, though it’s best enjoyed fresh.

    Recipe Variations

    • Vegan Caesar: Replace the egg yolk with silken tofu and the Parmesan with nutritional yeast for a plant-based version.
    • Spicy Kick: Add a teaspoon of sriracha or a pinch of cayenne pepper for some heat.
    • Creamier Texture: Incorporate a tablespoon of Greek yogurt or mayonnaise for an extra creamy dressing.
    • Herb Infused: Mix in finely chopped herbs like parsley, chives, or tarragon for a fresh twist.

    Frequently Asked Questions

    Can I make this dressing without anchovies?

    Absolutely! While anchovies contribute to the authentic flavor, you can omit them or substitute with a teaspoon of Worcestershire sauce for a similar umami depth without the fishy taste.

    How long does homemade Caesar dressing last?

    Stored properly in the refrigerator, your homemade Caesar dressing can last up to a week. Ensure it’s in an airtight container to maintain freshness. The flavors may intensify over time, so give it a good stir before using.

    Is there a substitute for raw egg yolk?

    Yes, for those wary of raw eggs, you can use pasteurized egg yolks or a tablespoon of mayonnaise as a safe alternative. Both options will still give you that creamy texture essential to Caesar dressing.

    Summary

    This Caesar salad dressing original recipe is a testament to the timeless appeal of classic flavors. Easy to make, versatile, and utterly delicious, it’s sure to become a staple in your culinary repertoire.

  • Seven Layer Salad Recipe with Ranch Dressing: A Crunchy, Creamy Delight

    Seven Layer Salad Recipe with Ranch Dressing: A Crunchy, Creamy Delight

    Oh, the joys of a seven layer salad! This classic dish is not just a feast for the eyes but a symphony of textures and flavors. Perfect for potlucks, picnics, or a fancy side at dinner, it’s as versatile as it is delicious. Let’s dive into making this crowd-pleaser.

    Why This Recipe Works

    • The combination of crisp vegetables, creamy dressing, and sharp cheese creates a perfect balance of flavors and textures.
    • Layering the ingredients ensures every bite is as good as the first, with each component shining through.
    • Ranch dressing adds a tangy, herby kick that ties all the layers together beautifully.
    • It’s make-ahead friendly, allowing the flavors to meld together overnight for an even tastier result.
    • Customizable to suit any taste or dietary preference, making it a versatile dish for any occasion.

    Ingredients

    • 6 cups iceberg lettuce, chopped
    • 1 cup cherry tomatoes, halved
    • 1 cup cucumber, diced
    • 1/2 cup red onion, thinly sliced
    • 1 cup frozen peas, thawed
    • 1 cup sharp cheddar cheese, shredded
    • 1/2 cup bacon, cooked and crumbled
    • 1 cup ranch dressing

    Equipment Needed

    • Large clear bowl (to showcase the layers)
    • Measuring cups and spoons
    • Knife and cutting board
    • Mixing spoon

    Instructions

    Seven Layer Salad Recipe With Ranch Dressing

    Step 1: Prepare Your Vegetables

    Start by washing and chopping all your vegetables. The iceberg lettuce should be chopped into bite-sized pieces, cherry tomatoes halved, cucumber diced, and red onion thinly sliced. Thaw the frozen peas by running them under cold water. Preparing your vegetables ahead of time makes the layering process smoother and faster.

    Step 2: Begin Layering

    In your large clear bowl, start with the chopped iceberg lettuce as the base. This creates a sturdy foundation for the other layers. Next, evenly distribute the cherry tomatoes, followed by the diced cucumber. The key here is to spread each layer evenly to ensure every serving gets a bit of everything.

    Step 3: Add the Peas and Onions

    Sprinkle the thawed peas over the cucumber layer, then add the thinly sliced red onions. The peas add a sweet pop, while the onions bring a sharp contrast. If you’re not a fan of raw onion’s bite, you can soak the slices in cold water for 10 minutes to mellow them out.

    Step 4: Cheese and Bacon

    Now, it’s time for the shredded sharp cheddar cheese, followed by the crumbled bacon. The cheese adds a creamy texture, and the bacon brings a smoky crunch. For a vegetarian version, you can skip the bacon or substitute it with a vegetarian bacon alternative.

    Step 5: Dress and Chill

    Finally, spread the ranch dressing evenly over the top. Cover the bowl with plastic wrap and refrigerate for at least 2 hours, though overnight is better. This chilling time allows the flavors to meld together beautifully. Serve chilled for the best taste experience.

    Tips and Tricks

    For an extra crunch, consider adding a layer of sunflower seeds or chopped nuts between the vegetables and the cheese. If you’re making this salad ahead of time, wait to add the bacon until just before serving to keep it crispy. To make the salad healthier, you can use Greek yogurt-based ranch dressing or even make your own from scratch. Another tip is to use a trifle bowl for serving; the tall, clear sides make the layers look even more impressive.

    Recipe Variations

    • Swap out the ranch dressing for blue cheese or Caesar dressing for a different flavor profile.
    • Add a layer of hard-boiled eggs for extra protein.
    • Use spinach or kale instead of iceberg lettuce for a nutrient boost.
    • For a Mexican twist, add black beans, corn, and use a cilantro lime dressing.
    • Make it a meat lover’s dream by adding layers of diced ham or turkey.

    Frequently Asked Questions

    Can I make this salad ahead of time?

    Absolutely! In fact, making it ahead allows the flavors to meld together more cohesively. Just add the bacon right before serving to maintain its crispiness. The salad can be assembled (minus the bacon) up to 24 hours in advance.

    Can I use a different type of dressing?

    Yes, you can customize the dressing to your preference. While ranch is classic, blue cheese, Caesar, or even a vinaigrette can work well depending on your taste preferences and the other ingredients you’re using.

    How long does the salad last in the fridge?

    Stored properly in an airtight container, the salad will last for up to 3 days in the refrigerator. However, it’s best enjoyed within the first 24 hours for optimal texture and freshness.

    Summary

    This seven layer salad with ranch dressing is a visually stunning and deliciously satisfying dish that’s perfect for any gathering. With its layers of crisp vegetables, creamy dressing, and savory toppings, it’s sure to be a hit. Plus, it’s customizable to suit any taste or dietary need.

  • Chunky Chicken Salad Recipe: A Crunchy, Flavorful Delight

    Chunky Chicken Salad Recipe: A Crunchy, Flavorful Delight

    You’re about to dive into the world of the most satisfying chunky chicken salad you’ve ever tasted. Perfect for picnics, lunches, or just because you deserve something delicious today.

    Why This Recipe Works

    • The combination of tender, juicy chicken with crisp vegetables creates a texture that’s simply irresistible.
    • A creamy, tangy dressing ties all the flavors together without overpowering the fresh ingredients.
    • It’s versatile! Serve it on bread, over greens, or straight from the bowl.
    • Prep is a breeze, making it perfect for busy days.
    • It’s a crowd-pleaser that’s equally at home at a casual family dinner or a fancy brunch.

    Ingredients

    • 2 cups cooked chicken, shredded or cubed
    • 1/2 cup mayonnaise
    • 1/4 cup sour cream
    • 1 tbsp lemon juice
    • 1/2 tsp salt
    • 1/4 tsp black pepper
    • 1/2 cup celery, diced
    • 1/2 cup red grapes, halved
    • 1/4 cup red onion, finely diced
    • 1/4 cup almonds, sliced

    Equipment Needed

    • Large mixing bowl
    • Measuring cups and spoons
    • Knife and cutting board
    • Mixing spoon

    Instructions

    Chunky Chicken Salad Recipe

    Step 1: Prepare the Dressing

    In your large mixing bowl, whisk together the mayonnaise, sour cream, lemon juice, salt, and pepper until smooth. This creamy base will coat every ingredient perfectly, ensuring each bite is as flavorful as the last.

    Step 2: Add the Chicken

    Gently fold the cooked chicken into the dressing. Whether you’re using leftover roast chicken or a store-bought rotisserie bird, make sure it’s well-coated for maximum flavor. Tip: For an extra flavor boost, try grilling the chicken before adding it to the salad.

    Step 3: Incorporate the Veggies and Fruits

    Add the diced celery, halved red grapes, and finely diced red onion to the bowl. These ingredients add a refreshing crunch and a sweet contrast to the savory chicken. Mix gently to avoid crushing the grapes.

    Step 4: Add the Crunch

    Sprinkle in the sliced almonds for that irresistible crunch. If you’re not an almond fan, walnuts or pecans make great substitutes. Tip: Toast the nuts lightly before adding them to elevate the salad’s texture and flavor.

    Step 5: Chill and Serve

    Cover the bowl and refrigerate for at least 30 minutes to let the flavors meld. This step is crucial for achieving the perfect chunky chicken salad. Serve chilled on a bed of greens, between slices of your favorite bread, or enjoy it straight from the bowl.

    Tips and Tricks

    For the best chunky chicken salad, consider these pro tips: Always use cold ingredients to keep the salad fresh longer. If you’re preparing it ahead of time, add the nuts just before serving to maintain their crunch. For a lighter version, substitute Greek yogurt for half of the mayonnaise. Experiment with different herbs like dill or parsley for a fresh twist. And remember, the salad tastes even better the next day as the flavors have more time to develop.

    Recipe Variations

    • Swap the grapes for diced apples or dried cranberries for a different sweet element.
    • Add a teaspoon of curry powder to the dressing for a spicy, exotic twist.
    • Include avocado chunks for a creamy, healthy fat addition.
    • Use turkey instead of chicken for a Thanksgiving-inspired version.
    • Mix in some cooked bacon bits for a smoky, savory flavor.

    Frequently Asked Questions

    Can I make this salad ahead of time?

    Absolutely! In fact, making it a few hours or even a day in advance allows the flavors to meld beautifully. Just hold off on adding the nuts until you’re ready to serve to keep them crunchy.

    What’s the best way to cook the chicken for this salad?

    You can boil, bake, grill, or even use a rotisserie chicken. The key is to ensure it’s cooked through and seasoned well. Grilling adds a nice smoky flavor, while boiling keeps it moist and tender.

    How long will the chicken salad last in the fridge?

    Stored in an airtight container, it should stay fresh for 3 to 5 days. Always check for any signs of spoilage before eating leftovers.

    Summary

    This chunky chicken salad is a perfect blend of textures and flavors, easy to make, and versatile enough to suit any occasion. Whether you’re meal prepping or hosting a gathering, it’s sure to be a hit.

  • Kraft Zesty Italian Pasta Salad Recipe: A Flavor Fiesta in Every Bite

    Kraft Zesty Italian Pasta Salad Recipe: A Flavor Fiesta in Every Bite

    Now, let’s dive into a dish that’s as vibrant as your summer parties should be. This Kraft Zesty Italian Pasta Salad is not just a side dish; it’s the main event, packed with flavors that dance on your palate.

    Why This Recipe Works

    • The zesty Italian dressing brings a tangy and herby punch that elevates the pasta beyond the ordinary.
    • It’s incredibly versatile, allowing you to throw in whatever veggies you have lying around.
    • Perfect for meal prep, as the flavors meld and intensify when stored in the fridge.
    • Quick and easy to make, requiring minimal cooking skills but delivering maximum taste.
    • The colorful ingredients make it as pleasing to the eye as it is to the taste buds.

    Ingredients

    • 1 lb rotini pasta
    • 1 cup Kraft Zesty Italian Dressing
    • 1 cup cherry tomatoes, halved
    • 1 cup cucumber, diced
    • 1/2 cup red onion, thinly sliced
    • 1/2 cup black olives, sliced
    • 1/2 cup feta cheese, crumbled
    • 1/4 cup fresh basil, chopped

    Equipment Needed

    • Large pot
    • Colander
    • Large mixing bowl
    • Measuring cups and spoons
    • Knife and cutting board

    Instructions

    Kraft Zesty Italian Pasta Salad Recipe

    Boil the Pasta to Perfection

    Fill your large pot with water and bring it to a rolling boil. Add a generous pinch of salt to season the water. Toss in the rotini pasta and cook according to the package instructions, usually about 8-10 minutes, until al dente. Drain the pasta in a colander and rinse under cold water to stop the cooking process and cool it down for the salad.

    Chop and Prep Your Veggies

    While the pasta is cooking, take this time to halve the cherry tomatoes, dice the cucumber, thinly slice the red onion, and slice the black olives. Having all your veggies prepped and ready to go makes assembling the salad a breeze.

    Combine Everything in a Large Bowl

    In your large mixing bowl, combine the cooled pasta, prepared veggies, crumbled feta cheese, and chopped fresh basil. Drizzle the Kraft Zesty Italian Dressing over the top. Here’s a tip: start with 3/4 cup of dressing, mix, then add more to taste. This ensures your salad isn’t overdressed.

    Toss and Taste

    Gently toss all the ingredients together until everything is evenly coated with the dressing. Taste and adjust the seasoning if necessary. Sometimes a little extra salt or a squeeze of lemon juice can brighten up the flavors even more.

    Chill Before Serving

    Cover the bowl with plastic wrap and let the salad chill in the refrigerator for at least an hour before serving. This resting time allows the flavors to meld together beautifully. Tip: If you’re in a hurry, you can serve it immediately, but the flavors won’t be as developed.

    Tips and Tricks

    For an extra flavor boost, consider marinating the red onions in a bit of the dressing before adding them to the salad. This takes the edge off the onions and infuses them with the zesty Italian flavors. If you’re not a fan of feta, mozzarella pearls or grated Parmesan are great substitutes. For a bit of crunch, add some toasted pine nuts or sunflower seeds. Always reserve a little dressing to add right before serving, as the pasta tends to absorb the dressing over time.

    Recipe Variations

    • Protein Power: Add grilled chicken, shrimp, or chickpeas to turn this salad into a hearty main dish.
    • Veggie Delight: Throw in some bell peppers, artichoke hearts, or avocado for extra veggies.
    • Cheese Swap: Try goat cheese or blue cheese instead of feta for a different flavor profile.
    • Pasta Switch: Use bowtie or penne pasta for a different texture and look.
    • Dressing Change: Experiment with ranch or balsamic vinaigrette for a different taste.

    Frequently Asked Questions

    Can I make this pasta salad ahead of time?

    Absolutely! This pasta salad is perfect for making ahead. In fact, it tastes better after the flavors have had time to meld in the fridge. Just hold off on adding all the dressing at once and add a little extra before serving to freshen it up.

    How long does this pasta salad last in the fridge?

    Stored in an airtight container, this pasta salad will last for up to 3 days in the refrigerator. After that, the veggies may start to lose their crunch, and the pasta can become a bit mushy.

    Can I use a different type of pasta?

    Yes, you can use any short pasta shape you like. Just keep in mind that cooking times may vary depending on the pasta you choose, so be sure to cook it al dente to prevent it from becoming too soft in the salad.

    Summary

    This Kraft Zesty Italian Pasta Salad is a vibrant, flavorful dish that’s perfect for any occasion. Easy to make and customizable, it’s sure to be a hit at your next gathering or as a tasty meal prep option.

  • Costco Grain Salad Recipe: A Wholesome Delight

    Costco Grain Salad Recipe: A Wholesome Delight

    Craving something fresh, nutritious, and utterly delicious? Look no further than this Costco-inspired grain salad recipe that’s packed with flavors and textures to satisfy your taste buds and keep you fueled throughout the day.

    Why This Recipe Works

    • It’s a perfect balance of grains, veggies, and proteins, making it a hearty meal or side dish.
    • The dressing is a simple yet flavorful combination that brings all the ingredients together.
    • It’s customizable based on what you have in your pantry or fridge.
    • Great for meal prep as it stays fresh and tasty for days.
    • It’s a crowd-pleaser, perfect for potlucks, picnics, or family dinners.

    Ingredients

    • 2 cups cooked quinoa (cooled)
    • 1 cup cooked farro (cooled)
    • 1 cup cherry tomatoes, halved
    • 1 cucumber, diced
    • 1/2 red onion, finely chopped
    • 1/4 cup feta cheese, crumbled
    • 1/4 cup olive oil
    • 2 tbsp lemon juice
    • 1 tsp honey
    • Salt and pepper to taste

    Equipment Needed

    • Large mixing bowl
    • Whisk
    • Measuring cups and spoons
    • Knife and cutting board

    Instructions

    Costco Grain Salad Recipe

    Step 1: Prepare the Grains

    Start by ensuring your quinoa and farro are cooked and cooled to room temperature. This prevents the salad from becoming mushy. If you’re in a hurry, spread the grains on a baking sheet to cool them faster. Tip: Rinse quinoa before cooking to remove any bitterness.

    Step 2: Chop the Veggies

    Dice the cucumber, halve the cherry tomatoes, and finely chop the red onion. Uniform pieces ensure every bite is balanced. Tip: Soak the red onion in cold water for 10 minutes to mellow its sharpness if desired.

    Step 3: Make the Dressing

    In a small bowl, whisk together olive oil, lemon juice, honey, salt, and pepper until emulsified. Taste and adjust seasoning as needed. This dressing is light yet flavorful, tying all the salad components together beautifully.

    Step 4: Combine Everything

    In a large mixing bowl, combine the cooled grains, prepared veggies, and crumbled feta cheese. Drizzle the dressing over the top and gently toss to coat everything evenly. Tip: Add the dressing just before serving to keep the salad fresh and crisp.

    Step 5: Serve and Enjoy

    Transfer the salad to a serving dish or individual bowls. It’s ready to enjoy immediately, or you can let it sit for a few minutes to allow the flavors to meld together even more.

    Tips and Tricks

    For an extra crunch, consider adding toasted nuts or seeds like almonds or sunflower seeds. If you’re making this salad ahead of time, keep the dressing separate and add it right before serving to maintain the best texture. Experiment with different grains like barley or bulgur for variety. Fresh herbs like parsley or mint can add a refreshing twist. Lastly, don’t shy away from adding proteins like grilled chicken or chickpeas to make it a more substantial meal.

    Recipe Variations

    • Mediterranean Twist: Add olives, artichoke hearts, and swap feta for goat cheese.
    • Asian Flair: Use a sesame oil and rice vinegar dressing, add edamame, and top with sesame seeds.
    • Summer Berry: Mix in fresh strawberries or blueberries and use a balsamic vinaigrette.
    • Spicy Kick: Include diced jalapeños and a pinch of chili flakes in the dressing.
    • Autumn Harvest: Roast butternut squash and Brussels sprouts to mix in for a seasonal version.

    Frequently Asked Questions

    Can I make this salad ahead of time?

    Absolutely! This salad is perfect for meal prep. Just store the dressing separately and add it when you’re ready to serve to keep everything fresh and crisp.

    What other grains can I use?

    Feel free to experiment with your favorite grains. Barley, bulgur, or even brown rice would work well in this recipe. The key is to ensure they’re cooked and cooled properly before mixing.

    How long does this salad last in the fridge?

    Stored properly in an airtight container, this salad can last up to 3-4 days in the fridge. Remember, the fresher the ingredients, the longer it’ll stay tasty.

    Summary

    This Costco-inspired grain salad is a versatile, nutritious, and delicious option for any meal. With its simple ingredients and easy preparation, it’s sure to become a staple in your recipe collection.