Author: onlinefoodrecipes

  • Crispy Potato Salad Recipe: A Crunchy Twist on a Classic

    Crispy Potato Salad Recipe: A Crunchy Twist on a Classic

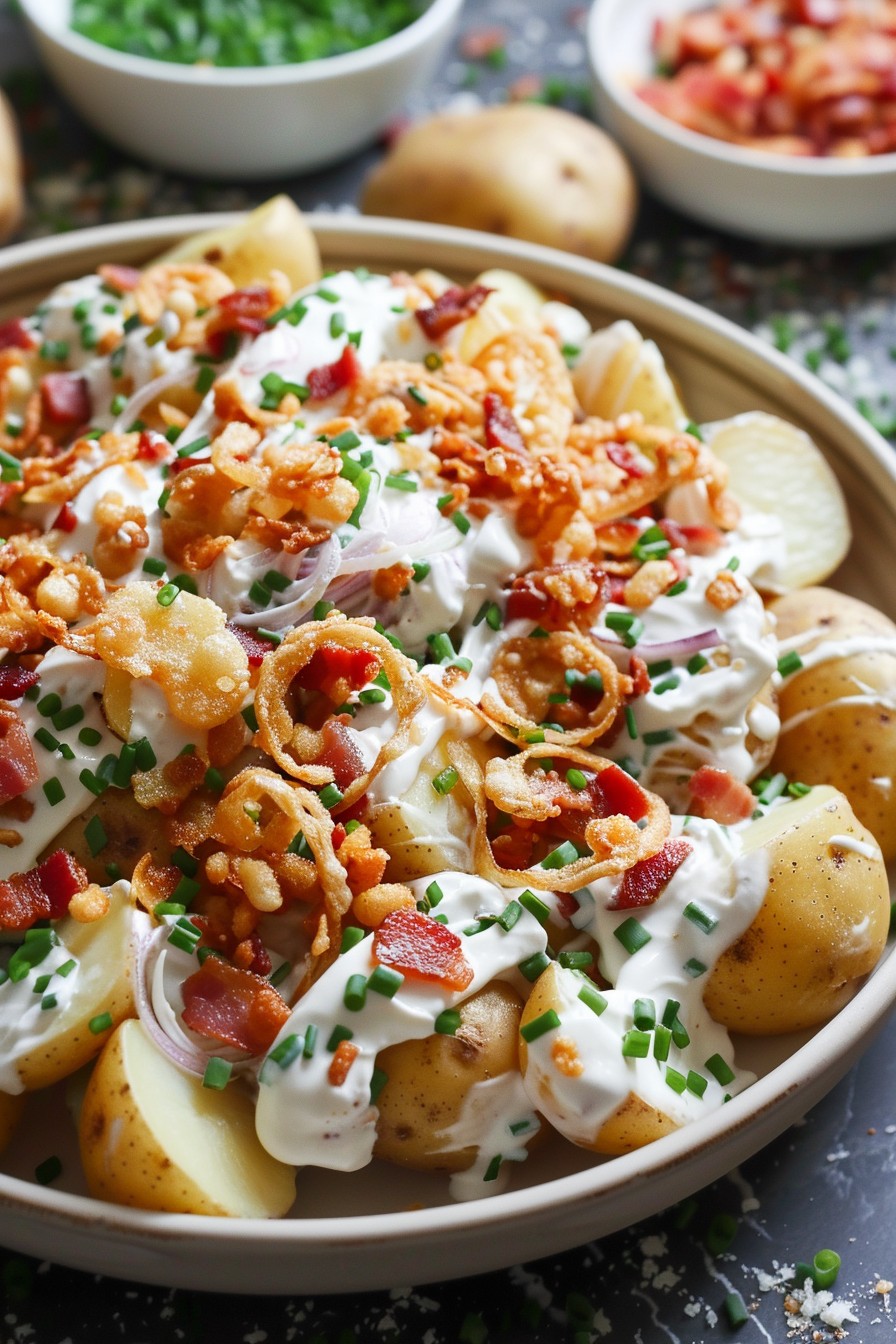
    Kick off your summer picnics with this crispy potato salad that brings a delightful crunch to your table. Perfect for those who love texture in their dishes, this recipe combines the creaminess of traditional potato salad with an unexpected crispy element that will have everyone asking for seconds.

    Why This Recipe Works

    • The combination of crispy and creamy textures creates a satisfying contrast that elevates the dish.
    • Using both mayonnaise and sour cream ensures a rich, tangy flavor profile that complements the potatoes perfectly.
    • Adding crispy elements like fried onions or bacon bits introduces a smoky depth that traditional potato salads lack.
    • This recipe is versatile, allowing for various add-ins based on personal preference or dietary restrictions.
    • It’s a crowd-pleaser that’s as suitable for a casual family dinner as it is for a festive gathering.

    Ingredients

    • 2 pounds of russet potatoes, peeled and diced into 1-inch cubes
    • 1 cup mayonnaise
    • 1/2 cup sour cream
    • 1 tablespoon Dijon mustard
    • 1/2 cup crispy fried onions
    • 4 slices of bacon, cooked and crumbled
    • 2 tablespoons fresh chives, chopped
    • Salt and pepper to taste

    Equipment Needed

    • Large pot
    • Mixing bowls
    • Whisk
    • Knife and cutting board
    • Measuring cups and spoons

    Instructions

    Crispy Potato Salad Recipe

    Step 1: Boil the Potatoes

    Fill a large pot with water and bring it to a boil. Add the diced potatoes and a pinch of salt. Boil for about 10-12 minutes, or until the potatoes are tender but still hold their shape. Drain the potatoes and let them cool slightly.

    Step 2: Prepare the Dressing

    In a mixing bowl, whisk together the mayonnaise, sour cream, and Dijon mustard until smooth. Season with salt and pepper to taste. This creamy dressing will coat the potatoes beautifully, adding richness and tang.

    Step 3: Combine the Ingredients

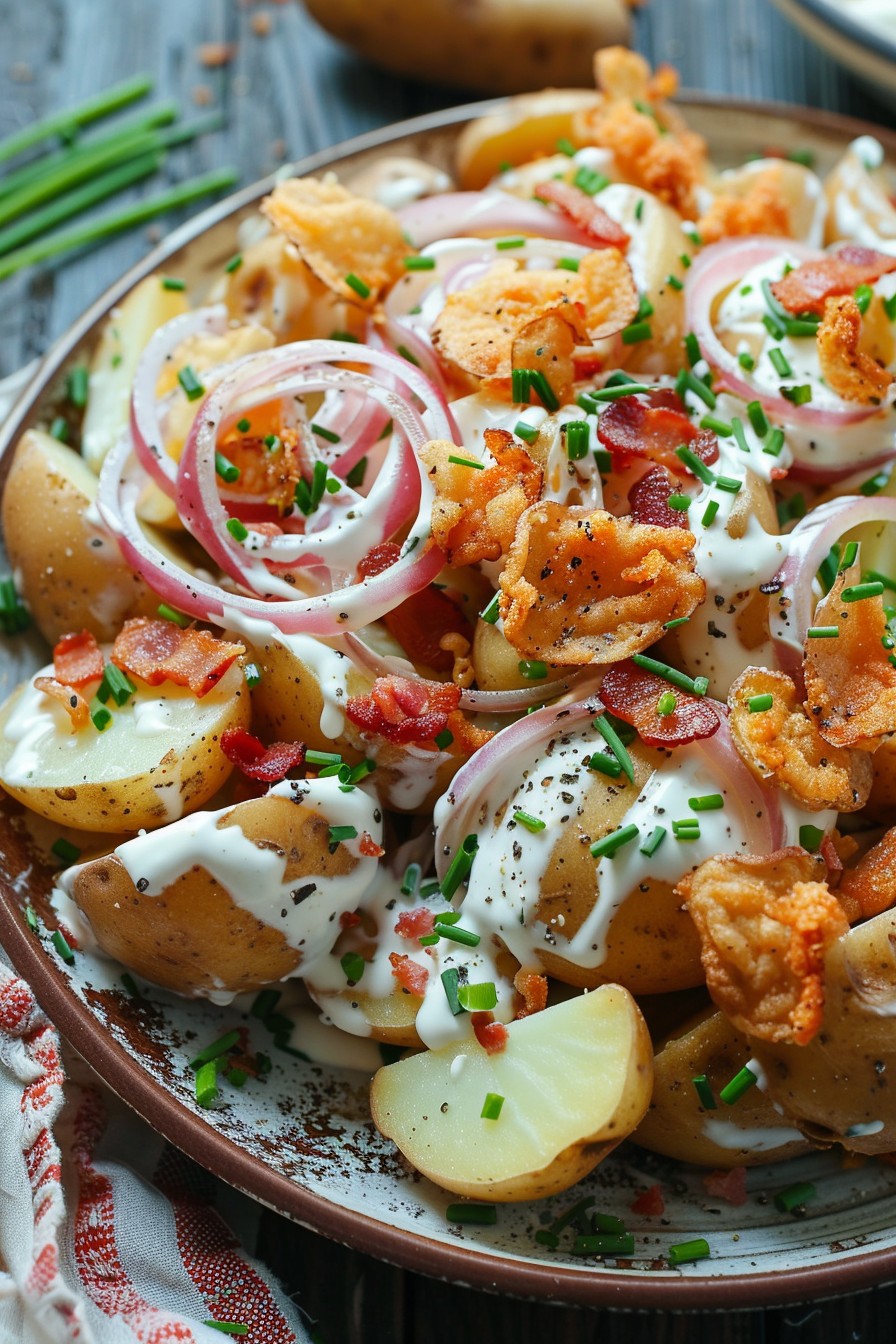
    Add the slightly cooled potatoes to the dressing and gently fold them in to avoid mashing. Then, fold in the crispy fried onions and crumbled bacon, reserving some for garnish. The key here is to maintain the potatoes’ integrity while ensuring every bite is flavorful.

    Step 4: Garnish and Serve

    Transfer the potato salad to a serving dish and sprinkle the remaining crispy onions, bacon, and fresh chives on top for a pop of color and extra crunch. Serve immediately or chill in the refrigerator for an hour to let the flavors meld together.

    Tips and Tricks

    For an even crispier texture, consider roasting the potatoes instead of boiling them. Cut them into smaller cubes, toss with a bit of oil, and roast at 400°F until golden and crispy. Let them cool before adding to the dressing. Another tip is to make the dressing a day ahead to save time. The flavors will develop more, making the salad even tastier. If you’re serving the salad at a picnic, keep it cool in a chilled container to maintain freshness and crispiness.

    Recipe Variations

    • For a vegetarian version, omit the bacon and add smoked paprika for a similar smoky flavor.
    • Swap the fried onions for crushed potato chips for a different kind of crunch.
    • Add diced pickles or capers for a briny twist that cuts through the creaminess.
    • Incorporate hard-boiled eggs for extra protein and a classic potato salad element.
    • Use Greek yogurt instead of sour cream for a lighter version that’s still creamy and tangy.

    Frequently Asked Questions

    Can I make this potato salad ahead of time?

    Absolutely! You can prepare the potato salad up to a day in advance. Just keep the crispy elements separate and add them right before serving to maintain their crunch. The flavors actually improve as they meld together in the fridge.

    What’s the best way to store leftovers?

    Store any leftovers in an airtight container in the refrigerator for up to 3 days. Note that the crispy toppings will soften over time, so it’s best enjoyed fresh.

    Can I use a different type of potato?

    Yes, while russet potatoes are great for their starchiness, you can also use Yukon Golds for a creamier texture or red potatoes for a firmer bite. Just adjust the boiling time accordingly.

    Summary

    This crispy potato salad is a delightful twist on the classic, offering a perfect balance of creamy and crunchy textures. It’s easy to make, customizable, and sure to be a hit at any gathering. Give it a try and watch it become your new go-to side dish!

  • Bread Salad Recipe: A Crunchy Twist on Summer Favorites

    Bread Salad Recipe: A Crunchy Twist on Summer Favorites

    Just when you thought salads couldn’t get any better, along comes bread salad to prove you wrong. This dish is a delightful mix of textures and flavors, perfect for those warm summer days when you crave something light yet satisfying.

    Why This Recipe Works

    • The combination of crispy bread and fresh vegetables creates a perfect balance of textures.
    • It’s incredibly versatile, allowing you to use whatever veggies you have on hand.
    • The dressing is simple yet flavorful, enhancing the natural tastes of the ingredients.
    • It’s a great way to use up stale bread, reducing food waste.
    • This salad is as nutritious as it is delicious, packed with vitamins and fiber.

    Ingredients

    • 4 cups day-old bread, cubed
    • 2 cups cherry tomatoes, halved
    • 1 cucumber, diced
    • 1/2 red onion, thinly sliced
    • 1/4 cup olive oil
    • 2 tbsp red wine vinegar
    • 1 tsp Dijon mustard
    • Salt and pepper to taste
    • 1/4 cup fresh basil, chopped

    Equipment Needed

    • Large mixing bowl
    • Whisk
    • Cutting board
    • Chef’s knife
    • Measuring cups and spoons

    Instructions

    Recipe Bread Salad

    Step 1: Prepare the Bread

    Start by cutting your day-old bread into 1-inch cubes. If your bread isn’t stale, you can toast it in a 350°F oven for about 10 minutes to achieve that perfect crunch. Let it cool before adding to the salad to prevent sogginess.

    Step 2: Chop the Vegetables

    While the bread is toasting or cooling, prepare your vegetables. Halve the cherry tomatoes, dice the cucumber, and thinly slice the red onion. The key here is uniformity in size for even distribution of flavors.

    Step 3: Make the Dressing

    In a small bowl, whisk together the olive oil, red wine vinegar, Dijon mustard, salt, and pepper. The mustard not only adds flavor but helps emulsify the dressing, ensuring it coats every ingredient beautifully.

    Step 4: Combine Everything

    In a large mixing bowl, combine the bread cubes, vegetables, and chopped basil. Drizzle the dressing over the top and gently toss to ensure everything is evenly coated. Let the salad sit for about 10 minutes before serving to allow the flavors to meld.

    Step 5: Serve and Enjoy

    Transfer the salad to a serving dish and enjoy immediately. The bread will start to soften over time, so this salad is best eaten fresh. However, it’s so delicious, we doubt there will be any leftovers!

    Tips and Tricks

    For an extra layer of flavor, consider adding some crumbled feta or goat cheese to the salad. If you’re not a fan of red onion, you can substitute it with green onions or shallots for a milder taste. To make this salad more substantial, add some grilled chicken or shrimp. Always taste your dressing before adding it to the salad; you might need to adjust the seasoning to your preference. Lastly, if you’re preparing this salad ahead of time, keep the dressing separate and add it just before serving to maintain the bread’s crunchiness.

    Recipe Variations

    • Mediterranean Twist: Add olives, feta cheese, and oregano for a Greek-inspired version.
    • Italian Style: Incorporate mozzarella balls, sun-dried tomatoes, and balsamic vinegar.
    • Spicy Kick: Include some diced jalapeños or a sprinkle of chili flakes for heat.
    • Autumn Version: Use roasted butternut squash and kale for a seasonal twist.
    • Protein-Packed: Add chickpeas or grilled chicken to turn it into a main dish.

    Frequently Asked Questions

    Can I use fresh bread instead of stale?

    Yes, you can use fresh bread, but toasting it first will help achieve the desired texture. Fresh bread tends to become too soggy when mixed with the dressing, so toasting it ensures it stays crispy longer.

    How long does this salad last?

    This salad is best enjoyed immediately after preparation. However, if you have leftovers, they can be stored in the refrigerator for up to a day. Just note that the bread will lose its crunch over time.

    Can I make this salad gluten-free?

    Absolutely! Just substitute the regular bread with your favorite gluten-free variety. Keep in mind that gluten-free breads may have a different texture, so you might need to adjust the toasting time accordingly.

    Summary

    This bread salad is a refreshing and versatile dish that’s perfect for summer. With its crunchy texture, fresh vegetables, and simple dressing, it’s sure to become a favorite. Plus, it’s a great way to use up leftover bread!

  • Macaroni Salad Filipino Style: A Creamy, Dreamy Delight

    Macaroni Salad Filipino Style: A Creamy, Dreamy Delight

    Mmm, who can resist the creamy, sweet, and tangy flavors of Filipino-style macaroni salad? This dish is a staple at gatherings, and once you try this recipe, you’ll see why it’s a crowd favorite. Perfect for potlucks, picnics, or just because!

    Why This Recipe Works

    • The combination of sweetened condensed milk and mayonnaise creates a uniquely rich and creamy dressing.
    • Adding pineapple chunks and raisins introduces a sweet and tangy flavor that balances the creaminess.
    • The use of elbow macaroni ensures the perfect bite-sized texture that holds the dressing well.
    • Chilling the salad before serving allows the flavors to meld together beautifully.
    • It’s customizable with various add-ins like ham, cheese, or veggies, making it versatile for any taste.

    Ingredients

    • 2 cups elbow macaroni, uncooked
    • 1 cup mayonnaise
    • 1/2 cup sweetened condensed milk
    • 1 cup pineapple chunks, drained
    • 1/2 cup raisins
    • 1/2 cup shredded cheddar cheese
    • 1/2 cup cooked ham, diced
    • 1/4 cup sweet pickle relish
    • 1/4 cup grated carrot
    • Salt and pepper to taste

    Equipment Needed

    • Large pot
    • Colander
    • Large mixing bowl
    • Measuring cups and spoons
    • Mixing spoon

    Instructions

    Recipe Of Macaroni Salad Filipino Style

    Step 1: Cook the Macaroni

    Bring a large pot of salted water to a boil. Add the elbow macaroni and cook according to package instructions until al dente, about 8 minutes. Drain in a colander and rinse under cold water to stop the cooking process. Let it cool completely. Tip: Rinsing the macaroni removes excess starch, preventing the salad from becoming gluey.

    Step 2: Prepare the Dressing

    In a large mixing bowl, whisk together the mayonnaise and sweetened condensed milk until smooth. This combination is the secret to the salad’s creamy sweetness. Adjust the ratio to your taste if you prefer it sweeter or more tangy.

    Step 3: Mix the Salad

    Add the cooled macaroni to the dressing along with pineapple chunks, raisins, cheddar cheese, ham, sweet pickle relish, and grated carrot. Gently fold everything together until well coated. Season with salt and pepper to taste. Tip: For a brighter flavor, add a tablespoon of lemon juice to the dressing.

    Step 4: Chill Before Serving

    Cover the bowl with plastic wrap and refrigerate for at least 2 hours, or overnight. This step is crucial as it allows the flavors to meld and the salad to reach the perfect creamy consistency.

    Tips and Tricks

    For an extra creamy texture, you can add a tablespoon of heavy cream to the dressing. If you’re not a fan of sweet pickle relish, you can substitute it with diced dill pickles for a tangier flavor. To make the salad more colorful, add some diced red bell pepper or green peas. For a lighter version, you can use light mayonnaise and reduce the amount of sweetened condensed milk. Always taste and adjust the seasoning before chilling, as flavors will intensify over time.

    Recipe Variations

    • For a seafood twist, add some cooked shrimp or crab meat.
    • Vegetarians can omit the ham and add more cheese or hard-boiled eggs.
    • Spice it up with some diced jalapeños or a dash of hot sauce.
    • For a tropical version, add some diced mango or papaya.
    • Use whole wheat or gluten-free pasta for a healthier or dietary-friendly option.

    Frequently Asked Questions

    Can I make this salad ahead of time?

    Absolutely! In fact, making it a day ahead allows the flavors to develop more fully. Just keep it covered in the refrigerator until you’re ready to serve.

    How long does it last in the fridge?

    This salad will keep well for up to 3 days in the refrigerator, stored in an airtight container. After that, the texture may start to change as the macaroni absorbs more of the dressing.

    Can I freeze macaroni salad?

    Freezing is not recommended as the mayonnaise-based dressing will separate and the texture of the macaroni will become mushy upon thawing.

    Summary

    This Filipino-style macaroni salad is a creamy, sweet, and tangy dish that’s perfect for any occasion. Easy to make and customizable, it’s sure to be a hit at your next gathering.

  • Creamy Macaroni Salad Recipe with Miracle Whip: A Summer Picnic Must-Have!

    Creamy Macaroni Salad Recipe with Miracle Whip: A Summer Picnic Must-Have!

    Zesty, creamy, and utterly delicious, this macaroni salad recipe with Miracle Whip is the perfect side dish for your next summer gathering. It’s easy to make, packed with flavor, and sure to be a crowd-pleaser. Let’s dive into the magic of this classic dish!

    Why This Recipe Works

    • The combination of Miracle Whip and a touch of vinegar gives this salad its signature tangy and creamy texture.
    • Adding crisp vegetables provides a refreshing crunch that balances the creaminess.
    • It’s a versatile recipe that can be customized with your favorite add-ins.
    • Perfect for making ahead, as the flavors meld beautifully overnight.
    • Simple ingredients come together to create a dish that’s both comforting and exciting.

    Ingredients

    • 2 cups elbow macaroni, uncooked
    • 1 cup Miracle Whip
    • 2 tbsp white vinegar
    • 1 tbsp sugar
    • 1 tsp salt
    • 1/2 tsp black pepper
    • 1 cup celery, finely chopped
    • 1/2 cup red onion, finely chopped
    • 1/2 cup red bell pepper, finely chopped
    • 2 hard-boiled eggs, chopped

    Equipment Needed

    • Large pot
    • Colander
    • Large mixing bowl
    • Whisk
    • Measuring cups and spoons
    • Knife and cutting board

    Instructions

    Macaroni Salad Recipe Miracle Whip

    Step 1: Cook the Macaroni

    Bring a large pot of salted water to a boil. Add the elbow macaroni and cook according to package instructions until al dente, about 8 minutes. Drain in a colander and rinse under cold water to stop the cooking process. Tip: Rinsing the macaroni removes excess starch, preventing the salad from becoming sticky.

    Step 2: Prepare the Dressing

    In a large mixing bowl, whisk together the Miracle Whip, white vinegar, sugar, salt, and black pepper until smooth. This creamy, tangy dressing is the heart of the salad, so make sure it’s well combined.

    Step 3: Combine Ingredients

    Add the cooled macaroni, celery, red onion, red bell pepper, and chopped eggs to the bowl with the dressing. Gently fold everything together until evenly coated. Tip: For the best flavor, let the salad chill in the refrigerator for at least an hour before serving.

    Step 4: Chill and Serve

    Cover the bowl with plastic wrap and refrigerate the salad for at least 1 hour to allow the flavors to meld. Before serving, give it a good stir and adjust the seasoning if necessary. Tip: If the salad seems too thick after chilling, a splash of milk can loosen it up.

    Tips and Tricks

    For an extra layer of flavor, consider adding a teaspoon of mustard or a dash of paprika to the dressing. If you’re short on time, using pre-chopped vegetables from the store can save you a few minutes. For a healthier version, substitute half of the Miracle Whip with Greek yogurt. Always taste and adjust the seasoning before serving, as chilling can mute flavors. Lastly, for a more colorful salad, add some peas or carrots for extra vibrancy and nutrition.

    Recipe Variations

    • Add cooked, chopped bacon for a smoky twist.
    • Stir in some shredded cheddar cheese for extra richness.
    • For a spicy kick, add a diced jalapeño or a sprinkle of cayenne pepper.
    • Include some diced pickles or relish for a tangy crunch.
    • Swap the elbow macaroni for shells or rotini for a different texture.

    Frequently Asked Questions

    Can I use mayonnaise instead of Miracle Whip?

    Yes, you can substitute mayonnaise for Miracle Whip, but keep in mind that the flavor profile will change. Miracle Whip has a tangier, sweeter taste due to the added spices and vinegar. If using mayonnaise, you might want to add a bit more vinegar and sugar to mimic the original flavor.

    How long can I store this macaroni salad?

    This macaroni salad can be stored in an airtight container in the refrigerator for up to 3 days. However, it’s best enjoyed within the first 24 hours for optimal texture and flavor. Be sure to give it a good stir before serving leftovers.

    Can I make this recipe ahead of time?

    Absolutely! In fact, making this salad a few hours or even a day in advance allows the flavors to meld together beautifully. Just be sure to keep it refrigerated until you’re ready to serve. If the salad thickens too much in the fridge, a little milk can help loosen it up.

    Summary

    This creamy macaroni salad with Miracle Whip is a delightful blend of tangy, sweet, and crunchy elements, perfect for any summer occasion. Easy to make and customizable, it’s sure to become a staple in your recipe collection.

  • Conch Salad Recipe: A Taste of the Tropics

    Conch Salad Recipe: A Taste of the Tropics

    Today, we’re diving into the vibrant flavors of the Caribbean with a fresh and zesty conch salad. This dish is a perfect blend of spicy, tangy, and sweet, making it a must-try for seafood lovers. Let’s get started!

    Why This Recipe Works

    • Fresh conch brings a unique, slightly sweet flavor that’s unmistakably tropical.
    • The combination of citrus juices ‘cooks’ the conch, ensuring it’s tender and flavorful.
    • Crunchy vegetables add texture and freshness, balancing the dish perfectly.
    • Adjustable heat levels mean you can tailor the spice to your liking.
    • It’s a no-cook recipe, perfect for hot summer days when you want to keep the kitchen cool.

    Ingredients

    • 1 pound fresh conch, cleaned and diced
    • 1/2 cup lime juice
    • 1/2 cup orange juice
    • 1/2 cup lemon juice
    • 1 small red onion, finely diced
    • 1 bell pepper, diced
    • 1 cucumber, diced
    • 1 tomato, diced
    • 1 jalapeno, minced (optional)
    • Salt and pepper to taste
    • Fresh cilantro, chopped for garnish

    Equipment Needed

    • Large mixing bowl
    • Sharp knife
    • Cutting board
    • Measuring cups
    • Juicer (optional)

    Instructions

    Conch Salad Recipe

    Step 1: Prepare the Conch

    Start by ensuring your conch is thoroughly cleaned and diced into small, bite-sized pieces. This ensures every bite is packed with flavor and the citrus juices can penetrate evenly.

    Step 2: Marinate the Conch

    In a large mixing bowl, combine the diced conch with lime, orange, and lemon juice. The acidity from the citrus will ‘cook’ the conch, so let it marinate in the fridge for at least 2 hours, stirring occasionally.

    Step 3: Add the Vegetables

    After marinating, add the diced red onion, bell pepper, cucumber, tomato, and jalapeno to the bowl. Mix well to ensure the vegetables are evenly distributed throughout the salad.

    Step 4: Season to Taste

    Season your conch salad with salt and pepper, adjusting according to your preference. Remember, the flavors will develop more as it sits, so it’s okay to start with a lighter hand.

    Step 5: Garnish and Serve

    Before serving, sprinkle freshly chopped cilantro over the top for a burst of color and flavor. Serve chilled for the best experience.

    Tips and Tricks

    For the best texture, make sure to dice all your vegetables uniformly. This not only makes the salad more visually appealing but ensures every forkful is balanced. If you’re short on time, you can reduce the marinating time to 1 hour, but the longer it marinates, the more flavorful the conch will be. Always use fresh citrus juice for the brightest flavor; bottled juice can’t compare. If you’re sensitive to spice, remove the seeds and membranes from the jalapeno before mincing, or leave it out entirely.

    Recipe Variations

    • For a fruitier twist, add diced mango or pineapple to the salad.
    • Swap the conch for cooked shrimp or scallops if conch isn’t available.
    • Add avocado for a creamy texture and healthy fats.
    • Include a dash of hot sauce or a sprinkle of chili flakes for extra heat.
    • For a more substantial meal, serve the salad over a bed of lettuce or with tortilla chips on the side.

    Frequently Asked Questions

    Can I use frozen conch?

    Yes, frozen conch can be used if fresh isn’t available. Just make sure to thaw it completely in the refrigerator before using and pat it dry to remove excess moisture.

    How long does conch salad last in the fridge?

    Conch salad is best enjoyed fresh but can be stored in an airtight container in the refrigerator for up to 2 days. The vegetables will soften over time, so it’s ideal to eat it within the first day.

    Is conch salad spicy?

    The spice level can be adjusted to your liking. The jalapeno adds heat, but you can reduce the amount or omit it entirely if you prefer a milder salad.

    Summary

    This conch salad recipe is a refreshing, no-cook dish that brings the flavors of the Caribbean to your table. With its combination of fresh conch, vibrant vegetables, and zesty citrus marinade, it’s a perfect choice for a light and flavorful meal.

  • Egyptian Barley Salad Recipe: A Nutritious & Flavorful Adventure

    Egyptian Barley Salad Recipe: A Nutritious & Flavorful Adventure

    Get ready to embark on a culinary journey to Egypt with this hearty and healthy barley salad. Packed with flavors and textures, it’s a dish that promises to delight your taste buds and nourish your body.

    Why This Recipe Works

    • Barley, the star ingredient, is a whole grain rich in fiber, vitamins, and minerals, making this salad not just tasty but also incredibly good for you.
    • The combination of fresh vegetables and herbs brings a burst of freshness and color to the dish, making it as visually appealing as it is delicious.
    • A simple yet flavorful dressing ties all the ingredients together, creating a harmonious blend of flavors that’s hard to resist.

    Ingredients

    • 1 cup pearl barley, rinsed
    • 2 cups water
    • 1 cucumber, diced
    • 1 red bell pepper, diced
    • 1/2 red onion, finely chopped
    • 1/4 cup fresh parsley, chopped
    • 1/4 cup fresh mint, chopped
    • 3 tbsp olive oil
    • 2 tbsp lemon juice
    • 1 tsp ground cumin
    • Salt and pepper to taste

    Equipment Needed

    • Medium saucepan
    • Mixing bowl
    • Knife
    • Cutting board
    • Measuring cups and spoons

    Instructions

    Egyptian Barley Salad Recipe

    Step 1: Cook the Barley

    In a medium saucepan, combine the rinsed barley and water. Bring to a boil over high heat, then reduce the heat to low, cover, and simmer for about 25 minutes, or until the barley is tender and the water is absorbed. Remove from heat and let it cool slightly.

    Step 2: Prepare the Vegetables

    While the barley is cooking, dice the cucumber and red bell pepper, and finely chop the red onion. Place them in a large mixing bowl. Add the chopped parsley and mint for an extra layer of freshness.

    Step 3: Make the Dressing

    In a small bowl, whisk together the olive oil, lemon juice, ground cumin, salt, and pepper. This simple dressing will add a bright and zesty flavor to the salad.

    Step 4: Combine Everything

    Add the slightly cooled barley to the bowl with the vegetables. Pour the dressing over the top and toss everything together until well combined. The salad is now ready to serve, or you can chill it in the refrigerator for an hour to let the flavors meld together even more.

    Tips and Tricks

    For an even more flavorful salad, consider toasting the barley in a dry skillet over medium heat for a few minutes before cooking it. This will bring out a nutty flavor that complements the other ingredients beautifully. If you’re short on time, you can use quick-cooking barley, which reduces the cooking time significantly. Lastly, feel free to adjust the amount of lemon juice and cumin in the dressing to suit your personal taste preferences.

    Recipe Variations

    • Add some crumbled feta cheese for a creamy, tangy twist.
    • Include some chopped Kalamata olives for a briny flavor.
    • For a bit of heat, add a diced jalapeno or a sprinkle of red pepper flakes.
    • Swap out the barley for quinoa or farro for a different texture and flavor profile.

    Frequently Asked Questions

    Can I make this salad ahead of time?

    Absolutely! This salad actually tastes better after it’s had some time to sit and the flavors have had a chance to meld together. Just be sure to give it a good stir before serving.

    Is this salad gluten-free?

    Barley contains gluten, so if you’re looking for a gluten-free option, you’ll need to substitute it with a gluten-free grain like quinoa or rice.

    How long will this salad keep in the refrigerator?

    Stored in an airtight container, this salad will keep well in the refrigerator for up to 3 days. After that, the vegetables may start to lose their crispness.

    Summary

    This Egyptian Barley Salad is a nutritious, flavorful, and versatile dish that’s perfect for any occasion. Whether you’re looking for a healthy lunch option or a unique side dish, this recipe is sure to impress.

  • Avocado Mango Salad Recipe: A Tropical Twist on Your Greens

    Avocado Mango Salad Recipe: A Tropical Twist on Your Greens

    Oh, the joys of combining creamy avocado with sweet mango in a salad that screams summer! This recipe is your ticket to a refreshing, vibrant dish that’s as nutritious as it is delicious. Perfect for picnics, potlucks, or just spicing up your lunch routine.

    Why This Recipe Works

    • The creamy texture of avocado perfectly complements the juicy sweetness of mango, creating a harmonious flavor profile.
    • It’s packed with vitamins, minerals, and healthy fats, making it a guilt-free indulgence.
    • The addition of lime juice and cilantro adds a zesty freshness that elevates the dish.
    • It’s incredibly versatile; serve it as a side, a main, or even as a salsa!
    • Quick and easy to prepare, it’s a fuss-free recipe that delivers on taste and presentation.

    Ingredients

    • 2 ripe avocados, diced
    • 1 large ripe mango, diced
    • 1/4 cup red onion, finely chopped
    • 1/4 cup fresh cilantro, chopped
    • 2 tbsp lime juice
    • 1 tbsp olive oil
    • Salt and pepper to taste

    Equipment Needed

    • Mixing bowl
    • Sharp knife
    • Cutting board
    • Measuring spoons

    Instructions

    Avocado Mango Salad Recipe

    Step 1: Prepare Your Ingredients

    Start by dicing the avocados and mango into bite-sized pieces. Finely chop the red onion and cilantro. The key here is uniformity in size for a perfect bite every time. Tip: To easily dice the mango, slice off the cheeks, score the flesh in a grid pattern, and scoop out the pieces with a spoon.

    Step 2: Combine the Fruits and Veggies

    In a large mixing bowl, gently toss together the diced avocado, mango, red onion, and cilantro. Be careful not to mash the avocados. The goal is to keep the pieces intact for that beautiful salad texture.

    Step 3: Dress the Salad

    Drizzle the lime juice and olive oil over the salad. Season with salt and pepper to taste. Gently toss the salad to ensure everything is evenly coated. Tip: The lime juice not only adds flavor but also helps prevent the avocado from browning.

    Step 4: Let It Marinate

    Allow the salad to sit for about 10 minutes before serving. This short marination time lets the flavors meld together beautifully. Tip: If you’re preparing this ahead of time, add the avocado just before serving to maintain its freshness and color.

    Step 5: Serve and Enjoy

    Transfer the salad to a serving dish and enjoy immediately. This salad is best served fresh but can be stored in the refrigerator for up to an hour if needed.

    Tips and Tricks

    For an extra kick, add a diced jalapeno or a sprinkle of chili powder. If you’re not a fan of cilantro, substitute it with fresh mint or basil for a different flavor profile. To make this salad more substantial, add grilled chicken or shrimp. Always use ripe but firm avocados and mangoes for the best texture. For a sweeter version, drizzle a bit of honey over the salad before serving.

    Recipe Variations

    • Add quinoa or black beans for a protein-packed version.
    • Swap mango with peaches or pineapple for a different sweet twist.
    • Include cucumber or bell peppers for added crunch.
    • Top with toasted nuts or seeds for extra texture and nutrients.
    • Use a different dressing, like a balsamic reduction or a yogurt-based dressing, for a new flavor experience.

    Frequently Asked Questions

    Can I make this salad ahead of time?

    Yes, but for the best results, add the avocado just before serving to prevent browning. You can prepare the other ingredients ahead and store them in the refrigerator separately.

    How do I pick a ripe mango?

    A ripe mango will give slightly when gently squeezed and have a sweet aroma at the stem end. The skin color can vary, so don’t rely on that alone.

    Can I use frozen mango?

    Yes, but thaw it completely and pat it dry to avoid watering down the salad. Fresh mango is preferred for the best texture and flavor.

    Summary

    This Avocado Mango Salad is a refreshing, nutritious, and versatile dish that’s perfect for any occasion. With its combination of creamy avocado, sweet mango, and zesty lime, it’s a guaranteed crowd-pleaser.

  • Burrata Salad Recipe: A Creamy Dream on a Plate

    Burrata Salad Recipe: A Creamy Dream on a Plate

    Very few dishes can boast the luxurious texture and flavor of a burrata salad. This recipe combines the creamy goodness of burrata with the freshness of seasonal produce for a dish that’s as beautiful as it is delicious. Perfect for those warm summer evenings or as a show-stopping appetizer at your next dinner party.

    Why This Recipe Works

    • The contrast between the creamy burrata and crisp, fresh vegetables creates a perfect balance of textures.
    • Using high-quality, fresh ingredients elevates the dish from good to unforgettable.
    • The simplicity of the recipe allows the natural flavors of the ingredients to shine through.
    • It’s versatile enough to serve as a main, side, or appetizer, making it a great addition to any meal.

    Ingredients

    • 1 ball of burrata cheese (about 8 oz)
    • 2 cups mixed salad greens
    • 1 cup cherry tomatoes, halved
    • 1/2 cucumber, thinly sliced
    • 1/4 cup basil leaves, torn
    • 2 tbsp extra virgin olive oil
    • 1 tbsp balsamic glaze
    • Salt and pepper to taste

    Equipment Needed

    • Large salad bowl
    • Sharp knife
    • Cutting board
    • Measuring cups and spoons

    Instructions

    Burrata Salad Recipe

    Step 1: Prepare Your Vegetables

    Start by washing all your vegetables thoroughly. Halve the cherry tomatoes and thinly slice the cucumber. Tear the basil leaves with your hands to release their aromatic oils. This step is all about prepping your ingredients so they’re ready to go when you assemble the salad.

    Step 2: Assemble the Salad Base

    In a large salad bowl, combine the mixed greens, cherry tomatoes, cucumber slices, and torn basil leaves. Gently toss them together to ensure an even distribution of ingredients. The key here is to be gentle to avoid bruising the greens.

    Step 3: Add the Burrata

    Carefully place the burrata ball in the center of the salad. If you prefer, you can tear the burrata into smaller pieces for easier serving. The creamy center will ooze out slightly, creating a luxurious dressing for the salad.

    Step 4: Dress the Salad

    Drizzle the extra virgin olive oil and balsamic glaze over the salad. Season with salt and pepper to taste. The olive oil adds richness, while the balsamic glaze provides a sweet and tangy contrast.

    Step 5: Serve Immediately

    This salad is best enjoyed fresh, so serve it right away. The warmth of the room will soften the burrata even more, making it even creamier. Enjoy the burst of flavors and textures with every bite.

    Tips and Tricks

    For an extra flavor boost, try adding a sprinkle of crushed red pepper flakes or a drizzle of honey. If you’re serving this salad as a main, consider adding some grilled chicken or shrimp for protein. Always use the freshest burrata you can find, as it makes a huge difference in taste and texture. To make the salad ahead of time, prep all the ingredients but wait to add the burrata and dressing until just before serving.

    Recipe Variations

    • Swap the mixed greens for arugula for a peppery kick.
    • Add sliced peaches or strawberries for a sweet twist.
    • Include some toasted pine nuts or walnuts for added crunch.
    • Use a different cheese, like mozzarella, if burrata isn’t available.
    • Experiment with different dressings, such as a lemon vinaigrette or pesto.

    Frequently Asked Questions

    Can I make this salad ahead of time?

    While you can prep the vegetables ahead of time, it’s best to add the burrata and dressing just before serving to maintain the best texture and flavor. The salad greens can wilt, and the burrata can lose its creamy center if left to sit too long.

    What can I substitute for burrata?

    If you can’t find burrata, fresh mozzarella is a good substitute. While it won’t have the same creamy center, it will still provide a soft, mild cheese that pairs well with the other ingredients. You could also try ricotta for a different texture.

    How do I store leftovers?

    This salad is best enjoyed fresh, but if you have leftovers, store them in an airtight container in the refrigerator. Keep in mind that the greens may wilt, and the burrata will firm up, so it’s not ideal for saving.

    Summary

    This burrata salad is a celebration of fresh, high-quality ingredients coming together to create a dish that’s both simple and spectacular. With its creamy cheese, crisp vegetables, and flavorful dressing, it’s sure to impress at any table.

  • Carrot Pineapple Raisin Salad Recipe: A Tropical Twist on a Classic

    Carrot Pineapple Raisin Salad Recipe: A Tropical Twist on a Classic

    Crisp, sweet, and bursting with tropical flavors, this Carrot Pineapple Raisin Salad is the perfect side dish to brighten up any meal. Combining the crunch of fresh carrots with the juicy sweetness of pineapple and the chewy texture of raisins, this salad is a delightful contrast of flavors and textures that will have everyone asking for seconds.

    Why This Recipe Works

    • The combination of sweet pineapple and raisins with the earthy crunch of carrots creates a perfect balance of flavors and textures.
    • It’s incredibly versatile, serving as a refreshing side dish, a healthy snack, or even a light dessert.
    • This salad is a breeze to make, requiring no cooking and just a few minutes of prep time.
    • It’s packed with vitamins and fiber, making it as nutritious as it is delicious.
    • The recipe is easily customizable, allowing you to adjust the sweetness or add other fruits and nuts for extra texture.

    Ingredients

    • 2 cups grated carrots
    • 1 cup diced pineapple (fresh or canned)
    • 1/2 cup raisins
    • 1/4 cup mayonnaise
    • 1 tablespoon honey
    • 1 teaspoon lemon juice
    • 1/4 teaspoon salt

    Equipment Needed

    • Grater
    • Mixing bowl
    • Measuring cups and spoons
    • Knife and cutting board

    Instructions

    Carrot Pineapple Raisin Salad Recipe

    Step 1: Prepare the Carrots

    Start by washing and peeling the carrots. Using a grater, grate the carrots into a large mixing bowl. For the best texture, aim for medium-sized shreds that are not too fine or too thick. This ensures the carrots will hold up well against the other ingredients without becoming mushy.

    Step 2: Add the Pineapple and Raisins

    Dice the pineapple into small, bite-sized pieces if you’re using fresh pineapple. If using canned pineapple, make sure to drain it well to avoid adding excess liquid to the salad. Add the pineapple and raisins to the bowl with the grated carrots. The sweetness of the pineapple and raisins complements the earthy flavor of the carrots beautifully.

    Step 3: Mix the Dressing

    In a small bowl, whisk together the mayonnaise, honey, lemon juice, and salt until smooth. The honey adds a natural sweetness that enhances the tropical flavors, while the lemon juice provides a subtle tanginess to balance the sweetness.

    Step 4: Combine Everything

    Pour the dressing over the carrot, pineapple, and raisin mixture. Gently toss everything together until the ingredients are evenly coated with the dressing. Be careful not to overmix, as this can cause the salad to become soggy.

    Step 5: Chill and Serve

    Cover the bowl with plastic wrap and refrigerate the salad for at least 30 minutes before serving. This chilling time allows the flavors to meld together and the salad to reach the perfect temperature for serving.

    Tips and Tricks

    For an extra crunch, consider adding chopped nuts like walnuts or pecans to the salad. If you’re looking for a lighter version, you can substitute Greek yogurt for the mayonnaise. To make the salad ahead of time, prepare the ingredients and store them separately, then mix them together with the dressing just before serving to maintain the best texture.

    Recipe Variations

    • Add shredded coconut for an extra tropical flavor.
    • Include diced apples or pears for additional sweetness and crunch.
    • Swap out the raisins for dried cranberries or chopped dates for a different kind of sweetness.
    • For a spicy kick, add a pinch of cinnamon or nutmeg to the dressing.
    • Use lime juice instead of lemon juice for a different citrus note.

    Frequently Asked Questions

    Can I use pre-shredded carrots?

    Yes, you can use pre-shredded carrots to save time. However, freshly grated carrots tend to have a better texture and more vibrant flavor. If you do opt for pre-shredded, make sure they’re fresh and not dried out.

    How long does this salad last in the fridge?

    This salad is best enjoyed within 2-3 days when stored in an airtight container in the refrigerator. The longer it sits, the more the carrots will soften and the dressing will thin out.

    Can I make this salad vegan?

    Absolutely! Simply substitute the mayonnaise with a vegan alternative and use maple syrup instead of honey to keep it plant-based.

    Summary

    This Carrot Pineapple Raisin Salad is a refreshing, easy-to-make dish that’s perfect for any occasion. With its delightful mix of textures and flavors, it’s sure to be a hit with everyone. Plus, it’s customizable to suit your taste preferences and dietary needs.

  • Louie Shrimp Salad Recipe: A Creamy, Crunchy Delight

    Louie Shrimp Salad Recipe: A Creamy, Crunchy Delight

    Dive into the delicious world of seafood with this Louie Shrimp Salad recipe. Perfect for summer picnics or a fancy dinner, this dish combines succulent shrimp with a creamy dressing and crisp veggies for a meal that’s both refreshing and satisfying.

    Why This Recipe Works

    • The combination of creamy dressing and crunchy vegetables offers a perfect texture contrast.
    • Using fresh, high-quality shrimp ensures the salad is packed with flavor.
    • The recipe is versatile, allowing for easy substitutions based on dietary preferences or what’s in your fridge.
    • It’s a quick and easy dish to prepare, making it perfect for busy weeknights or last-minute gatherings.
    • The vibrant colors and fresh ingredients make it as visually appealing as it is delicious.

    Ingredients

    • 1 pound large shrimp, peeled and deveined
    • 1 cup mayonnaise
    • 1/4 cup ketchup
    • 1 tablespoon lemon juice
    • 1 teaspoon Worcestershire sauce
    • 1/2 teaspoon hot sauce
    • 1 head iceberg lettuce, shredded
    • 1 avocado, diced
    • 2 hard-boiled eggs, chopped
    • 1/2 cup cherry tomatoes, halved
    • 1/4 cup green onions, sliced

    Equipment Needed

    • Large mixing bowl
    • Small mixing bowl
    • Whisk
    • Large pot
    • Slotted spoon

    Instructions

    Louie Shrimp Salad Recipe

    Step 1: Cook the Shrimp

    Bring a large pot of salted water to a boil. Add the shrimp and cook for 2-3 minutes, until they turn pink and opaque. Use a slotted spoon to transfer the shrimp to a bowl of ice water to stop the cooking process. Drain and set aside. Tip: Don’t overcook the shrimp to keep them tender.

    Step 2: Make the Dressing

    In a small bowl, whisk together the mayonnaise, ketchup, lemon juice, Worcestershire sauce, and hot sauce until smooth. Taste and adjust the seasoning as needed. This creamy dressing is the heart of the salad, so make sure it’s to your liking.

    Step 3: Assemble the Salad

    In a large bowl, combine the shredded lettuce, avocado, eggs, tomatoes, and green onions. Add the cooked shrimp and gently toss to combine. Drizzle the dressing over the salad and toss lightly to coat all the ingredients. Tip: Add the dressing just before serving to keep the salad crisp.

    Step 4: Serve and Enjoy

    Divide the salad among plates and serve immediately. For an extra touch, garnish with additional sliced green onions or a sprinkle of paprika. This salad is best enjoyed fresh but can be refrigerated for a short time if needed.

    Tips and Tricks

    For the best flavor, use freshly cooked shrimp rather than pre-cooked. If you’re short on time, a high-quality store-bought cocktail sauce can be mixed with mayonnaise for a quick dressing. To add more crunch, include diced celery or cucumber. For a lighter version, substitute Greek yogurt for half of the mayonnaise. Always taste and adjust the seasoning of the dressing before adding it to the salad.

    Recipe Variations

    • Substitute the shrimp with crab meat or lobster for a different seafood twist.
    • Add diced mango or pineapple for a sweet and tangy flavor.
    • Use romaine or spinach instead of iceberg lettuce for a different texture and nutritional profile.
    • For a spicy kick, increase the amount of hot sauce or add diced jalapeños.
    • Make it a wrap by serving the salad in large lettuce leaves or tortillas.

    Frequently Asked Questions

    Can I make this salad ahead of time?

    Yes, but for the best texture, keep the dressing separate and add it just before serving. The shrimp and vegetables can be prepared up to a day in advance and stored in the refrigerator.

    What can I use instead of ketchup in the dressing?

    Tomato paste or a homemade chili sauce can be used as substitutes. Adjust the sweetness and acidity to taste with a bit of sugar or vinegar.

    How can I tell when the shrimp are cooked?

    Shrimp are done when they turn pink and opaque. Overcooking will make them tough, so keep an eye on them and remove from heat as soon as they change color.

    Summary

    This Louie Shrimp Salad is a delightful mix of creamy, crunchy, and fresh flavors, perfect for any occasion. With simple ingredients and easy steps, it’s a foolproof recipe that’s sure to impress.