Author: onlinefoodrecipes

  • Kachumber Salad Recipe: A Crunchy, Fresh Delight

    Kachumber Salad Recipe: A Crunchy, Fresh Delight

    You’re about to dive into the world of Kachumber salad, a dish that’s as fun to say as it is to eat. This recipe is your ticket to a refreshing, crunchy side that pairs perfectly with just about anything.

    Why This Recipe Works

    • It’s a no-cook recipe, perfect for those hot summer days when turning on the stove feels like a crime.
    • The combination of crisp cucumbers, juicy tomatoes, and sharp onions creates a texture and flavor party in your mouth.
    • It’s incredibly versatile, serving as a side, a topping, or even a light main dish.
    • The lemon juice and spices add a zesty kick that elevates the simple ingredients to something extraordinary.

    Ingredients

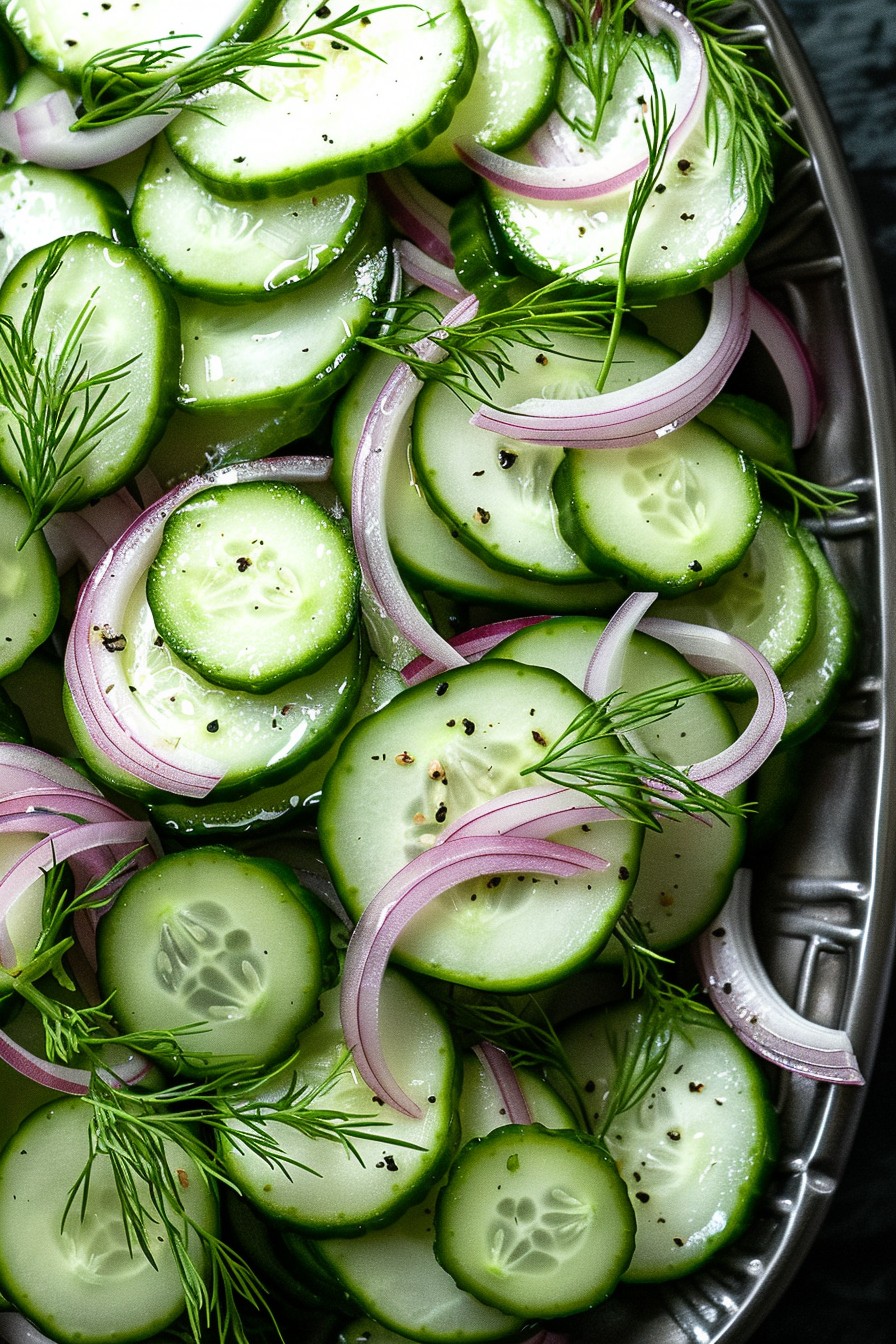
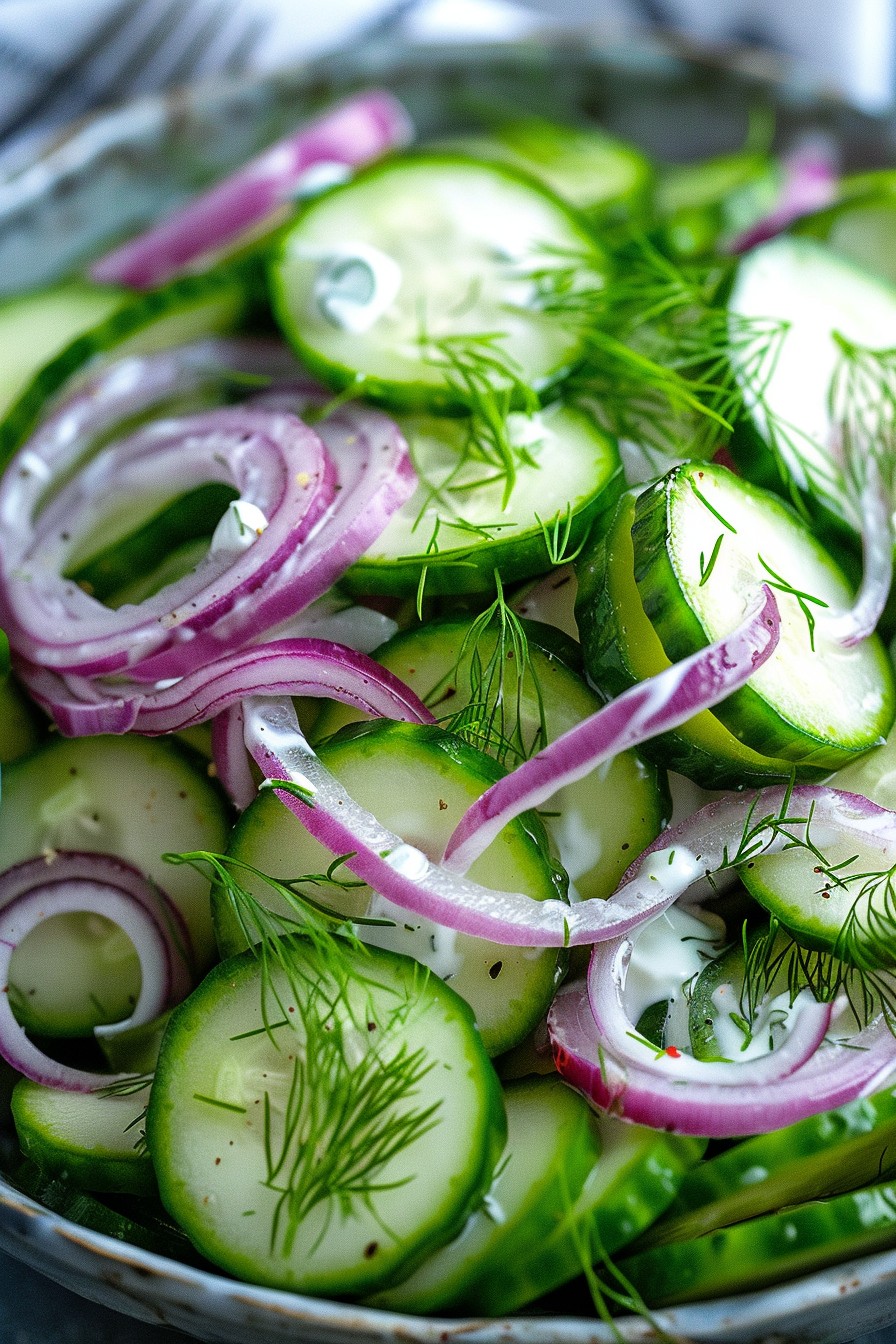
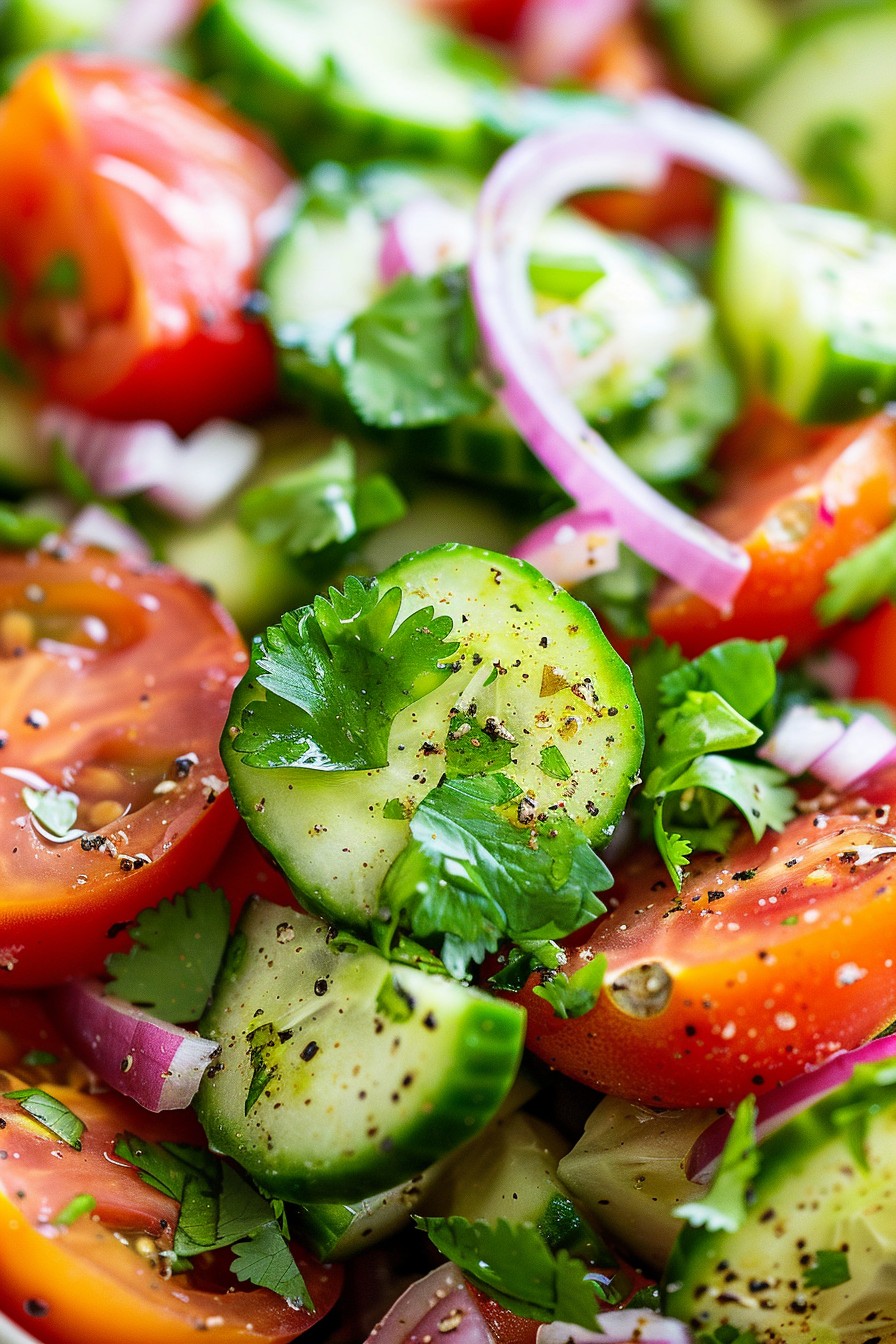
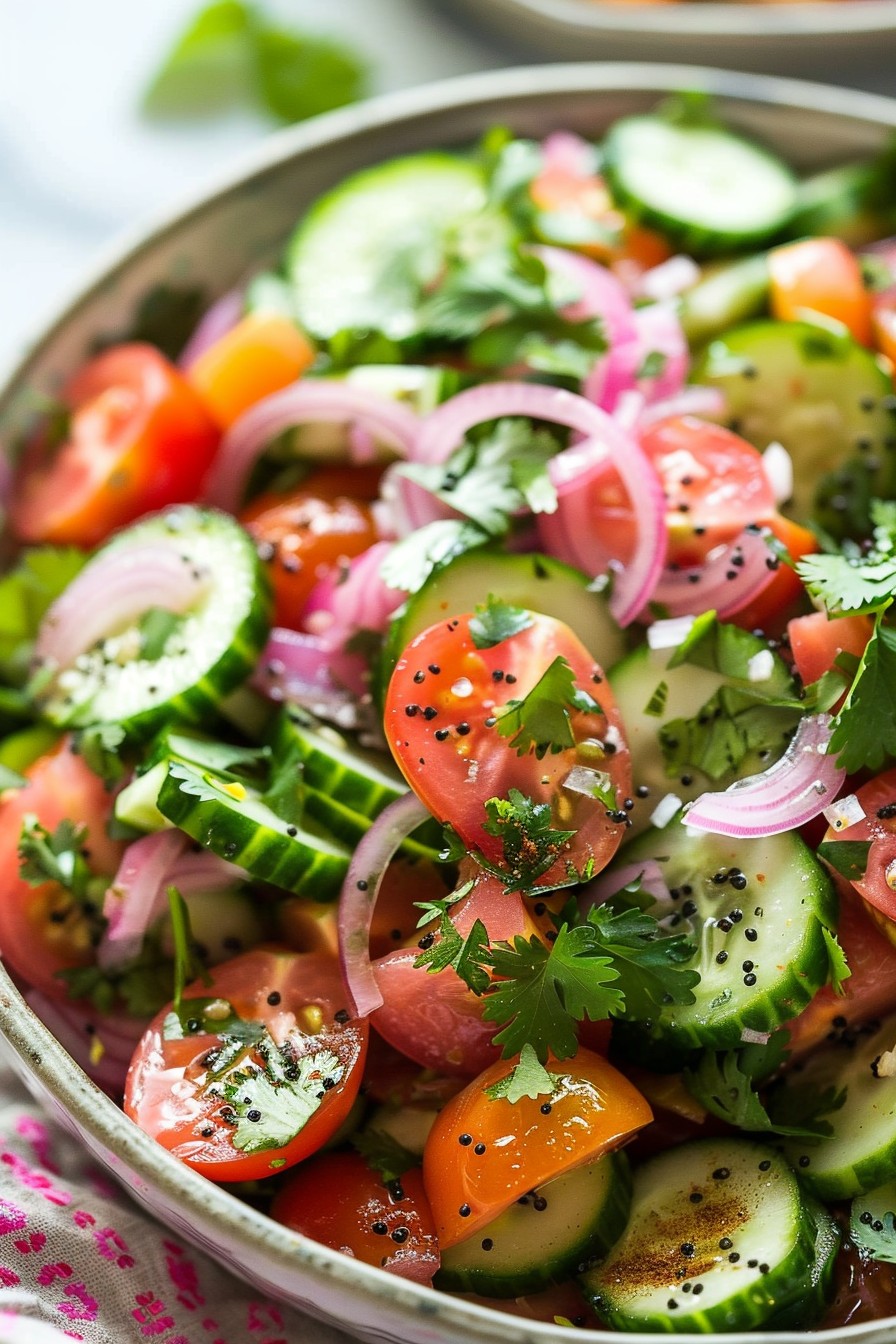
    • 2 cups diced cucumbers
    • 1 cup diced tomatoes
    • 1/2 cup finely chopped red onion
    • 1/4 cup chopped cilantro
    • 1 tbsp lemon juice
    • 1/2 tsp salt
    • 1/4 tsp black pepper
    • 1/4 tsp cumin powder

    Equipment Needed

    • Large mixing bowl
    • Sharp knife
    • Cutting board
    • Measuring spoons

    Instructions

    Kachumber Salad Recipe

    Step 1: Prep Your Veggies

    Start by washing all your vegetables under cold water. Dice the cucumbers and tomatoes into small, bite-sized pieces. Finely chop the red onion to ensure every bite has a bit of that sharp flavor without overpowering the dish. This step is crucial for the perfect texture balance.

    Step 2: Combine the Ingredients

    In your large mixing bowl, toss together the diced cucumbers, tomatoes, and red onion. Add the chopped cilantro for that fresh, herby note. The key here is gentle mixing to keep the veggies crisp and not bruised.

    Step 3: Season to Perfection

    Sprinkle the salt, black pepper, and cumin powder over the salad. Drizzle the lemon juice evenly. Toss the salad again, this time ensuring the spices and lemon juice coat every piece evenly. Taste and adjust the seasoning if needed.

    Step 4: Let It Marinate

    Cover the bowl with plastic wrap and let the salad sit in the refrigerator for at least 15 minutes. This marination time allows the flavors to meld together beautifully, enhancing the overall taste of the salad.

    Step 5: Serve and Enjoy

    Give the salad a final gentle toss before serving. It’s now ready to be enjoyed as a refreshing side or a light meal on its own. The crispness and flavor are at their peak right now!

    Tips and Tricks

    For an extra crunch, consider adding some diced bell peppers or radishes to the mix. If you’re not a fan of cilantro, parsley makes a great substitute. To make the salad ahead of time, keep the dressing separate until just before serving to maintain the veggies’ crispness. For a spicier kick, add a finely chopped green chili or a pinch of chili powder.

    Recipe Variations

    • Add diced avocado for a creamy texture and healthy fats.
    • Incorporate some cooked quinoa or chickpeas to turn it into a hearty main dish.
    • Swap lemon juice with lime juice for a different citrusy note.
    • Add some crumbled feta cheese for a salty, tangy twist.

    Frequently Asked Questions

    Can I make Kachumber salad ahead of time?

    Yes, you can prepare the ingredients ahead of time, but for the best texture and flavor, add the lemon juice and spices just before serving. This prevents the veggies from becoming too soggy.

    Is there a substitute for red onion?

    If red onion is too strong for your taste, you can use shallots or green onions for a milder flavor. Both options will still give you that necessary bite without overpowering the salad.

    How long does Kachumber salad last in the fridge?

    Stored in an airtight container, the salad can last up to 2 days. However, it’s best enjoyed fresh as the veggies will start to lose their crunch over time.

    Summary

    Kachumber salad is a simple, refreshing dish that’s bursting with flavors and textures. It’s easy to make, requires no cooking, and is incredibly versatile. Perfect for any occasion, this salad is sure to be a hit.

  • Trout Salad Recipe: A Fresh Twist on Summer Salads

    Trout Salad Recipe: A Fresh Twist on Summer Salads

    Delight your taste buds with this refreshing trout salad recipe, perfect for those warm summer days when you crave something light yet satisfying. Combining the delicate flavors of trout with crisp vegetables and a zesty dressing, this dish is a surefire way to impress at any picnic or dinner table.

    Why This Recipe Works

    • The combination of flaky trout and crunchy vegetables offers a perfect texture contrast.
    • A homemade lemon-dill dressing enhances the natural flavors of the trout without overpowering it.
    • This recipe is versatile, allowing for various substitutions based on dietary preferences or what’s in season.
    • It’s quick to prepare, making it ideal for weeknight dinners or last-minute gatherings.
    • Packed with protein and omega-3 fatty acids, it’s as nutritious as it is delicious.

    Ingredients

    • 2 cups cooked trout, flaked
    • 1 cup cherry tomatoes, halved
    • 1/2 cucumber, diced
    • 1/4 red onion, thinly sliced
    • 2 cups mixed greens
    • 1/4 cup olive oil
    • 2 tbsp lemon juice
    • 1 tbsp fresh dill, chopped
    • Salt and pepper to taste

    Equipment Needed

    • Mixing bowl
    • Whisk
    • Measuring cups and spoons
    • Salad spinner (optional)

    Instructions

    Trout Salad Recipe

    Prepare the Dressing

    In a small bowl, whisk together the olive oil, lemon juice, and fresh dill until well combined. Season with salt and pepper to taste. This dressing is key to bringing all the flavors together, so don’t skimp on the dill!

    Combine the Salad Ingredients

    In a large mixing bowl, toss together the mixed greens, cherry tomatoes, cucumber, and red onion. The vibrant colors not only make the salad visually appealing but also ensure a variety of textures and flavors in every bite.

    Add the Trout

    Gently fold the flaked trout into the salad. Be careful not to break the trout into too small pieces; you want to maintain some of its texture. This is where the salad transforms from good to great, adding that protein punch.

    Dress the Salad

    Drizzle the dressing over the salad and toss lightly to coat. The goal is to evenly distribute the dressing without crushing the ingredients. A little dressing goes a long way, so start with half and add more as needed.

    Serve Immediately

    This salad is best enjoyed fresh, so serve it right away. If you’re preparing it in advance, keep the dressing separate until just before serving to prevent the greens from wilting.

    Tips and Tricks

    For an extra crunch, consider adding toasted almonds or walnuts. If you’re not a fan of dill, basil or parsley makes a great substitute. To make this dish even more substantial, quinoa or farro can be added. Always taste your dressing before adding it to the salad; you might need to adjust the seasoning. Lastly, for the best flavor, use fresh, high-quality trout.

    Recipe Variations

    • Swap trout for salmon or chicken for a different protein option.
    • Add avocado for creaminess and healthy fats.
    • Include fruits like oranges or apples for a sweet contrast.
    • Use kale or spinach instead of mixed greens for a nutrient boost.
    • Try a yogurt-based dressing for a tangier flavor profile.

    Frequently Asked Questions

    Can I use canned trout for this recipe?

    Absolutely! Canned trout is a convenient and affordable option. Just be sure to drain it well and check for any bones before adding it to your salad. The texture will be slightly different, but the flavor will still be delightful.

    How long can I store the dressed salad?

    It’s best to consume the salad within a day if dressed, as the greens will start to wilt. However, you can store the undressed salad and dressing separately in the refrigerator for up to 2 days.

    Is there a vegan alternative to trout?

    For a vegan version, try using chickpeas or tofu as your protein source. Both will absorb the dressing well and provide a satisfying texture similar to trout.

    Summary

    This trout salad is a light, flavorful dish that’s perfect for summer. Easy to make and customizable, it’s sure to become a staple in your recipe collection.

  • Creamy Homemade Ranch Salad Dressing Recipe: Your Salad’s New Best Friend

    Creamy Homemade Ranch Salad Dressing Recipe: Your Salad’s New Best Friend

    Back in the day, ranch dressing was just a sidekick to your veggies, but not anymore. This homemade version will steal the show with its creamy texture and tangy flavor. Perfect for salads, dips, or even as a marinade, this ranch dressing is about to become your kitchen staple.

    Why This Recipe Works

    • It uses fresh herbs for a vibrant flavor that bottled versions can’t match.
    • The combination of buttermilk and mayonnaise creates a perfectly creamy base.
    • Adjustable thickness means you can make it perfect for dressing or dipping.
    • Homemade means no preservatives or unpronounceable ingredients.
    • It’s incredibly versatile, doubling as a dressing, dip, or marinade.

    Ingredients

    • 1 cup mayonnaise
    • 1/2 cup sour cream
    • 1/2 cup buttermilk
    • 1 tablespoon lemon juice
    • 1 teaspoon garlic powder
    • 1 teaspoon onion powder
    • 1/2 teaspoon salt
    • 1/4 teaspoon black pepper
    • 2 tablespoons fresh chives, finely chopped
    • 2 tablespoons fresh dill, finely chopped
    • 1 tablespoon fresh parsley, finely chopped

    Equipment Needed

    • Mixing bowl
    • Whisk
    • Measuring cups and spoons
    • Airtight container for storage

    Instructions

    Ranch Salad Dressing Recipe

    Step 1: Combine the Base Ingredients

    In a large mixing bowl, whisk together the mayonnaise, sour cream, and buttermilk until smooth. This combination forms the creamy base of your dressing. Tip: For an extra smooth texture, you can use an electric mixer on low speed.

    Step 2: Add the Flavor Enhancers

    Stir in the lemon juice, garlic powder, onion powder, salt, and black pepper. These ingredients add the tangy and savory flavors that ranch is known for. Make sure to whisk thoroughly to distribute the spices evenly.

    Step 3: Incorporate the Fresh Herbs

    Fold in the chopped chives, dill, and parsley. Fresh herbs are key to achieving that signature ranch flavor, so don’t skip them! Tip: If you’re in a pinch, you can use dried herbs, but fresh is always best.

    Step 4: Adjust the Consistency

    If the dressing is too thick, add a little more buttermilk, one tablespoon at a time, until you reach your desired consistency. This step ensures your dressing is perfect for your intended use, whether it’s for salads or dipping.

    Step 5: Chill Before Serving

    Transfer the dressing to an airtight container and refrigerate for at least 30 minutes before serving. This allows the flavors to meld together beautifully. Tip: The dressing will thicken slightly as it chills, so keep that in mind when adjusting the consistency.

    Tips and Tricks

    For those looking to elevate their ranch dressing game, consider these advanced tips. First, toasting the garlic and onion powders in a dry skillet for a minute before adding them can deepen their flavors. Second, using full-fat ingredients will give you the creamiest texture, but low-fat alternatives can work if you’re watching calories. Lastly, for a smoother dressing, you can blend all the ingredients in a food processor until smooth. Remember, the dressing will keep in the fridge for up to a week, so make a big batch!

    Recipe Variations

    • Spicy Ranch: Add a teaspoon of hot sauce or a pinch of cayenne pepper for a kick.
    • Avocado Ranch: Blend in half an avocado for a creamy, green twist.
    • Bacon Ranch: Mix in crumbled bacon bits for a smoky flavor.
    • Vegan Ranch: Use vegan mayonnaise and sour cream, and substitute the buttermilk with almond milk mixed with a tablespoon of vinegar.

    Frequently Asked Questions

    Can I make this ranch dressing ahead of time? Absolutely! In fact, making it ahead allows the flavors to meld together more cohesively. Just store it in an airtight container in the fridge for up to a week.

    What can I use if I don’t have buttermilk? You can make a quick substitute by adding a tablespoon of lemon juice or vinegar to a cup of milk and letting it sit for 5 minutes before using.

    How can I make my ranch dressing thicker? If your dressing is too thin, you can thicken it by adding more mayonnaise or sour cream, a tablespoon at a time, until you reach the desired consistency.

    Summary

    This homemade ranch dressing is creamy, tangy, and packed with fresh herb flavors. It’s versatile, easy to make, and far superior to store-bought versions. Whether you’re dressing a salad, dipping veggies, or marinating chicken, this ranch dressing is sure to impress.

  • Tomato and Onion Salad Recipe: A Crisp, Refreshing Delight

    Tomato and Onion Salad Recipe: A Crisp, Refreshing Delight

    Ready to whip up a salad that’s as easy as it is delicious? This tomato and onion salad is your go-to for a quick, refreshing side that pairs perfectly with just about anything. Let’s dive in!

    Why This Recipe Works

    • It’s incredibly simple, requiring just a handful of ingredients you likely already have.
    • The combination of juicy tomatoes and sharp onions creates a perfect balance of flavors.
    • It’s versatile, serving as a great side dish or a light main course.
    • Prep time is minimal, making it ideal for last-minute gatherings.
    • The salad gets better as it sits, allowing flavors to meld beautifully.

    Ingredients

    • 4 large tomatoes, diced
    • 1 medium red onion, thinly sliced
    • 2 tbsp olive oil
    • 1 tbsp balsamic vinegar
    • Salt and pepper to taste
    • Fresh basil leaves, chopped (optional)

    Equipment Needed

    • Large mixing bowl
    • Sharp knife
    • Cutting board
    • Measuring spoons

    Instructions

    Tomato And Onion Salad Recipe

    Step 1: Prepare Your Vegetables

    Start by washing your tomatoes under cold water. Pat them dry, then dice them into bite-sized pieces. For the onion, peel off the outer layer and slice it as thinly as possible to ensure every bite is flavorful without being overpowering.

    Step 2: Combine Tomatoes and Onions

    In your large mixing bowl, gently toss the diced tomatoes and sliced onions together. Be careful not to crush the tomatoes; you want them to retain their shape and juiciness.

    Step 3: Dress the Salad

    Drizzle the olive oil and balsamic vinegar over the tomato and onion mixture. Season with salt and pepper to taste. If you’re using basil, now’s the time to sprinkle it in for an aromatic touch.

    Step 4: Let It Marinate

    Allow the salad to sit for at least 10 minutes before serving. This resting period lets the flavors combine and the onions mellow slightly, enhancing the overall taste.

    Step 5: Serve and Enjoy

    Give the salad one final gentle toss before serving. It’s perfect on its own or as a side to grilled meats or fish. Enjoy the crisp, refreshing flavors!

    Tips and Tricks

    For an extra burst of flavor, consider adding a pinch of sugar to balance the acidity of the tomatoes and vinegar. If you’re not a fan of raw onions, soaking the sliced onions in cold water for 10 minutes before adding them to the salad can help reduce their sharpness. Lastly, for a creamier version, a dollop of mayonnaise or Greek yogurt can be mixed in with the dressing.

    Recipe Variations

    • Add cucumbers for extra crunch and freshness.
    • Incorporate feta cheese for a salty, creamy element.
    • Swap balsamic vinegar for lemon juice for a tangier twist.
    • Include avocado slices for a richer, buttery texture.
    • Mix in some olives for a Mediterranean flair.

    Frequently Asked Questions

    Can I make this salad ahead of time?

    Absolutely! This salad actually benefits from sitting for a bit, as it allows the flavors to meld. Just hold off on adding any fresh herbs until you’re ready to serve to keep them vibrant.

    How long will this salad keep in the fridge?

    Stored in an airtight container, your tomato and onion salad will stay fresh for up to 2 days. After that, the tomatoes may start to lose their texture.

    Can I use yellow or green tomatoes instead?

    Yes, any tomato variety will work in this recipe. Each type brings its own unique flavor and color to the dish, so feel free to experiment.

    Summary

    This tomato and onion salad is a testament to the beauty of simplicity. With just a few ingredients and minimal prep time, you can create a dish that’s bursting with flavor and perfect for any occasion.

  • Dijon Mustard Potato Salad Recipe: A Tangy Twist on a Classic

    Dijon Mustard Potato Salad Recipe: A Tangy Twist on a Classic

    Our Dijon Mustard Potato Salad is the perfect blend of creamy, tangy, and crunchy. It’s a crowd-pleaser that’ll have everyone asking for seconds!

    Why This Recipe Works

    • The Dijon mustard adds a sophisticated tang that elevates the flavor profile beyond your average potato salad.
    • Using a mix of red and Yukon gold potatoes gives the salad a beautiful color and varied texture.
    • The addition of crisp celery and red onion provides a refreshing crunch that contrasts beautifully with the creamy dressing.
    • It’s versatile! Serve it as a side at your next BBQ or enjoy it as a hearty lunch.
    • This recipe is easy to make ahead, allowing the flavors to meld together for an even tastier result.

    Ingredients

    • 2 pounds mixed red and Yukon gold potatoes, cubed
    • 1/2 cup mayonnaise
    • 2 tablespoons Dijon mustard
    • 1 tablespoon apple cider vinegar
    • 1/2 teaspoon salt
    • 1/4 teaspoon black pepper
    • 1/2 cup diced celery
    • 1/4 cup diced red onion
    • 2 tablespoons chopped fresh parsley

    Equipment Needed

    • Large pot
    • Mixing bowl
    • Whisk
    • Knife and cutting board
    • Measuring cups and spoons

    Instructions

    Dijon Mustard Potato Salad Recipe

    Step 1: Cook the Potatoes

    Place the cubed potatoes in a large pot and cover with cold water. Bring to a boil over high heat, then reduce to a simmer and cook for about 10 minutes, or until the potatoes are tender but still firm. Drain and let cool slightly.

    Step 2: Prepare the Dressing

    In a mixing bowl, whisk together the mayonnaise, Dijon mustard, apple cider vinegar, salt, and pepper until smooth. This creamy, tangy dressing is the secret to our potato salad’s irresistible flavor.

    Step 3: Combine the Ingredients

    Add the slightly cooled potatoes, diced celery, red onion, and chopped parsley to the bowl with the dressing. Gently toss until all the ingredients are evenly coated. Be careful not to overmix to keep the potatoes from breaking apart.

    Step 4: Chill and Serve

    Cover the bowl and refrigerate the potato salad for at least 1 hour before serving. This chilling time allows the flavors to meld together beautifully. Serve chilled for the best taste experience.

    Tips and Tricks

    For an extra flavor boost, try adding a teaspoon of honey to the dressing to balance the tanginess of the mustard. If you’re short on time, you can serve the salad immediately, but the flavors won’t be as developed. For a lighter version, substitute Greek yogurt for half of the mayonnaise. Always taste and adjust the seasoning before serving, as potatoes can absorb salt differently.

    Recipe Variations

    • Add hard-boiled eggs for a protein-packed twist.
    • Mix in some crispy bacon bits for a smoky flavor.
    • Swap the parsley for dill or chives for a different herbal note.
    • Include a handful of capers or chopped pickles for an extra tangy bite.
    • For a vegan version, use vegan mayonnaise and skip the eggs.

    Frequently Asked Questions

    Can I use another type of mustard?

    Absolutely! While Dijon mustard gives this salad its distinctive tang, you can substitute it with yellow mustard for a milder flavor or whole grain mustard for added texture. Just keep in mind that the flavor profile will change slightly.

    How long can I store this potato salad?

    This potato salad can be stored in an airtight container in the refrigerator for up to 3 days. After that, the texture of the potatoes may start to change, and the salad won’t be as fresh.

    Can I make this recipe ahead of time?

    Yes, and we highly recommend it! Making the salad a few hours or even a day in advance allows the flavors to meld together, resulting in a more cohesive and flavorful dish.

    Summary

    Our Dijon Mustard Potato Salad is a tangy, creamy, and crunchy delight that’s perfect for any occasion. With its simple ingredients and easy preparation, it’s sure to become a staple in your recipe collection.

  • Reser’s Macaroni Salad Recipe: A Creamy Dream Come True

    Reser’s Macaroni Salad Recipe: A Creamy Dream Come True

    Forget the store-bought versions, this Reser’s macaroni salad recipe is about to become your new best friend. Perfect for picnics, potlucks, or just because, this dish is creamy, crunchy, and utterly irresistible.

    Why This Recipe Works

    • The combination of creamy mayonnaise and tangy vinegar creates a dressing that’s rich yet light.
    • Crunchy vegetables add texture and freshness, making every bite interesting.
    • It’s incredibly versatile; serve it as a side or bulk it up for a main dish.
    • Perfect make-ahead dish, as the flavors meld and improve overnight.
    • Simple ingredients come together to create a dish that’s greater than the sum of its parts.

    Ingredients

    • 1 lb elbow macaroni, cooked and cooled
    • 1 cup mayonnaise
    • 2 tbsp white vinegar
    • 1 tbsp sugar
    • 1 tsp salt
    • 1/2 tsp black pepper
    • 1 cup diced celery
    • 1/2 cup diced red onion
    • 1/2 cup diced red bell pepper
    • 1/4 cup chopped parsley

    Equipment Needed

    • Large pot for boiling pasta
    • Colander
    • Large mixing bowl
    • Measuring cups and spoons
    • Knife and cutting board

    Instructions

    Reser S Macaroni Salad Recipe

    Step 1: Cook the Macaroni

    Bring a large pot of salted water to a boil. Add the elbow macaroni and cook according to package instructions until al dente, about 8 minutes. Drain in a colander and rinse under cold water to stop the cooking process. Let it cool completely. Tip: For extra flavor, cook the macaroni in chicken broth instead of water.

    Step 2: Prepare the Dressing

    In a large mixing bowl, whisk together the mayonnaise, white vinegar, sugar, salt, and black pepper until smooth. This dressing is the secret to the salad’s addictive quality, so make sure it’s well combined.

    Step 3: Combine Ingredients

    Add the cooled macaroni, diced celery, red onion, red bell pepper, and chopped parsley to the bowl with the dressing. Gently toss until everything is evenly coated. Tip: Letting the salad sit for at least an hour before serving allows the flavors to meld beautifully.

    Step 4: Chill and Serve

    Cover the bowl with plastic wrap and refrigerate for at least 1 hour before serving. This chilling time is crucial for the flavors to develop. Serve cold and enjoy the creamy, crunchy goodness.

    Tips and Tricks

    For an even creamier salad, consider adding a couple of tablespoons of sour cream or Greek yogurt to the dressing. If you’re not a fan of raw onion, you can soak the diced onion in cold water for 10 minutes to mellow its bite. For a healthier version, swap half of the mayonnaise with mashed avocado. Always taste and adjust the seasoning before serving; sometimes a little extra salt or vinegar can make all the difference.

    Recipe Variations

    • Add diced ham or cooked chicken for a protein-packed main dish.
    • Stir in some shredded cheddar cheese for a cheesy twist.
    • For a spicy kick, add diced jalapeños or a dash of hot sauce.
    • Swap the macaroni for whole wheat or gluten-free pasta to suit dietary needs.
    • Include other veggies like cucumbers or carrots for extra crunch and color.

    Frequently Asked Questions

    Can I make this salad ahead of time?

    Absolutely! In fact, this salad tastes better the next day as the flavors have more time to meld. Just be sure to keep it refrigerated in an airtight container.

    How long does it last in the fridge?

    Stored properly, this macaroni salad will stay fresh for up to 3 days. After that, the texture of the vegetables and pasta may start to change.

    Can I freeze macaroni salad?

    Freezing is not recommended as the mayonnaise-based dressing will separate and the vegetables will become mushy upon thawing.

    Summary

    This Reser’s macaroni salad recipe is a creamy, crunchy delight that’s perfect for any occasion. With simple ingredients and easy steps, it’s a foolproof dish that’s sure to impress. Whether you stick to the classic recipe or try one of the variations, it’s bound to be a hit.

  • Chickpea Salad Recipe with Feta Cheese: A Crunchy, Creamy Delight

    Chickpea Salad Recipe with Feta Cheese: A Crunchy, Creamy Delight

    Some salads are just sad bowls of greens, but not this one. Packed with protein-rich chickpeas and tangy feta cheese, this salad is a meal in itself. Perfect for a quick lunch or a side dish that steals the show.

    Why This Recipe Works

    • The combination of creamy feta and crunchy chickpeas creates a texture that’s anything but boring.
    • It’s a protein powerhouse, thanks to the chickpeas, making it filling and satisfying.
    • The lemon dressing adds a bright, fresh flavor that ties everything together beautifully.
    • It’s incredibly versatile; eat it as is, or toss it into wraps or over greens.
    • Prep is a breeze, making it perfect for meal prep or last-minute gatherings.

    Ingredients

    • 2 cups cooked chickpeas, drained and rinsed
    • 1 cup crumbled feta cheese
    • 1/2 cup diced red onion
    • 1/2 cup chopped parsley
    • 1/4 cup olive oil
    • 2 tbsp lemon juice
    • 1 tsp salt
    • 1/2 tsp black pepper

    Equipment Needed

    • Large mixing bowl
    • Measuring cups and spoons
    • Knife and cutting board
    • Whisk

    Instructions

    Chickpea Salad Recipe With Feta Cheese

    Step 1: Prep Your Ingredients

    Start by draining and rinsing your chickpeas to remove any excess sodium or canning liquid. Dice the red onion into small pieces to ensure every bite has a bit of sharpness. Chop the parsley finely for a fresh, herby note throughout the salad.

    Step 2: Make the Dressing

    In a small bowl, whisk together the olive oil, lemon juice, salt, and black pepper until well combined. The dressing should be emulsified, meaning the oil and lemon juice are fully integrated, creating a smooth, cohesive flavor.

    Step 3: Combine the Salad

    In a large mixing bowl, toss the chickpeas, feta cheese, red onion, and parsley together. Pour the dressing over the top and gently mix until everything is evenly coated. The key here is to be gentle to keep the chickpeas and feta intact.

    Step 4: Let It Marinate

    Cover the bowl with plastic wrap and let the salad sit in the fridge for at least 30 minutes. This allows the flavors to meld together beautifully, making the salad even more delicious.

    Step 5: Serve and Enjoy

    After marinating, give the salad a quick stir to redistribute the dressing. Serve chilled or at room temperature for the best flavor experience. Enjoy as a standalone dish or as part of a larger meal.

    Tips and Tricks

    For an extra crunch, try adding some diced cucumber or bell peppers to the salad. If you’re not a fan of feta, goat cheese makes a great substitute with its creamy texture and tangy flavor. To make this salad ahead of time, prepare all the ingredients and store them separately, combining them with the dressing just before serving to maintain the best texture.

    Recipe Variations

    • Add some diced avocado for a creamy, rich twist.
    • Throw in some quinoa for an extra protein boost.
    • Swap the lemon juice for balsamic vinegar for a deeper, sweeter dressing.
    • Include some chopped mint for a refreshing, herby note.
    • Add a pinch of chili flakes for a spicy kick.

    Frequently Asked Questions

    Can I use canned chickpeas?

    Absolutely! Canned chickpeas are a great time-saver. Just be sure to drain and rinse them well to remove any excess sodium or canning liquid that could affect the flavor of your salad.

    How long does this salad last in the fridge?

    This salad will keep well in the fridge for up to 3 days when stored in an airtight container. The flavors will continue to meld, making it even more delicious over time.

    Can I make this salad vegan?

    Yes! Simply omit the feta cheese or substitute it with a vegan cheese alternative. The chickpeas provide plenty of protein on their own, making this salad satisfying even without the cheese.

    Summary

    This chickpea salad with feta cheese is a perfect blend of textures and flavors, easy to make, and versatile enough to suit any meal. Whether you’re looking for a quick lunch or a standout side dish, this recipe has you covered.

  • Zesty Orange Salad Dressing Recipe: A Citrusy Delight

    Zesty Orange Salad Dressing Recipe: A Citrusy Delight

    Now, let’s dive into a recipe that will brighten up any salad with its vibrant flavors. This orange salad dressing is not just a dressing; it’s a celebration of citrus that will make your taste buds dance.

    Why This Recipe Works

    • The combination of fresh orange juice and zest brings a bright, citrusy flavor that’s unmatched by store-bought versions.
    • Using honey as a natural sweetener balances the acidity of the orange, creating a perfect harmony of flavors.
    • Olive oil adds a smooth, rich texture that coats every leaf of your salad beautifully.
    • This dressing is versatile, pairing well with everything from simple greens to more complex salad mixes.
    • It’s quick and easy to make, requiring just a few minutes and no special equipment.

    Ingredients

    • 1/2 cup fresh orange juice (about 2 oranges)
    • 1 tablespoon orange zest
    • 2 tablespoons honey
    • 1/4 cup olive oil
    • 1 tablespoon white wine vinegar
    • 1/2 teaspoon salt
    • 1/4 teaspoon black pepper

    Equipment Needed

    • Measuring cups and spoons
    • Juicer or reamer
    • Zester
    • Whisk
    • Mixing bowl
    • Airtight container for storage

    Instructions

    Orange Salad Dressing Recipe

    Step 1: Juice and Zest the Oranges

    Start by juicing the oranges until you have 1/2 cup of fresh orange juice. Then, zest one of the oranges to get about a tablespoon of zest. The zest adds an extra pop of citrus flavor that really makes the dressing shine.

    Step 2: Combine the Wet Ingredients

    In a mixing bowl, whisk together the orange juice, orange zest, honey, and white wine vinegar. The honey not only sweetens the dressing but also helps to emulsify it, giving it a lovely consistency.

    Step 3: Slowly Add the Olive Oil

    While continuously whisking, slowly drizzle in the olive oil. This gradual addition helps to create a smooth, emulsified dressing that won’t separate easily. Keep whisking until the dressing is well combined.

    Step 4: Season to Taste

    Add the salt and black pepper, then give the dressing a taste. Adjust the seasoning if necessary. Remember, the flavors will meld and intensify as the dressing sits, so it’s okay if it’s a bit mild at this stage.

    Step 5: Store or Serve Immediately

    You can use the dressing right away, or store it in an airtight container in the refrigerator for up to a week. If the dressing separates, just give it a good shake or whisk before using.

    Tips and Tricks

    For an even more vibrant flavor, try using blood oranges when they’re in season. Their deep red juice and slightly berry-like flavor add an unexpected twist to the dressing. If you’re not a fan of honey, maple syrup makes a great substitute and adds a subtle depth of flavor. For a creamier dressing, blend in a tablespoon of Greek yogurt or mayonnaise. This not only thickens the dressing but also adds a tangy note that complements the citrus beautifully. Always taste your dressing before serving, as the sweetness and acidity of oranges can vary depending on their variety and ripeness.

    Recipe Variations

    • Add a teaspoon of Dijon mustard for a tangy kick and extra emulsification.
    • Incorporate fresh herbs like basil or mint for a refreshing twist.
    • For a spicy version, add a pinch of red pepper flakes or a dash of hot sauce.
    • Swap out the white wine vinegar for balsamic vinegar for a deeper, more complex flavor.
    • Use lemon or lime juice in place of orange juice for a different citrus profile.

    Frequently Asked Questions

    Can I use bottled orange juice instead of fresh?

    While you can use bottled orange juice in a pinch, fresh orange juice is highly recommended for the best flavor. Bottled juices often contain preservatives and lack the fresh, vibrant taste of freshly squeezed juice. Plus, you’ll miss out on the zest, which adds a crucial layer of citrus flavor.

    How long can I store this dressing?

    This dressing can be stored in an airtight container in the refrigerator for up to a week. Over time, the flavors will meld and become even more delicious. Just be sure to give it a good shake or whisk before using, as the oil may separate.

    Can I make this dressing vegan?

    Absolutely! Simply replace the honey with maple syrup or agave nectar to keep the dressing vegan. Both alternatives provide the necessary sweetness and help to emulsify the dressing, just like honey does.

    Summary

    This zesty orange salad dressing is a quick and easy way to add a burst of citrus flavor to any salad. With just a few simple ingredients and steps, you can create a dressing that’s far superior to anything you’d find in a store. Whether you stick to the classic recipe or experiment with variations, this dressing is sure to become a staple in your kitchen.

  • Creamy Dreamy Dressing for Broccoli Salad Recipe

    Creamy Dreamy Dressing for Broccoli Salad Recipe

    Summer salads are a staple, but let’s be honest, the dressing makes or breaks them. This creamy, tangy dressing is the hero your broccoli salad deserves. Simple, quick, and packed with flavor, it’s about to become your go-to.

    Why This Recipe Works

    • Balance is key: The perfect mix of creamy mayo and tangy vinegar creates a dressing that’s rich yet refreshing.
    • Sweet meets savory: A hint of sugar balances the acidity, while mustard adds depth.
    • Versatility: This dressing pairs beautifully with not just broccoli but any hearty salad.
    • Quick fix: Ready in under 5 minutes, it’s the ultimate last-minute salad saver.

    Ingredients

    • 1 cup mayonnaise
    • 2 tablespoons apple cider vinegar
    • 1 tablespoon sugar
    • 1 teaspoon Dijon mustard
    • Salt and pepper to taste

    Equipment Needed

    • Mixing bowl
    • Whisk
    • Measuring cups and spoons

    Instructions

    Dressing For Broccoli Salad Recipe

    Step 1: Combine the Base Ingredients

    In your mixing bowl, whisk together the mayonnaise and apple cider vinegar until smooth. This combination forms the creamy, tangy base of your dressing. Tip: For an extra smooth texture, let the mixture sit for a minute before whisking again.

    Step 2: Sweeten the Deal

    Add the sugar to the bowl, whisking until fully dissolved. The sugar not only sweetens the dressing but also helps to balance the acidity of the vinegar.

    Step 3: Add Depth with Mustard

    Stir in the Dijon mustard. This ingredient adds a subtle complexity and depth to the dressing, elevating it from good to great.

    Step 4: Season to Perfection

    Season with salt and pepper to taste. Remember, the dressing should be flavorful but not overpowering, as it’s meant to complement the salad.

    Step 5: Chill and Serve

    For the best flavor, let the dressing chill in the refrigerator for at least 30 minutes before serving. This allows the flavors to meld together beautifully.

    Tips and Tricks

    For a lighter version, substitute half of the mayonnaise with Greek yogurt. This not only reduces the calories but adds a pleasant tanginess. If you’re out of apple cider vinegar, white vinegar or lemon juice can be used as substitutes, though the flavor profile will slightly change. For a smoother dressing, consider using a blender instead of a whisk. Lastly, always taste your dressing before serving and adjust the seasoning as needed.

    Recipe Variations

    • Herb-infused: Add fresh dill or parsley for a herby twist.
    • Spicy kick: Incorporate a pinch of cayenne pepper or a dash of hot sauce for heat.
    • Garlic lovers: Minced garlic or garlic powder can add a robust flavor.
    • Cheesy delight: A sprinkle of Parmesan cheese can add a savory depth.

    Frequently Asked Questions

    Can I make this dressing ahead of time? Absolutely! This dressing can be made up to 3 days in advance and stored in the refrigerator. Just give it a good stir before serving.

    Is there a dairy-free alternative? Yes, you can use vegan mayonnaise to make this recipe dairy-free without sacrificing the creamy texture.

    How can I thin out the dressing if it’s too thick? A little water or additional vinegar can be whisked in until you reach your desired consistency.

    Summary

    This creamy, tangy dressing is the perfect complement to any broccoli salad, blending simplicity with irresistible flavor. Quick to make and versatile, it’s sure to become a staple in your recipe collection.

  • Cucumber Salad Recipe with Sour Cream: A Refreshing Summer Delight

    Cucumber Salad Recipe with Sour Cream: A Refreshing Summer Delight

    Tantalize your taste buds with this creamy, crunchy cucumber salad that’s perfect for those hot summer days. This dish is not only easy to make but also brings a refreshing twist to your meal lineup. Let’s dive into why this recipe is a must-try!

    Why This Recipe Works

    • The combination of crisp cucumbers and creamy sour cream creates a perfect balance of textures.
    • It’s incredibly versatile, serving as a side dish or a light main course.
    • The recipe requires minimal ingredients, making it budget-friendly.
    • Preparation is quick and easy, ideal for last-minute gatherings.
    • It’s a healthier option that doesn’t skimp on flavor.

    Ingredients

    • 2 large cucumbers, thinly sliced
    • 1 cup sour cream
    • 2 tablespoons white vinegar
    • 1 tablespoon sugar
    • 1/2 teaspoon salt
    • 1/4 teaspoon black pepper
    • 1 small red onion, thinly sliced
    • Fresh dill for garnish

    Equipment Needed

    • Mixing bowl
    • Measuring cups and spoons
    • Knife and cutting board
    • Spatula or spoon for mixing

    Instructions

    Cucumber Salad Recipe With Sour Cream

    Prepare the Cucumbers

    Start by washing the cucumbers thoroughly under cold water. Slice them thinly, about 1/8 inch thick, for the perfect crunch. If you prefer, you can peel the cucumbers, but leaving the skin on adds color and nutrients.

    Mix the Dressing

    In a large mixing bowl, combine the sour cream, white vinegar, sugar, salt, and black pepper. Whisk until the mixture is smooth and the sugar has dissolved. This creamy dressing is the heart of the salad, so make sure it’s well blended.

    Combine Ingredients

    Add the sliced cucumbers and red onion to the bowl with the dressing. Gently toss everything together until the cucumbers and onion are evenly coated. Be careful not to overmix, as you want to keep the cucumbers crisp.

    Chill the Salad

    Cover the bowl with plastic wrap and refrigerate the salad for at least 1 hour before serving. This chilling time allows the flavors to meld together beautifully.

    Garnish and Serve

    Just before serving, sprinkle the salad with fresh dill for a pop of color and flavor. Serve chilled for the most refreshing experience.

    Tips and Tricks

    For an extra crunch, consider adding some thinly sliced radishes or celery to the salad. If you’re watching your calorie intake, Greek yogurt can be a great substitute for sour cream. To make the salad ahead of time, prepare the ingredients but wait to add the dressing until just before serving to keep the cucumbers crisp. For a bit of heat, a dash of cayenne pepper or some diced jalapeños can add a nice kick.

    Recipe Variations

    • Add diced avocado for a creamy texture and healthy fats.
    • Incorporate cherry tomatoes for a burst of color and sweetness.
    • Swap the sour cream for mayonnaise for a richer flavor.
    • Include some crumbled feta cheese for a tangy twist.
    • Use apple cider vinegar instead of white vinegar for a different acidity level.

    Frequently Asked Questions

    Can I make this salad ahead of time?

    Yes, you can prepare the salad a few hours in advance. However, for the best texture, add the dressing just before serving to keep the cucumbers crisp.

    How long does the salad last in the fridge?

    The salad is best enjoyed within 1-2 days. After that, the cucumbers may start to lose their crunch and the dressing may become watery.

    Can I use low-fat sour cream?

    Absolutely! Low-fat sour cream works just as well in this recipe and is a great way to reduce calories without sacrificing flavor.

    Summary

    This cucumber salad with sour cream is a simple, refreshing dish that’s perfect for summer. With its creamy dressing and crisp cucumbers, it’s sure to be a hit at any gathering. Plus, it’s easy to customize with your favorite add-ins.