Author: onlinefoodrecipes

  • Capellini Asiago Pasta Salad Recipe: A Lighter Twist on a Classic

    Capellini Asiago Pasta Salad Recipe: A Lighter Twist on a Classic

    Absolutely everyone loves a good pasta salad, especially when it’s packed with the rich flavors of Asiago cheese and the delicate texture of capellini. This recipe is a game-changer for your summer picnics or a quick weeknight dinner.

    Why This Recipe Works

    • The capellini pasta cooks in just minutes, making this dish a quick fix for any meal.
    • Asiago cheese adds a nutty and slightly sweet flavor that elevates the salad beyond the ordinary.
    • The combination of fresh vegetables and a light dressing keeps the salad refreshing and not too heavy.

    Ingredients

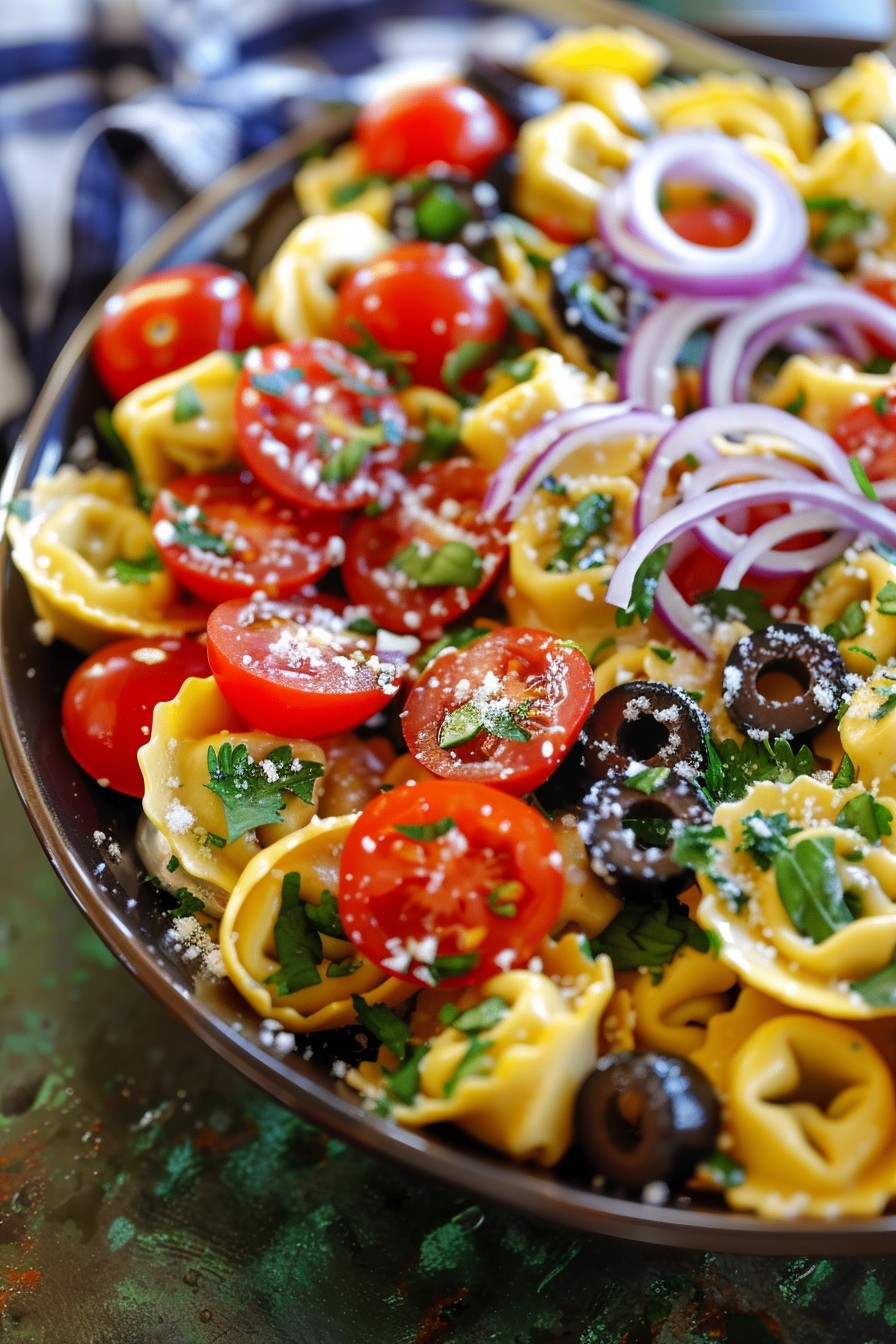
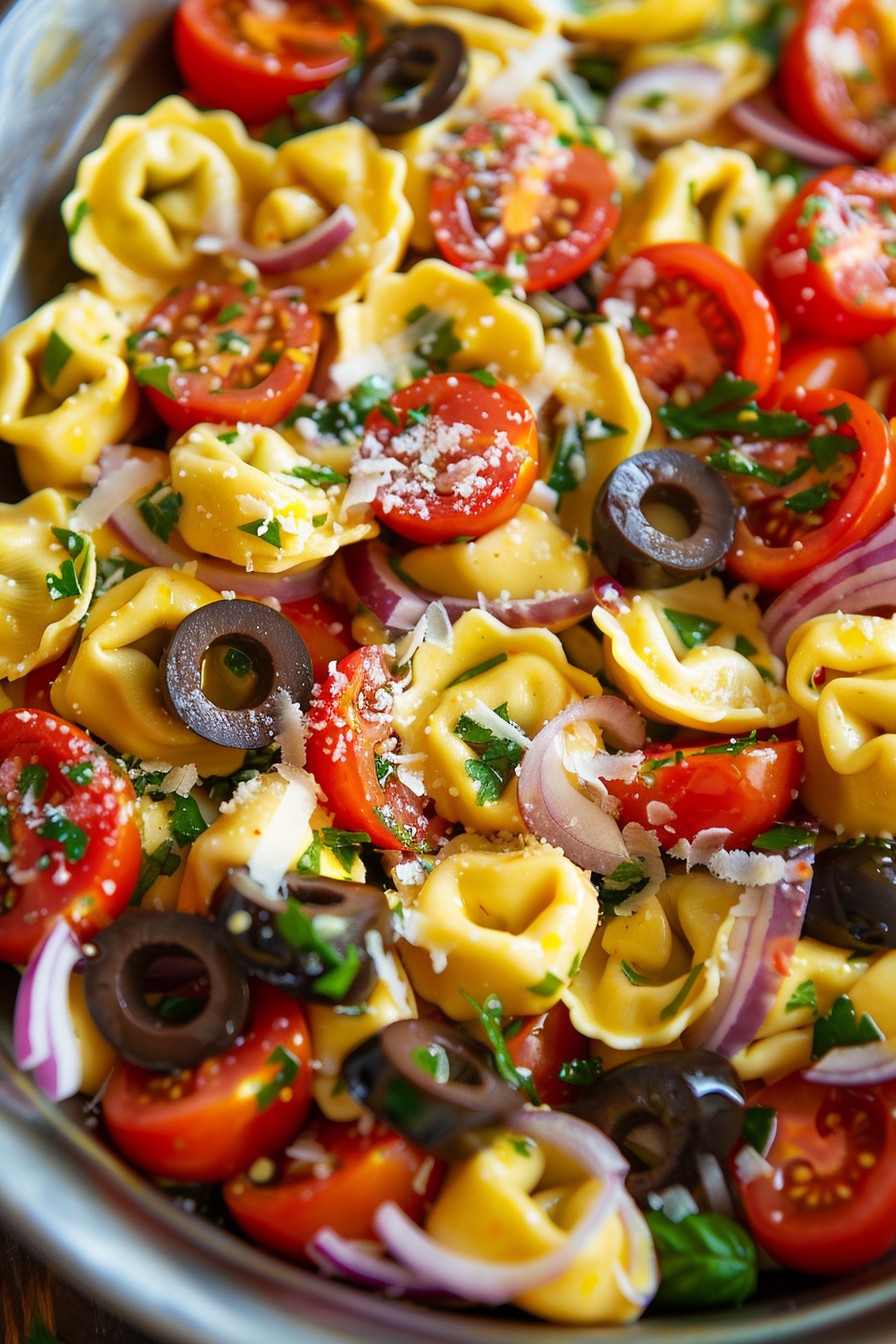
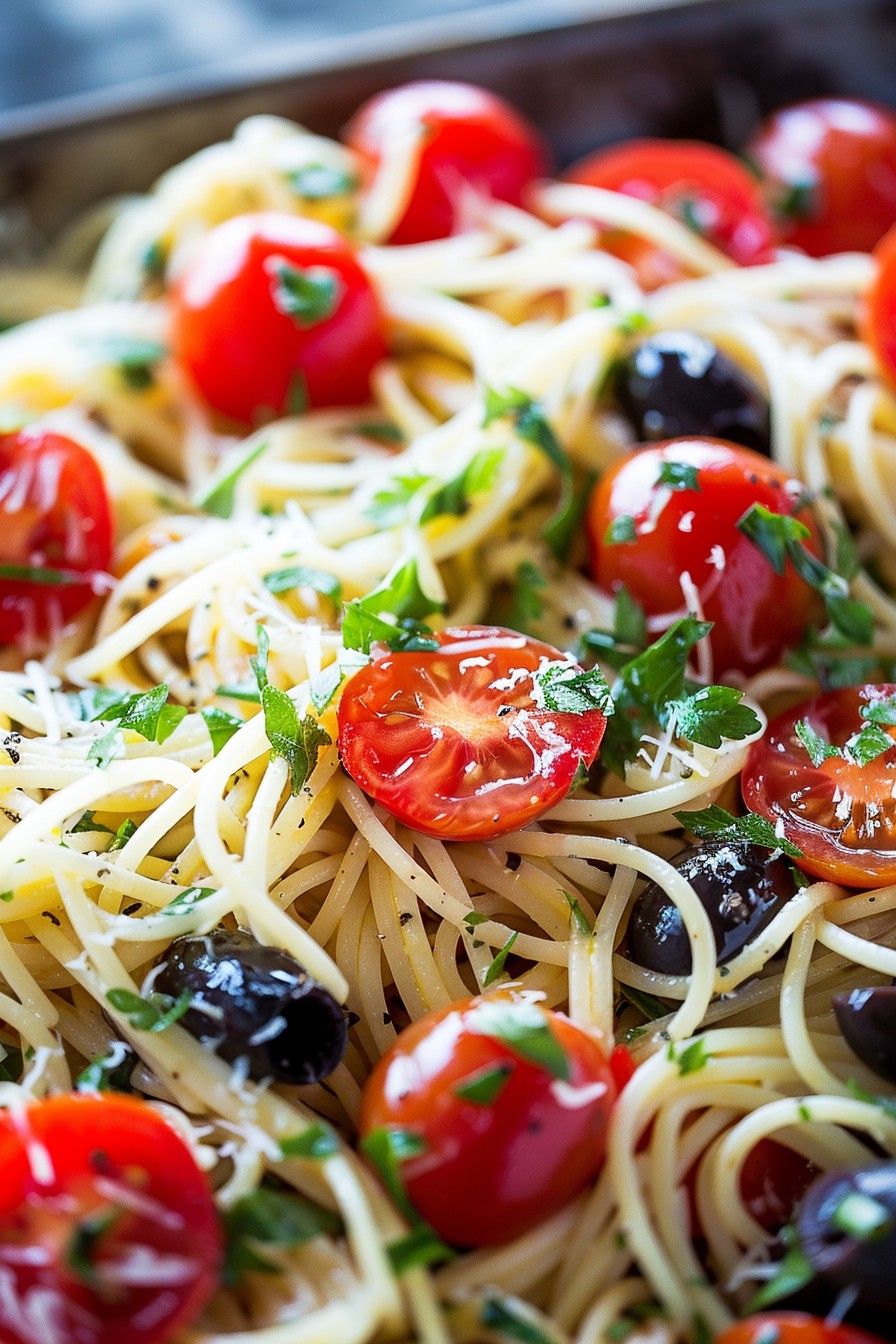
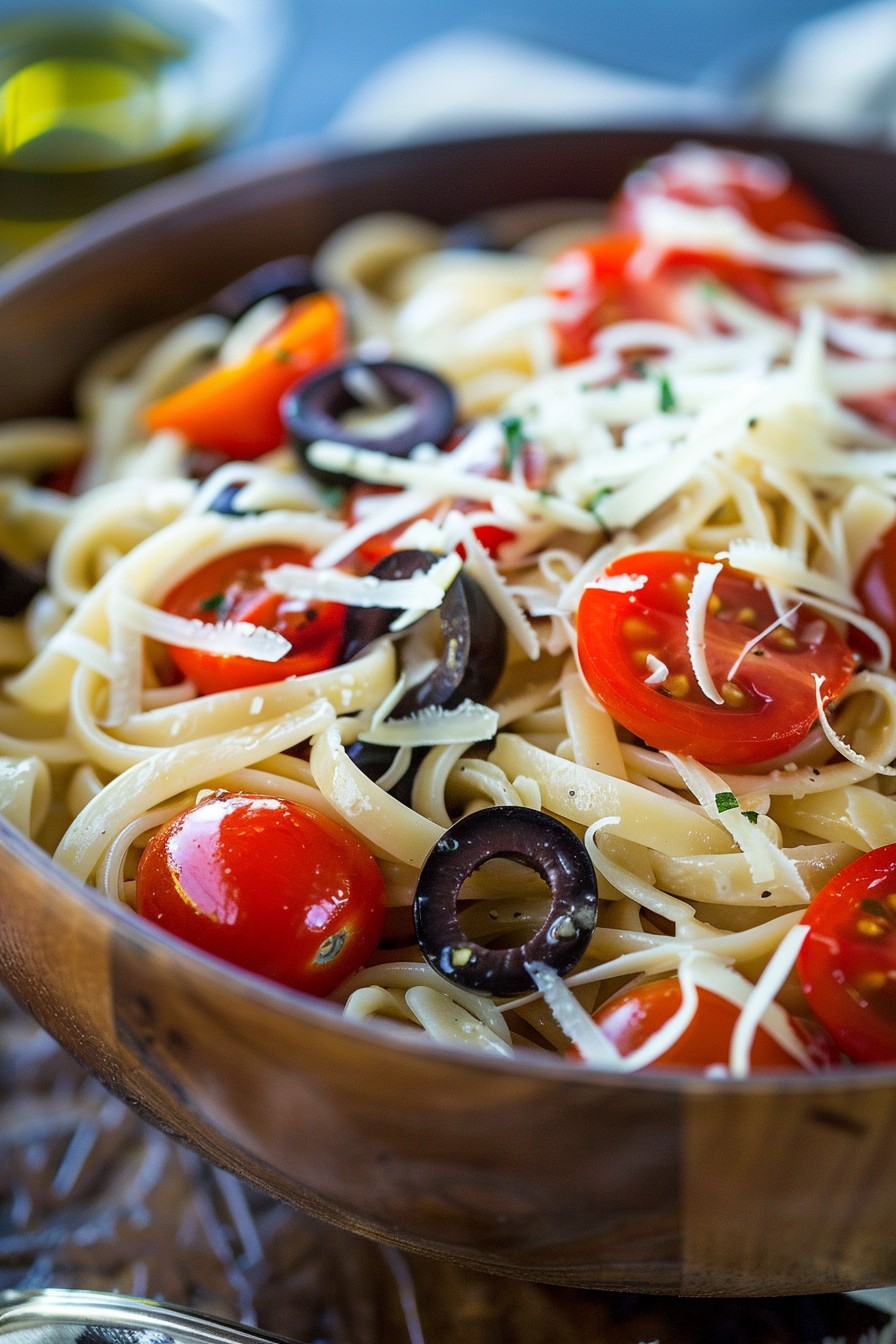
    • 8 oz capellini pasta
    • 1 cup grated Asiago cheese
    • 1 cup cherry tomatoes, halved
    • 1/2 cup black olives, sliced
    • 1/4 cup olive oil
    • 2 tbsp lemon juice
    • Salt and pepper to taste

    Equipment Needed

    • Large pot
    • Colander
    • Mixing bowl
    • Whisk

    Instructions

    Capellini Asiago Pasta Salad Recipe

    Boil the Pasta to Perfection

    Fill a large pot with water and bring it to a rolling boil. Add a generous pinch of salt before adding the capellini pasta. Cook for exactly 3 minutes, as capellini is very thin and cooks quickly. Drain immediately and rinse under cold water to stop the cooking process.

    Prepare the Dressing

    In a mixing bowl, whisk together the olive oil and lemon juice until well combined. Season with salt and pepper to taste. This simple dressing will bring all the flavors together without overpowering the delicate taste of the Asiago cheese.

    Combine All Ingredients

    In a large bowl, toss the cooled pasta with the dressing, cherry tomatoes, black olives, and grated Asiago cheese. Make sure everything is evenly coated with the dressing for the best flavor in every bite.

    Tips and Tricks

    For an even more flavorful salad, let it sit in the refrigerator for an hour before serving. This allows the flavors to meld together beautifully. If you’re not a fan of black olives, try substituting them with green olives or even capers for a different taste profile. Always grate the Asiago cheese fresh for the best texture and flavor.

    Recipe Variations

    • Add grilled chicken or shrimp for a protein-packed version.
    • Swap out the Asiago for Parmesan or Pecorino Romano for a different cheese flavor.
    • Incorporate fresh basil or arugula for an herby twist.

    Frequently Asked Questions

    Can I make this pasta salad ahead of time?

    Yes, this pasta salad can be made up to a day in advance. Just keep it covered in the refrigerator and give it a good stir before serving to redistribute the dressing.

    Is there a substitute for capellini pasta?

    If you can’t find capellini, angel hair pasta is a great substitute as it has a similar thickness and cooking time.

    Can I use bottled lemon juice instead of fresh?

    While fresh lemon juice is preferred for its bright flavor, bottled lemon juice can be used in a pinch. Just be sure to adjust the quantity to taste.

    Summary

    This Capellini Asiago Pasta Salad is a quick, flavorful, and versatile dish perfect for any occasion. With its simple ingredients and easy preparation, it’s sure to become a favorite.

  • Southern Crab Salad Recipe: A Delightful Summer Dish

    Southern Crab Salad Recipe: A Delightful Summer Dish

    Brighten up your summer meals with this Southern Crab Salad recipe. Bursting with fresh flavors and a creamy texture, it’s perfect for picnics, potlucks, or a light dinner. Let’s dive into making this delicious dish that’s sure to impress.

    Why This Recipe Works

    • The combination of sweet crab meat and crisp vegetables offers a refreshing taste and satisfying crunch.
    • A creamy, tangy dressing binds all the ingredients together without overpowering the delicate flavor of the crab.
    • It’s incredibly versatile, serving as a great sandwich filler, salad topper, or standalone dish.
    • Quick and easy to prepare, making it perfect for last-minute gatherings.
    • Light yet filling, it’s a hit among both seafood lovers and those looking for a healthier meal option.

    Ingredients

    • 1 pound lump crab meat, picked over for shells
    • 1/2 cup mayonnaise
    • 1/4 cup sour cream
    • 2 tablespoons lemon juice
    • 1 teaspoon Old Bay seasoning
    • 1/2 cup finely diced celery
    • 1/4 cup finely diced red onion
    • 2 tablespoons chopped fresh parsley
    • Salt and pepper to taste

    Equipment Needed

    • Large mixing bowl
    • Whisk
    • Rubber spatula
    • Measuring cups and spoons
    • Knife and cutting board

    Instructions

    Southern Crab Salad Recipe

    Prepare the Dressing

    In a large mixing bowl, whisk together the mayonnaise, sour cream, lemon juice, and Old Bay seasoning until smooth. This creamy dressing is the secret to bringing all the flavors together. Tip: For an extra zing, add a pinch of cayenne pepper to the dressing.

    Combine the Ingredients

    Gently fold in the crab meat, celery, red onion, and parsley into the dressing. Be careful not to break up the crab meat too much to maintain those lovely lumps. The key here is to mix until just combined to keep the salad light and fluffy.

    Season to Taste

    Add salt and pepper to taste. Remember, the Old Bay seasoning already adds a bit of saltiness, so it’s best to taste before adding more salt. This step ensures your salad is perfectly seasoned to your liking.

    Chill Before Serving

    Cover the bowl with plastic wrap and refrigerate for at least 30 minutes before serving. This chilling time allows the flavors to meld together beautifully. Tip: For the best flavor, let it chill for up to 2 hours.

    Serve and Enjoy

    Serve the crab salad on a bed of lettuce, as a sandwich filling, or with crackers for a light appetizer. It’s versatile, delicious, and sure to be a crowd-pleaser. Tip: Garnish with additional parsley or a lemon wedge for a fresh, appealing look.

    Tips and Tricks

    For the freshest taste, use lump crab meat if possible, but claw meat is a more economical option that works well too. If you’re serving this salad at a party, consider making it a day ahead; the flavors deepen overnight. To add a bit of crunch, toss in some diced bell peppers or cucumbers. For a lighter version, substitute Greek yogurt for half of the mayonnaise. Always check for shells in the crab meat, even if it’s labeled as ‘picked over’.

    Recipe Variations

    • Add diced avocado for a creamy texture and healthy fats.
    • Mix in some cooked pasta or rice to turn it into a hearty crab pasta salad.
    • For a spicy kick, add a dash of hot sauce or diced jalapeños to the dressing.
    • Substitute the crab with cooked shrimp or lobster for a different seafood twist.
    • Incorporate diced apples or grapes for a sweet contrast to the savory flavors.

    Frequently Asked Questions

    Can I use imitation crab meat?

    Yes, imitation crab meat can be used as a budget-friendly alternative, though the flavor and texture will differ slightly from real crab. It’s best to chop it into smaller pieces to mimic the texture of lump crab meat.

    How long does the crab salad last in the fridge?

    Properly stored in an airtight container, the crab salad will last for up to 3 days in the refrigerator. Be sure to give it a good stir before serving again as the dressing may separate slightly.

    Can I freeze crab salad?

    Freezing is not recommended as the mayonnaise-based dressing and the texture of the crab meat will not hold up well after thawing, resulting in a watery and less appealing dish.

    Summary

    This Southern Crab Salad is a must-try for anyone looking for a light, flavorful, and easy-to-make dish. Perfect for any occasion, it’s sure to become a favorite in your recipe collection.

  • Dairy-Free Caesar Salad Dressing Recipe: Creamy Without the Cream!

    Dairy-Free Caesar Salad Dressing Recipe: Creamy Without the Cream!

    Never let dairy restrictions keep you from enjoying a classic Caesar salad. This dairy-free Caesar dressing is so creamy and flavorful, you won’t miss the traditional ingredients. Perfect for those with dietary restrictions or anyone looking to try a healthier version of the classic.

    Why This Recipe Works

    • Uses creamy avocado as a base for a rich texture without dairy.
    • Incorporates nutritional yeast for that cheesy flavor everyone loves in Caesar dressing.
    • Balances tanginess and umami with lemon juice and capers, creating a complex flavor profile.
    • Quick and easy to make, requiring no cooking and just a blender.
    • Versatile enough to dress any salad, not just Caesar.

    Ingredients

    • 1 ripe avocado, peeled and pitted
    • 2 tbsp nutritional yeast
    • 1/4 cup olive oil
    • 2 tbsp lemon juice
    • 1 tbsp capers
    • 1 clove garlic, minced
    • 1/2 tsp Dijon mustard
    • Salt and pepper to taste
    • 1/4 cup water (adjust for desired consistency)

    Equipment Needed

    • Blender or food processor
    • Measuring cups and spoons
    • Rubber spatula

    Instructions

    Dairy Free Caesar Salad Dressing Recipe

    Step 1: Prepare Your Ingredients

    Gather all your ingredients and measure them out. This makes the blending process smoother and ensures you don’t forget anything. Tip: For the best flavor, use fresh lemon juice instead of bottled.

    Step 2: Blend the Base

    Add the avocado, nutritional yeast, olive oil, lemon juice, capers, garlic, and Dijon mustard to your blender. Blend on high until the mixture is smooth. This should take about 1 minute. Tip: If the mixture is too thick, add water one tablespoon at a time until you reach your desired consistency.

    Step 3: Season to Taste

    Once your dressing is smooth, taste it and add salt and pepper as needed. Blend for another 10 seconds to incorporate the seasoning. Tip: Remember, you can always add more seasoning, but you can’t take it away, so start with a little.

    Step 4: Adjust Consistency

    If your dressing is still too thick, add more water, one tablespoon at a time, blending after each addition until you reach the perfect consistency for drizzling over your salad.

    Step 5: Serve or Store

    Your dairy-free Caesar dressing is ready to use immediately. If you’re not using it right away, store it in an airtight container in the refrigerator for up to 3 days. Tip: Give it a good stir or shake before using, as it may separate slightly when stored.

    Tips and Tricks

    For an even creamier texture, you can substitute the water with unsweetened almond milk. If you’re a fan of anchovies in traditional Caesar dressing, try adding a couple of anchovy fillets or a teaspoon of anchovy paste to this recipe for that classic flavor. To make this dressing nut-free, ensure that any milk substitutes you use are nut-free as well. For a thicker dressing, perfect for dipping, reduce the amount of water or omit it entirely. Lastly, if you don’t have a blender, you can mash the avocado with a fork and whisk all the ingredients together vigorously for a chunkier version of the dressing.

    Recipe Variations

    • Add a teaspoon of smoked paprika for a smoky flavor twist.
    • Incorporate a handful of fresh basil leaves for a herby version.
    • For a spicy kick, blend in a small jalapeño (seeds removed).
    • Use lime juice instead of lemon juice for a different citrus note.
    • Add a tablespoon of tahini for a nutty flavor and extra creaminess.

    Frequently Asked Questions

    Can I make this dressing ahead of time?

    Absolutely! This dressing can be made up to 3 days in advance. Just store it in an airtight container in the refrigerator. Remember to give it a good stir or shake before using, as it may separate slightly over time.

    Is there a substitute for nutritional yeast?

    If you don’t have nutritional yeast or can’t find it, you can omit it, but you’ll miss out on some of the cheesy flavor. A small amount of grated Parmesan cheese (if you’re not strictly dairy-free) or a pinch of salt can help make up for it.

    How can I thin the dressing without water?

    You can use any unsweetened plant-based milk, like almond or soy milk, to thin the dressing instead of water. This will also add a bit of creaminess and flavor.

    Summary

    This dairy-free Caesar salad dressing is a creamy, flavorful alternative to the traditional recipe, perfect for those avoiding dairy. Easy to make and versatile, it’s sure to become a staple in your kitchen.

  • Creamy Chicken Salad with Eggs and Pickle Relish: A Picnic Perfect Dish

    Creamy Chicken Salad with Eggs and Pickle Relish: A Picnic Perfect Dish

    Perfect for picnics, potlucks, or just a lazy Sunday lunch, this creamy chicken salad with eggs and pickle relish is a crowd-pleaser. Packed with flavors and textures, it’s a recipe that’s as fun to make as it is to eat.

    Why This Recipe Works

    • The combination of tender chicken, hard-boiled eggs, and crunchy pickle relish creates a delightful texture contrast.
    • Mayonnaise and mustard blend together for a creamy, tangy dressing that binds all the ingredients perfectly.
    • It’s incredibly versatile, serving as a sandwich filler, a lettuce wrap, or a standalone salad.
    • Quick and easy to prepare, making it ideal for last-minute gatherings.
    • The pickle relish adds a sweet and tangy kick that elevates the overall flavor profile.

    Ingredients

    • 2 cups cooked chicken, shredded
    • 3 hard-boiled eggs, chopped
    • 1/2 cup mayonnaise
    • 1/4 cup pickle relish
    • 1 tablespoon mustard
    • Salt and pepper to taste

    Equipment Needed

    • Mixing bowl
    • Whisk
    • Measuring cups and spoons
    • Knife and cutting board

    Instructions

    Chicken Salad Recipe With Eggs And Pickle Relish

    Step 1: Prepare the Ingredients

    Start by shredding your cooked chicken into bite-sized pieces. Chop the hard-boiled eggs into small chunks. Having your ingredients prepped and ready to go makes the mixing process a breeze.

    Step 2: Mix the Dressing

    In a large mixing bowl, whisk together the mayonnaise, mustard, and pickle relish until smooth. This creamy dressing is the secret to the salad’s irresistible flavor.

    Step 3: Combine the Ingredients

    Add the shredded chicken and chopped eggs to the bowl with the dressing. Gently fold everything together until the chicken and eggs are evenly coated with the dressing. Be careful not to overmix to keep the texture just right.

    Step 4: Season to Taste

    Season the salad with salt and pepper to your liking. Remember, the pickle relish already adds some saltiness, so you might not need much extra salt.

    Step 5: Chill and Serve

    For the best flavor, cover the salad and refrigerate for at least an hour before serving. This allows the flavors to meld together beautifully.

    Tips and Tricks

    For a lighter version, you can substitute Greek yogurt for half of the mayonnaise. If you’re short on time, store-bought rotisserie chicken works great in this recipe. For an extra crunch, add some diced celery or onions. To make it ahead, the salad can be stored in the refrigerator for up to 3 days. Just give it a good stir before serving.

    Recipe Variations

    • Add diced apples or grapes for a sweet twist.
    • Swap the pickle relish for chopped dill pickles for a more tangy flavor.
    • Incorporate curry powder for a warm, spicy note.
    • Use avocado instead of mayonnaise for a healthier, creamy texture.
    • Throw in some nuts or seeds for added crunch.

    Frequently Asked Questions

    Can I use canned chicken?

    Yes, canned chicken can be used in a pinch, but for the best texture and flavor, freshly cooked or rotisserie chicken is recommended. Just make sure to drain the canned chicken well before using.

    How long can I store the chicken salad?

    This chicken salad can be stored in an airtight container in the refrigerator for up to 3 days. Beyond that, the texture may start to change, and it’s best to enjoy it fresh.

    Can I freeze the chicken salad?

    Freezing is not recommended as the mayonnaise-based dressing can separate and become watery upon thawing, affecting the salad’s texture and flavor.

    Summary

    This creamy chicken salad with eggs and pickle relish is a versatile, flavorful dish that’s perfect for any occasion. Easy to make and customizable, it’s sure to become a favorite in your recipe collection.

  • Southern 7 Layer Salad Recipe: A Classic Crowd-Pleaser

    Southern 7 Layer Salad Recipe: A Classic Crowd-Pleaser

    Every bite of this Southern 7 Layer Salad is a trip down memory lane, packed with crisp veggies, creamy dressing, and a sprinkle of bacon for good measure. It’s the perfect dish for potlucks, picnics, or any gathering where you want to impress without the stress.

    Why This Recipe Works

    • Layers of fresh vegetables provide a crunchy texture and vibrant colors that make the salad as beautiful as it is delicious.
    • The creamy dressing ties all the layers together with a tangy sweetness that’s irresistible.
    • Adding bacon and cheese on top gives a savory depth that elevates the salad from side dish to star of the show.
    • It’s make-ahead friendly, allowing the flavors to meld together beautifully overnight.
    • Customizable layers mean you can tweak it to suit your taste or what you have on hand.

    Ingredients

    • 1 head iceberg lettuce, chopped
    • 1 cup cherry tomatoes, halved
    • 1 cucumber, sliced
    • 1 red onion, thinly sliced
    • 1 cup frozen peas, thawed
    • 1 1/2 cups mayonnaise
    • 2 tablespoons sugar
    • 1 cup shredded cheddar cheese
    • 8 slices bacon, cooked and crumbled

    Equipment Needed

    • Large clear bowl (to show off those layers!)
    • Mixing bowl
    • Whisk
    • Knife and cutting board

    Instructions

    Southern 7 Layer Salad Recipe

    Step 1: Prepare the Vegetables

    Start by washing and chopping all your vegetables. The iceberg lettuce should be chopped into bite-sized pieces, the cherry tomatoes halved, the cucumber sliced, and the red onion thinly sliced. This ensures every layer is easy to eat and visually appealing. Tip: For an extra crunch, you can chill the vegetables in the fridge before assembling the salad.

    Step 2: Layer the Lettuce

    Place the chopped iceberg lettuce at the bottom of your clear bowl. This forms the base of your salad and supports all the other layers. Press down gently to compact the lettuce slightly, which helps keep the layers distinct. Tip: Using a clear bowl not only showcases the beautiful layers but also makes serving a breeze.

    Step 3: Add the Vegetables

    Layer the cherry tomatoes, cucumber slices, red onion, and thawed peas on top of the lettuce. Each vegetable should form its own distinct layer for maximum visual impact. The peas add a sweet pop of flavor and color that contrasts beautifully with the other vegetables.

    Step 4: Prepare the Dressing

    In a mixing bowl, whisk together the mayonnaise and sugar until smooth. This creamy, slightly sweet dressing is what binds the salad together. Spread it evenly over the top of the vegetable layers, making sure to cover them completely to seal in the freshness.

    Step 5: Top with Cheese and Bacon

    Sprinkle the shredded cheddar cheese and crumbled bacon over the top of the dressing. These toppings add a rich, savory element that makes the salad irresistible. For the best flavor and texture, add the bacon just before serving to keep it crispy.

    Tips and Tricks

    For a lighter version of the dressing, you can substitute half of the mayonnaise with Greek yogurt. This adds a tangy flavor and reduces the calorie count without sacrificing creaminess. If you’re preparing the salad ahead of time, wait to add the bacon until just before serving to maintain its crispiness. For a vegetarian version, omit the bacon and consider adding toasted nuts for crunch. To ensure each layer is distinct, press down gently after adding each vegetable. This also helps the salad hold together better when serving.

    Recipe Variations

    • Swap out the iceberg lettuce for romaine or spinach for a different texture and nutritional profile.
    • Add hard-boiled eggs between the vegetable layers for extra protein.
    • Use a mix of cheeses, such as Monterey Jack or pepper Jack, for a spicier kick.
    • Incorporate avocado slices for a creamy, healthy fat addition.
    • Replace the peas with corn for a sweeter, summery twist.

    Frequently Asked Questions

    Can I make this salad ahead of time? Absolutely! In fact, making it a day ahead allows the flavors to meld together beautifully. Just add the bacon and any other crispy toppings right before serving to keep them from getting soggy.

    How long does the salad last in the fridge? Stored properly in an airtight container, the salad will last for up to 3 days. However, it’s best enjoyed within the first 24 hours for optimal texture and freshness.

    Can I use a different type of dressing? While the mayonnaise-based dressing is traditional, you can experiment with ranch or a vinaigrette for a different flavor profile. Just keep in mind that the salad’s texture and layering might be affected.

    Summary

    This Southern 7 Layer Salad is a timeless classic that’s as easy to make as it is delicious. With its layers of fresh vegetables, creamy dressing, and savory toppings, it’s sure to be a hit at any gathering. Plus, it’s customizable to suit your tastes and dietary needs.

  • Ham Salad Sandwich Spread Recipe: A Delightful Twist on a Classic

    Ham Salad Sandwich Spread Recipe: A Delightful Twist on a Classic

    Every now and then, we stumble upon a recipe that’s so simple yet so satisfying, it becomes a staple in our kitchen. This ham salad sandwich spread is one of those gems, offering a perfect blend of flavors and textures that’ll make your sandwiches anything but ordinary.

    Why This Recipe Works

    • The combination of finely chopped ham and creamy mayonnaise creates a rich and satisfying texture that’s hard to resist.
    • Adding a touch of mustard and sweet relish introduces a perfect balance of tangy and sweet flavors, elevating the overall taste.
    • It’s incredibly versatile, serving as a fantastic spread for sandwiches, a dip for crackers, or even a topping for salads.
    • This recipe is a great way to use up leftover ham, reducing waste and saving money.
    • With just a few simple ingredients and minimal prep time, it’s a quick and easy solution for busy days.

    Ingredients

    • 2 cups finely chopped cooked ham
    • 1/2 cup mayonnaise
    • 2 tablespoons sweet relish
    • 1 tablespoon yellow mustard
    • 1/4 teaspoon black pepper

    Equipment Needed

    • Mixing bowl
    • Wooden spoon or spatula
    • Measuring cups and spoons
    • Knife and cutting board (for chopping ham, if not pre-chopped)

    Instructions

    Ham Salad Sandwich Spread Recipe

    Step 1: Prepare Your Ingredients

    Start by ensuring your ham is finely chopped to achieve the perfect texture for your spread. If you’re using leftover ham from a previous meal, make sure to remove any excess fat or gristle. Measure out your mayonnaise, sweet relish, mustard, and black pepper so everything is ready to go.

    Step 2: Combine the Ingredients

    In a large mixing bowl, add the chopped ham, mayonnaise, sweet relish, mustard, and black pepper. Using a wooden spoon or spatula, gently mix all the ingredients together until well combined. The goal is to have a uniform mixture where the ham is evenly coated with the mayonnaise and other flavors.

    Step 3: Adjust the Consistency

    If your spread seems too thick, you can add a little more mayonnaise, one tablespoon at a time, until you reach your desired consistency. Conversely, if it’s too runny, you can add a bit more chopped ham to thicken it up. Taste the mixture and adjust the seasoning if necessary.

    Step 4: Chill Before Serving

    For the best flavor, cover the bowl with plastic wrap and refrigerate the ham salad for at least 30 minutes before serving. This allows the flavors to meld together beautifully. If you’re in a hurry, you can serve it immediately, but the taste will be even better after a short chill.

    Step 5: Serve and Enjoy

    Once chilled, your ham salad sandwich spread is ready to enjoy. Spread it generously on your favorite bread, add some lettuce and tomato for extra crunch and freshness, and dig in. It’s also great as a dip with crackers or as a topping for a green salad.

    Tips and Tricks

    For a smoother spread, you can pulse the ham in a food processor a few times before mixing it with the other ingredients. If you prefer a chunkier texture, hand-chopping is the way to go. Experiment with different types of mustard, such as Dijon or spicy brown, to vary the flavor profile. Adding a hard-boiled egg, finely chopped, can introduce a new dimension of taste and texture. For a healthier version, substitute Greek yogurt for half of the mayonnaise. Always taste and adjust the seasoning before serving, as the saltiness of the ham can vary.

    Recipe Variations

    • Spicy Kick: Add a dash of hot sauce or a pinch of cayenne pepper for those who like it hot.
    • Cheesy Delight: Mix in some shredded cheddar cheese for a creamy, cheesy version.
    • Vegetable Boost: Incorporate finely diced celery or onions for added crunch and flavor.
    • Sweet and Savory: A tablespoon of honey or maple syrup can add a unique sweet twist.
    • Herb Infusion: Fresh herbs like dill or parsley can brighten up the flavor profile.

    Frequently Asked Questions

    Can I make this recipe ahead of time? Absolutely! This ham salad spread can be made up to 3 days in advance and stored in an airtight container in the refrigerator. The flavors will continue to develop, making it even more delicious.

    What’s the best way to chop the ham? For a finer texture, a food processor works wonders. Just pulse a few times until the ham reaches your desired consistency. For a more rustic, chunky spread, hand-chopping with a sharp knife is ideal.

    Can I use low-fat mayonnaise? Yes, you can substitute low-fat or even fat-free mayonnaise if you’re watching your calorie intake. Keep in mind that this may slightly alter the taste and texture of the spread.

    Summary

    This ham salad sandwich spread is a versatile, flavorful, and easy-to-make recipe that’s perfect for sandwiches, dips, or salad toppings. With simple ingredients and minimal prep time, it’s a must-try for anyone looking to add a little excitement to their meals.

  • Spinach Craisin Salad Recipe: A Sweet and Savory Delight

    Spinach Craisin Salad Recipe: A Sweet and Savory Delight

    Zesty, fresh, and bursting with flavors, this Spinach Craisin Salad is your go-to dish for any occasion. Whether you’re looking for a light lunch or a vibrant side, this recipe promises a delightful mix of textures and tastes that will leave everyone asking for seconds.

    Why This Recipe Works

    • The combination of sweet craisins and savory spinach creates a perfect balance of flavors.
    • Adding nuts introduces a satisfying crunch that elevates the salad’s texture.
    • A homemade dressing ties all the ingredients together for a cohesive and delicious dish.

    Ingredients

    • 6 cups fresh spinach, washed and dried
    • 1/2 cup craisins
    • 1/4 cup sliced almonds, toasted
    • 1/4 cup feta cheese, crumbled
    • 2 tbsp olive oil
    • 1 tbsp balsamic vinegar
    • 1 tsp honey
    • Salt and pepper to taste

    Equipment Needed

    • Large salad bowl
    • Small mixing bowl
    • Whisk
    • Measuring cups and spoons

    Instructions

    Spinach Craisin Salad Recipe

    Step 1: Prepare the Spinach

    Start by ensuring your spinach is thoroughly washed and dried to prevent any sogginess in your salad. Tear the leaves into bite-sized pieces if they’re too large, and place them in your large salad bowl. This step is crucial for achieving the perfect salad base.

    Step 2: Add the Toppings

    Sprinkle the craisins, toasted almonds, and crumbled feta cheese over the spinach. The craisins add a sweet pop, while the almonds bring a nutty crunch, and the feta offers a creamy tang. This trio of toppings is what makes the salad stand out.

    Step 3: Whisk Together the Dressing

    In a small bowl, combine the olive oil, balsamic vinegar, honey, and a pinch of salt and pepper. Whisk vigorously until the mixture is emulsified and slightly thickened. This homemade dressing is simple yet elevates the salad with its sweet and tangy profile.

    Step 4: Dress the Salad

    Drizzle the dressing over the salad just before serving. Toss gently to ensure every leaf is lightly coated without overwhelming the ingredients. The key is to dress the salad sparingly to maintain the freshness and crispness of the spinach.

    Step 5: Serve Immediately

    For the best experience, serve the salad right after dressing it. This ensures the spinach stays crisp and the toppings retain their texture. Enjoy the vibrant colors and flavors that make this salad a feast for the senses.

    Tips and Tricks

    Toasting the almonds brings out their nutty flavor, adding depth to the salad. If you’re preparing the salad ahead of time, keep the dressing separate and add it just before serving to prevent the spinach from wilting. For an extra layer of flavor, consider adding a pinch of cinnamon or nutmeg to the dressing. These small touches can make a big difference in the overall taste of your salad.

    Recipe Variations

    • Swap craisins for dried cherries or apricots for a different sweet twist.
    • Use walnuts or pecans instead of almonds for a variation in crunch.
    • Add grilled chicken or shrimp to turn the salad into a hearty main dish.
    • Incorporate avocado slices for a creamy texture and healthy fats.
    • Try goat cheese instead of feta for a tangier flavor profile.

    Frequently Asked Questions

    Can I use baby spinach instead of regular spinach?

    Absolutely! Baby spinach is tender and sweet, making it a great alternative. Just ensure it’s washed and dried properly to maintain the salad’s freshness.

    How long can I store the dressed salad?

    It’s best enjoyed immediately, but if you must store it, keep it in the fridge for no more than a few hours. The spinach will start to wilt, and the nuts may lose their crunch.

    Can I make the dressing ahead of time?

    Yes, the dressing can be prepared up to 3 days in advance. Store it in an airtight container in the refrigerator and give it a good shake or whisk before using.

    Summary

    This Spinach Craisin Salad is a delightful mix of sweet and savory, perfect for any meal. With simple ingredients and easy steps, it’s a foolproof recipe that’s sure to impress.

  • Salmon Salad Sandwich Recipe: A Delightful Twist on a Classic

    Salmon Salad Sandwich Recipe: A Delightful Twist on a Classic

    Unleash your culinary creativity with this salmon salad sandwich recipe that’s bound to become your new favorite. Perfect for a quick lunch or a fancy picnic, this dish combines the richness of salmon with the freshness of veggies, all hugged by your choice of bread.

    Why This Recipe Works

    • The combination of flaky salmon and crunchy vegetables offers a satisfying texture contrast.
    • Using Greek yogurt instead of mayo makes it healthier without sacrificing creaminess.
    • It’s versatile; enjoy it on toast, in a wrap, or even as a lettuce wrap for a low-carb option.
    • Quick to prepare, making it perfect for busy days.
    • The lemon zest adds a bright, fresh flavor that elevates the entire dish.

    Ingredients

    • 1 cup cooked salmon, flaked
    • 1/4 cup Greek yogurt
    • 1 tbsp lemon juice
    • 1 tsp lemon zest
    • 1/4 cup diced celery
    • 1/4 cup diced red onion
    • Salt and pepper to taste
    • 4 slices of your favorite bread
    • Lettuce leaves for serving

    Equipment Needed

    • Mixing bowl
    • Measuring cups and spoons
    • Knife and cutting board
    • Toaster or pan for bread

    Instructions

    Salmon Salad Sandwich Recipe

    Step 1: Prepare the Salmon

    Start by flaking the cooked salmon into a mixing bowl. Ensure there are no bones or skin left. The salmon should be in small, bite-sized pieces for the perfect sandwich texture. Tip: For an extra flavor boost, use smoked salmon.

    Step 2: Mix the Dressing

    In the same bowl, add the Greek yogurt, lemon juice, and lemon zest. Mix well until the salmon is evenly coated. The dressing should be creamy and slightly tangy. Adjust the lemon juice according to your taste preference.

    Step 3: Add the Veggies

    Fold in the diced celery and red onion into the salmon mixture. These add a nice crunch and freshness to the salad. Season with salt and pepper to taste. Tip: Let the salad sit for 10 minutes to allow the flavors to meld.

    Step 4: Toast the Bread

    While the salad is resting, toast your bread slices until golden and crisp. This step is crucial for adding texture to your sandwich. You can also use a pan to grill the bread for a toastier flavor.

    Step 5: Assemble the Sandwich

    Lay out the toasted bread slices. Place a generous amount of the salmon salad on one slice, top with lettuce leaves, and cover with another slice of bread. Press gently. Tip: For a more filling option, add avocado slices or cucumber.

    Tips and Tricks

    For those looking to elevate their salmon salad sandwich, consider these advanced tips. First, homemade mayonnaise can be used instead of Greek yogurt for a richer taste. Second, adding capers or dill can introduce a new layer of flavor. Third, for a smoother texture, you can pulse the salmon mixture in a food processor briefly. Lastly, toasting the bread with a bit of garlic butter can add an irresistible aroma and taste.

    Recipe Variations

    • Swap the bread for a croissant for a more decadent version.
    • Add hard-boiled eggs to the salad for extra protein.
    • Use canned tuna instead of salmon for a different twist.
    • Incorporate chopped apples or grapes for a sweet and savory version.
    • Try it with pita bread or as a topping for crackers for a snackable option.

    Frequently Asked Questions

    Can I use raw salmon for this recipe?

    It’s recommended to use cooked salmon to ensure food safety and the right texture. However, if you prefer, you can lightly sear salmon fillets and let them cool before flaking into the salad.

    How long can I store the salmon salad?

    The salmon salad can be stored in an airtight container in the refrigerator for up to 2 days. Make sure to give it a good stir before using it again.

    Can I make this recipe dairy-free?

    Absolutely! Substitute Greek yogurt with avocado or a dairy-free yogurt alternative to keep the creaminess without the dairy.

    Summary

    This salmon salad sandwich is a quick, healthy, and delicious option for any meal. With its creamy texture, crunchy veggies, and the option to customize, it’s sure to please everyone.

  • Costco Tortellini Pasta Salad Recipe: A Crowd-Pleasing Delight

    Costco Tortellini Pasta Salad Recipe: A Crowd-Pleasing Delight

    Pasta salad is the ultimate summer dish, and this Costco tortellini pasta salad recipe is no exception. Packed with flavor, easy to make, and perfect for any gathering, it’s a dish that’ll have everyone coming back for seconds. Let’s dive into how you can whip up this deliciousness in no time.

    Why This Recipe Works

    • The cheese-filled tortellini adds a rich and creamy texture that’s irresistible.
    • It’s incredibly versatile, allowing you to throw in whatever veggies or proteins you have on hand.
    • The dressing is a simple yet flavorful combination that ties everything together beautifully.
    • It’s a make-ahead dish, meaning less stress when hosting.
    • Perfect for picnics, potlucks, or a quick weeknight dinner.

    Ingredients

    • 1 package (20 oz) Costco cheese tortellini
    • 1 cup cherry tomatoes, halved
    • 1/2 cup black olives, sliced
    • 1/4 cup red onion, finely diced
    • 1/2 cup Italian dressing
    • 1/4 cup grated Parmesan cheese
    • Salt and pepper to taste

    Equipment Needed

    • Large pot
    • Colander
    • Large mixing bowl
    • Measuring cups and spoons
    • Knife and cutting board

    Instructions

    Costco Tortellini Pasta Salad Recipe

    Boil the Tortellini

    Bring a large pot of salted water to a boil. Add the tortellini and cook according to the package instructions, usually about 7-9 minutes, until they’re tender but still firm to the bite. Drain them in a colander and rinse under cold water to stop the cooking process. Tip: Adding a splash of olive oil to the boiling water can prevent the tortellini from sticking together.

    Prepare the Vegetables

    While the tortellini is cooking, halve the cherry tomatoes, slice the black olives, and finely dice the red onion. This is your chance to get creative—feel free to add or substitute other veggies like cucumbers or bell peppers based on what you have or love.

    Mix the Salad

    In a large mixing bowl, combine the cooled tortellini, prepared vegetables, and Italian dressing. Toss everything together until well coated. The dressing should evenly cover all the ingredients, ensuring every bite is flavorful. Tip: Letting the salad sit for at least 30 minutes before serving allows the flavors to meld together beautifully.

    Add the Finishing Touches

    Sprinkle the grated Parmesan cheese over the salad and give it one final gentle toss. Season with salt and pepper to taste. The Parmesan adds a nice salty kick that complements the creamy tortellini and fresh veggies.

    Serve and Enjoy

    Transfer the pasta salad to a serving dish or keep it in the mixing bowl. It’s ready to serve immediately, but if you can wait, chilling it for an hour will enhance the flavors even more. Tip: For an extra touch of freshness, garnish with some chopped basil or parsley before serving.

    Tips and Tricks

    For those looking to elevate their Costco tortellini pasta salad, consider these advanced tips. First, toasting the tortellini in a pan after boiling can add a delightful crunch. Second, homemade Italian dressing can take the flavor to the next level compared to store-bought. Third, adding a protein like grilled chicken or shrimp can turn this side dish into a hearty main course. Lastly, experimenting with different cheeses, such as feta or mozzarella, can introduce new flavors and textures to the salad.

    Recipe Variations

    • Mediterranean Twist: Add feta cheese, cucumbers, and a lemon-olive oil dressing for a fresh take.
    • Protein-Packed: Mix in grilled chicken, shrimp, or chickpeas for added protein.
    • Veggie Delight: Load up on more vegetables like bell peppers, artichokes, and spinach for a healthier version.
    • Spicy Kick: Incorporate some diced jalapeños or a dash of red pepper flakes for those who like it hot.
    • Cheese Lover’s Dream: Add extra cheeses like mozzarella pearls or crumbled blue cheese for a richer taste.

    Frequently Asked Questions

    Can I make this salad ahead of time?

    Absolutely! This salad is perfect for making ahead. In fact, letting it sit for a few hours or overnight in the fridge allows the flavors to meld together even more. Just hold off on adding the Parmesan cheese until you’re ready to serve to keep it from getting soggy.

    How long does this pasta salad last in the fridge?

    Stored in an airtight container, this pasta salad will stay fresh in the fridge for up to 3 days. The vegetables may soften a bit over time, but the flavors will continue to develop, making it just as delicious.

    Can I use a different type of pasta?

    While tortellini is the star of this recipe, you can certainly substitute it with other pasta shapes like penne or farfalle. Keep in mind that the cooking time may vary depending on the pasta you choose, so adjust accordingly.

    Summary

    This Costco tortellini pasta salad is a versatile, flavorful, and easy-to-make dish that’s perfect for any occasion. With simple ingredients and minimal prep time, it’s a guaranteed hit that will leave your guests asking for the recipe.

  • Chill Out with This Cold Tuna Pasta Salad Recipe

    Chill Out with This Cold Tuna Pasta Salad Recipe

    Let’s face it, when the temperature rises, the last thing you want is to slave over a hot stove. That’s where this cold tuna pasta salad comes in—a refreshing, no-cook-required dish that’s perfect for picnics, potlucks, or just a lazy summer dinner.

    Why This Recipe Works

    • Quick and Easy: With minimal prep and no cooking required beyond boiling pasta, this recipe is a breeze to whip up.
    • Versatile: Easily customizable with whatever veggies or dressings you have on hand.
    • Perfect for Meal Prep: Stays fresh in the fridge for days, making it ideal for busy weeks.

    Ingredients

    • 8 oz pasta (like fusilli or penne)
    • 1 can (5 oz) tuna in water, drained
    • 1/2 cup mayonnaise
    • 1/4 cup red onion, finely diced
    • 1/2 cup cucumber, diced
    • 1/2 cup cherry tomatoes, halved
    • 1 tbsp lemon juice
    • Salt and pepper to taste

    Equipment Needed

    • Large pot
    • Colander
    • Large mixing bowl
    • Measuring cups and spoons

    Instructions

    Cold Tuna Pasta Salad Recipe

    Boil the Pasta

    Fill a large pot with water and bring to a rolling boil. Add a generous pinch of salt, then stir in the pasta. Cook according to package instructions until al dente, usually about 8-10 minutes. Drain in a colander and rinse under cold water to cool quickly.

    Mix the Dressing

    In a large mixing bowl, combine the mayonnaise and lemon juice. Whisk until smooth. This creamy dressing will coat every noodle and veggie perfectly.

    Combine All Ingredients

    Add the cooled pasta, drained tuna, red onion, cucumber, and cherry tomatoes to the bowl with the dressing. Gently toss until everything is evenly coated. Season with salt and pepper to taste.

    Chill Before Serving

    Cover the bowl with plastic wrap and refrigerate for at least 1 hour before serving. This allows the flavors to meld together beautifully.

    Tips and Tricks

    For an extra crunch, add some diced celery or bell peppers. If you’re not a fan of mayonnaise, Greek yogurt makes a great substitute. To make this dish even more hearty, throw in some cooked chickpeas or kidney beans. Always taste and adjust the seasoning after chilling, as flavors can mellow out in the fridge.

    Recipe Variations

    • Mediterranean Twist: Swap the mayo for olive oil and add olives and feta cheese.
    • Spicy Kick: Mix in some diced jalapeños or a dash of hot sauce.
    • Herb Lover’s: Fresh dill, parsley, or basil can add a bright, herby flavor.

    Frequently Asked Questions

    Can I use a different type of pasta?

    Absolutely! While fusilli and penne are great for holding onto the dressing, any short pasta will work. Just avoid long noodles like spaghetti, as they’re harder to eat cold.

    How long does this salad last in the fridge?

    Stored in an airtight container, it’ll stay fresh for up to 3 days. The veggies might soften a bit, but the flavors will only get better.

    Can I make this recipe vegan?

    Yes! Substitute the tuna with chickpeas and use vegan mayo. You’ll still get that satisfying protein and creaminess.

    Summary

    This cold tuna pasta salad is the ultimate summer dish—easy, refreshing, and endlessly customizable. Perfect for those days when you want something delicious without the hassle.