Author: onlinefoodrecipes

  • Tomato Cucumber Avocado Salad: A Refreshing Summer Delight

    Tomato Cucumber Avocado Salad: A Refreshing Summer Delight

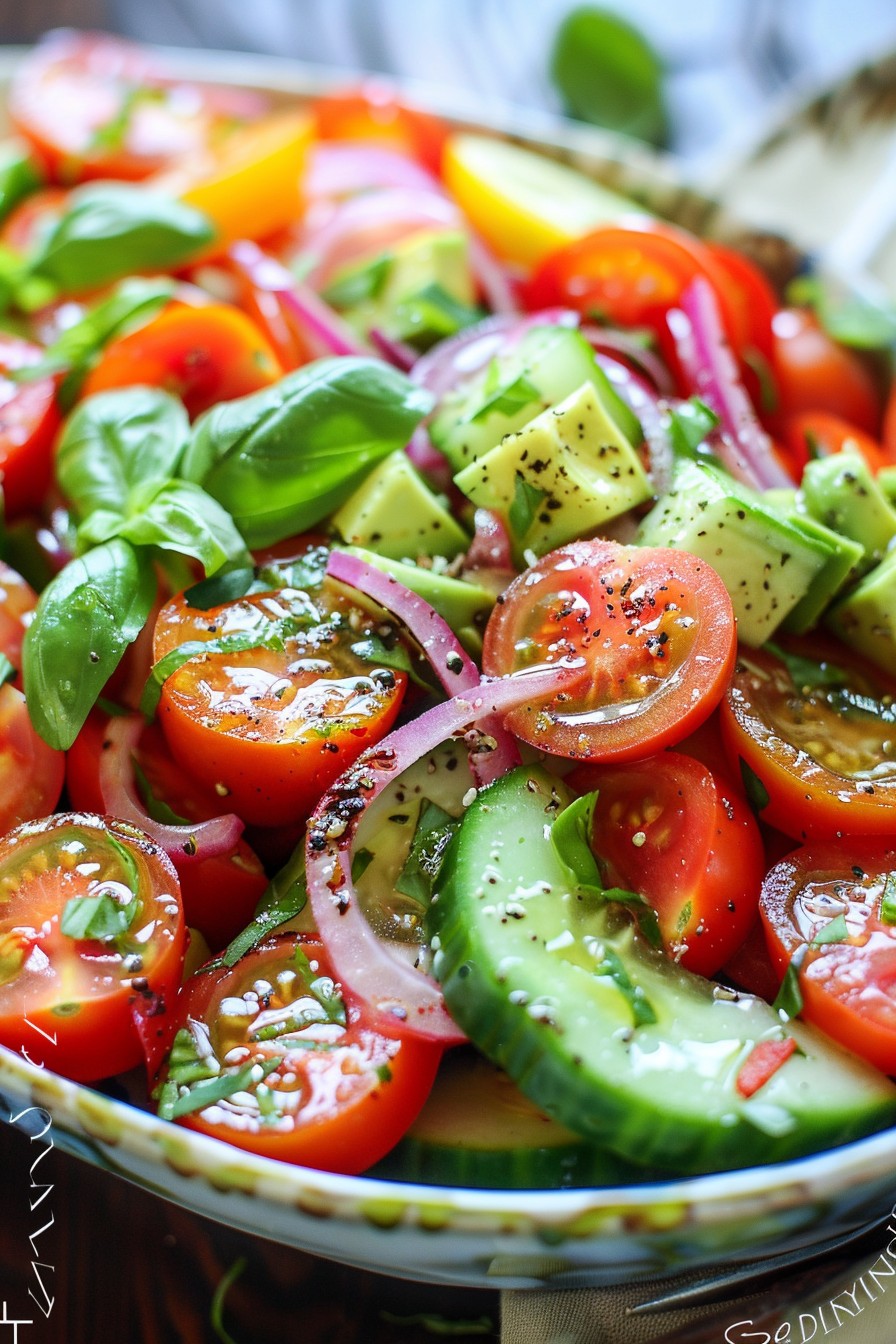
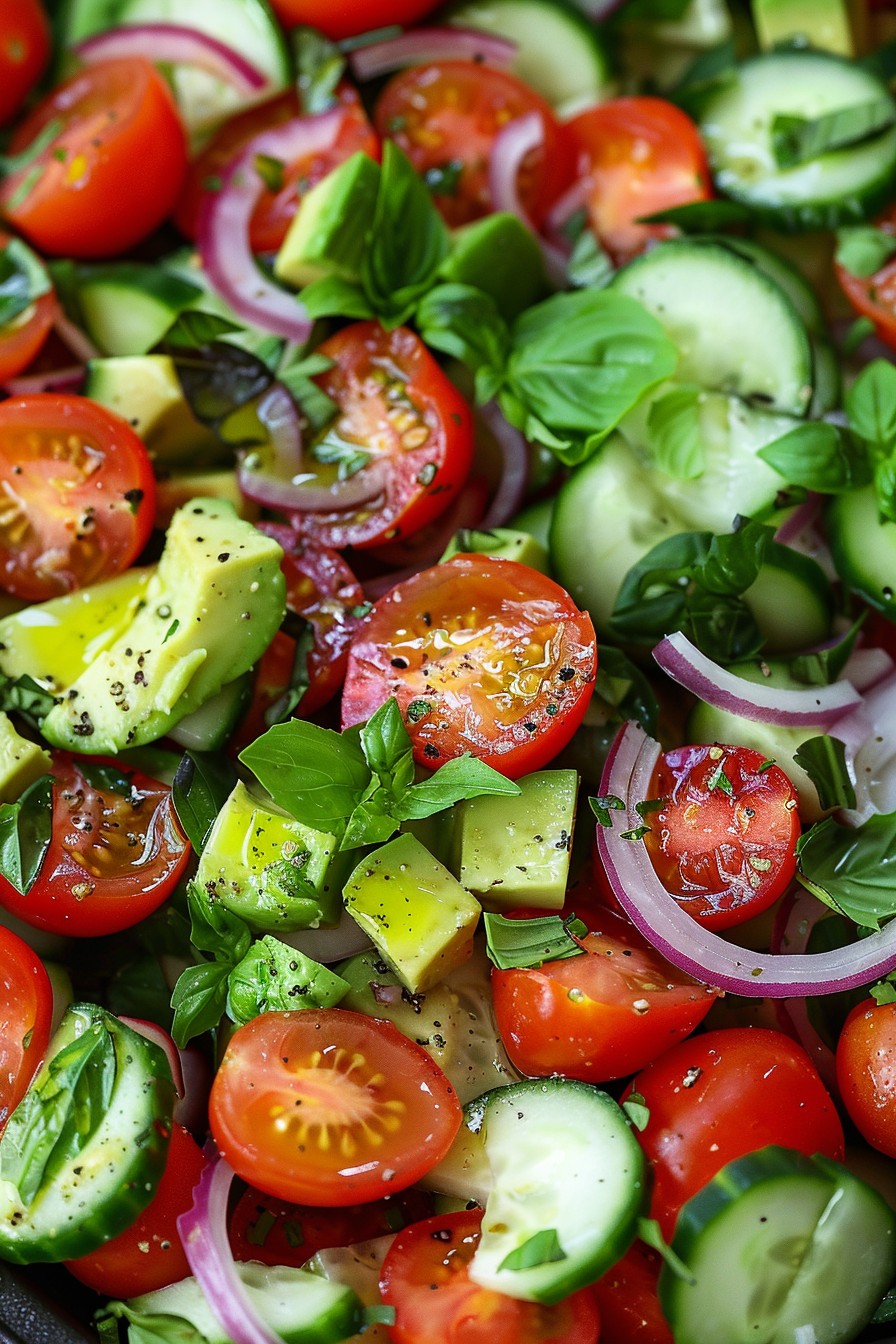
    Brighten up your summer meals with this vibrant and healthy tomato cucumber avocado salad. It’s the perfect blend of freshness and flavor that will leave you craving more.

    Why This Recipe Works

    • The combination of juicy tomatoes, crisp cucumbers, and creamy avocados creates a delightful texture contrast.
    • A simple dressing of olive oil and lemon juice enhances the natural flavors without overpowering them.
    • This salad is incredibly versatile, serving as a perfect side dish or a light main course.
    • It’s packed with nutrients, making it as healthy as it is delicious.
    • Quick and easy to prepare, it’s ideal for busy weeknights or last-minute gatherings.

    Ingredients

    • 2 cups cherry tomatoes, halved
    • 1 large cucumber, diced
    • 2 ripe avocados, cubed
    • 1/4 cup red onion, thinly sliced
    • 2 tbsp olive oil
    • 1 tbsp lemon juice
    • Salt and pepper to taste
    • 1/4 cup fresh basil, chopped

    Equipment Needed

    • Large mixing bowl
    • Sharp knife
    • Cutting board
    • Measuring cups and spoons

    Instructions

    Recipe Tomato Cucumber Avocado Salad

    Prepare the Vegetables

    Start by washing the cherry tomatoes and cucumber under cold water. Halve the cherry tomatoes and dice the cucumber into bite-sized pieces. Thinly slice the red onion to add a bit of sharpness to the salad. Tip: For a milder onion flavor, soak the sliced onion in cold water for 10 minutes before adding it to the salad.

    Cube the Avocados

    Cut the avocados in half, remove the pit, and carefully cube the flesh. To prevent browning, drizzle a little lemon juice over the avocado cubes immediately after cutting. This not only adds flavor but also keeps the avocados looking fresh.

    Make the Dressing

    In a small bowl, whisk together the olive oil and lemon juice. Season with salt and pepper to taste. This simple dressing brings all the ingredients together without masking their natural flavors.

    Combine All Ingredients

    In a large mixing bowl, gently toss the tomatoes, cucumber, avocado, and red onion with the dressing. Be careful not to mash the avocados. Add the chopped basil last for a fresh, aromatic finish. Tip: For the best flavor, let the salad sit for 5 minutes before serving to allow the flavors to meld.

    Serve and Enjoy

    Transfer the salad to a serving dish and enjoy immediately. This salad is best served fresh but can be stored in the refrigerator for up to 2 hours. Tip: If you need to prepare it in advance, add the avocados just before serving to maintain their texture.

    Tips and Tricks

    For an extra burst of flavor, consider adding a handful of crumbled feta cheese or a sprinkle of toasted nuts for crunch. If you’re not a fan of basil, cilantro or parsley make great substitutes. To make this salad more filling, add a protein like grilled chicken or chickpeas. Always use ripe but firm avocados to ensure they hold their shape in the salad. For a spicier kick, add a pinch of red pepper flakes or a dash of hot sauce to the dressing.

    Recipe Variations

    • Add quinoa or farro for a heartier salad.
    • Swap the lemon juice for lime juice and add cilantro for a Mexican twist.
    • Include diced mango or strawberries for a sweet and savory version.
    • Use balsamic vinegar instead of lemon juice for a richer dressing.
    • Add olives and feta cheese for a Mediterranean flair.

    Frequently Asked Questions

    Can I make this salad ahead of time?

    While you can prepare the vegetables and dressing ahead, it’s best to add the avocados and basil just before serving to prevent browning and maintain freshness. The salad is best enjoyed within a few hours of preparation.

    How do I choose ripe avocados?

    Look for avocados that are slightly soft to the touch but not mushy. The skin should be dark and free of large blemishes. If the avocado is too firm, let it ripen at room temperature for a day or two.

    Can I substitute another oil for olive oil?

    Yes, avocado oil or grapeseed oil are great alternatives. However, olive oil adds a distinct flavor that complements the salad ingredients well.

    Summary

    This tomato cucumber avocado salad is a refreshing, nutritious, and easy-to-make dish that’s perfect for any occasion. With its vibrant colors and flavors, it’s sure to be a hit at your next meal or gathering.

  • Chicken Cranberry Pecan Salad Recipe: A Flavorful Fiesta in Every Bite!

    Chicken Cranberry Pecan Salad Recipe: A Flavorful Fiesta in Every Bite!

    Now, let’s dive into a salad that’s anything but boring. This Chicken Cranberry Pecan Salad is a perfect blend of savory, sweet, and crunchy, making it a hit for any meal. Whether you’re meal prepping or hosting a dinner, this recipe is your ticket to a deliciously satisfying dish.

    Why This Recipe Works

    • The combination of tender chicken, sweet cranberries, and crunchy pecans creates a symphony of textures and flavors.
    • It’s incredibly versatile, serving as a hearty lunch or a light dinner option.
    • The homemade dressing ties all the ingredients together with a tangy and sweet profile that’s irresistible.
    • It’s a great way to incorporate lean protein and healthy fats into your diet.
    • This salad is as beautiful as it is tasty, making it perfect for impressing guests.

    Ingredients

    • 2 cups cooked chicken, shredded or diced
    • 1/2 cup dried cranberries
    • 1/2 cup pecans, roughly chopped
    • 4 cups mixed greens
    • 1/4 cup red onion, thinly sliced
    • 1/2 cup feta cheese, crumbled
    • 1/4 cup olive oil
    • 2 tbsp balsamic vinegar
    • 1 tbsp honey
    • 1 tsp Dijon mustard
    • Salt and pepper to taste

    Equipment Needed

    • Large mixing bowl
    • Small whisk or fork
    • Measuring cups and spoons
    • Knife and cutting board

    Instructions

    Chicken Cranberry Pecan Salad Recipe

    Step 1: Prepare the Dressing

    In a small bowl, whisk together the olive oil, balsamic vinegar, honey, and Dijon mustard until well combined. Season with salt and pepper to taste. This dressing is the secret to bringing all the flavors together, so don’t skip it! Tip: For a smoother dressing, you can blend the ingredients in a small blender.

    Step 2: Combine the Salad Ingredients

    In a large mixing bowl, toss together the mixed greens, cooked chicken, dried cranberries, chopped pecans, sliced red onion, and crumbled feta cheese. The key here is to ensure everything is evenly distributed so every bite is packed with flavor.

    Step 3: Dress the Salad

    Drizzle the dressing over the salad and toss gently to coat all the ingredients. Be careful not to overdress the salad; you can always add more dressing if needed. Tip: Add the dressing just before serving to keep the greens crisp.

    Step 4: Serve and Enjoy

    Divide the salad among plates and serve immediately. This salad is best enjoyed fresh, but you can store any leftovers in an airtight container in the fridge for up to two days. Tip: For an extra crunch, add the pecans right before serving.

    Tips and Tricks

    Toasting the pecans before adding them to the salad can elevate the flavor profile significantly. Simply spread them on a baking sheet and toast in a 350°F oven for about 5-7 minutes, or until fragrant. Another tip is to use rotisserie chicken for a quick and easy protein option. Lastly, if you’re not a fan of feta, goat cheese or blue cheese can be great substitutes.

    Recipe Variations

    • Swap the chicken for turkey or tofu for a different protein option.
    • Use walnuts or almonds instead of pecans for a different crunch.
    • Add some avocado slices for a creamy texture and healthy fats.
    • Incorporate some quinoa or farro for an extra hearty salad.
    • Try using a raspberry vinaigrette instead of the balsamic dressing for a sweeter twist.

    Frequently Asked Questions

    Can I make this salad ahead of time?

    Yes, you can prepare the ingredients ahead of time, but it’s best to dress the salad just before serving to prevent the greens from getting soggy. Store the dressing separately and toss everything together when you’re ready to eat.

    Is there a substitute for dried cranberries?

    Absolutely! If you’re not a fan of dried cranberries, you can use raisins, chopped dried apricots, or even fresh pomegranate seeds for a different kind of sweetness and texture.

    Can I use a different type of vinegar for the dressing?

    Yes, apple cider vinegar or red wine vinegar can be great substitutes for balsamic vinegar. Each will give the dressing a slightly different flavor profile, so choose based on your preference.

    Summary

    This Chicken Cranberry Pecan Salad is a delightful mix of flavors and textures that’s perfect for any occasion. Easy to make and customizable, it’s sure to become a favorite in your recipe collection.

  • Sub Salad Recipe: A Crunchy, Flavorful Twist on the Classic Sub

    Sub Salad Recipe: A Crunchy, Flavorful Twist on the Classic Sub

    Oh, the joys of a sub sandwich—packed with meats, cheeses, and all the fixings. But who says you need bread to enjoy those flavors? Our Sub Salad brings all the beloved elements of a sub into a fresh, fork-friendly dish that’s perfect for any occasion.

    Why This Recipe Works

    • It’s a bread-free way to enjoy all your favorite sub flavors, making it a great option for those watching their carb intake.
    • The combination of crisp vegetables, savory meats, and creamy dressings offers a satisfying texture and taste experience.
    • Customizable to fit any dietary preference or taste, from vegetarian to meat-lovers.
    • Perfect for meal prep, as the flavors meld beautifully when stored in the fridge.
    • A crowd-pleaser that’s as suitable for a quick lunch as it is for a potluck.

    Ingredients

    • 2 cups chopped romaine lettuce
    • 1 cup diced turkey breast
    • 1 cup diced ham
    • 1/2 cup sliced black olives
    • 1/2 cup diced tomatoes
    • 1/2 cup sliced cucumbers
    • 1/4 cup sliced red onions
    • 1/2 cup shredded cheddar cheese
    • 1/4 cup mayonnaise
    • 1/4 cup Italian dressing
    • Salt and pepper to taste

    Equipment Needed

    • Large mixing bowl
    • Cutting board
    • Chef’s knife
    • Measuring cups and spoons
    • Salad tongs or large spoon

    Instructions

    Sub Salad Recipe

    Step 1: Prep Your Vegetables

    Start by washing all your vegetables thoroughly under cold water. Chop the romaine lettuce into bite-sized pieces and dice the tomatoes and cucumbers. Slice the red onions thinly to ensure they distribute evenly throughout the salad. Tip: For a milder onion flavor, soak the sliced onions in cold water for 10 minutes before adding them to the salad.

    Step 2: Dice the Meats

    Using a sharp chef’s knife, dice the turkey breast and ham into small, bite-sized pieces. This ensures every forkful has a bit of meaty goodness. Tip: For an extra flavor boost, consider using smoked turkey or honey ham.

    Step 3: Combine Ingredients

    In a large mixing bowl, combine the chopped romaine, diced meats, black olives, tomatoes, cucumbers, and red onions. Toss gently to mix the ingredients without bruising the lettuce.

    Step 4: Add Cheese and Dressings

    Sprinkle the shredded cheddar cheese over the salad. In a small bowl, whisk together the mayonnaise and Italian dressing until smooth. Drizzle the dressing over the salad and toss to coat evenly. Tip: Add the dressing just before serving to keep the salad crisp.

    Step 5: Season and Serve

    Season the salad with salt and pepper to taste. Give it one final toss and serve immediately for the best texture and flavor.

    Tips and Tricks

    For those looking to elevate their Sub Salad, consider these advanced tips. First, toasting the cheese before adding it to the salad can add a delightful crunch and depth of flavor. Second, incorporating a variety of dressings, such as ranch or balsamic vinaigrette, can cater to different taste preferences. Lastly, adding croutons made from sub bread can bring back that classic sub texture without overwhelming the dish with bread.

    Recipe Variations

    • Vegetarian Sub Salad: Omit the meats and add chickpeas or tofu for protein.
    • Italian Sub Salad: Use salami, pepperoni, and provolone cheese for an Italian twist.
    • Spicy Sub Salad: Add jalapeños or a spicy dressing to kick up the heat.
    • Seafood Sub Salad: Replace the meats with shrimp or crab meat for a seafood version.
    • Low-Fat Sub Salad: Use low-fat cheeses and dressings to lighten up the dish.

    Frequently Asked Questions

    Can I make this salad ahead of time?

    Absolutely! You can prep all the ingredients ahead of time and store them separately in the fridge. Combine them and add the dressing just before serving to keep everything fresh and crisp.

    What other dressings work well with this salad?

    Besides Italian dressing, ranch, Caesar, or even a simple olive oil and vinegar combination work beautifully. The key is to choose a dressing that complements the flavors of the meats and cheeses you’ve selected.

    How long will leftovers last in the fridge?

    Leftovers can be stored in an airtight container in the fridge for up to 2 days. However, the salad is best enjoyed fresh, as the vegetables may wilt over time.

    Summary

    This Sub Salad is a versatile, flavorful dish that brings all the joys of a sub sandwich into a healthy, bread-free format. Perfect for any meal, it’s customizable to suit any taste and is sure to be a hit with everyone.

  • Creamy Dreamy Potato Salad Mayonnaise Recipe: A Summer Picnic Must-Have!

    Creamy Dreamy Potato Salad Mayonnaise Recipe: A Summer Picnic Must-Have!

    Zesty, creamy, and utterly delicious, this potato salad mayonnaise recipe is your go-to for any summer gathering. Perfectly balanced with a creamy mayo dressing and a hint of mustard, it’s a crowd-pleaser that’s as easy to make as it is to devour.

    Why This Recipe Works

    • The combination of creamy mayonnaise and a touch of mustard creates a dressing that’s rich yet balanced.
    • Using waxy potatoes ensures your salad holds its shape, offering the perfect bite every time.
    • A sprinkle of fresh herbs adds a burst of flavor and color, making it as beautiful as it is tasty.

    Ingredients

    • 2 pounds waxy potatoes, peeled and cubed
    • 1 cup mayonnaise
    • 2 tablespoons mustard
    • 1/2 cup chopped celery
    • 1/4 cup chopped red onion
    • Salt and pepper to taste
    • 2 tablespoons fresh dill, chopped

    Equipment Needed

    • Large pot
    • Mixing bowl
    • Knife and cutting board
    • Measuring cups and spoons

    Instructions

    Potato Salad Mayonnaise Recipe

    Step 1: Cook the Potatoes

    Start by placing your peeled and cubed potatoes in a large pot. Cover them with cold water by about an inch, then bring to a boil over high heat. Once boiling, reduce the heat to medium and let them simmer for about 10-15 minutes, or until they’re just tender when pierced with a fork. Drain and let them cool slightly.

    Step 2: Prepare the Dressing

    In a large mixing bowl, whisk together the mayonnaise and mustard until smooth. This combo is the secret to the creamy, tangy dressing that coats every potato piece perfectly. Season with salt and pepper to taste.

    Step 3: Combine Ingredients

    Add the slightly cooled potatoes to the bowl with the dressing. Gently fold in the chopped celery and red onion, ensuring everything is evenly coated. The key here is to mix gently to keep the potatoes from breaking apart.

    Step 4: Add the Final Touches

    Sprinkle the fresh dill over the salad and give it one final gentle mix. The dill adds a fresh, herby brightness that lifts the whole dish.

    Step 5: Chill and Serve

    Cover the bowl and refrigerate the salad for at least an hour before serving. This chilling time allows the flavors to meld together beautifully. Serve cold and enjoy the compliments!

    Tips and Tricks

    For an extra flavor boost, consider adding a tablespoon of apple cider vinegar to the dressing for a slight tang. If you’re short on time, you can serve the salad immediately, but the flavors won’t be as developed. For a smoother texture, mash a few of the potatoes before mixing them in. Always taste and adjust the seasoning before serving. And remember, the salad tastes even better the next day, so don’t hesitate to make it ahead!

    Recipe Variations

    • Add hard-boiled eggs for a protein-packed twist.
    • Mix in some crispy bacon bits for a smoky flavor.
    • Swap the dill for parsley or cilantro for a different herbal note.
    • Include a diced apple for a sweet crunch.
    • Use Greek yogurt in place of half the mayonnaise for a lighter version.

    Frequently Asked Questions

    Can I use any type of potato? Waxy potatoes like Yukon Gold or red potatoes are best because they hold their shape after cooking. Russets can get too mushy.

    How long can I store this salad? Properly stored in an airtight container, it’ll keep in the fridge for up to 3 days.

    Can I make this recipe vegan? Absolutely! Just use vegan mayonnaise and skip the eggs if you’re adding them.

    Summary

    This creamy, dreamy potato salad mayonnaise recipe is a summer essential, perfect for picnics, potlucks, or any day you crave something deliciously comforting. With its simple ingredients and easy steps, it’s sure to become a staple in your recipe collection.

  • Ramen Pasta Salad Recipe: A Fusion Delight

    Ramen Pasta Salad Recipe: A Fusion Delight

    Dive into the world of fusion cuisine with this Ramen Pasta Salad recipe that combines the best of both worlds. Perfect for picnics, potlucks, or a quick weeknight dinner, this dish is sure to impress with its unique flavors and textures.

    Why This Recipe Works

    • The combination of ramen noodles and pasta offers a delightful texture contrast that’s both chewy and tender.
    • It’s a versatile recipe that allows for endless customization with your favorite veggies and proteins.
    • The dressing is a simple yet flavorful mix that brings all the ingredients together harmoniously.
    • Quick and easy to prepare, making it perfect for busy days.
    • It’s a great way to use up leftover ingredients in your fridge.

    Ingredients

    • 2 packs of ramen noodles (seasoning packets discarded)
    • 2 cups of fusilli pasta
    • 1 cup of shredded carrots
    • 1 cup of thinly sliced cucumbers
    • 1/2 cup of chopped green onions
    • 1/4 cup of soy sauce
    • 2 tbsp of sesame oil
    • 1 tbsp of honey
    • 1 tsp of grated ginger
    • 1 clove of garlic, minced

    Equipment Needed

    • Large pot
    • Colander
    • Mixing bowls
    • Whisk
    • Measuring cups and spoons

    Instructions

    Ramen Pasta Salad Recipe

    Step 1: Cook the Pasta and Ramen

    Bring a large pot of water to a boil and add the fusilli pasta. Cook according to package instructions until al dente, about 8-10 minutes. In the last 2 minutes of cooking, add the ramen noodles to the pot. Drain everything in a colander and rinse under cold water to stop the cooking process. Tip: Rinsing the pasta and noodles helps prevent them from sticking together.

    Step 2: Prepare the Vegetables

    While the pasta and ramen are cooking, prepare your vegetables. Shred the carrots, slice the cucumbers thinly, and chop the green onions. Having your veggies ready to go makes the assembly process much smoother. Tip: For extra crunch, you can add other vegetables like bell peppers or snap peas.

    Step 3: Make the Dressing

    In a small mixing bowl, whisk together the soy sauce, sesame oil, honey, grated ginger, and minced garlic until well combined. This dressing is the secret to the salad’s addictive flavor. Tip: Adjust the honey and soy sauce to taste if you prefer a sweeter or saltier dressing.

    Step 4: Combine Everything

    In a large mixing bowl, combine the cooled pasta and ramen with the prepared vegetables. Pour the dressing over the top and toss everything together until well coated. The salad is best served chilled, so let it sit in the fridge for at least 30 minutes before serving.

    Step 5: Serve and Enjoy

    Once chilled, give the salad a final toss and serve. This dish is perfect on its own or as a side to grilled meats. The flavors meld together beautifully over time, making it even more delicious the next day.

    Tips and Tricks

    For those looking to elevate their Ramen Pasta Salad, consider these advanced tips. First, toasting the ramen noodles before boiling can add a deeper flavor. Simply break them into pieces and toast in a dry skillet over medium heat until golden. Second, adding a protein like grilled chicken, shrimp, or tofu can turn this salad into a hearty main dish. Third, for an extra burst of flavor, sprinkle some toasted sesame seeds or crushed peanuts on top before serving. Lastly, if you’re making this salad ahead of time, keep the dressing separate until just before serving to maintain the best texture.

    Recipe Variations

    • For a spicy kick, add a teaspoon of sriracha or chili flakes to the dressing.
    • Swap out the vegetables based on what’s in season or your personal preferences. Broccoli, snow peas, or red cabbage would all be great additions.
    • Use different types of pasta or noodles. Soba noodles or whole wheat pasta would work well in this recipe.
    • For a creamier dressing, mix in a tablespoon of peanut butter or tahini.
    • Add fresh herbs like cilantro or mint for a refreshing twist.

    Frequently Asked Questions

    Can I make this recipe gluten-free?

    Absolutely! Simply use gluten-free pasta and ramen noodles, and ensure that your soy sauce is gluten-free as well. There are plenty of gluten-free alternatives available that work just as well in this recipe.

    How long does this salad keep in the fridge?

    This salad can be stored in an airtight container in the fridge for up to 3 days. The flavors will continue to meld, making it even more delicious over time. Just give it a good stir before serving again.

    Can I add meat to this salad?

    Yes, adding meat is a great way to make this salad more filling. Grilled chicken, shrimp, or even thinly sliced steak would be excellent additions. Just cook the meat separately and add it to the salad when you combine everything.

    Summary

    This Ramen Pasta Salad is a fun and flavorful fusion dish that’s perfect for any occasion. With its easy preparation and customizable ingredients, it’s sure to become a favorite in your recipe collection.

  • Japanese Salad Sauce Recipe: A Tangy Twist to Your Greens

    Japanese Salad Sauce Recipe: A Tangy Twist to Your Greens

    Welcome to a flavor-packed journey that will transform your salads from mundane to extraordinary. This Japanese salad sauce is your ticket to adding a burst of umami and tanginess to any bowl of greens.

    Why This Recipe Works

    • It combines the perfect balance of sweet, tangy, and umami flavors that elevate any salad.
    • Uses simple, pantry-staple ingredients that are easy to find.
    • Quick to whip up, saving you time without compromising on taste.
    • Versatile enough to dress not just salads but also as a marinade or dipping sauce.

    Ingredients

    • 1/4 cup soy sauce
    • 2 tbsp rice vinegar
    • 1 tbsp sesame oil
    • 1 tbsp honey
    • 1 tsp grated ginger
    • 1 clove garlic, minced
    • 1 tbsp sesame seeds

    Equipment Needed

    • Mixing bowl
    • Whisk
    • Measuring cups and spoons

    Instructions

    Japanese Salad Sauce Recipe

    Step 1: Combine the Base Ingredients

    In a mixing bowl, whisk together the soy sauce, rice vinegar, and sesame oil until well combined. This forms the base of your sauce, so make sure it’s thoroughly mixed to ensure every bite is flavorful.

    Step 2: Add Sweetness and Aroma

    Stir in the honey, grated ginger, and minced garlic. These ingredients add depth and a hint of sweetness that balances the tanginess of the vinegar.

    Step 3: Finish with Sesame Seeds

    Sprinkle in the sesame seeds and give the sauce a final whisk. The seeds add a nice crunch and nutty flavor that makes this sauce stand out.

    Step 4: Let It Rest

    Allow the sauce to sit for at least 10 minutes before serving. This resting period lets the flavors meld together beautifully.

    Step 5: Serve and Enjoy

    Drizzle over your favorite salad or use as a marinade. The possibilities are endless with this versatile sauce.

    Tips and Tricks

    For a smoother sauce, you can blend all the ingredients except the sesame seeds in a blender until smooth. Then, stir in the sesame seeds by hand. If you prefer a thicker consistency, consider adding a teaspoon of cornstarch dissolved in water and heating the sauce gently until it thickens. Always taste and adjust the seasoning to your preference, as the intensity of ingredients like soy sauce and ginger can vary.

    Recipe Variations

    • Spicy Version: Add a teaspoon of chili oil or a pinch of red pepper flakes for a spicy kick.
    • Creamy Version: Mix in a tablespoon of mayonnaise or Greek yogurt for a creamier texture.
    • Citrus Twist: Substitute lime juice for rice vinegar and add a bit of zest for a citrusy flavor.

    Frequently Asked Questions

    Can I make this sauce ahead of time?

    Absolutely! This sauce can be stored in an airtight container in the refrigerator for up to a week. The flavors will continue to develop, making it even more delicious over time.

    Is there a substitute for honey?

    Yes, you can use maple syrup or agave nectar as a vegan alternative to honey. Both will provide the desired sweetness without altering the flavor profile too much.

    Can I use this sauce for anything other than salads?

    Definitely! This sauce works great as a marinade for meats or tofu, a dipping sauce for spring rolls, or even as a dressing for grain bowls. Its versatility is one of its best features.

    Summary

    This Japanese salad sauce is a simple yet transformative recipe that brings a perfect balance of flavors to any dish. Easy to make and incredibly versatile, it’s a must-try for anyone looking to add a little extra oomph to their meals.

  • Fig Salad Dressing Recipe: A Sweet & Tangy Delight

    Fig Salad Dressing Recipe: A Sweet & Tangy Delight

    Dive into the world of homemade dressings with this fig salad dressing recipe that’s bound to elevate your greens from mundane to magnificent. Perfect for those who love a balance of sweet and tangy flavors.

    Why This Recipe Works

    • The natural sweetness of figs pairs perfectly with the acidity of vinegar, creating a balanced flavor profile.
    • Using fresh figs ensures a vibrant, fruity taste that dried figs can’t match.
    • This dressing is versatile, working well with both leafy greens and grain salads.
    • It’s a healthier alternative to store-bought dressings, free from preservatives and unnecessary additives.
    • The recipe is incredibly easy to make, requiring just a few simple steps and ingredients.

    Ingredients

    • 1 cup fresh figs, stemmed and quartered
    • 1/4 cup extra virgin olive oil
    • 2 tbsp balsamic vinegar
    • 1 tbsp honey
    • 1 tsp Dijon mustard
    • Salt and pepper to taste

    Equipment Needed

    • Blender or food processor
    • Measuring cups and spoons
    • Small bowl for mixing
    • Whisk

    Instructions

    Fig Salad Dressing Recipe

    Step 1: Prepare Your Figs

    Start by washing your fresh figs under cold water. Pat them dry with a clean towel, then remove the stems and quarter them. This ensures they blend smoothly into your dressing. Tip: If your figs aren’t very ripe, you can microwave them for about 10 seconds to soften.

    Step 2: Blend the Base

    In your blender or food processor, combine the quartered figs, balsamic vinegar, honey, and Dijon mustard. Blend on high until the mixture is smooth. This should take about 30 seconds. Tip: For a thinner consistency, you can add a tablespoon of water at this stage.

    Step 3: Emulsify With Olive Oil

    With the blender running on low, slowly drizzle in the olive oil. This process, called emulsification, will give your dressing a creamy, cohesive texture. It should take about a minute to fully incorporate the oil.

    Step 4: Season to Taste

    Transfer the dressing to a small bowl and whisk in salt and pepper to taste. Remember, you can always add more, but you can’t take it out, so start with a little and adjust as needed.

    Step 5: Serve or Store

    Your fig salad dressing is now ready to use! Drizzle it over your favorite salad, or store it in an airtight container in the fridge for up to a week. Tip: Give it a good shake or stir before using, as the ingredients may separate over time.

    Tips and Tricks

    For those looking to take their fig salad dressing to the next level, consider roasting your figs before blending. This enhances their natural sweetness and adds a depth of flavor. Additionally, if you prefer a chunkier texture, you can mash the figs with a fork instead of blending them. Lastly, experimenting with different types of vinegar, like apple cider or red wine vinegar, can introduce new flavor profiles to your dressing.

    Recipe Variations

    • Add a pinch of cinnamon or nutmeg for a warm, spicy note.
    • Incorporate a handful of fresh herbs, such as basil or thyme, for an aromatic twist.
    • For a creamier version, blend in a tablespoon of Greek yogurt or mayonnaise.
    • Swap the honey for maple syrup to make the dressing vegan.
    • Add a clove of garlic or a small shallot for a savory kick.

    Frequently Asked Questions

    Can I use dried figs instead of fresh?

    While you can use dried figs, you’ll need to rehydrate them first by soaking in warm water for about 30 minutes. Keep in mind that the flavor will be more concentrated and less fresh-tasting.

    How long does this dressing last in the fridge?

    Stored properly in an airtight container, your fig salad dressing should last up to a week. Always give it a good stir or shake before using, as separation is natural.

    Can I freeze this dressing?

    Freezing is not recommended, as the texture and consistency may change upon thawing, affecting the overall quality of the dressing.

    Summary

    This fig salad dressing recipe is a game-changer for salad lovers, offering a perfect blend of sweet and tangy flavors. Easy to make and customizable, it’s sure to become a staple in your kitchen.

  • Classic Caesar Salad Recipe NYT – A Crunchy, Creamy Delight

    Classic Caesar Salad Recipe NYT – A Crunchy, Creamy Delight

    Perfect for those who crave a salad with a punch of flavor and a satisfying crunch, this Classic Caesar Salad recipe is a game-changer. Packed with crisp romaine, homemade croutons, and a creamy dressing, it’s a timeless dish that never fails to impress.

    Why This Recipe Works

    • The homemade dressing beats store-bought any day, with its perfect balance of tangy, creamy, and umami flavors.
    • Freshly made croutons add an irresistible crunch and buttery flavor that elevates the salad.
    • Using high-quality Parmesan cheese ensures a rich, nutty taste that’s essential for authenticity.
    • The addition of anchovies in the dressing provides depth and a classic Caesar flavor profile.
    • This recipe is versatile, allowing for easy customization to suit dietary preferences or to add a personal twist.

    Ingredients

    • 1 large head of romaine lettuce, washed and torn into bite-sized pieces
    • 1/2 cup extra-virgin olive oil
    • 2 cloves garlic, minced
    • 1 cup day-old bread, cubed
    • 1/2 cup freshly grated Parmesan cheese
    • 2 anchovy fillets, minced
    • 1 large egg yolk
    • 1 tbsp Dijon mustard
    • 1 tbsp lemon juice
    • Salt and freshly ground black pepper to taste

    Equipment Needed

    • Large salad bowl
    • Small mixing bowl
    • Whisk
    • Baking sheet
    • Skillet

    Instructions

    Caesar Salad Recipe Nyt

    Step 1: Prepare the Croutons

    Preheat your oven to 375°F. Toss the bread cubes with 2 tablespoons of olive oil and a pinch of salt. Spread them out on a baking sheet and bake for 10-12 minutes, or until golden and crispy. Let them cool before adding to the salad.

    Step 2: Make the Dressing

    In a small bowl, whisk together the egg yolk, Dijon mustard, and lemon juice. Slowly drizzle in the remaining olive oil while whisking continuously until the dressing is emulsified. Stir in the minced garlic and anchovies, then season with salt and pepper to taste.

    Step 3: Assemble the Salad

    In a large salad bowl, combine the torn romaine lettuce with half of the Parmesan cheese. Drizzle the dressing over the lettuce and toss gently to coat. Add the croutons and the remaining Parmesan, then give it one final toss.

    Step 4: Serve Immediately

    Divide the salad among plates and serve right away to ensure the croutons stay crispy and the lettuce remains fresh. Enjoy the perfect balance of flavors and textures in every bite.

    Tips and Tricks

    For an even more flavorful dressing, let it sit for 30 minutes before tossing with the salad to allow the flavors to meld. If you’re concerned about using raw egg yolk, you can substitute it with mayonnaise for a similar texture and richness. To make this salad ahead of time, prepare the dressing and croutons separately and combine them just before serving to maintain the best texture.

    Recipe Variations

    • Add grilled chicken or shrimp for a protein-packed meal.
    • Substitute kale for romaine for a heartier green.
    • For a vegetarian version, omit the anchovies and add a splash of Worcestershire sauce.
    • Try adding avocado slices for extra creaminess.
    • For a gluten-free option, use gluten-free bread for the croutons.

    Frequently Asked Questions

    Can I make the dressing without anchovies?

    Yes, you can omit the anchovies if you prefer, but they do add a depth of flavor that’s characteristic of a classic Caesar dressing. Consider adding a bit of Worcestershire sauce as a substitute for some of that umami taste.

    How long will the dressing keep in the fridge?

    The dressing can be stored in an airtight container in the refrigerator for up to 3 days. Give it a good whisk before using, as it may separate slightly.

    Can I use store-bought croutons?

    While you can use store-bought croutons for convenience, homemade croutons really make a difference in texture and flavor. They’re easy to make and can be customized with your favorite herbs and spices.

    Summary

    This Classic Caesar Salad recipe is a foolproof way to bring a restaurant-quality dish to your table. With its creamy dressing, crispy croutons, and fresh romaine, it’s a salad that’s sure to please.

  • Frozen Pea Salad Recipe: A Cool Twist on a Classic

    Frozen Pea Salad Recipe: A Cool Twist on a Classic

    Every now and then, a recipe comes along that’s so simple yet so satisfying, it earns a permanent spot in your culinary repertoire. This frozen pea salad is one of those recipes. It’s crisp, refreshing, and packed with flavors that meld together beautifully after a quick chill in the fridge.

    Why This Recipe Works

    • Quick and Easy: With minimal prep time and no cooking required, this salad is a breeze to put together.
    • Refreshing: The frozen peas thaw just enough to be tender yet still retain a delightful crunch.
    • Versatile: Perfect as a side dish or a light main, it’s adaptable to whatever you’re serving.
    • Flavorful: A tangy dressing and mix-ins like cheese and bacon elevate the humble pea to new heights.

    Ingredients

    • 4 cups frozen peas, thawed
    • 1/2 cup mayonnaise
    • 2 tablespoons apple cider vinegar
    • 1 teaspoon sugar
    • 1/2 teaspoon salt
    • 1/4 teaspoon black pepper
    • 1/2 cup diced cheddar cheese
    • 1/4 cup diced red onion
    • 4 slices bacon, cooked and crumbled

    Equipment Needed

    • Large mixing bowl
    • Whisk
    • Measuring cups and spoons
    • Serving bowl

    Instructions

    Frozen Pea Salad Recipe

    Step 1: Prepare the Dressing

    In a large mixing bowl, whisk together the mayonnaise, apple cider vinegar, sugar, salt, and black pepper until smooth. This creamy, tangy dressing is the secret to the salad’s addictive flavor. Tip: For a lighter version, you can substitute half of the mayonnaise with Greek yogurt.

    Step 2: Combine the Ingredients

    Add the thawed peas, diced cheddar cheese, and diced red onion to the bowl with the dressing. Gently stir until all the ingredients are evenly coated. The combination of sweet peas, sharp cheese, and pungent onion creates a perfect balance of flavors.

    Step 3: Add the Bacon

    Fold in the crumbled bacon, reserving a little for garnish if desired. The bacon adds a smoky crunch that contrasts beautifully with the creamy peas. Tip: For a vegetarian version, omit the bacon or substitute with smoked almonds for a similar crunch and flavor.

    Step 4: Chill the Salad

    Cover the bowl with plastic wrap and refrigerate for at least 1 hour before serving. This chilling time allows the flavors to meld together and the peas to soften slightly. Tip: If you’re in a hurry, you can serve the salad immediately, but the flavors won’t be as developed.

    Step 5: Serve and Enjoy

    Transfer the salad to a serving bowl, garnish with the reserved bacon if using, and serve chilled. This salad is best enjoyed the day it’s made but can be stored in the refrigerator for up to 2 days.

    Tips and Tricks

    For the best texture, make sure your peas are fully thawed but still cold when you mix them with the dressing. If you’re using fresh peas, blanch them quickly in boiling water, then shock them in ice water to preserve their bright green color and crisp texture. To make this salad ahead of time, prepare all the components but wait to add the bacon until just before serving to keep it crispy. For a more colorful presentation, add some diced red bell pepper or shredded carrots. And remember, the salad’s flavor improves as it sits, so don’t skip the chilling step if you can help it.

    Recipe Variations

    • Mediterranean Twist: Swap the cheddar for feta cheese and add some chopped Kalamata olives and a sprinkle of oregano.
    • Southwestern Style: Add some corn, black beans, diced avocado, and a squeeze of lime juice for a Tex-Mex flair.
    • Asian Inspired: Use a dressing of sesame oil, rice vinegar, and a touch of soy sauce, and top with toasted sesame seeds.
    • Protein-Packed: Stir in some diced ham or turkey to turn this side into a hearty main dish.

    Frequently Asked Questions

    Can I use fresh peas instead of frozen? Absolutely! Fresh peas will give you a slightly sweeter and more vibrant salad. Just blanch them for a minute or two in boiling water, then cool them down in ice water before using.

    How long can I store the salad? This salad is best enjoyed within 1-2 days of making it. After that, the peas can start to lose their texture and the dressing may separate a bit.

    Can I make this salad vegan? Yes! Simply use vegan mayonnaise and skip the bacon or use a plant-based alternative. You can also add some smoked paprika to mimic the smoky flavor of bacon.

    Summary

    This frozen pea salad is a refreshing, easy-to-make dish that’s perfect for picnics, potlucks, or a quick weeknight side. With its creamy dressing, crisp peas, and smoky bacon, it’s a crowd-pleaser that’s sure to become a favorite.

  • Caesar Kale Salad Recipe: A Crunchy Twist on a Classic

    Caesar Kale Salad Recipe: A Crunchy Twist on a Classic

    Alright, let’s dive into making a Caesar salad that even Julius himself would envy. This version swaps out the traditional romaine for kale, adding a nutritious punch and a satisfying crunch that’ll have you coming back for seconds.

    Why This Recipe Works

    • Kale’s sturdy leaves hold up beautifully against the creamy Caesar dressing, ensuring every bite is as crisp as the last.
    • Homemade croutons add a golden, buttery crunch that store-bought versions just can’t match.
    • The addition of Parmesan cheese brings a salty, umami depth that complements the kale’s earthiness.
    • This salad is a meal in itself but can easily be paired with your favorite protein for an extra hearty dish.
    • It’s a fantastic way to sneak some greens into your diet without sacrificing flavor.

    Ingredients

    • 1 bunch kale, stems removed and leaves torn into bite-sized pieces
    • 1/2 cup grated Parmesan cheese
    • 1 cup homemade croutons
    • 1/2 cup Caesar dressing
    • 1 tbsp lemon juice
    • Salt and pepper to taste

    Equipment Needed

    • Large mixing bowl
    • Salad spinner
    • Baking sheet
    • Chef’s knife

    Instructions

    Caesar Kale Salad Recipe

    Prepare the Kale

    Start by washing your kale thoroughly under cold water. Use a salad spinner to dry the leaves completely—this ensures the dressing sticks properly. Remove the stems and tear the leaves into bite-sized pieces. Place the kale in a large mixing bowl.

    Make the Croutons

    Preheat your oven to 375°F. Cut day-old bread into 1-inch cubes, toss with olive oil, salt, and your favorite herbs, then spread on a baking sheet. Bake for 10-15 minutes until golden and crispy. Let cool before adding to the salad.

    Dress the Salad

    Add the Caesar dressing and lemon juice to the kale. Use your hands to massage the dressing into the leaves—this helps soften the kale and ensures every leaf is coated. Season with salt and pepper to taste.

    Add the Toppings

    Sprinkle the grated Parmesan cheese and homemade croutons over the dressed kale. Toss gently to combine, ensuring the toppings are evenly distributed throughout the salad.

    Serve Immediately

    This salad is best enjoyed right after preparation to maintain the crunch of the croutons and the freshness of the kale. Serve as a standalone meal or as a side to your favorite dish.

    Tips and Tricks

    For an even more flavorful salad, try roasting the kale leaves lightly before adding the dressing. This brings out a slightly sweeter flavor and adds another layer of texture. If you’re short on time, a store-bought Caesar dressing can work in a pinch, but homemade will always taste better. Don’t skip massaging the kale—it’s the secret to removing any bitterness and making the leaves tender. For a nuttier flavor, swap half the Parmesan with pecorino Romano. And remember, the quality of your ingredients will make or break this salad, so opt for the best you can find.

    Recipe Variations

    • Add grilled chicken or shrimp for a protein-packed meal.
    • Swap the kale for Brussels sprouts leaves for a different kind of crunch.
    • Include anchovies in the dressing for a traditional Caesar flavor.
    • Top with avocado slices for a creamy contrast.
    • Use gluten-free bread for the croutons to make this salad celiac-friendly.

    Frequently Asked Questions

    Can I make this salad ahead of time?

    Yes, but keep the dressing and croutons separate until just before serving to prevent the kale from wilting and the croutons from getting soggy. The kale can be prepped and stored in the fridge, and the croutons can be kept in an airtight container at room temperature.

    How do I store leftovers?

    Leftovers can be stored in an airtight container in the refrigerator for up to 2 days. Note that the croutons will lose their crunch over time, so you might want to make a fresh batch if you plan on having leftovers.

    Can I use bottled lemon juice?

    While fresh lemon juice is preferred for its bright flavor, bottled lemon juice can be used in a pinch. Just be aware that it might have a slightly different taste and could contain preservatives.

    Summary

    This Caesar Kale Salad is a delightful twist on the classic, offering a nutritious and flavorful option that’s perfect for any occasion. With its crunchy homemade croutons, creamy dressing, and hearty kale, it’s a salad that stands tall on its own or as part of a larger meal.