Author: onlinefoodrecipes

  • Beet and Potato Salad Recipe: A Colorful Twist on a Classic

    Beet and Potato Salad Recipe: A Colorful Twist on a Classic

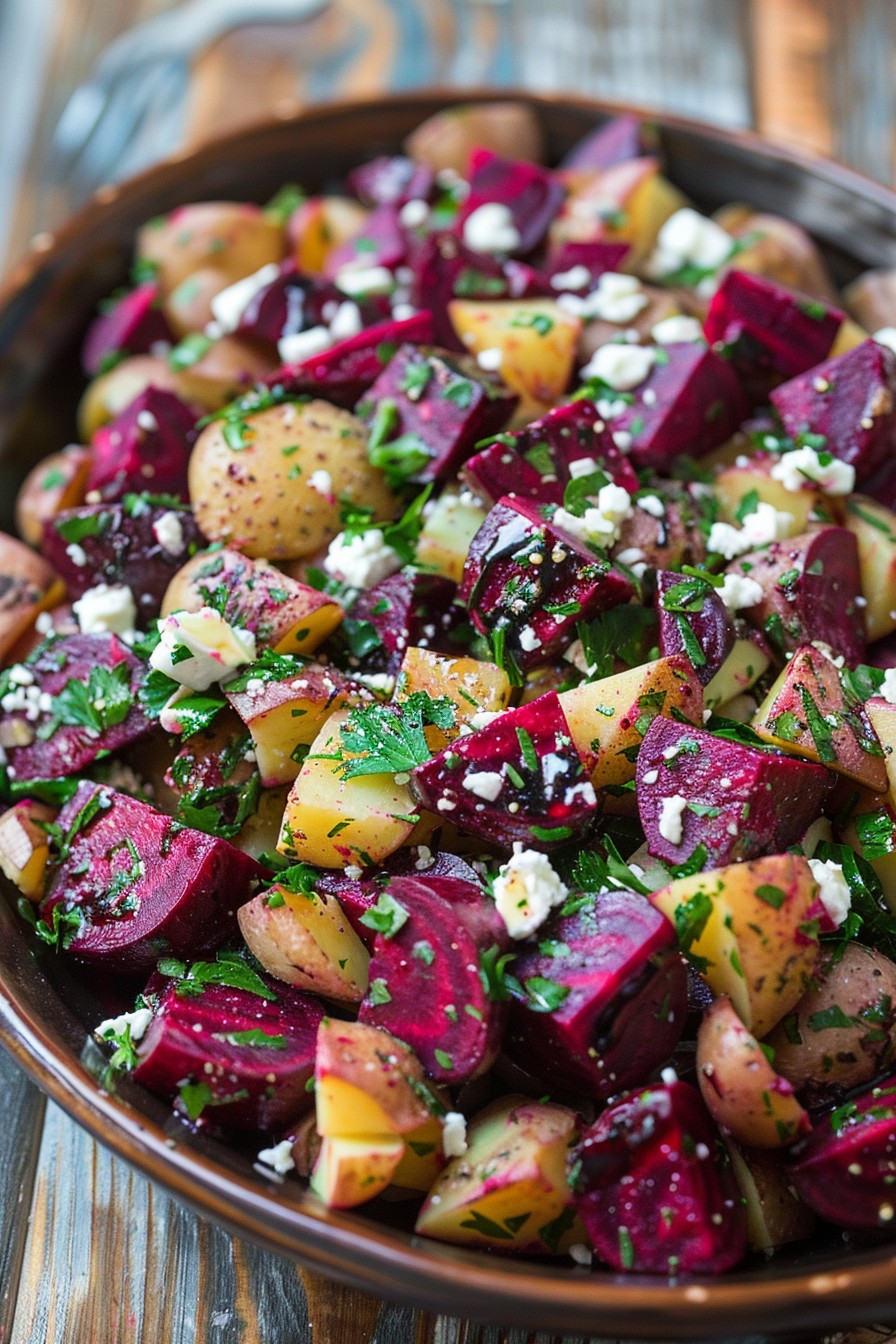
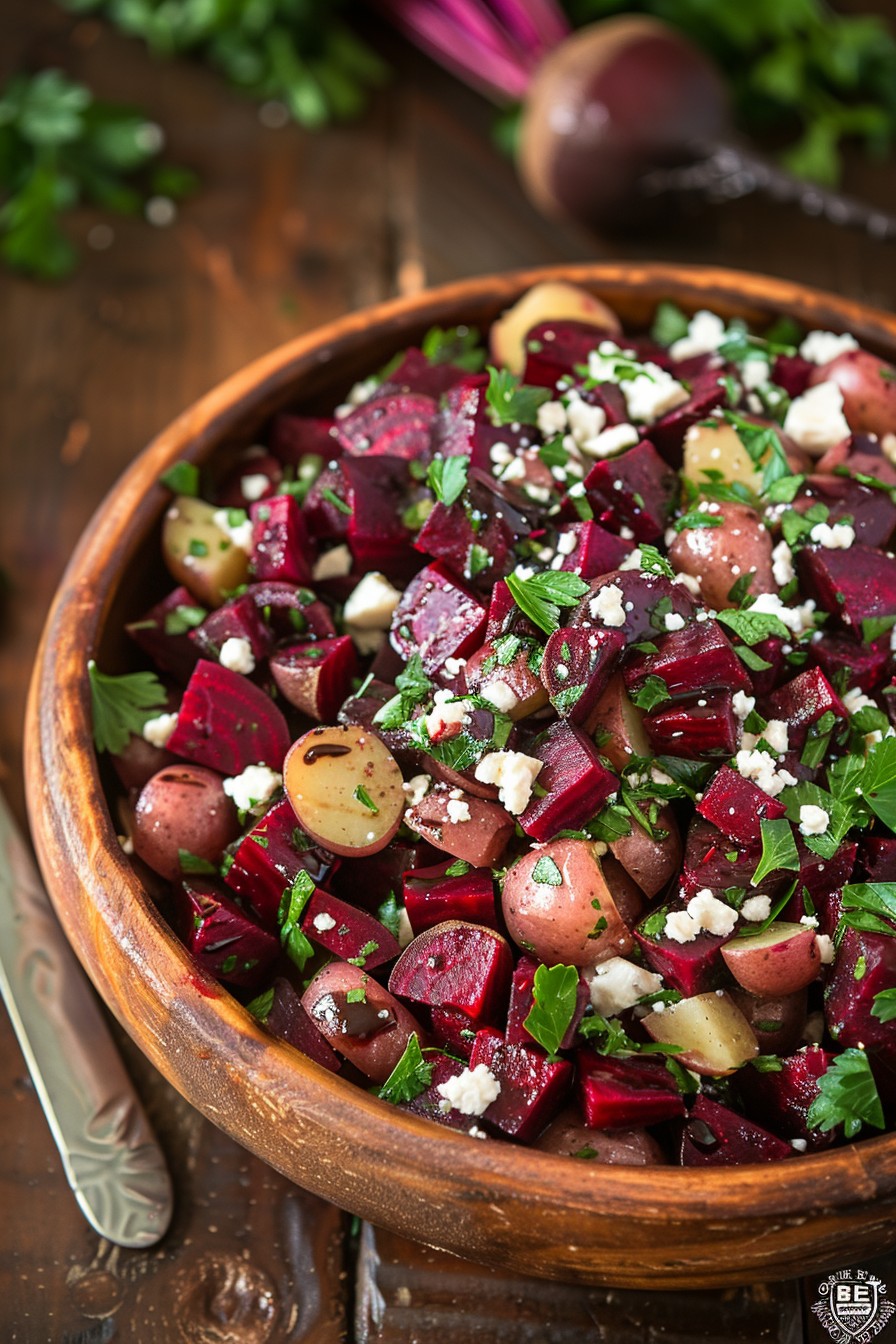
    Craving something vibrant and delicious? This beet and potato salad is your ticket to flavor town. Combining the earthy sweetness of beets with the hearty comfort of potatoes, this dish is a feast for the eyes and the palate.

    Why This Recipe Works

    • The combination of beets and potatoes offers a perfect balance of sweetness and earthiness.
    • Roasting the vegetables enhances their natural flavors, making the salad more delicious.
    • The addition of a tangy dressing cuts through the richness, adding a refreshing contrast.
    • It’s a versatile dish that can be served warm or cold, making it perfect for any occasion.
    • This salad is not only tasty but also packed with nutrients, offering a healthy option for any meal.

    Ingredients

    • 2 medium beets, peeled and diced into 1/2-inch cubes
    • 2 medium potatoes, peeled and diced into 1/2-inch cubes
    • 2 tablespoons olive oil
    • 1 tablespoon balsamic vinegar
    • 1 teaspoon Dijon mustard
    • Salt and pepper to taste
    • 1/4 cup chopped fresh parsley
    • 1/4 cup crumbled feta cheese (optional)

    Equipment Needed

    • Baking sheet
    • Mixing bowls
    • Whisk
    • Measuring cups and spoons
    • Knife and cutting board

    Instructions

    Beet And Potato Salad Recipe

    Preheat and Prep

    Preheat your oven to 400°F. While the oven is heating, peel and dice the beets and potatoes into 1/2-inch cubes. Tip: Cutting them into uniform sizes ensures even cooking.

    Roast the Vegetables

    Toss the diced beets and potatoes with 1 tablespoon of olive oil, salt, and pepper. Spread them out on a baking sheet in a single layer. Roast for 25-30 minutes, or until tender and slightly caramelized. Tip: Stir halfway through to ensure even roasting.

    Make the Dressing

    In a small bowl, whisk together the remaining olive oil, balsamic vinegar, Dijon mustard, and a pinch of salt and pepper. Adjust the seasoning to taste.

    Combine and Serve

    Once the vegetables are done, let them cool slightly before transferring to a mixing bowl. Drizzle with the dressing and toss gently to combine. Garnish with chopped parsley and crumbled feta cheese if using. Tip: Letting the salad sit for a few minutes before serving allows the flavors to meld.

    Tips and Tricks

    For an extra flavor boost, try adding roasted garlic or a sprinkle of smoked paprika to the dressing. If you’re short on time, you can microwave the diced beets and potatoes for a few minutes before roasting to speed up the cooking process. For a creamier texture, mash some of the roasted potatoes before adding the dressing. Always taste and adjust the seasoning before serving, as the flavors can change during cooking.

    Recipe Variations

    • Add roasted walnuts or pecans for a crunchy texture.
    • Swap the feta cheese for goat cheese for a creamier taste.
    • Include other roasted vegetables like carrots or sweet potatoes for more color and flavor.
    • Use a different dressing, such as a lemon tahini or honey mustard, to change the flavor profile.
    • For a vegan version, omit the cheese or use a plant-based alternative.

    Frequently Asked Questions

    Can I make this salad ahead of time? Yes, you can prepare the salad up to a day in advance. Just keep the dressing separate and add it before serving to keep the vegetables from getting soggy.

    How do I store leftovers? Store any leftovers in an airtight container in the refrigerator for up to 3 days. The flavors will continue to develop, making it even more delicious the next day.

    Can I use canned beets? While you can use canned beets for convenience, roasting fresh beets will give the salad a better texture and more intense flavor.

    Summary

    This beet and potato salad is a delightful mix of flavors and textures, perfect for any meal. With its vibrant colors and delicious taste, it’s sure to become a favorite.

  • Cherry Pocket Salad Dressing Recipe: A Sweet & Tangy Delight

    Cherry Pocket Salad Dressing Recipe: A Sweet & Tangy Delight

    Today’s the day to jazz up your salads with a dressing that’s as fun to make as it is to eat. This cherry pocket salad dressing is a game-changer, blending sweet, tangy, and creamy into one irresistible concoction. Let’s dive in!

    Why This Recipe Works

    • Perfect Balance: The sweetness of cherries meets the tanginess of vinegar for a dressing that’s just right.
    • Easy to Make: With simple ingredients and steps, anyone can whip this up in no time.
    • Versatile: Great on salads, as a marinade, or even as a dip.

    Ingredients

    • 1 cup fresh cherries, pitted and chopped
    • 1/4 cup olive oil
    • 2 tbsp balsamic vinegar
    • 1 tbsp honey
    • 1/2 tsp salt
    • 1/4 tsp black pepper

    Equipment Needed

    • Blender or food processor
    • Measuring cups and spoons
    • Knife and cutting board

    Instructions

    Cherry Pocket Salad Dressing Recipe

    Step 1: Prep Your Cherries

    Start by washing and pitting your cherries. Chop them roughly to make blending easier. This ensures your dressing will have a smooth consistency without any large chunks.

    Step 2: Blend the Base

    In your blender, combine the chopped cherries, olive oil, balsamic vinegar, honey, salt, and pepper. Blend on high for about 30 seconds until the mixture is smooth. If it’s too thick, add a tablespoon of water to thin it out.

    Step 3: Taste and Adjust

    Give your dressing a taste. Want it sweeter? Add a bit more honey. Prefer it tangier? A splash more vinegar will do the trick. This is your chance to make it perfect for your palate.

    Step 4: Serve or Store

    Pour your dressing into a jar or bottle. It can be used immediately or stored in the fridge for up to a week. The flavors will meld and deepen over time, making it even more delicious.

    Tips and Tricks

    For an extra smooth dressing, strain it through a fine mesh sieve to remove any remaining cherry bits. If you’re using frozen cherries, thaw them completely and pat dry to avoid watering down your dressing. For a creamier version, add a tablespoon of Greek yogurt or mayonnaise. These small tweaks can elevate your dressing from good to great.

    Recipe Variations

    • Spicy Kick: Add a pinch of cayenne pepper or a diced jalapeño for some heat.
    • Herb Infused: Mix in fresh basil or mint for a refreshing twist.
    • Citrus Zest: A bit of orange or lemon zest can add a bright, citrusy note.

    Frequently Asked Questions

    Can I use frozen cherries? Absolutely! Just make sure they’re thawed and dried well to prevent your dressing from becoming too watery.

    How long does this dressing last? Stored in an airtight container in the fridge, it’ll stay fresh for up to a week.

    Can I make it without a blender? Yes, you can mash the cherries with a fork and whisk everything together, though the texture will be chunkier.

    Summary

    This cherry pocket salad dressing is a versatile, easy-to-make addition to any meal. With its perfect balance of sweet and tangy, it’s sure to become a staple in your kitchen.

  • Tortellini Pesto Salad Recipe: A Fresh Twist on Classic Pasta

    Tortellini Pesto Salad Recipe: A Fresh Twist on Classic Pasta

    Craving something fresh yet comforting? This tortellini pesto salad combines the best of both worlds, offering a delightful mix of cheesy tortellini, vibrant pesto, and crisp veggies. Perfect for picnics, potlucks, or a quick weeknight dinner, this dish is as versatile as it is delicious.

    Why This Recipe Works

    • The combination of cheese-filled tortellini and homemade pesto creates a rich, flavorful base that’s hard to resist.
    • Adding fresh vegetables like cherry tomatoes and spinach introduces a refreshing crunch and a boost of nutrients.
    • It’s a versatile dish that can be served warm or cold, making it perfect for any occasion.
    • The recipe is quick and easy, requiring minimal cooking and prep time.
    • Customizable with various add-ins, allowing you to tailor it to your taste preferences.

    Ingredients

    • 1 lb cheese tortellini
    • 1/2 cup homemade or store-bought pesto
    • 1 cup cherry tomatoes, halved
    • 2 cups fresh spinach leaves
    • 1/4 cup pine nuts, toasted
    • Salt and pepper to taste

    Equipment Needed

    • Large pot
    • Colander
    • Mixing bowl
    • Measuring cups and spoons
    • Knife and cutting board

    Instructions

    Tortellini Pesto Salad Recipe

    Step 1: Cook the Tortellini

    Bring a large pot of salted water to a boil. Add the tortellini and cook according to the package instructions, usually about 7-9 minutes, until they float to the top. Drain well and let them cool slightly.

    Step 2: Prepare the Vegetables

    While the tortellini is cooking, wash and halve the cherry tomatoes. Rinse the spinach leaves and pat them dry. Toast the pine nuts in a dry skillet over medium heat until golden, about 3-5 minutes, stirring frequently to prevent burning.

    Step 3: Mix the Salad

    In a large mixing bowl, combine the slightly cooled tortellini with the pesto, tossing gently to coat evenly. Add the cherry tomatoes, spinach, and toasted pine nuts, mixing lightly to distribute the ingredients throughout the salad.

    Step 4: Season to Taste

    Season the salad with salt and pepper to taste. Remember, the pesto already contains salt, so you might not need much additional seasoning.

    Step 5: Serve or Chill

    You can serve the salad immediately while it’s still warm, or cover and refrigerate it for at least an hour to serve it chilled. Both ways are delicious!

    Tips and Tricks

    For an extra flavor boost, consider adding grated Parmesan cheese or a squeeze of lemon juice before serving. If you’re making the salad ahead of time, keep the pine nuts separate and add them just before serving to maintain their crunch. For a vegan version, use dairy-free tortellini and pesto. Always taste and adjust the seasoning after mixing, as flavors can meld and change over time.

    Recipe Variations

    • Protein Power: Add grilled chicken, shrimp, or chickpeas for an extra protein punch.
    • Veggie Delight: Incorporate other vegetables like roasted red peppers, cucumbers, or avocado for added texture and flavor.
    • Cheese Lover: Mix in chunks of mozzarella or feta cheese for a creamy, tangy twist.
    • Spicy Kick: Add a dash of red pepper flakes or diced jalapeños for some heat.
    • Dressing Swap: Substitute pesto with a creamy Caesar or balsamic vinaigrette for a different flavor profile.

    Frequently Asked Questions

    Can I use dried tortellini instead of fresh?

    Absolutely! Dried tortellini works just as well in this recipe. Just be sure to cook it according to the package instructions, as cooking times may vary slightly from fresh tortellini.

    How long does this salad keep in the fridge?

    Stored in an airtight container, the salad will stay fresh for up to 3 days. However, the spinach may wilt slightly over time, so it’s best enjoyed within the first day or two.

    Can I make the pesto from scratch?

    Yes, homemade pesto can elevate the dish with its fresh, vibrant flavors. Blend together basil leaves, garlic, pine nuts, Parmesan cheese, and olive oil until smooth. Adjust the ingredients to taste.

    Summary

    This tortellini pesto salad is a quick, flavorful, and versatile dish that’s perfect for any occasion. With its combination of cheesy pasta, fresh vegetables, and aromatic pesto, it’s sure to become a favorite in your recipe collection.

  • Creamy Dreamy Chicken Salad with Sour Cream

    Creamy Dreamy Chicken Salad with Sour Cream

    Make your taste buds dance with this tangy twist on classic chicken salad!

    Why This Recipe Works

    • The sour cream adds a rich, tangy depth that mayo alone can’t achieve.
    • Perfect balance of textures with crunchy celery and soft chicken.
    • Quick to prepare, making it ideal for last-minute lunches or dinners.
    • Versatile enough to serve on bread, greens, or straight from the bowl.

    Ingredients

    • 2 cups cooked chicken, shredded
    • 1/2 cup sour cream
    • 1/4 cup mayonnaise
    • 1 celery stalk, finely diced
    • 1 tbsp lemon juice
    • 1 tsp garlic powder
    • Salt and pepper to taste

    Equipment Needed

    • Mixing bowl
    • Measuring cups and spoons
    • Knife and cutting board

    Instructions

    Chicken Salad Recipe Using Sour Cream

    Step 1: Combine the Creamy Base

    In a large mixing bowl, whisk together the sour cream and mayonnaise until smooth. This combo is the secret to our salad’s irresistible creaminess. Tip: For an extra tangy kick, add a splash more lemon juice.

    Step 2: Add the Chicken

    Fold in the shredded chicken, ensuring each piece is lovingly coated with the creamy mixture. The chicken should be moist but not swimming in dressing.

    Step 3: Incorporate the Crunch

    Gently mix in the diced celery for that essential crunch. It’s the texture contrast that makes this salad a standout.

    Step 4: Season to Perfection

    Sprinkle in the garlic powder, salt, and pepper. Taste and adjust the seasoning—because bland chicken salad is a sad affair.

    Step 5: Chill and Serve

    Cover and refrigerate for at least 30 minutes to let the flavors meld. Serve chilled for the best experience. Tip: This salad tastes even better the next day!

    Tips and Tricks

    For those looking to elevate their chicken salad game, consider roasting your own chicken for deeper flavor. If you’re short on time, a rotisserie chicken works wonders. Toasting the bread or adding avocado slices can transform your serving style. For a healthier twist, swap half the sour cream with Greek yogurt. Remember, the key to a great chicken salad is balancing flavors and textures, so don’t shy away from experimenting with add-ins like grapes or nuts.

    Recipe Variations

    • Spicy Kick: Add diced jalapeños or a dash of hot sauce.
    • Fruity Twist: Mix in diced apples or grapes for sweetness.
    • Nutty Crunch: Stir in chopped walnuts or almonds.
    • Herbaceous: Fresh dill or parsley can add a bright note.

    Frequently Asked Questions

    Can I use Greek yogurt instead of sour cream? Absolutely! Greek yogurt is a fantastic substitute that offers a similar tanginess with fewer calories. Just keep in mind it might make the salad a bit thicker, so you could thin it with a little milk or lemon juice if needed.

    How long can I store this chicken salad? Stored in an airtight container, your chicken salad will stay fresh in the fridge for up to 3 days. Beyond that, the texture starts to suffer, and nobody wants a soggy salad.

    Can I freeze chicken salad? Freezing is not recommended due to the dairy components, which can separate and become grainy upon thawing. It’s best enjoyed fresh or within a few days of making.

    Summary

    This Creamy Dreamy Chicken Salad with Sour Cream is a delightful twist on the classic, offering a perfect balance of tangy, creamy, and crunchy. Easy to make and versatile, it’s sure to become a go-to recipe for any occasion.

  • 7 Layer Pea Salad Recipe: A Crunchy, Creamy Dream

    7 Layer Pea Salad Recipe: A Crunchy, Creamy Dream

    Welcome to a dish that’s as fun to make as it is to eat! This 7 Layer Pea Salad is a vibrant, crunchy, and creamy delight that’s perfect for picnics, potlucks, or just because you deserve something delicious today.

    Why This Recipe Works

    • The combination of textures from the crunchy peas, crisp bacon, and creamy dressing creates a symphony in every bite.
    • It’s a make-ahead marvel, tasting even better after the flavors meld in the fridge.
    • With layers of color and flavor, it’s as visually appealing as it is tasty.
    • Simple ingredients come together for a surprisingly sophisticated dish.
    • It’s versatile, allowing for easy swaps to suit dietary needs or preferences.

    Ingredients

    • 4 cups frozen peas, thawed
    • 1 cup shredded cheddar cheese
    • 1/2 cup red onion, finely diced
    • 1 cup celery, diced
    • 6 strips bacon, cooked and crumbled
    • 1 cup mayonnaise
    • 1/2 cup sour cream
    • 1 tbsp sugar
    • 1 tsp apple cider vinegar
    • Salt and pepper to taste

    Equipment Needed

    • Large mixing bowl
    • Whisk
    • Measuring cups and spoons
    • Sharp knife
    • Cutting board

    Instructions

    7 Layer Pea Salad Recipe

    Step 1: Prepare the Dressing

    In a large mixing bowl, whisk together the mayonnaise, sour cream, sugar, and apple cider vinegar until smooth. Season with salt and pepper to taste. This creamy, tangy dressing is the glue that holds our salad together, so make sure it’s well blended.

    Step 2: Layer the Peas

    Spread the thawed peas evenly at the bottom of your serving dish. The peas are the foundation of our salad, providing a sweet, crunchy base that contrasts beautifully with the creamy layers above.

    Step 3: Add the Veggies

    Sprinkle the diced red onion and celery over the peas. These add a crisp texture and a burst of flavor that cuts through the richness of the dressing.

    Step 4: Sprinkle the Cheese

    Evenly distribute the shredded cheddar cheese over the vegetables. The cheese adds a sharp, creamy element that complements the sweetness of the peas.

    Step 5: Top with Bacon

    Finish by scattering the crumbled bacon over the top. The bacon adds a smoky, salty crunch that makes this salad irresistible.

    Step 6: Chill and Serve

    Cover the salad and refrigerate for at least 2 hours before serving. This allows the flavors to meld and the salad to reach the perfect temperature.

    Tips and Tricks

    For an extra crunch, consider adding some toasted almonds or sunflower seeds. If you’re short on time, you can use pre-cooked bacon. For a lighter version, substitute Greek yogurt for the sour cream. Always taste your dressing before adding it to the salad to ensure it’s perfectly seasoned. If you’re making this salad ahead, add the bacon just before serving to keep it crispy.

    Recipe Variations

    • Swap the cheddar cheese for feta or blue cheese for a different flavor profile.
    • Add hard-boiled eggs for extra protein.
    • Use green onions instead of red for a milder taste.
    • Incorporate diced ham instead of bacon for a different kind of smokiness.
    • For a vegetarian version, omit the bacon and add smoked paprika for that smoky flavor.

    Frequently Asked Questions

    Can I use fresh peas instead of frozen?

    Absolutely! Fresh peas can be a great substitute, but you’ll want to blanch them first to soften them slightly. Frozen peas are convenient and already perfectly tender, which is why we recommend them.

    How long does this salad keep in the fridge?

    This salad is best enjoyed within 2-3 days. After that, the vegetables may start to lose their crunch, and the dressing can become too watery.

    Can I make this salad dairy-free?

    Yes! Use dairy-free mayonnaise and sour cream alternatives, and skip the cheese or use a dairy-free cheese substitute. The salad will still be delicious.

    Summary

    This 7 Layer Pea Salad is a delightful mix of textures and flavors, perfect for any occasion. Easy to make and even easier to love, it’s sure to become a staple in your recipe collection.

  • Baby Red Potato Salad Recipe: A Creamy Dream Come True

    Baby Red Potato Salad Recipe: A Creamy Dream Come True

    Delight your taste buds with this irresistibly creamy baby red potato salad. Perfect for picnics, potlucks, or just because, this recipe is a crowd-pleaser that combines simplicity with flavor in every bite.

    Why This Recipe Works

    • The baby red potatoes hold their shape well after cooking, providing the perfect texture.
    • A creamy dressing made with mayonnaise and a touch of mustard adds richness without overpowering the potatoes.
    • Fresh herbs and crisp vegetables add brightness and crunch, balancing the creaminess of the dressing.
    • It’s versatile; serve it warm, at room temperature, or chilled, making it perfect for any occasion.
    • Easy to make ahead, allowing the flavors to meld together beautifully.

    Ingredients

    • 2 pounds baby red potatoes, halved
    • 1/2 cup mayonnaise
    • 2 tablespoons Dijon mustard
    • 1 tablespoon apple cider vinegar
    • 1/2 teaspoon salt
    • 1/4 teaspoon black pepper
    • 1/4 cup red onion, finely diced
    • 2 celery stalks, diced
    • 2 tablespoons fresh dill, chopped
    • 2 tablespoons fresh parsley, chopped

    Equipment Needed

    • Large pot
    • Mixing bowl
    • Whisk
    • Knife
    • Cutting board

    Instructions

    Baby Red Potato Salad Recipe

    Step 1: Cook the Potatoes

    Place the halved baby red potatoes in a large pot and cover with cold water by about an inch. Bring to a boil over high heat, then reduce to a simmer and cook until the potatoes are just tender, about 10-12 minutes. Tip: To check for doneness, pierce a potato with a fork; it should slide in easily but the potato should still hold its shape.

    Step 2: Prepare the Dressing

    While the potatoes cook, whisk together the mayonnaise, Dijon mustard, apple cider vinegar, salt, and black pepper in a large mixing bowl. This creamy dressing is the secret to the salad’s irresistible flavor.

    Step 3: Combine the Ingredients

    Drain the potatoes and let them cool slightly. Add the warm potatoes to the dressing along with the red onion, celery, dill, and parsley. Gently toss to combine, ensuring each potato piece is coated in the dressing. Tip: Adding the potatoes while they’re still warm helps them absorb the dressing better.

    Step 4: Chill and Serve

    Cover the salad and refrigerate for at least 1 hour to allow the flavors to meld. Before serving, give it a gentle stir and adjust the seasoning if necessary. Tip: For best results, let the salad sit at room temperature for about 15 minutes before serving to take the chill off.

    Tips and Tricks

    For an extra layer of flavor, consider adding crispy bacon bits or a sprinkle of smoked paprika. If you’re short on time, you can serve the salad immediately without chilling, though the flavors won’t be as developed. For a lighter version, substitute half of the mayonnaise with Greek yogurt. Always taste and adjust the seasoning after the salad has chilled, as flavors can mellow out in the fridge.

    Recipe Variations

    • Add hard-boiled eggs for a protein boost and extra creaminess.
    • Swap the dill and parsley for other fresh herbs like chives or tarragon for a different flavor profile.
    • Include a handful of pickles or capers for a tangy twist.
    • For a smoky flavor, add a teaspoon of smoked paprika to the dressing.
    • Make it vegan by using plant-based mayonnaise.

    Frequently Asked Questions

    Can I use a different type of potato?

    Yes, while baby red potatoes are ideal for their texture and flavor, you can use Yukon Gold or even fingerling potatoes. Just adjust the cooking time as needed based on the size and type of potato.

    How long can I store the potato salad?

    Properly stored in an airtight container in the refrigerator, the potato salad will last for up to 3 days. Be sure to give it a good stir before serving again.

    Can I make this recipe ahead of time?

    Absolutely! Making it ahead allows the flavors to meld together even more. Just keep it refrigerated and give it a final stir before serving.

    Summary

    This baby red potato salad is creamy, flavorful, and versatile, making it a must-try for any occasion. With simple ingredients and easy steps, it’s a recipe that’s sure to become a favorite.

  • Ensalada Rusa Recipe: A Creamy, Dreamy Potato Salad

    Ensalada Rusa Recipe: A Creamy, Dreamy Potato Salad

    Welcome to a twist on the classic potato salad that will have your taste buds dancing. Ensalada Rusa, or Russian Salad, is a vibrant mix of potatoes, carrots, peas, and mayonnaise that’s as fun to make as it is to eat. Let’s dive into this creamy, dreamy dish that’s perfect for picnics, potlucks, or just because.

    Why This Recipe Works

    • The combination of soft potatoes, crunchy carrots, and sweet peas creates a delightful texture contrast.
    • Using homemade mayonnaise elevates the flavor to a whole new level, but store-bought works in a pinch.
    • It’s a versatile dish that can be served as a side or a main, making it a crowd-pleaser for any occasion.
    • The recipe is easily customizable with your favorite add-ins, like boiled eggs or pickles, for an extra flavor kick.
    • It’s a make-ahead dish that tastes even better the next day, as the flavors have time to meld together beautifully.

    Ingredients

    • 2 cups diced potatoes, boiled until tender
    • 1 cup diced carrots, boiled until tender
    • 1 cup green peas, cooked
    • 1/2 cup mayonnaise
    • 1 tbsp mustard
    • Salt and pepper to taste

    Equipment Needed

    • Large pot for boiling
    • Mixing bowl
    • Knife and cutting board
    • Measuring cups and spoons

    Instructions

    Ensalada Rusa Recipe

    Step 1: Boil the Vegetables

    Start by boiling the diced potatoes and carrots in a large pot of salted water until they’re tender but still hold their shape, about 10-12 minutes. Add the green peas in the last 2 minutes of cooking. Drain well and let them cool to room temperature. Tip: Don’t overcook the vegetables to avoid a mushy salad.

    Step 2: Prepare the Dressing

    In a small bowl, whisk together the mayonnaise and mustard until smooth. This will be the creamy base of your Ensalada Rusa. Taste and adjust the seasoning with salt and pepper as needed. Tip: For a lighter version, you can substitute half of the mayonnaise with Greek yogurt.

    Step 3: Combine Everything

    In a large mixing bowl, gently fold the cooled vegetables into the dressing until everything is evenly coated. Be careful not to mash the potatoes. The salad should be creamy but still have some texture. Tip: Letting the salad chill in the fridge for at least an hour before serving enhances the flavors.

    Tips and Tricks

    For an extra layer of flavor, consider adding a tablespoon of lemon juice or vinegar to the dressing for a slight tang. If you’re making the salad ahead of time, hold off on adding the dressing until just before serving to keep the vegetables from getting soggy. For a more colorful presentation, sprinkle some chopped parsley or dill on top before serving. Experiment with the ratio of mayonnaise to mustard to find your perfect balance of creaminess and tang. Lastly, if you’re short on time, frozen mixed vegetables can be a quick and convenient substitute for fresh ones.

    Recipe Variations

    • Add diced boiled eggs for a protein boost and extra creaminess.
    • Mix in some chopped pickles or capers for a briny contrast to the sweet vegetables.
    • For a meaty version, fold in some diced ham or chicken.
    • Try using sweet potatoes instead of regular potatoes for a sweeter, more vibrant salad.
    • For a vegan version, use vegan mayonnaise and skip the eggs.

    Frequently Asked Questions

    Can I make Ensalada Rusa ahead of time?

    Absolutely! In fact, it tastes even better the next day as the flavors have more time to meld together. Just keep it refrigerated in an airtight container and give it a good stir before serving.

    How long does Ensalada Rusa last in the fridge?

    When stored properly in an airtight container, it can last up to 3-4 days in the refrigerator. Just make sure it’s kept cold and not left out at room temperature for more than 2 hours.

    Can I freeze Ensalada Rusa?

    Freezing is not recommended as the mayonnaise can separate and the vegetables may become watery upon thawing, resulting in a less than ideal texture.

    Summary

    Ensalada Rusa is a versatile, creamy, and delicious salad that’s perfect for any occasion. With its simple ingredients and easy preparation, it’s sure to become a favorite in your recipe collection.

  • Thousand Island Taco Salad Recipe: A Crunchy, Creamy Delight

    Thousand Island Taco Salad Recipe: A Crunchy, Creamy Delight

    Mixing up your taco night with a salad might sound like a plot twist, but this Thousand Island Taco Salad is here to steal the show. It’s the perfect blend of crunchy, creamy, and downright delicious, proving that salads can indeed be the main event.

    Why This Recipe Works

    • The combination of crisp lettuce, seasoned ground beef, and creamy Thousand Island dressing creates a texture and flavor profile that’s hard to resist.
    • It’s a versatile dish that can easily be customized to suit any taste or dietary preference.
    • Perfect for busy weeknights, this salad comes together in under 30 minutes, making it a quick and satisfying meal.

    Ingredients

    • 1 lb ground beef
    • 1 packet taco seasoning
    • 1 head iceberg lettuce, chopped
    • 1 cup Thousand Island dressing
    • 1 cup shredded cheddar cheese
    • 1 cup crushed tortilla chips
    • 1/2 cup diced tomatoes
    • 1/4 cup sliced black olives

    Equipment Needed

    • Large skillet
    • Mixing bowl
    • Salad tongs

    Instructions

    Thousand Island Taco Salad Recipe

    Brown the Ground Beef

    Heat a large skillet over medium-high heat. Add the ground beef, breaking it apart with a spoon, and cook until no pink remains, about 5-7 minutes. Drain any excess fat, then stir in the taco seasoning and 1/4 cup water. Simmer for 5 minutes until the mixture thickens.

    Prepare the Salad Base

    In a large mixing bowl, combine the chopped iceberg lettuce, diced tomatoes, and sliced black olives. Toss lightly to mix. Tip: For an extra crunch, add the tortilla chips just before serving to keep them crispy.

    Combine and Dress

    Add the seasoned ground beef to the salad base. Drizzle with Thousand Island dressing and toss until everything is evenly coated. Tip: Start with half the dressing and add more to taste to avoid overdressing the salad.

    Add the Final Touches

    Sprinkle the shredded cheddar cheese and crushed tortilla chips over the top. Serve immediately for the best texture and flavor.

    Tips and Tricks

    For a lighter version, substitute ground turkey for the beef and use a low-fat Thousand Island dressing. If you’re meal prepping, keep the dressing and tortilla chips separate until you’re ready to eat to maintain freshness and crunch. Experiment with adding different vegetables like bell peppers or avocado for extra flavor and nutrition.

    Recipe Variations

    • Vegetarian Twist: Replace the ground beef with black beans or a plant-based meat alternative.
    • Spicy Kick: Add jalapeños or a dash of hot sauce to the dressing for some heat.
    • Cheese Lover’s Dream: Mix in different types of cheese like pepper jack or mozzarella for variety.

    Frequently Asked Questions

    Can I make this salad ahead of time?

    Yes, but for the best results, prepare the components separately and combine them just before serving. This keeps the lettuce crisp and the tortilla chips crunchy.

    What can I use instead of Thousand Island dressing?

    Ranch or a creamy cilantro lime dressing would also work well, offering a different but equally delicious flavor profile.

    How can I make this recipe gluten-free?

    Ensure your taco seasoning and tortilla chips are gluten-free. Most are, but it’s always good to check the labels.

    Summary

    This Thousand Island Taco Salad is a fun, flavorful twist on taco night that’s sure to please. Quick to make and endlessly customizable, it’s a recipe you’ll come back to again and again.

  • Chop Chop Salad Dressing Recipe: The Ultimate Flavor Booster

    Chop Chop Salad Dressing Recipe: The Ultimate Flavor Booster

    Salads are about to get a major upgrade with this chop chop salad dressing recipe. Simple, flavorful, and downright delicious, this dressing is the secret weapon your greens have been missing.

    Why This Recipe Works

    • It’s a perfect balance of tangy and sweet, making every bite irresistible.
    • Uses common pantry staples, so no need for a special grocery run.
    • Quick to whip up, saving you time for more important things, like eating.
    • Versatile enough to dress up any salad, from a simple garden to a hearty Cobb.
    • The homemade touch means no preservatives or weird ingredients.

    Ingredients

    • 1/2 cup mayonnaise
    • 1/4 cup sour cream
    • 2 tablespoons apple cider vinegar
    • 1 tablespoon honey
    • 1 teaspoon Dijon mustard
    • 1/2 teaspoon garlic powder
    • 1/2 teaspoon onion powder
    • Salt and pepper to taste

    Equipment Needed

    • Mixing bowl
    • Whisk
    • Measuring cups and spoons
    • Airtight container for storage

    Instructions

    Chop Chop Salad Dressing Recipe

    Step 1: Combine the Base Ingredients

    In your mixing bowl, whisk together the mayonnaise and sour cream until smooth. This creamy base is what gives the dressing its luxurious texture. Tip: For an extra smooth dressing, let the sour cream sit at room temperature for about 10 minutes before mixing.

    Step 2: Add the Vinegar and Honey

    Pour in the apple cider vinegar and honey, whisking continuously to incorporate. The vinegar adds a tangy punch, while the honey brings a subtle sweetness that balances the flavors beautifully.

    Step 3: Mix in the Seasonings

    Stir in the Dijon mustard, garlic powder, and onion powder. These seasonings add depth and a slight kick to the dressing. Tip: If you’re a garlic lover, feel free to add a minced garlic clove for an extra flavor boost.

    Step 4: Season to Taste

    Finally, season with salt and pepper to your liking. Give it a taste and adjust any of the ingredients if needed. The dressing should have a harmonious blend of tangy, sweet, and savory notes.

    Step 5: Chill and Serve

    Transfer the dressing to an airtight container and refrigerate for at least 30 minutes before serving. This chilling time allows the flavors to meld together. Tip: The dressing will thicken slightly in the fridge, so give it a good stir before using.

    Tips and Tricks

    For those looking to elevate their chop chop salad dressing even further, consider these advanced tips. First, experimenting with different types of vinegar can dramatically change the flavor profile; try balsamic for a deeper taste or white wine vinegar for a lighter touch. Second, incorporating fresh herbs like dill or parsley can add a refreshing twist. Lastly, for a healthier version, substitute Greek yogurt for the sour cream to reduce calories without sacrificing creaminess.

    Recipe Variations

    • Spicy Version: Add a dash of cayenne pepper or a few drops of hot sauce for a fiery kick.
    • Herb-Infused: Mix in chopped fresh herbs such as basil, cilantro, or chives for a garden-fresh flavor.
    • Creamy Avocado: Blend in half an avocado for a richer, greener dressing that’s packed with healthy fats.
    • Tangy Yogurt: Replace the sour cream with plain Greek yogurt for a tangier, protein-packed alternative.
    • Sweet and Fruity: Add a tablespoon of mango or peach puree for a sweet, tropical twist.

    Frequently Asked Questions

    Can I make this dressing ahead of time?

    Absolutely! This dressing can be made up to 3 days in advance and stored in the refrigerator. In fact, making it ahead allows the flavors to develop more fully. Just give it a good stir before serving to recombine any ingredients that may have separated.

    Is there a substitute for honey?

    Yes, if you’re looking for a vegan option or simply don’t have honey on hand, maple syrup or agave nectar are excellent substitutes. They’ll provide a similar sweetness while keeping the dressing’s consistency intact.

    How can I thin out the dressing if it’s too thick?

    If your dressing is thicker than you’d like, a splash of water or extra vinegar can help thin it to your desired consistency. Add a little at a time, stirring well after each addition, until you reach the perfect texture.

    Summary

    This chop chop salad dressing recipe is a game-changer for any salad lover. With its perfect balance of flavors and easy preparation, it’s sure to become a staple in your kitchen. Whether you stick to the classic recipe or experiment with variations, this dressing will bring your salads to life.

  • Ensalada de Manzana Recipe: A Crunchy, Sweet, and Tangy Delight

    Ensalada de Manzana Recipe: A Crunchy, Sweet, and Tangy Delight

    Welcome to a recipe that’s as fun to make as it is to eat! Ensalada de Manzana, or Apple Salad, is a refreshing dish that combines the crispness of apples with the creaminess of dressing, creating a perfect balance of flavors. Whether you’re looking for a side dish or a light meal, this recipe is sure to impress.

    Why This Recipe Works

    • The combination of sweet and tangy flavors makes this salad irresistibly delicious.
    • It’s incredibly versatile, allowing for numerous variations to suit any taste.
    • Preparing this salad is quick and easy, making it perfect for last-minute gatherings.
    • The crisp texture of the apples adds a refreshing crunch that’s hard to resist.
    • This dish is a great way to incorporate fruits into your diet in a fun and tasty way.

    Ingredients

    • 2 large apples, cored and diced
    • 1 cup of mayonnaise
    • 1/2 cup of sweetened condensed milk
    • 1/4 cup of raisins
    • 1/4 cup of chopped walnuts
    • 1 tablespoon of lemon juice

    Equipment Needed

    • Large mixing bowl
    • Whisk
    • Measuring cups and spoons
    • Knife and cutting board

    Instructions

    Ensalada De Manzana Recipe

    Step 1: Prepare the Apples

    Start by coring and dicing the apples into bite-sized pieces. To prevent browning, toss them immediately with the tablespoon of lemon juice. This not only keeps the apples looking fresh but also adds a slight tanginess that enhances the overall flavor of the salad.

    Step 2: Mix the Dressing

    In a large mixing bowl, whisk together the mayonnaise and sweetened condensed milk until smooth. This creamy dressing is the secret to the salad’s irresistible taste, combining richness with a hint of sweetness.

    Step 3: Combine Ingredients

    Add the diced apples, raisins, and chopped walnuts to the bowl with the dressing. Gently fold everything together until the apples are evenly coated. The raisins add a chewy texture, while the walnuts provide a crunchy contrast.

    Step 4: Chill Before Serving

    Cover the bowl with plastic wrap and refrigerate for at least 30 minutes before serving. Chilling allows the flavors to meld together beautifully, making the salad even more delicious.

    Tips and Tricks

    For an extra burst of flavor, consider adding a pinch of cinnamon or nutmeg to the dressing. If you’re not a fan of walnuts, pecans or almonds make great substitutes. To make the salad lighter, you can substitute half of the mayonnaise with Greek yogurt. Always taste the dressing before adding it to the apples to adjust the sweetness or tanginess to your liking. For a more colorful salad, use a mix of red and green apples.

    Recipe Variations

    • Add diced celery for an extra crunch.
    • Include grapes or pineapple chunks for a fruity twist.
    • Swap the raisins for dried cranberries for a tart flavor.
    • Use pecans instead of walnuts for a different nutty taste.
    • For a dairy-free version, substitute the mayonnaise with avocado puree.

    Frequently Asked Questions

    Can I make this salad ahead of time?

    Absolutely! Ensalada de Manzana can be made up to a day in advance. Just keep it refrigerated until you’re ready to serve. The flavors will continue to develop, making it even tastier.

    What type of apples are best for this recipe?

    For the best texture and flavor, use crisp and slightly tart apples like Granny Smith or Honeycrisp. However, feel free to use your favorite variety.

    Can I omit the nuts?

    Yes, if you have a nut allergy or simply prefer not to include them, the salad will still be delicious without the walnuts. You can add sunflower seeds for a similar crunch without the nuts.

    Summary

    Ensalada de Manzana is a delightful dish that’s easy to make and packed with flavors and textures. Perfect for any occasion, it’s a versatile recipe that you can customize to your liking. Give it a try and enjoy the sweet, tangy, and crunchy goodness!