Author: onlinefoodrecipes

  • Strawberry Balsamic Salad Dressing Recipe: A Sweet & Tangy Delight

    Strawberry Balsamic Salad Dressing Recipe: A Sweet & Tangy Delight

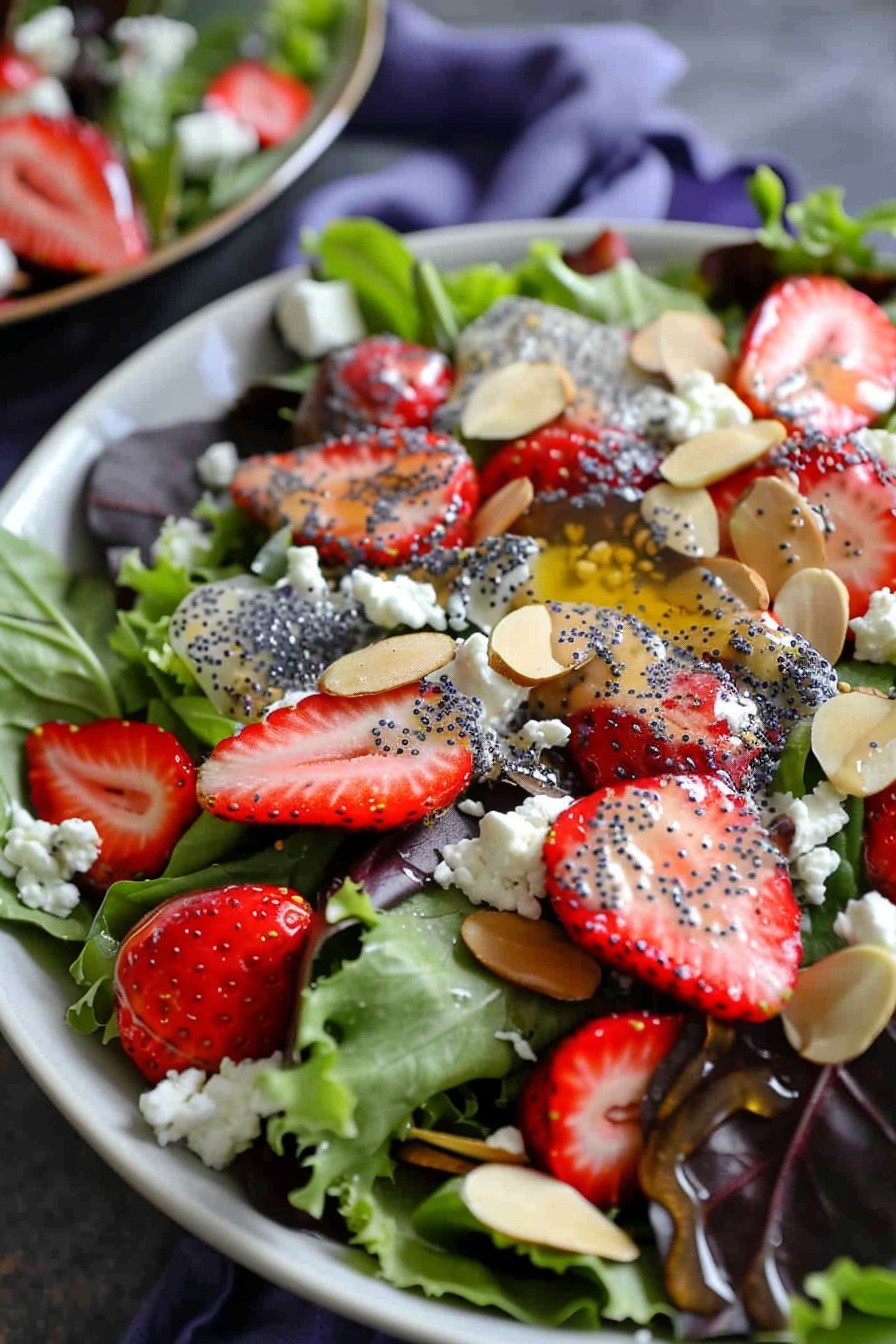
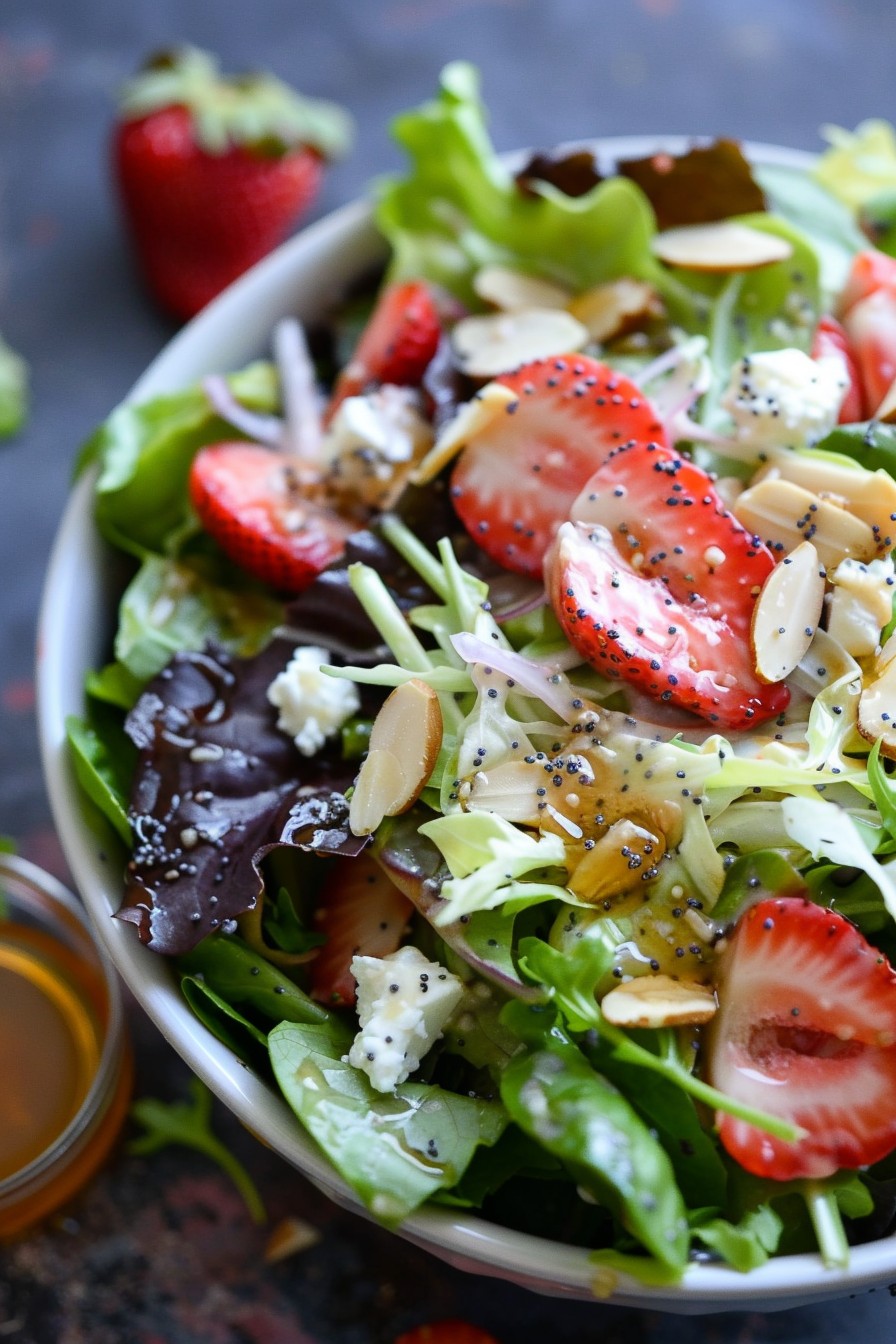
    Just when you thought your salads couldn’t get any better, along comes this strawberry balsamic dressing to prove you wrong. Perfect for summer picnics or a fancy dinner, this dressing is a game-changer.

    Why This Recipe Works

    • The combination of sweet strawberries and tangy balsamic vinegar creates a perfect balance of flavors.
    • It’s incredibly versatile, pairing well with everything from greens to grilled meats.
    • Making it at home allows you to control the sweetness and acidity to your liking.
    • It’s a great way to use up strawberries that are a little past their prime.
    • This dressing is not only delicious but also packed with antioxidants.

    Ingredients

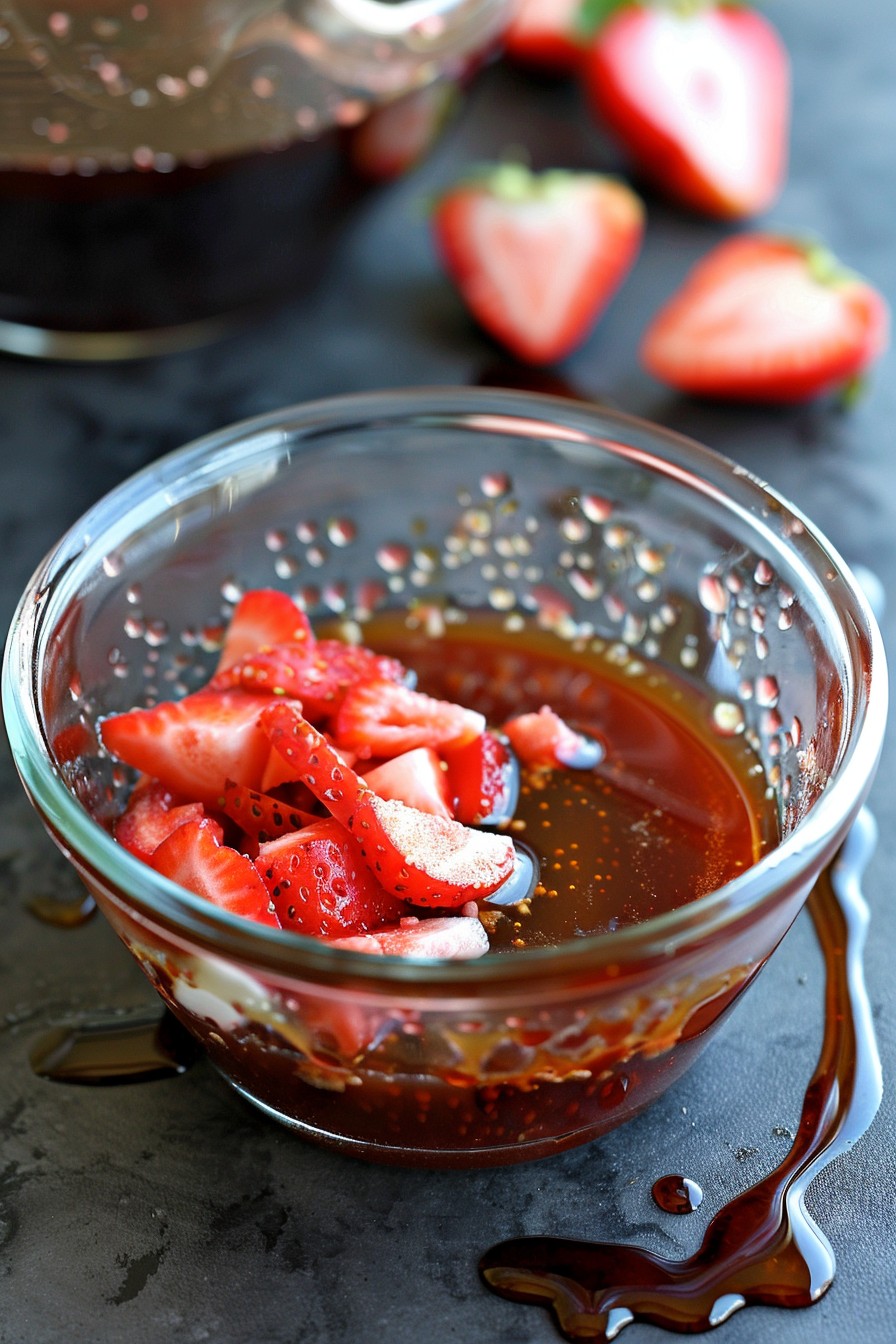
    • 1 cup fresh strawberries, hulled and chopped
    • 1/4 cup balsamic vinegar
    • 1/2 cup extra virgin olive oil
    • 1 tablespoon honey
    • 1 teaspoon Dijon mustard
    • Salt and pepper to taste

    Equipment Needed

    • Blender or food processor
    • Measuring cups and spoons
    • Small bowl
    • Whisk

    Instructions

    Strawberry Balsamic Salad Dressing Recipe

    Step 1: Prepare the Strawberries

    Start by washing and hulling the strawberries. Chop them into small pieces to make blending easier. This ensures your dressing will have a smooth consistency without any large chunks.

    Step 2: Blend the Ingredients

    In a blender or food processor, combine the strawberries, balsamic vinegar, honey, and Dijon mustard. Blend until the mixture is smooth. This is where the magic starts to happen, as the flavors begin to meld together.

    Step 3: Emulsify with Olive Oil

    With the blender running on low, slowly drizzle in the olive oil. This step is crucial for creating a creamy, emulsified dressing that won’t separate. Take your time to ensure the oil is fully incorporated.

    Step 4: Season to Taste

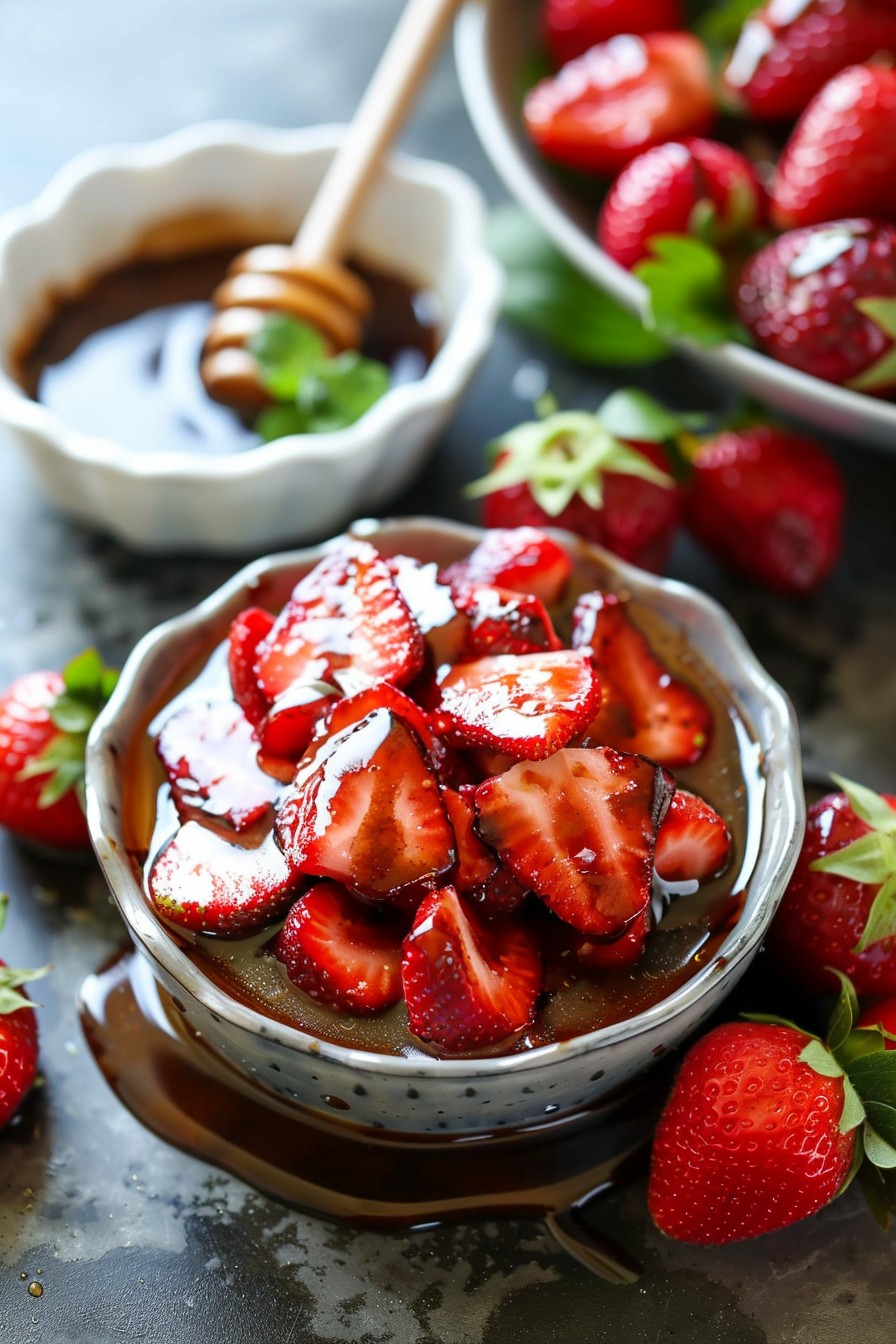
    Transfer the dressing to a small bowl and season with salt and pepper. Give it a taste and adjust the seasoning as needed. Remember, the flavors will develop more as the dressing sits.

    Step 5: Serve or Store

    Use the dressing immediately, or store it in an airtight container in the refrigerator for up to a week. Shake well before using, as the ingredients may separate over time.

    Tips and Tricks

    For a smoother dressing, strain the blended mixture through a fine-mesh sieve to remove any seeds or pulp. If you prefer a thicker consistency, add a tablespoon of Greek yogurt or mayonnaise. To enhance the strawberry flavor, let the chopped strawberries macerate with a little sugar for 10 minutes before blending. Always taste your dressing before serving and adjust the sweetness or acidity as needed. For a vegan version, substitute the honey with maple syrup or agave nectar.

    Recipe Variations

    • Add a handful of fresh basil leaves for a herby twist.
    • Substitute raspberries or blackberries for a different berry flavor.
    • For a spicy kick, add a pinch of red pepper flakes.
    • Use apple cider vinegar instead of balsamic for a lighter taste.
    • Incorporate a tablespoon of poppy seeds for added texture.

    Frequently Asked Questions

    Can I use frozen strawberries?

    Yes, you can use frozen strawberries, but make sure to thaw them completely and drain any excess liquid before blending. This will prevent your dressing from becoming too watery.

    How long does this dressing last in the fridge?

    This dressing can be stored in an airtight container in the refrigerator for up to a week. Just give it a good shake or stir before using, as the ingredients may separate over time.

    Can I make this dressing without a blender?

    Absolutely! You can mash the strawberries with a fork and whisk all the ingredients together in a bowl. The texture will be chunkier, but it will still taste delicious.

    Summary

    This strawberry balsamic salad dressing is a sweet and tangy delight that will elevate any salad. Easy to make and customizable, it’s a must-try for any salad lover.

  • Strawberry Poppyseed Salad: A Summer Delight

    Strawberry Poppyseed Salad: A Summer Delight

    Kickstart your summer with this refreshing strawberry poppyseed salad that’s as vibrant in color as it is in flavor. Perfect for picnics, potlucks, or a light lunch, this salad combines sweet strawberries with a tangy poppyseed dressing for a dish that’s sure to impress.

    Why This Recipe Works

    • The combination of sweet strawberries and tangy poppyseed dressing creates a perfect balance of flavors.
    • Adding nuts provides a satisfying crunch that contrasts beautifully with the soft fruits.
    • It’s incredibly versatile, allowing for numerous variations to suit any taste or dietary preference.
    • Quick and easy to prepare, making it ideal for last-minute gatherings.
    • The salad is as nutritious as it is delicious, packed with vitamins and antioxidants.

    Ingredients

    • 6 cups mixed greens (washed and dried)
    • 2 cups fresh strawberries (hulled and sliced)
    • 1/2 cup crumbled feta cheese
    • 1/4 cup sliced almonds
    • 1/4 cup poppyseed dressing
    • 1 tbsp honey (optional for extra sweetness)

    Equipment Needed

    • Large salad bowl
    • Salad tongs or large spoon
    • Measuring cups and spoons
    • Knife and cutting board

    Instructions

    Recipe For Strawberry Poppyseed Salad

    Prepare Your Ingredients

    Start by washing your mixed greens and strawberries thoroughly under cold water. Pat them dry with a clean towel or use a salad spinner to remove excess water. Hull the strawberries and slice them into even pieces for uniform bites. If you’re using nuts, give them a quick toast in a dry pan over medium heat for about 2-3 minutes until they’re fragrant and slightly golden.

    Assemble the Salad

    In a large salad bowl, add the mixed greens as the base. Scatter the sliced strawberries, crumbled feta cheese, and toasted almonds over the top. Drizzle with poppyseed dressing and a tablespoon of honey if you prefer a sweeter taste. The key here is to distribute the ingredients evenly so every forkful is a perfect mix.

    Toss Gently

    Using salad tongs or a large spoon, gently toss the salad to coat all the ingredients with the dressing. Be careful not to overmix as this can bruise the greens and make the salad soggy. A light toss ensures everything is evenly distributed without compromising the texture.

    Serve Immediately

    This salad is best enjoyed fresh. Serve it immediately after tossing to maintain the crispness of the greens and the freshness of the strawberries. If you’re preparing it ahead of time, keep the dressing separate and add it just before serving.

    Tips and Tricks

    For an extra layer of flavor, consider adding a pinch of sea salt to the strawberries before adding them to the salad. This enhances their natural sweetness. If you’re not a fan of feta, goat cheese or blue cheese can be great substitutes. To make the salad more substantial, add grilled chicken or shrimp. Always toast your nuts to unlock their full flavor potential. Lastly, if you’re serving this salad at an outdoor event, keep it chilled until serving time to prevent wilting.

    Recipe Variations

    • Swap strawberries for raspberries or blackberries for a different berry flavor profile.
    • Use spinach or arugula instead of mixed greens for a peppery twist.
    • Add avocado slices for creaminess and healthy fats.
    • Include quinoa or farro to turn the salad into a hearty meal.
    • For a vegan version, omit the cheese or use a plant-based alternative.

    Frequently Asked Questions

    Can I make the dressing from scratch?

    Absolutely! Homemade poppyseed dressing can elevate your salad. Combine 1/2 cup mayonnaise, 1/4 cup milk, 2 tablespoons sugar, 1 tablespoon poppyseeds, 1 tablespoon white vinegar, and a pinch of salt. Whisk until smooth and adjust the sweetness or tanginess to your liking.

    How long can I store the salad?

    It’s best enjoyed the day it’s made, but you can store it in the refrigerator for up to 24 hours. Keep the dressing separate and add it just before serving to prevent the greens from becoming soggy.

    Can I add other fruits?

    Yes, this salad is versatile. Peaches, mangoes, or oranges can add a tropical twist. Just ensure the fruits complement the dressing and other ingredients.

    Summary

    This strawberry poppyseed salad is a delightful mix of sweet, tangy, and crunchy, perfect for any summer occasion. Easy to make and customizable, it’s a crowd-pleaser that’s as nutritious as it is delicious.

  • Tortellini Cold Salad Recipe: A Refreshing Twist on Pasta Salad

    Tortellini Cold Salad Recipe: A Refreshing Twist on Pasta Salad

    Just when you thought pasta salad couldn’t get any better, here comes the tortellini cold salad to prove you wrong. Jam-packed with flavors, textures, and colors, this dish is your next go-to for picnics, potlucks, or a quick fridge raid. Let’s dive into making this crowd-pleaser that’s as easy to whip up as it is delicious.

    Why This Recipe Works

    • The cheese-filled tortellini adds a creamy, indulgent texture that’s unmatched by regular pasta.
    • Fresh veggies and a tangy dressing bring a refreshing contrast to the rich tortellini.
    • It’s versatile; swap ingredients based on what’s in your fridge or pantry.
    • Perfect for make-ahead meals, as the flavors meld and intensify overnight.
    • No cooking required for the dressing, making it a breeze to prepare.

    Ingredients

    • 1 lb cheese tortellini, cooked and cooled
    • 1 cup cherry tomatoes, halved
    • 1/2 cup black olives, sliced
    • 1/4 cup red onion, finely diced
    • 1/2 cup Italian dressing
    • 1/4 cup grated Parmesan cheese
    • Salt and pepper to taste

    Equipment Needed

    • Large mixing bowl
    • Colander
    • Measuring cups and spoons
    • Knife and cutting board

    Instructions

    Tortellini Cold Salad Recipe

    Step 1: Cook the Tortellini

    Bring a large pot of salted water to a boil. Add the tortellini and cook according to the package instructions, usually about 7-9 minutes, until al dente. Drain and rinse under cold water to stop the cooking process. Tip: Adding a splash of olive oil to the boiling water can prevent the tortellini from sticking together.

    Step 2: Prep the Veggies

    While the tortellini cooks, halve the cherry tomatoes, slice the black olives, and finely dice the red onion. Tip: Soaking the diced red onion in cold water for 10 minutes can mellow its sharpness.

    Step 3: Combine Ingredients

    In a large mixing bowl, combine the cooled tortellini, prepared veggies, and Italian dressing. Toss gently to ensure everything is evenly coated. Tip: For best results, let the salad chill in the fridge for at least an hour before serving to allow the flavors to meld.

    Step 4: Season and Serve

    Before serving, sprinkle with grated Parmesan cheese and season with salt and pepper to taste. Give it one final toss and serve chilled.

    Tips and Tricks

    For those looking to elevate their tortellini cold salad, consider these pro tips. First, toasting the tortellini in a dry pan after boiling can add a delightful crunch. Second, incorporating a mix of fresh herbs like basil or parsley can introduce a burst of freshness. Third, for a creamier version, mix in a tablespoon of mayonnaise or Greek yogurt into the dressing. Lastly, adding protein such as grilled chicken or shrimp can turn this side dish into a hearty main course.

    Recipe Variations

    • Swap the Italian dressing for a balsamic vinaigrette for a deeper flavor profile.
    • Add avocado chunks for a creamy texture and healthy fats.
    • Include sun-dried tomatoes and artichoke hearts for a Mediterranean twist.
    • Use spinach or arugula for a green boost.
    • For a spicy kick, add sliced jalapeños or a dash of red pepper flakes.

    Frequently Asked Questions

    Can I make this salad ahead of time?

    Absolutely! This salad actually tastes better the next day as the flavors have more time to meld. Just hold off on adding the Parmesan until right before serving to keep it from getting soggy.

    What’s the best way to store leftovers?

    Store in an airtight container in the refrigerator for up to 3 days. If the salad seems dry upon serving, a quick drizzle of additional dressing can revive it.

    Can I use frozen tortellini?

    Yes, frozen tortellini works just as well as fresh. Just be sure to cook it according to the package directions and cool it completely before mixing it with the other ingredients.

    Summary

    This tortellini cold salad is a refreshing, flavorful twist on traditional pasta salad, perfect for any occasion. With its simple preparation and versatile ingredients, it’s sure to become a staple in your recipe collection.

  • Creamy No-Mayo Chicken Salad: A Lighter Twist on a Classic

    Creamy No-Mayo Chicken Salad: A Lighter Twist on a Classic

    Perfect for those who love chicken salad but could do without the mayo, this recipe delivers all the creamy, savory goodness you crave, minus the heavy dressing. Packed with flavor and texture, it’s a game-changer for picnics, lunches, and light dinners.

    Why This Recipe Works

    • Uses Greek yogurt and avocado for a creamy texture without mayo, offering a healthier fat profile.
    • Incorporates crunchy celery and almonds for a satisfying bite that contrasts beautifully with the creamy base.
    • Seasoned with fresh herbs and lemon juice for a bright, flavorful punch that elevates the chicken.
    • Easy to make ahead, flavors meld and improve over time, making it perfect for meal prep.
    • Versatile base recipe that can be customized with endless add-ins to suit any taste.

    Ingredients

    • 2 cups cooked chicken, shredded or diced
    • 1/2 cup plain Greek yogurt
    • 1 ripe avocado, mashed
    • 1/2 cup celery, finely diced
    • 1/4 cup almonds, sliced
    • 2 tbsp fresh lemon juice
    • 1 tbsp fresh dill, chopped
    • Salt and pepper to taste

    Equipment Needed

    • Mixing bowl
    • Measuring cups and spoons
    • Knife and cutting board
    • Fork or potato masher

    Instructions

    Non Mayo Chicken Salad Recipe

    Step 1: Prepare Your Ingredients

    Start by ensuring your chicken is cooked and cooled. Shred or dice it into bite-sized pieces. Finely dice the celery, chop the dill, and slice the almonds if they’re not already pre-sliced. Mash the avocado in a separate bowl until smooth. Having everything prepped and ready to go makes the mixing process a breeze.

    Step 2: Mix the Creamy Base

    In a large mixing bowl, combine the Greek yogurt and mashed avocado. Stir until the mixture is smooth and evenly combined. This duo will give your chicken salad that creamy texture without any mayo. Add the lemon juice and chopped dill, mixing well to incorporate all the flavors.

    Step 3: Combine All Ingredients

    Add the shredded chicken, diced celery, and sliced almonds to the bowl with the creamy base. Gently fold everything together until the chicken is evenly coated with the dressing. Be careful not to overmix to maintain some texture.

    Step 4: Season to Taste

    Now’s the time to taste your creation. Add salt and pepper as needed, and if you feel it needs a bit more zing, a splash more lemon juice can brighten it right up. Remember, you can always add more seasoning, but you can’t take it away, so start with a little and adjust as you go.

    Step 5: Chill and Serve

    For the best flavor, cover the bowl and let the chicken salad chill in the refrigerator for at least 30 minutes before serving. This resting time allows the flavors to meld together beautifully. Serve on a bed of greens, between slices of your favorite bread, or with crackers for a light and satisfying meal.

    Tips and Tricks

    For an even creamier texture, you can blend the avocado and Greek yogurt together before mixing with the other ingredients. If you’re not a fan of almonds, try walnuts or pecans for a different crunch. To make this recipe even quicker, use a rotisserie chicken from the store. For a dairy-free version, substitute the Greek yogurt with a dairy-free yogurt alternative. Lastly, if you’re meal prepping, this chicken salad keeps well in the fridge for up to 3 days, making it a great make-ahead option.

    Recipe Variations

    • Add grapes or apples for a sweet crunch.
    • Stir in curry powder for a spicy twist.
    • Include hard-boiled eggs for extra protein.
    • Swap the almonds for sunflower seeds for a nut-free version.
    • Use turkey instead of chicken for a different flavor profile.

    Frequently Asked Questions

    Can I make this recipe dairy-free?

    Absolutely! Simply replace the Greek yogurt with a dairy-free yogurt alternative. Look for one that’s plain and unsweetened to keep the flavors balanced. The avocado will still provide plenty of creaminess, so you won’t miss the dairy at all.

    How long does this chicken salad last in the fridge?

    This no-mayo chicken salad will stay fresh in the refrigerator for up to 3 days when stored in an airtight container. The lemon juice helps keep the avocado from browning too quickly, but it’s best enjoyed within the first couple of days for optimal freshness.

    Can I freeze this chicken salad?

    Freezing is not recommended due to the avocado and Greek yogurt, which can change texture when thawed. For best results, enjoy this salad fresh or store it in the fridge for a few days.

    Summary

    This no-mayo chicken salad is a lighter, healthier take on the classic, using Greek yogurt and avocado for creaminess. Packed with flavor and texture, it’s versatile, easy to make, and perfect for any occasion. Whether you’re meal prepping or need a quick lunch, this recipe is sure to satisfy.

  • Orzo Salad with Shrimp: A Summer Delight

    Orzo Salad with Shrimp: A Summer Delight

    Here’s a dish that’s as fun to make as it is to eat. Perfect for those warm summer nights when you want something light yet satisfying.

    Why This Recipe Works

    • The combination of orzo and shrimp offers a delightful texture contrast.
    • It’s packed with fresh herbs and vegetables for a burst of flavor.
    • Quick and easy to prepare, making it perfect for weeknight dinners.
    • Versatile enough to serve as a main dish or a side.
    • Leftovers taste even better the next day, making it a great make-ahead meal.

    Ingredients

    • 1 cup orzo pasta
    • 1 lb shrimp, peeled and deveined
    • 2 tbsp olive oil
    • 1 lemon, juiced and zested
    • 1/2 cup cherry tomatoes, halved
    • 1/4 cup red onion, finely diced
    • 1/4 cup fresh parsley, chopped
    • Salt and pepper to taste

    Equipment Needed

    • Large pot
    • Mixing bowl
    • Skillet
    • Colander

    Instructions

    Recipe For Orzo Salad With Shrimp

    Boil the Orzo

    Bring a large pot of salted water to a boil. Add the orzo and cook according to package instructions, usually about 8-10 minutes, until al dente. Drain and rinse under cold water to stop the cooking process. Tip: Rinsing the orzo prevents it from sticking together.

    Cook the Shrimp

    Heat olive oil in a skillet over medium-high heat. Add the shrimp, season with salt and pepper, and cook for about 2-3 minutes per side until pink and opaque. Remove from heat and let cool slightly. Tip: Don’t overcrowd the skillet to ensure even cooking.

    Prepare the Dressing

    In a small bowl, whisk together the lemon juice, lemon zest, and remaining olive oil. Season with salt and pepper to taste. This simple dressing adds a bright, fresh flavor to the salad.

    Combine Everything

    In a large mixing bowl, combine the cooked orzo, shrimp, cherry tomatoes, red onion, and parsley. Drizzle with the dressing and toss gently to combine. Tip: Let the salad sit for 10 minutes before serving to allow the flavors to meld.

    Serve and Enjoy

    Transfer the salad to a serving dish and enjoy immediately. This dish is perfect for a light lunch or dinner and pairs wonderfully with a crisp white wine.

    Tips and Tricks

    For an extra crunch, add some toasted pine nuts or almonds. If you’re not a fan of shrimp, grilled chicken makes a great substitute. To make this dish ahead of time, prepare all the components separately and combine them just before serving. This prevents the orzo from absorbing all the dressing and becoming soggy. For a spicier kick, add a pinch of red pepper flakes to the dressing.

    Recipe Variations

    • Swap the shrimp for grilled chicken or tofu for a different protein.
    • Add avocado for extra creaminess.
    • Include other vegetables like cucumbers or bell peppers for more crunch.
    • Use quinoa instead of orzo for a gluten-free option.
    • Add feta cheese for a salty, tangy twist.

    Frequently Asked Questions

    Can I make this salad ahead of time?

    Yes, you can prepare the components ahead of time and combine them just before serving. This keeps the orzo from getting soggy and the shrimp from becoming rubbery.

    What can I use instead of shrimp?

    Grilled chicken, tofu, or even chickpeas make great substitutes for shrimp. The key is to use a protein that complements the fresh flavors of the salad.

    How long will leftovers last?

    Leftovers can be stored in an airtight container in the refrigerator for up to 2 days. The flavors will continue to meld, making it even more delicious the next day.

    Summary

    This orzo salad with shrimp is a light, flavorful dish perfect for summer. Quick to prepare and versatile, it’s sure to become a favorite in your recipe rotation.

  • Ramen Slaw Salad Recipe: A Crunchy, Flavorful Twist on a Classic

    Ramen Slaw Salad Recipe: A Crunchy, Flavorful Twist on a Classic

    How about we shake up your salad game with something unexpectedly delicious? This Ramen Slaw Salad combines the crunch of ramen noodles with the freshness of coleslaw, creating a dish that’s as fun to eat as it is to make. Perfect for picnics, potlucks, or just because you deserve something awesome.

    Why This Recipe Works

    • The crunch from the ramen noodles adds an unexpected texture that elevates the salad from good to unforgettable.
    • It’s a versatile dish that can serve as a side or a main, depending on your mood or the occasion.
    • The dressing is a perfect balance of sweet, tangy, and savory, making every bite a flavor explosion.
    • It’s incredibly easy to make, requiring no cooking skills, just a willingness to mix things together.
    • This salad gets better as it sits, making it a great make-ahead option for busy days.

    Ingredients

    • 1 package (3 oz) ramen noodles, crushed (flavor packet reserved)
    • 1/2 cup sliced almonds
    • 1/4 cup sunflower seeds
    • 1/4 cup vegetable oil
    • 3 tbsp apple cider vinegar
    • 2 tbsp sugar
    • 1/2 tsp salt
    • 1/4 tsp black pepper
    • 1 bag (14 oz) coleslaw mix
    • 4 green onions, thinly sliced

    Equipment Needed

    • Large mixing bowl
    • Small mixing bowl
    • Whisk
    • Measuring cups and spoons

    Instructions

    Ramen Slaw Salad Recipe

    Step 1: Toast the Noodles and Nuts

    Heat a large skillet over medium heat. Add the crushed ramen noodles, sliced almonds, and sunflower seeds. Toast them for about 5 minutes, stirring frequently, until they’re golden and fragrant. This step is crucial for unlocking all those nutty flavors and adding that irresistible crunch.

    Step 2: Whisk Together the Dressing

    In a small bowl, whisk together the vegetable oil, apple cider vinegar, sugar, salt, black pepper, and the reserved ramen flavor packet. The flavor packet is the secret weapon here, so don’t skip it! Taste and adjust the seasoning if needed.

    Step 3: Combine the Salad

    In a large bowl, toss together the coleslaw mix, green onions, and the toasted noodle mixture. Pour the dressing over the top and toss everything until well coated. The salad should be evenly dressed but not soggy.

    Step 4: Let It Marinate

    Cover the bowl and refrigerate the salad for at least 30 minutes before serving. This waiting period allows the flavors to meld together and the noodles to soften slightly, creating the perfect texture.

    Step 5: Serve and Enjoy

    Give the salad a final toss before serving to redistribute the dressing. Serve chilled for the best flavor and texture experience. Watch as this humble salad becomes the star of the meal.

    Tips and Tricks

    For an extra layer of flavor, consider adding a teaspoon of sesame oil to the dressing. If you’re serving this salad at a gathering, keep the toasted noodle mixture separate until just before serving to maintain maximum crunch. For a healthier version, you can substitute the sugar with honey or maple syrup and use olive oil instead of vegetable oil. Don’t be afraid to add other veggies like shredded carrots or bell peppers for extra color and nutrition. Lastly, if you’re not a fan of almonds, any other nuts like pecans or walnuts would work beautifully.

    Recipe Variations

    • Add shredded chicken or tofu to turn this salad into a hearty main dish.
    • Swap the apple cider vinegar for rice vinegar for a slightly different tang.
    • Include dried cranberries or raisins for a sweet contrast to the savory elements.
    • Use kale or Brussels sprouts instead of coleslaw mix for a different green base.
    • Spice it up with a dash of chili flakes or sriracha in the dressing for those who like it hot.

    Frequently Asked Questions

    Can I make this salad ahead of time? Absolutely! In fact, it’s better if you do. The flavors have time to meld, and the noodles soften to the perfect texture. Just add the toasted noodle mixture right before serving to keep it crunchy.

    How long does this salad keep? Stored in an airtight container in the fridge, it’ll stay fresh for up to 3 days. After that, the noodles may get too soft.

    Can I use a different type of noodle? Sure, but the ramen noodles are key for that unique texture and flavor. If you must substitute, try chow mein noodles, but the result won’t be quite the same.

    Summary

    This Ramen Slaw Salad is a crunchy, flavorful twist on traditional coleslaw, perfect for any occasion. Easy to make and even easier to love, it’s sure to become a go-to recipe in your collection.

  • Cucumber and Apple Salad Recipe: A Crunchy, Refreshing Delight

    Cucumber and Apple Salad Recipe: A Crunchy, Refreshing Delight

    Summer’s here, and what better way to beat the heat than with a bowl of refreshing cucumber and apple salad? This dish is not only a feast for the eyes but also a symphony of flavors that will tantalize your taste buds. Let’s dive into making this simple yet delicious salad.

    Why This Recipe Works

    • The crispness of cucumbers paired with the sweetness of apples creates a perfect balance of flavors.
    • It’s incredibly easy to make, requiring no cooking, just chopping and mixing.
    • The salad is versatile, serving as a side dish or a light main course.
    • It’s packed with nutrients, offering a healthy dose of vitamins and hydration.
    • The addition of a tangy dressing elevates the simple ingredients to something extraordinary.

    Ingredients

    • 2 large cucumbers, thinly sliced
    • 2 medium apples, cored and thinly sliced
    • 1/4 cup red onion, thinly sliced
    • 2 tbsp olive oil
    • 1 tbsp apple cider vinegar
    • 1 tsp honey
    • Salt and pepper to taste
    • 1/4 cup fresh mint leaves, chopped

    Equipment Needed

    • Sharp knife
    • Cutting board
    • Large mixing bowl
    • Small bowl for dressing
    • Whisk

    Instructions

    Cucumber And Apple Salad Recipe

    Step 1: Prepare the Vegetables and Fruits

    Start by washing the cucumbers and apples thoroughly under cold water. Pat them dry with a clean towel. Using a sharp knife, slice the cucumbers into thin rounds. Core the apples and slice them similarly to the cucumbers for uniform pieces. Thinly slice the red onion. Combine all these in a large mixing bowl.

    Step 2: Make the Dressing

    In a small bowl, whisk together the olive oil, apple cider vinegar, and honey until well combined. Season with salt and pepper to taste. This dressing will add a sweet and tangy flavor to the salad, enhancing the natural tastes of the cucumbers and apples.

    Step 3: Combine and Toss

    Pour the dressing over the cucumber and apple mixture in the large bowl. Gently toss the salad to ensure all the pieces are evenly coated with the dressing. Be careful not to overmix to keep the slices intact.

    Step 4: Add the Fresh Mint

    Chop the fresh mint leaves and sprinkle them over the salad. The mint adds a refreshing aroma and a burst of flavor that complements the sweetness of the apples and the crispness of the cucumbers.

    Step 5: Chill and Serve

    For the best flavor, let the salad chill in the refrigerator for at least 30 minutes before serving. This allows the flavors to meld together beautifully. Serve cold as a refreshing side dish or a light main course.

    Tips and Tricks

    For an extra crunch, consider adding some toasted walnuts or almonds to the salad. If you’re not a fan of mint, basil or cilantro can be great substitutes. To prevent the apples from browning, you can toss them in a little lemon juice before adding them to the salad. For a creamier texture, a dollop of Greek yogurt can be mixed into the dressing. Always taste the dressing before adding it to the salad to adjust the seasoning according to your preference.

    Recipe Variations

    • Add some feta cheese for a salty contrast to the sweet apples.
    • Include some avocado slices for a creamy texture and healthy fats.
    • Swap the apples for pears for a different kind of sweetness.
    • Add some grilled chicken or shrimp to turn the salad into a hearty meal.
    • Use balsamic vinegar instead of apple cider vinegar for a deeper flavor.

    Frequently Asked Questions

    Can I make this salad ahead of time?

    Yes, you can prepare the salad a few hours in advance. However, it’s best to add the dressing and mint just before serving to maintain the crispness of the cucumbers and apples. If you need to prepare it earlier, keep the dressing separate and toss it in when you’re ready to serve.

    What type of apples are best for this salad?

    Crisp and slightly sweet apples like Honeycrisp or Fuji work wonderfully in this salad. They hold their shape well and provide a nice contrast to the cucumbers. Avoid overly soft apples as they can become mushy when mixed with the dressing.

    Can I use a different type of vinegar?

    Absolutely! While apple cider vinegar complements the flavors in this salad, you can experiment with other vinegars like white wine vinegar or rice vinegar for a different taste profile. Just adjust the sweetness accordingly since some vinegars are more acidic than others.

    Summary

    This cucumber and apple salad is a refreshing, easy-to-make dish perfect for any occasion. With its crisp textures and sweet-tangy dressing, it’s sure to be a hit. Customize it with your favorite add-ins and enjoy a healthy, delicious meal.

  • Ensalada de Papa Recipe: A Creamy, Dreamy Potato Salad That Steals the Show

    Ensalada de Papa Recipe: A Creamy, Dreamy Potato Salad That Steals the Show

    Let’s dive into the world of comfort food with a twist. Ensalada de papa, or potato salad, is a dish that brings joy to any table. Whether it’s a backyard BBQ or a cozy family dinner, this recipe is sure to impress with its creamy texture and vibrant flavors.

    Why This Recipe Works

    • The combination of creamy mayonnaise and tangy mustard creates a dressing that’s rich yet balanced.
    • Using Yukon Gold potatoes ensures a buttery texture that holds up well in the salad.
    • Fresh herbs and a squeeze of lemon juice add brightness and depth to the dish.
    • It’s versatile enough to serve as a side or a main dish, depending on your mood.
    • This recipe is a crowd-pleaser, perfect for potlucks and picnics.

    Ingredients

    • 2 pounds Yukon Gold potatoes, peeled and cut into 1-inch cubes
    • 1/2 cup mayonnaise
    • 2 tablespoons Dijon mustard
    • 1 tablespoon lemon juice
    • 1/4 cup chopped fresh parsley
    • 1/4 cup chopped red onion
    • Salt and pepper to taste

    Equipment Needed

    • Large pot
    • Mixing bowl
    • Whisk
    • Knife and cutting board
    • Measuring cups and spoons

    Instructions

    Ensalada De Papa Recipe

    Step 1: Cook the Potatoes

    Place the cubed potatoes in a large pot and cover with cold water. Bring to a boil over high heat, then reduce to a simmer. Cook for about 10-12 minutes, or until the potatoes are tender but still hold their shape. Drain and let cool slightly.

    Step 2: Prepare the Dressing

    In a mixing bowl, whisk together the mayonnaise, Dijon mustard, and lemon juice until smooth. Season with salt and pepper to taste. This creamy dressing is the secret to the salad’s irresistible flavor.

    Step 3: Combine the Ingredients

    Add the slightly cooled potatoes to the bowl with the dressing. Gently fold in the chopped parsley and red onion until everything is evenly coated. Be careful not to overmix to keep the potatoes from breaking apart.

    Step 4: Chill and Serve

    Cover the bowl with plastic wrap and refrigerate for at least 1 hour to allow the flavors to meld. Serve chilled, garnished with extra parsley if desired.

    Tips and Tricks

    For the best texture, don’t overcook the potatoes. They should be tender but still firm to the bite. If you’re short on time, you can serve the salad immediately, but chilling it really enhances the flavors. For a lighter version, you can substitute Greek yogurt for half of the mayonnaise. Adding a pinch of paprika or cayenne can give the salad a subtle kick. Always taste and adjust the seasoning before serving.

    Recipe Variations

    • Add hard-boiled eggs for extra protein and texture.
    • Mix in some chopped celery or pickles for crunch.
    • Use sweet potatoes instead of Yukon Gold for a sweeter twist.
    • Incorporate bacon bits for a smoky flavor.
    • Try a vegan version by using plant-based mayonnaise.

    Frequently Asked Questions

    Can I make this salad ahead of time?

    Absolutely! In fact, making it a day ahead allows the flavors to develop even more. Just keep it refrigerated until you’re ready to serve.

    What’s the best way to store leftovers?

    Store any leftovers in an airtight container in the refrigerator. They’ll keep for up to 3 days, though the texture may change slightly over time.

    Can I use a different type of potato?

    Yes, but keep in mind that waxy potatoes like Yukon Gold or red potatoes hold their shape better than starchy varieties like russets.

    Summary

    This Ensalada de Papa recipe is a creamy, dreamy side dish that’s perfect for any occasion. With its simple ingredients and easy preparation, it’s a foolproof way to bring a taste of comfort to your table.

  • Weight Watchers Tuna Salad Recipe: A Light & Flavorful Delight

    Weight Watchers Tuna Salad Recipe: A Light & Flavorful Delight

    Never let your diet dull your taste buds! This Weight Watchers tuna salad is here to prove that healthy eating can be delicious, satisfying, and incredibly easy to whip up. Perfect for lunches, snacks, or a light dinner, this recipe is a game-changer for anyone watching their waistline without sacrificing flavor.

    Why This Recipe Works

    • It’s packed with lean protein from tuna, keeping you full and energized.
    • Greek yogurt replaces mayo, slashing calories without losing creaminess.
    • Fresh veggies add crunch and nutrients, making every bite satisfying.
    • Customizable with your favorite herbs and spices for endless flavor variations.
    • Quick and easy to prepare, perfect for meal prep or last-minute meals.

    Ingredients

    • 2 cans (5 oz each) tuna in water, drained
    • 1/2 cup non-fat Greek yogurt
    • 1/4 cup diced celery
    • 1/4 cup diced red onion
    • 1 tbsp lemon juice
    • 1 tsp Dijon mustard
    • Salt and pepper to taste

    Equipment Needed

    • Mixing bowl
    • Measuring cups and spoons
    • Knife and cutting board
    • Can opener

    Instructions

    Weight Watchers Tuna Salad Recipe

    Step 1: Prep Your Ingredients

    Start by draining your tuna well to avoid a watery salad. Dice the celery and red onion into small, uniform pieces for even distribution and the perfect crunch in every bite. This prep work ensures your salad comes together quickly and smoothly.

    Step 2: Mix the Base

    In your mixing bowl, combine the drained tuna, Greek yogurt, lemon juice, and Dijon mustard. Stir until the mixture is creamy and well incorporated. The yogurt and mustard add a tangy depth that mayo just can’t match, making this step crucial for flavor.

    Step 3: Add the Veggies

    Fold in the diced celery and red onion, mixing gently to distribute evenly. These veggies not only add a refreshing crunch but also pack in fiber and nutrients, boosting the health factor of your salad.

    Step 4: Season to Perfection

    Season your tuna salad with salt and pepper to taste. Remember, you can always add more, but you can’t take it out, so start with a little and adjust as needed. This is your chance to make the salad truly yours.

    Step 5: Serve or Store

    Your tuna salad is ready to enjoy immediately, or you can refrigerate it for up to 3 days. It’s perfect on whole grain bread, over a bed of greens, or straight from the bowl for a quick and healthy snack.

    Tips and Tricks

    For an even lighter version, try using albacore tuna packed in water for a milder flavor and leaner profile. If you’re not a fan of red onion, green onions or shallots make a great substitute, offering a milder taste. To add a bit of sweetness without extra calories, toss in a handful of diced apples or grapes. For those who love a bit of heat, a dash of cayenne pepper or diced jalapeños can spice things up beautifully. Lastly, if you’re meal prepping, keep the salad in an airtight container with a piece of paper towel on top to absorb any excess moisture, keeping it fresh longer.

    Recipe Variations

    • Mediterranean Twist: Add chopped Kalamata olives, cucumber, and feta cheese for a Greek-inspired version.
    • Avocado Boost: Mash in half an avocado for extra creaminess and healthy fats.
    • Egg White Addition: Mix in diced hard-boiled egg whites for additional protein.
    • Spicy Kick: Stir in a teaspoon of sriracha or chopped pickled jalapeños for heat.
    • Herb Garden: Fresh dill, parsley, or cilantro can add a bright, herby flavor.

    Frequently Asked Questions

    Can I use canned salmon instead of tuna?

    Absolutely! Canned salmon is a great alternative to tuna, offering a similar texture and protein content. Just make sure to remove any bones and skin before mixing it into your salad. This swap can add a nice variety to your meal prep rotation.

    How can I make this recipe dairy-free?

    To make this recipe dairy-free, substitute the Greek yogurt with a dairy-free yogurt alternative or mashed avocado. Both options will give you the creaminess you desire without the dairy. Just be mindful of the flavor changes these substitutions might bring.

    What are the best ways to serve this tuna salad?

    This tuna salad is incredibly versatile. Serve it on whole grain toast for a classic sandwich, over a bed of mixed greens for a light salad, or with crackers and veggies for a satisfying snack. It’s also great stuffed into a tomato or avocado half for a low-carb option.

    Summary

    This Weight Watchers tuna salad recipe is a testament to the fact that healthy eating doesn’t have to be boring. With its high protein content, low calorie count, and endless customization options, it’s a perfect addition to any diet. Quick to prepare and delicious to eat, it’s sure to become a staple in your meal rotation.

  • Cabbage Salad Dressing Recipe: A Crunchy, Tangy Delight

    Cabbage Salad Dressing Recipe: A Crunchy, Tangy Delight

    Howdy, salad lovers! Today, we’re diving into a recipe that’ll make your cabbage salad the star of any meal. This dressing is the perfect blend of tangy, sweet, and creamy, guaranteed to elevate your greens from boring to brilliant.

    Why This Recipe Works

    • Perfect Balance: The dressing strikes a harmonious balance between tangy vinegar, sweet honey, and creamy mayonnaise, ensuring every bite is packed with flavor.
    • Versatility: Not just for cabbage, this dressing can jazz up any salad or even serve as a dip for fresh veggies.
    • Quick & Easy: With just a few simple steps and ingredients, you can whip up this dressing in no time, making it perfect for busy weeknights.

    Ingredients

    • 1/2 cup mayonnaise
    • 2 tablespoons apple cider vinegar
    • 1 tablespoon honey
    • 1 teaspoon Dijon mustard
    • 1/4 teaspoon salt
    • 1/4 teaspoon black pepper

    Equipment Needed

    • Mixing bowl
    • Whisk
    • Measuring cups and spoons

    Instructions

    Cabbage Salad Dressing Recipe

    Step 1: Combine the Base Ingredients

    In a medium mixing bowl, add the mayonnaise, apple cider vinegar, honey, and Dijon mustard. Whisk these ingredients together until they’re fully combined and smooth. This creates the creamy base of your dressing, ensuring a uniform texture throughout.

    Step 2: Season to Perfection

    Once your base is smooth, sprinkle in the salt and black pepper. Whisk again to incorporate these seasonings evenly. Taste as you go—this is your chance to adjust the flavors to your liking!

    Step 3: Let It Rest

    Cover the bowl with plastic wrap and let the dressing sit in the refrigerator for at least 30 minutes. This resting period allows the flavors to meld together beautifully, resulting in a more cohesive and flavorful dressing.

    Step 4: Serve and Enjoy

    After the resting period, give the dressing a quick whisk to recombine any separated ingredients. Drizzle it over your favorite cabbage salad or use it as a dip. Either way, you’re in for a treat!

    Tips and Tricks

    For a lighter version, substitute Greek yogurt for half of the mayonnaise. This swap reduces calories while adding a tangy twist. If you prefer a sweeter dressing, increase the honey by an additional teaspoon. For those who love a bit of heat, a pinch of cayenne pepper can add a nice kick. Always taste and adjust the seasoning before serving to ensure it meets your flavor preferences.

    Recipe Variations

    • Herb-Infused: Add fresh dill or parsley for a refreshing herbal note.
    • Spicy Kick: Incorporate a teaspoon of sriracha or a dash of cayenne pepper for heat.
    • Citrus Twist: Replace apple cider vinegar with lemon juice for a brighter, citrusy flavor.
    • Creamy Avocado: Blend in half an avocado for an ultra-creamy texture and rich taste.

    Frequently Asked Questions

    Can I make this dressing ahead of time? Absolutely! This dressing can be made up to 3 days in advance. Just store it in an airtight container in the refrigerator and give it a good stir before using.

    Is there a substitute for honey? Yes, maple syrup or agave nectar can be used as a vegan alternative to honey, offering a similar sweetness with a slight flavor variation.

    Can I use this dressing on other salads? Definitely! While it’s perfect for cabbage salads, this dressing also works wonderfully on leafy greens, grain salads, or as a veggie dip.

    Summary

    This cabbage salad dressing recipe is a game-changer, offering a perfect blend of tangy, sweet, and creamy flavors. Easy to make and versatile, it’s sure to become a staple in your kitchen.