Author: onlinefoodrecipes

  • Canned Chicken Salad Recipe with Grapes: A Quick & Tasty Delight

    Canned Chicken Salad Recipe with Grapes: A Quick & Tasty Delight

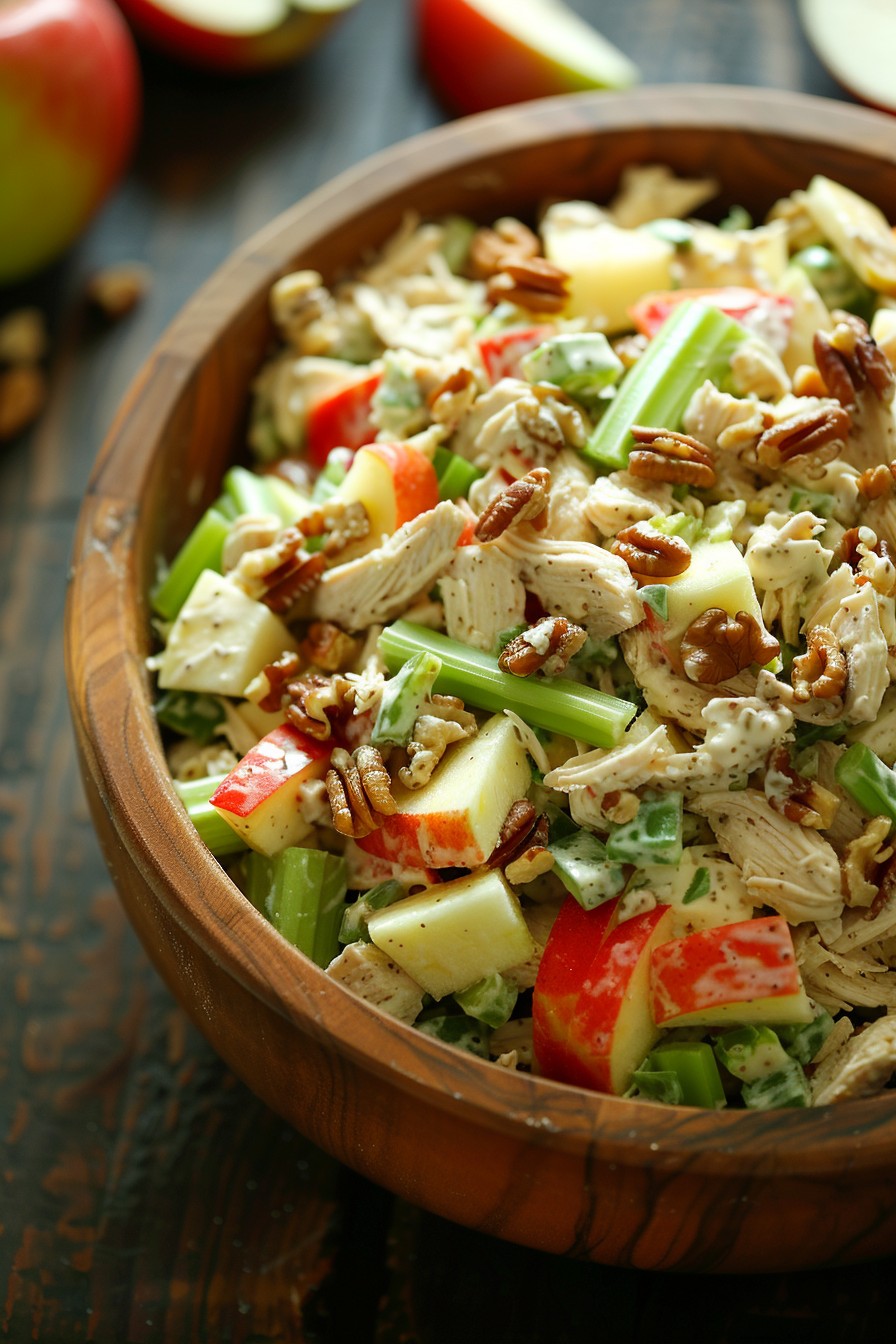
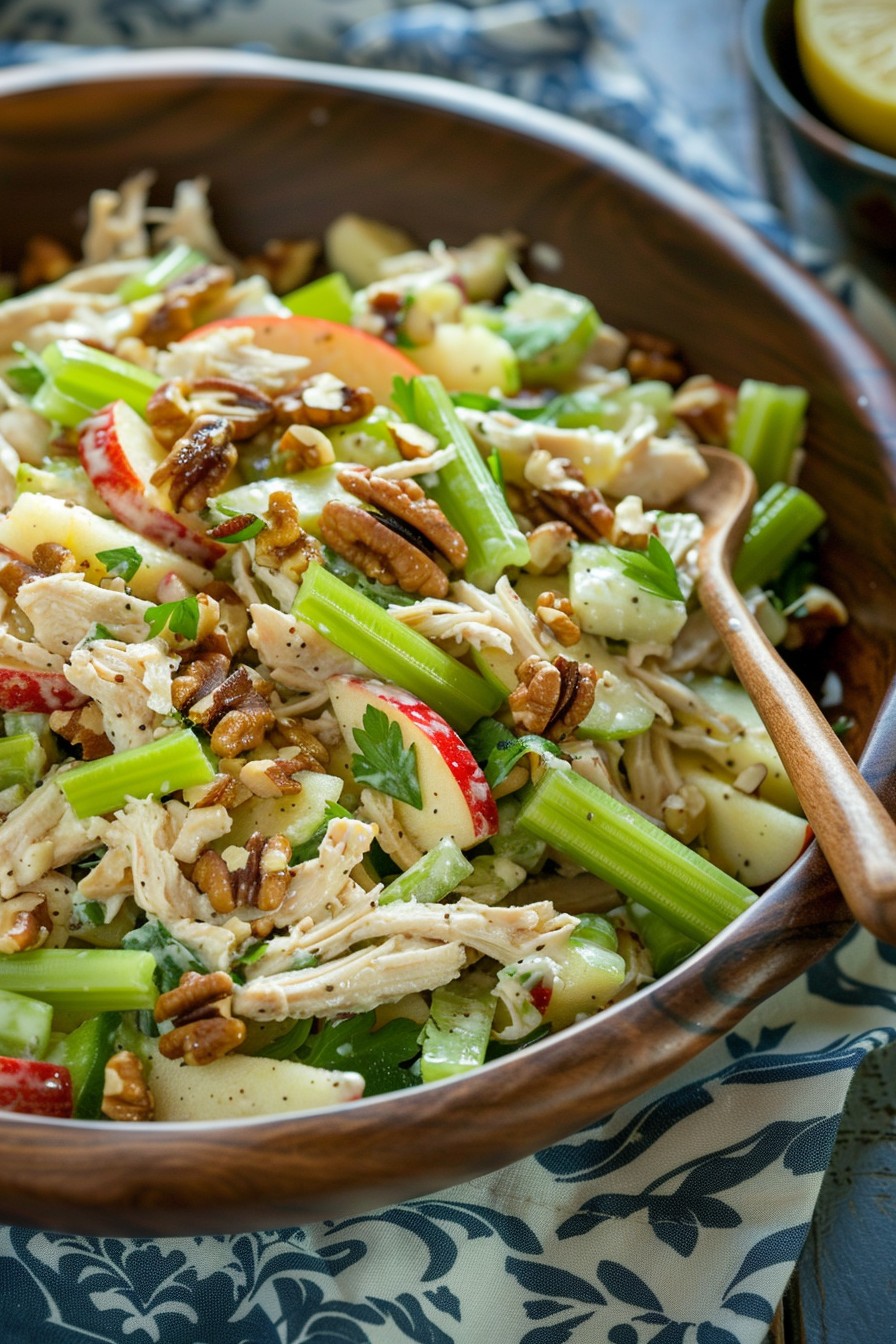
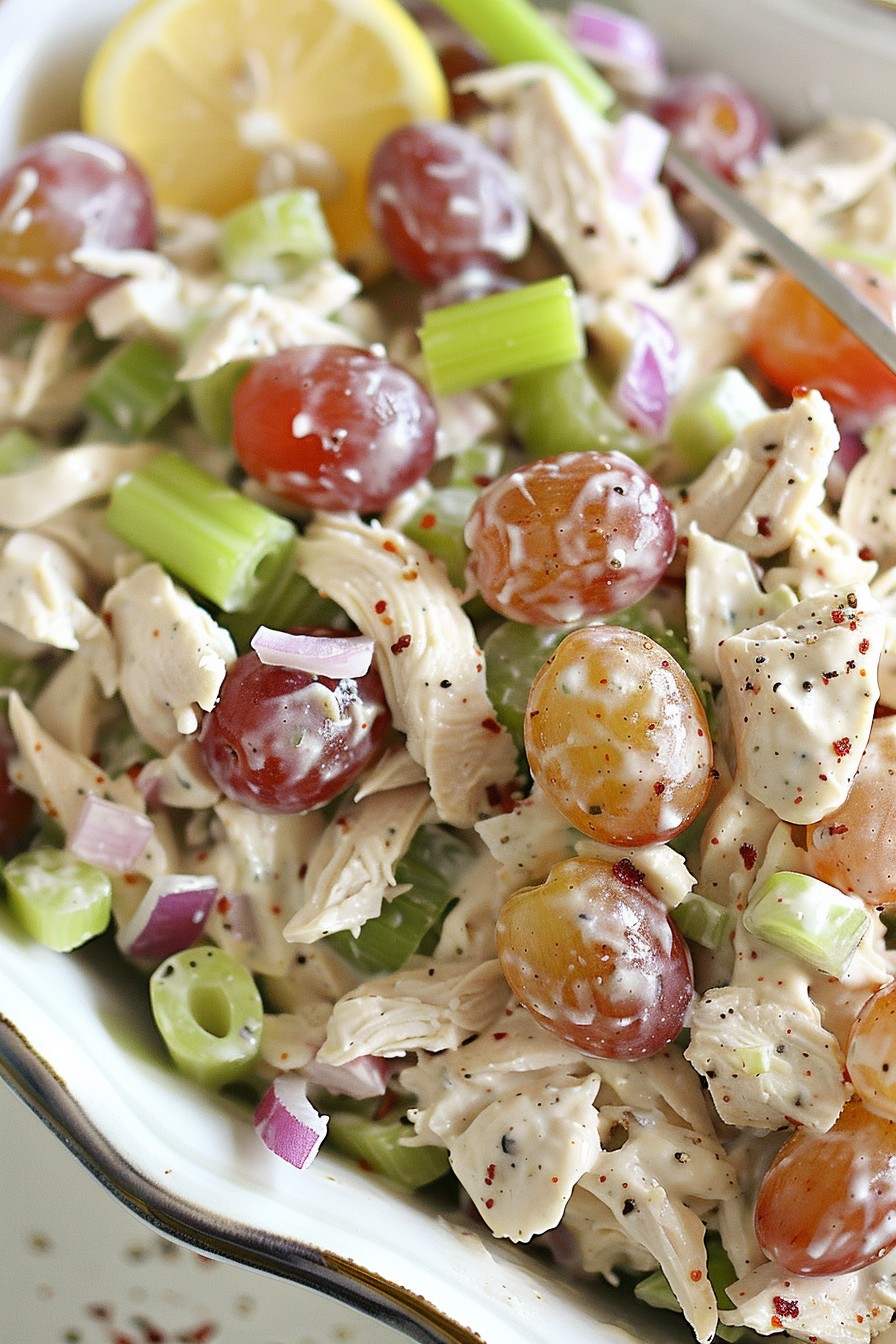
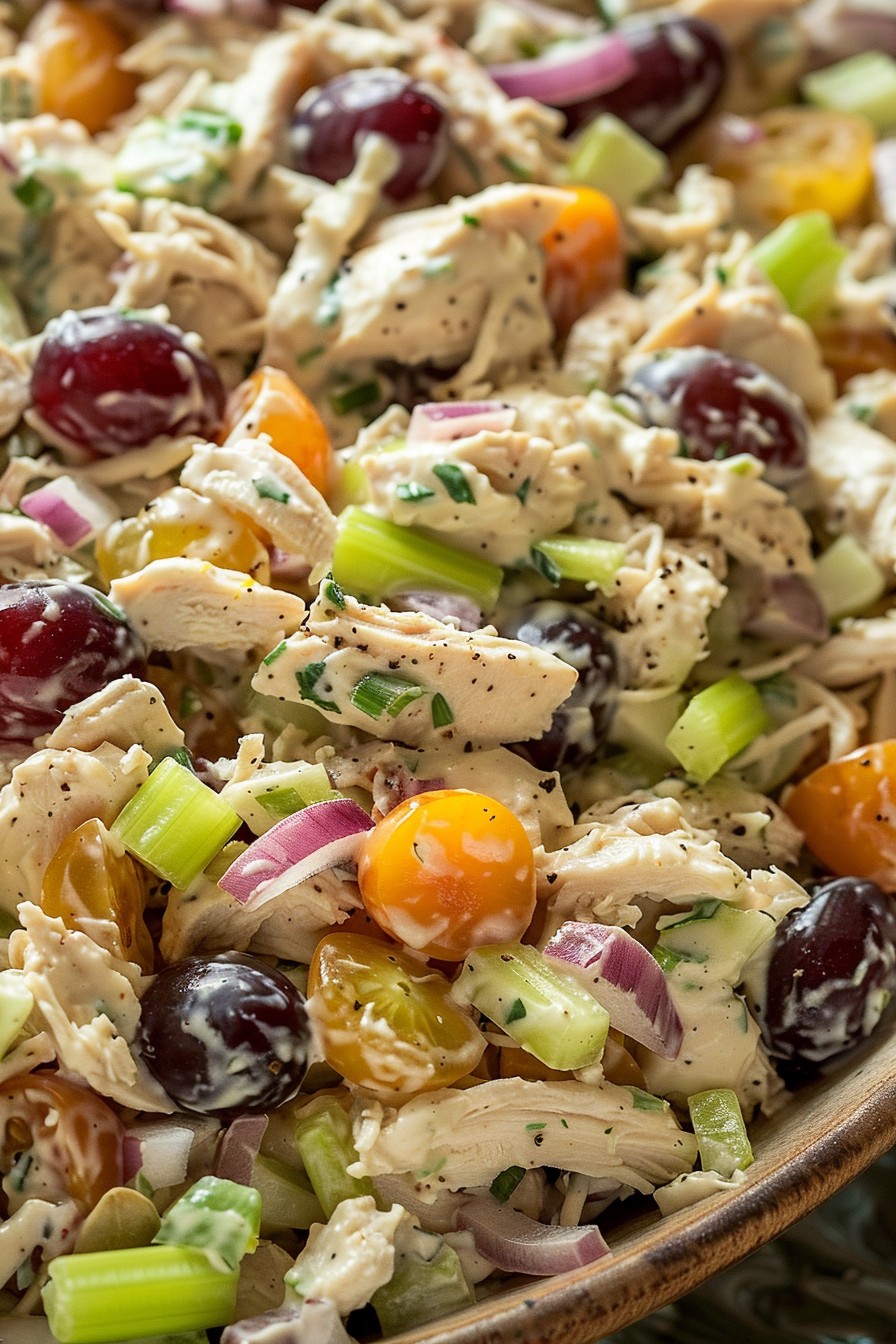
    Kickstart your meal prep with this effortlessly delicious canned chicken salad recipe. Packed with juicy grapes and a creamy dressing, it’s a perfect blend of convenience and flavor that’ll make your taste buds dance.

    Why This Recipe Works

    • Utilizes canned chicken for a quick and easy protein source without sacrificing taste.
    • The addition of grapes introduces a sweet and refreshing crunch that elevates the salad.
    • Creamy dressing binds all the ingredients together for a harmonious flavor profile.
    • Versatile enough to serve as a sandwich filler, wrap, or standalone salad.
    • Perfect for meal prep, as it stores well in the fridge for up to 3 days.

    Ingredients

    • 2 cups canned chicken, drained and shredded
    • 1 cup seedless grapes, halved
    • 1/2 cup mayonnaise
    • 1/4 cup sour cream
    • 1 tbsp lemon juice
    • 1/2 tsp salt
    • 1/4 tsp black pepper
    • 1/4 cup chopped celery
    • 2 tbsp chopped red onion

    Equipment Needed

    • Mixing bowl
    • Measuring cups and spoons
    • Knife and cutting board
    • Spoon or spatula for mixing

    Instructions

    Canned Chicken Salad Recipe With Grapes

    Step 1: Prepare Your Ingredients

    Start by draining the canned chicken thoroughly to remove any excess liquid. Shred the chicken using a fork to achieve a fine texture. Halve the seedless grapes, chop the celery and red onion into small, uniform pieces to ensure every bite is balanced. Measuring out your mayonnaise, sour cream, lemon juice, salt, and pepper beforehand will streamline the mixing process.

    Step 2: Mix the Dressing

    In your mixing bowl, combine the mayonnaise, sour cream, and lemon juice. Whisk them together until the mixture is smooth and homogenous. Season with salt and black pepper to taste. This creamy dressing will coat every ingredient evenly, providing a rich and tangy flavor base for your salad.

    Step 3: Combine Chicken and Vegetables

    Add the shredded chicken, halved grapes, chopped celery, and red onion to the bowl with the dressing. Gently fold the ingredients together until everything is well coated with the dressing. Be careful not to overmix to maintain the texture of the grapes and vegetables.

    Step 4: Chill Before Serving

    For the best flavor, cover the bowl with plastic wrap and refrigerate the salad for at least 30 minutes before serving. This chilling time allows the flavors to meld together beautifully and enhances the overall taste of the salad.

    Step 5: Serve and Enjoy

    Once chilled, give the salad a quick stir and serve it on a bed of lettuce, between slices of your favorite bread, or as a dip with crackers. The versatility of this salad makes it a hit for any meal or snack time.

    Tips and Tricks

    For an extra crunch, consider adding a handful of chopped walnuts or almonds to the salad. If you’re looking for a lighter version, substitute Greek yogurt for half of the mayonnaise. To make the salad ahead of time, keep the dressing separate and mix it in just before serving to maintain the freshness of the ingredients. Experiment with different herbs like dill or parsley for an added flavor dimension. Lastly, if you prefer a sweeter salad, a drizzle of honey can balance the tanginess of the lemon juice beautifully.

    Recipe Variations

    • Swap grapes for diced apples or dried cranberries for a different sweet element.
    • Add curry powder to the dressing for a warm, spicy twist on the classic recipe.
    • Incorporate avocado chunks for a creamy texture and healthy fats.
    • Use Greek yogurt instead of sour cream for a tangier and protein-packed version.
    • For a crunchier salad, mix in sunflower seeds or chopped pecans.

    Frequently Asked Questions

    Can I use fresh chicken instead of canned?

    Absolutely! While canned chicken offers convenience, cooked and shredded fresh chicken breast can be used for a fresher taste. Just ensure it’s cooled before mixing with the other ingredients to prevent the salad from becoming watery.

    How long can I store this salad in the fridge?

    This chicken salad can be stored in an airtight container in the refrigerator for up to 3 days. Beyond that, the grapes may start to lose their crispness, and the salad could become soggy.

    Can I make this recipe dairy-free?

    Yes, by substituting the mayonnaise with a dairy-free alternative and omitting the sour cream or using a dairy-free sour cream. The salad will still be creamy and delicious, just with a slightly different flavor profile.

    Summary

    This canned chicken salad with grapes is a quick, versatile, and delicious option for any meal. With its creamy dressing and sweet crunch from the grapes, it’s sure to become a favorite. Perfect for sandwiches, wraps, or as a standalone salad, it’s a recipe that combines convenience with gourmet taste.

  • Egg Avocado Salad Recipe: A Creamy Dreamy Delight

    Egg Avocado Salad Recipe: A Creamy Dreamy Delight

    Forget the same old salad routine; this egg avocado salad is here to shake things up. Fresh, creamy, and packed with protein, it’s the perfect dish for any meal of the day.

    Why This Recipe Works

    • The creamy texture of avocado pairs perfectly with the firmness of hard-boiled eggs, creating a delightful contrast.
    • It’s a powerhouse of nutrients, offering healthy fats, proteins, and vitamins in every bite.
    • Quick and easy to prepare, making it ideal for busy weekdays or last-minute gatherings.
    • Versatile enough to serve as a salad, sandwich filler, or even a dip.
    • The addition of fresh herbs and a squeeze of lemon juice elevates the flavors to a whole new level.

    Ingredients

    • 4 large eggs, hard-boiled and chopped
    • 2 ripe avocados, diced
    • 1/4 cup red onion, finely chopped
    • 2 tbsp fresh cilantro, chopped
    • 1 tbsp lemon juice
    • Salt and pepper to taste

    Equipment Needed

    • Mixing bowl
    • Knife
    • Cutting board
    • Measuring spoons

    Instructions

    Egg Avocado Salad Recipe

    Step 1: Prepare the Eggs

    Start by placing your eggs in a pot and covering them with cold water. Bring the water to a boil over high heat, then cover the pot and remove it from the heat. Let the eggs sit for 12 minutes for perfectly hard-boiled eggs. Tip: Adding a pinch of salt to the water can make peeling the eggs easier.

    Step 2: Chop the Ingredients

    While the eggs are cooking, dice the avocados and finely chop the red onion and cilantro. Be sure to cut the avocados into bite-sized pieces to ensure every forkful is packed with flavor. Tip: To prevent the avocados from browning, toss them with a bit of the lemon juice right after cutting.

    Step 3: Combine Everything

    In a large mixing bowl, gently combine the chopped eggs, avocados, red onion, and cilantro. Drizzle with lemon juice and season with salt and pepper to taste. Mix carefully to avoid mashing the avocados too much. Tip: For an extra kick, add a dash of hot sauce or a sprinkle of chili flakes.

    Step 4: Serve and Enjoy

    Your egg avocado salad is ready to serve! Enjoy it on its own, over a bed of greens, or as a filling for sandwiches. The flavors will meld together even more if you let it sit in the fridge for about 30 minutes before serving.

    Tips and Tricks

    For those looking to take their egg avocado salad to the next level, consider these tips. First, the ripeness of your avocados is key; they should be soft but not mushy. Second, if you’re making this salad ahead of time, add the avocados last to prevent them from becoming too soft. Third, experiment with different herbs like dill or parsley for a new flavor profile. Lastly, for a smoother texture, you can mash half of the avocados before mixing.

    Recipe Variations

    • Add crispy bacon bits for a smoky flavor and extra crunch.
    • Incorporate diced tomatoes or cucumbers for added freshness and texture.
    • Swap the cilantro for basil or mint for a different herbal note.
    • For a dairy-free version, skip the cheese or use a vegan alternative.
    • Turn it into a wrap by spreading the salad on a tortilla and rolling it up with some greens.

    Frequently Asked Questions

    Can I make this salad ahead of time?

    Yes, you can prepare the salad a few hours in advance, but it’s best to add the avocados just before serving to maintain their texture and color. The lemon juice will help prevent browning, but the avocados will still soften over time.

    How long does the salad last in the fridge?

    Stored in an airtight container, the salad can last up to 2 days in the fridge. However, the avocados will continue to soften, so it’s best enjoyed within the first day.

    Can I use lime juice instead of lemon juice?

    Absolutely! Lime juice will give the salad a slightly different, more tropical flavor, but it works just as well as lemon juice in preventing the avocados from browning.

    Summary

    This egg avocado salad is a nutritious, versatile, and delicious dish that’s easy to make and perfect for any occasion. With its creamy texture and fresh flavors, it’s sure to become a favorite in your recipe collection.

  • Waldorf Chicken Salad Recipe: A Crunchy, Creamy Delight

    Waldorf Chicken Salad Recipe: A Crunchy, Creamy Delight

    Just when you thought chicken salad couldn’t get any better, along comes the Waldorf version to prove you wrong. This recipe combines juicy chicken, crisp apples, and crunchy walnuts in a creamy dressing that’s downright addictive. Perfect for sandwiches, wraps, or a fancy lettuce cup, it’s a versatile dish that’ll have everyone asking for seconds.

    Why This Recipe Works

    • The combination of sweet apples and savory chicken creates a perfect balance of flavors.
    • Crunchy walnuts add a delightful texture contrast to the creamy dressing.
    • It’s a versatile dish that can be served in multiple ways, making it perfect for any occasion.
    • The recipe is easy to customize with your favorite ingredients or whatever you have on hand.
    • It’s a great make-ahead meal, as the flavors meld and improve over time.

    Ingredients

    • 2 cups cooked chicken, shredded or diced
    • 1 cup diced celery
    • 1 cup diced apples (preferably Granny Smith for a tart contrast)
    • 1/2 cup chopped walnuts
    • 1/2 cup mayonnaise
    • 1/4 cup Greek yogurt
    • 1 tbsp lemon juice
    • 1 tsp Dijon mustard
    • Salt and pepper to taste

    Equipment Needed

    • Mixing bowl
    • Measuring cups and spoons
    • Knife and cutting board
    • Rubber spatula

    Instructions

    Waldorf Chicken Salad Recipe

    Step 1: Prepare Your Ingredients

    Start by ensuring your chicken is cooked and cooled. If you’re using leftover chicken, that’s perfect. Dice the celery and apples into small, bite-sized pieces to ensure every forkful has a bit of everything. Toast the walnuts lightly for extra crunch and flavor, but this step is optional.

    Step 2: Make the Dressing

    In a small bowl, whisk together the mayonnaise, Greek yogurt, lemon juice, and Dijon mustard until smooth. This combination gives the dressing a tangy kick while keeping it light. Season with salt and pepper to taste. Remember, you can always add more later, so start with a little.

    Step 3: Combine Everything

    In a large mixing bowl, combine the chicken, celery, apples, and walnuts. Pour the dressing over the top and gently fold everything together with a rubber spatula until evenly coated. Be careful not to overmix, or the apples might break down and become mushy.

    Step 4: Chill Before Serving

    Cover the bowl with plastic wrap and refrigerate for at least an hour before serving. This resting time allows the flavors to meld together beautifully. If you’re in a hurry, you can serve it immediately, but the flavors won’t be as developed.

    Step 5: Serve and Enjoy

    Serve the Waldorf chicken salad on a bed of lettuce, between slices of your favorite bread, or with crackers for a light snack. It’s perfect for picnics, lunches, or a quick dinner. Enjoy the crunch and creaminess in every bite!

    Tips and Tricks

    For an extra flavor boost, consider adding a handful of dried cranberries or grapes for a sweet pop. If you’re not a fan of walnuts, pecans or almonds make great substitutes. To keep the apples from browning, toss them in a little lemon juice before adding them to the salad. For a healthier version, you can substitute the mayonnaise with more Greek yogurt, though the texture will be less creamy. Always taste and adjust the seasoning before serving, as flavors can change after chilling.

    Recipe Variations

    • Add grapes or dried cranberries for a sweeter version.
    • Substitute the walnuts with pecans or almonds for a different nutty flavor.
    • Use turkey instead of chicken for a Thanksgiving twist.
    • Add avocado for extra creaminess and healthy fats.
    • For a dairy-free version, use vegan mayonnaise and skip the Greek yogurt.

    Frequently Asked Questions

    Can I make this recipe ahead of time? Absolutely! In fact, it tastes better after chilling for a few hours as the flavors have time to meld. Just be sure to keep it refrigerated until you’re ready to serve.

    What’s the best type of apple to use? Granny Smith apples are ideal for their tartness and crisp texture, but any firm, sweet apple like Honeycrisp or Fuji would work well too.

    Can I use canned chicken? While you can use canned chicken in a pinch, the texture and flavor won’t be as good as freshly cooked or leftover chicken. If you do use it, be sure to drain it well and consider adding extra seasoning.

    Summary

    This Waldorf Chicken Salad is a delightful mix of crunchy, creamy, sweet, and savory flavors. It’s easy to make, versatile, and perfect for any meal. Whether you’re packing a lunch or hosting a brunch, this recipe is sure to impress.

  • 5 Cup Ambrosia Salad Recipe: A Nostalgic Treat That Never Gets Old

    5 Cup Ambrosia Salad Recipe: A Nostalgic Treat That Never Gets Old

    Yummy, creamy, and bursting with fruity flavors, this 5 Cup Ambrosia Salad is the ultimate throwback dessert that’s perfect for any occasion. Whether you’re prepping for a potluck or just craving something sweet, this recipe is a guaranteed crowd-pleaser. Let’s dive into why this classic dish still reigns supreme and how you can whip it up in no time.

    Why This Recipe Works

    • It’s incredibly easy to make, requiring just five main ingredients and minimal prep time.
    • The combination of creamy, crunchy, and fruity textures creates a delightful eating experience.
    • It’s versatile, allowing for endless variations to suit your taste preferences.
    • The recipe is a nostalgic favorite, evoking memories of family gatherings and holiday feasts.
    • It’s a make-ahead dish, meaning less stress when hosting events.

    Ingredients

    • 1 cup mandarin oranges, drained
    • 1 cup pineapple chunks, drained
    • 1 cup mini marshmallows
    • 1 cup sweetened shredded coconut
    • 1 cup sour cream

    Equipment Needed

    • Large mixing bowl
    • Rubber spatula
    • Measuring cups
    • Can opener (if using canned fruit)

    Instructions

    5 Cup Ambrosia Salad Recipe

    Step 1: Gather Your Ingredients

    Before you start, make sure all your ingredients are prepped and ready to go. Drain the mandarin oranges and pineapple chunks well to avoid a watery salad. This step is crucial for achieving the perfect consistency. Tip: Pat the fruit dry with a paper towel for extra assurance.

    Step 2: Combine the Fruits

    In a large mixing bowl, gently fold together the mandarin oranges and pineapple chunks. The key here is to be gentle to keep the fruit intact. This ensures every bite is packed with juicy goodness.

    Step 3: Add the Marshmallows and Coconut

    Sprinkle in the mini marshmallows and sweetened shredded coconut. The marshmallows add a soft, pillowy texture, while the coconut brings a subtle crunch and tropical flavor. Tip: For a toastier flavor, lightly toast the coconut before adding it to the mix.

    Step 4: Fold in the Sour Cream

    Add the sour cream to the bowl and use a rubber spatula to fold everything together until well combined. The sour cream acts as the creamy binder that brings all the elements together. Be careful not to overmix to maintain the salad’s texture.

    Step 5: Chill and Serve

    Cover the bowl with plastic wrap and refrigerate for at least 1 hour before serving. This chilling time allows the flavors to meld together beautifully. Tip: For best results, let it chill overnight.

    Tips and Tricks

    For those looking to elevate their Ambrosia Salad, consider these advanced tips. First, swapping sour cream for Greek yogurt can add a tangier twist and a protein boost. Second, adding a handful of chopped nuts introduces a delightful crunch and richness. Third, a splash of citrus juice can brighten up the flavors. Lastly, experimenting with different fruit combinations can keep the recipe fresh and exciting.

    Recipe Variations

    • Swap sour cream for whipped cream for a lighter version.
    • Add a cup of cherries or grapes for extra fruitiness.
    • Incorporate a teaspoon of vanilla extract for a flavor boost.
    • Mix in a tablespoon of orange zest for a citrusy kick.
    • Use flavored marshmallows for a fun twist.

    Frequently Asked Questions

    Can I make this salad ahead of time?

    Absolutely! This salad actually tastes better after chilling for a few hours or overnight, making it a perfect make-ahead dish for busy hosts.

    Can I use fresh fruit instead of canned?

    Yes, fresh fruit can be used for a more natural taste. Just ensure it’s chopped into bite-sized pieces and drained well to prevent excess moisture.

    How long does Ambrosia Salad last in the fridge?

    Stored properly in an airtight container, it can last up to 3 days. However, it’s best enjoyed within the first 48 hours for optimal texture.

    Summary

    This 5 Cup Ambrosia Salad is a timeless classic that’s easy to make, delicious, and versatile. Perfect for any gathering, it’s sure to bring smiles and nostalgia to the table.

  • Pasta Salad Recipe for Kids: A Fun, Flavorful Adventure

    Pasta Salad Recipe for Kids: A Fun, Flavorful Adventure

    Ready to whip up a dish that’ll have the kiddos begging for seconds? This pasta salad is not just a meal; it’s a colorful journey through flavors and textures that even the pickiest eaters can’t resist. Let’s dive into making this delightful dish that’s perfect for picnics, lunches, or just because.

    Why This Recipe Works

    • Kid-Friendly Ingredients: We’re using familiar favorites like pasta, cheese, and veggies, making it a hit with the little ones.
    • Customizable: Easily swap out or add ingredients based on your child’s preferences or dietary needs.
    • Perfect for Any Occasion: Whether it’s a school lunch or a family barbecue, this pasta salad fits right in.
    • Make-Ahead Magic: It tastes even better the next day, making meal prep a breeze.

    Ingredients

    • 2 cups of rotini pasta (colorful for extra fun)
    • 1 cup of cherry tomatoes, halved
    • 1/2 cup of cucumber, diced
    • 1/2 cup of cheddar cheese, cubed
    • 1/4 cup of olive oil
    • 2 tablespoons of vinegar
    • 1 teaspoon of honey
    • Salt and pepper to taste

    Equipment Needed

    • Large pot
    • Colander
    • Large mixing bowl
    • Whisk
    • Measuring cups and spoons

    Instructions

    Pasta Salad Recipe For Kids

    Step 1: Cook the Pasta

    Bring a large pot of salted water to a boil. Add the rotini pasta and cook according to the package instructions, usually about 8-10 minutes, until al dente. Drain the pasta in a colander and rinse under cold water to stop the cooking process. This ensures your pasta salad is perfectly tender, not mushy.

    Step 2: Prepare the Dressing

    In a large mixing bowl, whisk together the olive oil, vinegar, honey, salt, and pepper until well combined. This simple dressing brings a sweet and tangy flavor that kids love. Tip: Let the kids help with the whisking—it’s a great way to get them involved!

    Step 3: Combine the Ingredients

    Add the cooled pasta, cherry tomatoes, cucumber, and cheddar cheese to the bowl with the dressing. Gently toss everything together until well coated. The vibrant colors and shapes make this dish as fun to look at as it is to eat.

    Step 4: Chill and Serve

    Cover the bowl and refrigerate the pasta salad for at least 1 hour before serving. This allows the flavors to meld together beautifully. Serve chilled for a refreshing treat that’s perfect for warm days.

    Tips and Tricks

    For an extra protein boost, add some diced chicken or turkey. If you’re dealing with veggie skeptics, try grating the carrots or zucchini finely so they blend in seamlessly. Always taste and adjust the seasoning before serving—sometimes a little extra honey or salt can make all the difference. For a dairy-free version, skip the cheese or use a plant-based alternative. Remember, the key to a great pasta salad is balance, so feel free to play around with the ingredient ratios until you find your family’s perfect mix.

    Recipe Variations

    • Italian Twist: Swap the cheddar for mozzarella pearls and add some sliced olives and a sprinkle of Italian seasoning.
    • Greek Style: Add feta cheese, kalamata olives, and a squeeze of lemon juice for a Mediterranean flair.
    • Rainbow Salad: Use a variety of colorful veggies like bell peppers, purple cabbage, and yellow squash to make the dish as vibrant as possible.
    • Protein Packed: Mix in some chickpeas or black beans for an extra fiber and protein boost.

    Frequently Asked Questions

    Can I make this pasta salad ahead of time?

    Absolutely! In fact, making it a day ahead allows the flavors to develop more fully. Just keep it refrigerated and give it a good stir before serving.

    What if my child doesn’t like vinegar?

    You can easily substitute the vinegar with lemon juice for a different kind of tanginess that might be more to their liking.

    How long will this pasta salad keep in the fridge?

    Stored in an airtight container, it should stay fresh for up to 3 days. Just be sure to give it a quick toss before serving again.

    Summary

    This pasta salad is a surefire way to bring a smile to your child’s face. With its simple ingredients, customizable options, and make-ahead convenience, it’s a recipe that parents will love just as much as the kids. Give it a try and watch it become a new family favorite.

  • Spinach Salad with Hot Bacon Dressing Recipe: A Sizzling Twist on a Classic

    Spinach Salad with Hot Bacon Dressing Recipe: A Sizzling Twist on a Classic

    Now, let’s dive into a dish that combines the freshness of spinach with the rich, smoky flavors of hot bacon dressing. This recipe is a game-changer for salad lovers looking for something with a bit more oomph.

    Why This Recipe Works

    • The contrast between the crisp, fresh spinach and the warm, savory bacon dressing creates a delightful sensory experience.
    • Using the bacon fat to make the dressing infuses it with deep, smoky flavors that store-bought dressings can’t match.
    • It’s incredibly versatile, serving as a perfect side dish or a hearty main with the right additions.

    Ingredients

    • 6 cups fresh spinach leaves, washed and dried
    • 6 slices bacon, chopped
    • 1 small red onion, thinly sliced
    • 2 hard-boiled eggs, sliced
    • 1/4 cup apple cider vinegar
    • 1 tablespoon sugar
    • 1 teaspoon Dijon mustard
    • Salt and pepper to taste

    Equipment Needed

    • Large skillet
    • Mixing bowl
    • Whisk
    • Salad spinner (optional)

    Instructions

    Spinach Salad With Hot Bacon Dressing Recipe

    Step 1: Cook the Bacon

    In a large skillet over medium heat, cook the chopped bacon until it’s crispy and the fat has rendered, about 8-10 minutes. Remove the bacon with a slotted spoon and set aside on paper towels to drain. Keep the bacon fat in the skillet.

    Step 2: Prepare the Dressing

    To the bacon fat in the skillet, add the apple cider vinegar, sugar, and Dijon mustard. Whisk together over medium heat until the sugar is dissolved and the dressing is slightly thickened, about 2-3 minutes. Season with salt and pepper to taste.

    Step 3: Assemble the Salad

    In a large mixing bowl, combine the fresh spinach leaves, sliced red onion, and hard-boiled eggs. Pour the hot bacon dressing over the salad and toss gently to coat all the ingredients evenly.

    Step 4: Add the Bacon

    Sprinkle the crispy bacon pieces over the top of the salad. The heat from the dressing will slightly wilt the spinach, which is exactly what you want for that perfect texture.

    Step 5: Serve Immediately

    This salad is best enjoyed right away while the dressing is still warm. Serve it as a side dish or add some grilled chicken to make it a main course.

    Tips and Tricks

    For an extra layer of flavor, consider adding a pinch of smoked paprika to the dressing. If you’re not a fan of red onion, thinly sliced shallots make a great substitute. To save time, you can cook the bacon and prepare the dressing ahead of time, then reheat the dressing just before serving. Always taste your dressing before adding it to the salad to adjust the seasoning as needed.

    Recipe Variations

    • Add some crumbled blue cheese or goat cheese for a creamy contrast.
    • Throw in some toasted pecans or walnuts for added crunch.
    • Substitute the spinach with kale or arugula for a different flavor profile.
    • For a sweeter twist, add some sliced strawberries or apples.
    • Make it a meal by topping with grilled chicken or shrimp.

    Frequently Asked Questions

    Can I make this salad ahead of time?

    While you can prepare the components ahead, it’s best to assemble the salad just before serving to prevent the spinach from getting too wilted. The dressing can be reheated gently before tossing with the salad.

    Is there a vegetarian version of this recipe?

    Absolutely! Skip the bacon and use a tablespoon of olive oil to make the dressing. Add some smoked paprika to mimic the smoky flavor of bacon.

    How can I store leftovers?

    Leftovers can be stored in an airtight container in the refrigerator for up to a day. Note that the spinach will wilt further, so it’s best enjoyed fresh.

    Summary

    This spinach salad with hot bacon dressing is a perfect blend of flavors and textures, making it a standout dish for any occasion. Easy to prepare and endlessly customizable, it’s sure to become a favorite.

  • Zesty Lemon Salad Recipe: A Burst of Sunshine in Every Bite

    Zesty Lemon Salad Recipe: A Burst of Sunshine in Every Bite

    Kickstart your day with this vibrant lemon salad that’s as refreshing as a summer breeze. Perfect for those who love a tangy twist to their greens, this recipe is a foolproof way to brighten up any meal.

    Why This Recipe Works

    • The combination of fresh lemons and crisp greens offers a perfect balance of tanginess and freshness.
    • Simple ingredients come together to create a complex flavor profile that’s both invigorating and satisfying.
    • It’s incredibly versatile, serving as a great side dish or a light main course for those warmer days.

    Ingredients

    • 2 large lemons, thinly sliced
    • 4 cups mixed greens (arugula, spinach, and kale work great)
    • 1/4 cup extra virgin olive oil
    • 2 tbsp honey
    • 1/2 tsp salt
    • 1/4 tsp black pepper
    • 1/4 cup sliced almonds, toasted

    Equipment Needed

    • Large mixing bowl
    • Whisk
    • Measuring cups and spoons
    • Knife and cutting board

    Instructions

    Lemon Salad Recipe

    Prepare the Lemon Slices

    Start by washing the lemons thoroughly under cold water. Using a sharp knife, slice them as thinly as possible, about 1/8 inch thick. Remove any seeds you encounter. This ensures every bite is seed-free and full of lemony goodness.

    Toast the Almonds

    Heat a small skillet over medium heat. Add the sliced almonds and toast them for about 3-5 minutes, stirring frequently, until they’re golden brown and fragrant. Keep an eye on them to prevent burning, as they can go from toasted to burnt in seconds.

    Whisk Together the Dressing

    In a small bowl, combine the olive oil, honey, salt, and black pepper. Whisk them together until the mixture is well blended and slightly emulsified. This dressing will coat the greens beautifully, adding a sweet and savory note to the salad.

    Assemble the Salad

    In a large mixing bowl, toss the mixed greens with the prepared dressing until evenly coated. Add the lemon slices and toasted almonds, gently tossing to distribute them throughout the salad. This step ensures every forkful is packed with flavor and texture.

    Serve Immediately

    For the best experience, serve the salad right after assembling. The greens stay crisp, and the flavors are at their peak. If you must wait, keep the dressing separate until just before serving to prevent wilting.

    Tips and Tricks

    For an extra layer of flavor, consider adding a sprinkle of feta cheese or avocado slices. If you’re not a fan of almonds, try substituting with walnuts or pecans for a different crunch. Always zest your lemons before slicing; the zest can be used to garnish the salad or add to the dressing for an intensified lemon flavor. Lastly, if you prefer a less tangy salad, reduce the amount of lemon or balance it with a bit more honey.

    Recipe Variations

    • Add grilled chicken or shrimp for a protein-packed meal.
    • Incorporate other citrus fruits like oranges or grapefruits for a varied citrus profile.
    • Swap the honey for maple syrup to make it vegan-friendly.
    • Include quinoa or farro for a hearty, grain-based salad.
    • Use different nuts like pistachios or pine nuts for a unique twist.

    Frequently Asked Questions

    Can I make this salad ahead of time?

    Yes, but for the best texture and freshness, it’s recommended to add the dressing and assemble the salad just before serving. You can prep the ingredients ahead and store them separately in the fridge.

    How can I make the salad less tangy?

    Adjust the tanginess by reducing the number of lemon slices or increasing the amount of honey in the dressing. You can also add sweeter ingredients like dried cranberries or apple slices to balance the flavors.

    What other greens can I use?

    Feel free to use any greens you prefer or have on hand. Romaine, butter lettuce, or even shredded Brussels sprouts can work well in this recipe. The key is to choose greens that can hold up to the dressing without wilting too quickly.

    Summary

    This zesty lemon salad is a refreshing and versatile dish that’s perfect for any occasion. With its bright flavors and simple preparation, it’s sure to become a staple in your recipe collection.

  • Farro and Kale Salad Recipe: A Hearty, Healthy Bowl of Goodness

    Farro and Kale Salad Recipe: A Hearty, Healthy Bowl of Goodness

    You’re about to dive into a recipe that’s as nutritious as it is delicious. This farro and kale salad is packed with flavors and textures that will make your taste buds dance. Perfect for meal prep or a fancy dinner side, it’s a versatile dish that everyone will love.

    Why This Recipe Works

    • Farro adds a nutty flavor and chewy texture that makes the salad satisfying.
    • Kale is a superfood that brings crunch and a plethora of health benefits.
    • The lemon vinaigrette ties everything together with its bright and zesty flavor.
    • It’s customizable with your favorite add-ins like nuts, cheese, or dried fruit.
    • This salad gets better as it sits, making it perfect for leftovers.

    Ingredients

    • 1 cup farro, rinsed
    • 2 cups water
    • 1 bunch kale, stems removed and leaves chopped
    • 1/4 cup olive oil
    • 2 tbsp lemon juice
    • 1 tsp honey
    • 1/2 tsp salt
    • 1/4 tsp black pepper
    • 1/4 cup grated Parmesan cheese
    • 1/4 cup chopped walnuts

    Equipment Needed

    • Medium saucepan
    • Mixing bowls
    • Whisk
    • Knife and cutting board
    • Measuring cups and spoons

    Instructions

    Farro And Kale Salad Recipe

    Cook the Farro

    In a medium saucepan, combine the farro and water. Bring to a boil, then reduce heat to low, cover, and simmer for 25 minutes or until the farro is tender but still chewy. Drain any excess water and let it cool slightly.

    Prepare the Kale

    While the farro cooks, chop the kale into bite-sized pieces. In a large mixing bowl, massage the kale with a bit of olive oil to soften it. This step is crucial for removing the bitterness and making the kale more palatable.

    Make the Dressing

    In a small bowl, whisk together the olive oil, lemon juice, honey, salt, and pepper until well combined. Taste and adjust the seasoning as needed. This dressing is the secret to the salad’s vibrant flavor.

    Combine Everything

    Add the cooked farro to the bowl with the kale. Pour the dressing over the top and toss to combine. Sprinkle with Parmesan cheese and walnuts for added texture and flavor.

    Serve or Store

    This salad can be served immediately or stored in the refrigerator for up to 3 days. The flavors will meld together over time, making it even more delicious.

    Tips and Tricks

    For an extra flavor boost, toast the walnuts before adding them to the salad. If you’re not a fan of walnuts, try almonds or pecans instead. To make this salad vegan, omit the Parmesan cheese or use a vegan alternative. For a more filling meal, add grilled chicken or chickpeas. Always taste and adjust the dressing before adding it to the salad to ensure it’s perfectly balanced.

    Recipe Variations

    • Swap farro for quinoa or brown rice for a different grain base.
    • Add dried cranberries or cherries for a sweet contrast to the savory elements.
    • Include avocado slices for creaminess and healthy fats.
    • Use a different dressing, such as balsamic vinaigrette or tahini lemon.
    • Incorporate other greens like spinach or arugula for variety.

    Frequently Asked Questions

    Can I use another grain instead of farro?

    Absolutely! Quinoa, brown rice, or even barley would work well in this recipe. Just adjust the cooking time according to the grain you choose.

    How do I store leftovers?

    Store the salad in an airtight container in the refrigerator for up to 3 days. The flavors will continue to develop, making it even tastier the next day.

    Can I make this salad ahead of time?

    Yes, this salad is perfect for meal prep. Just wait to add the nuts and cheese until you’re ready to serve to keep them fresh and crunchy.

    Summary

    This farro and kale salad is a nutritious, flavorful dish that’s perfect for any occasion. With its hearty grains, crunchy greens, and zesty dressing, it’s a meal that satisfies on all levels.

  • Somen Salad Recipe: A Refreshing Summer Delight

    Somen Salad Recipe: A Refreshing Summer Delight

    Ready to dive into a dish that’s as fun to make as it is to eat? This somen salad recipe is your ticket to a refreshing, flavorful meal that’s perfect for those hot summer days. Let’s get started!

    Why This Recipe Works

    • It’s a perfect blend of cool, refreshing noodles and crisp, vibrant vegetables.
    • The dressing is a harmonious mix of savory, sweet, and tangy flavors that’ll have your taste buds dancing.
    • It’s incredibly versatile, allowing you to customize it with your favorite proteins or veggies.
    • Quick and easy to prepare, making it ideal for busy weeknights or last-minute gatherings.
    • The dish is as visually appealing as it is delicious, guaranteed to impress your guests.

    Ingredients

    • 8 oz somen noodles
    • 2 cups shredded lettuce
    • 1 cucumber, julienned
    • 1 carrot, julienned
    • 2 green onions, thinly sliced
    • 1/4 cup soy sauce
    • 2 tbsp rice vinegar
    • 1 tbsp sugar
    • 1 tsp sesame oil
    • 1 tbsp sesame seeds

    Equipment Needed

    • Large pot
    • Colander
    • Mixing bowls
    • Whisk
    • Measuring cups and spoons

    Instructions

    Somen Salad Recipe

    Step 1: Cook the Somen Noodles

    Bring a large pot of water to a rolling boil. Add the somen noodles and cook for about 3 minutes, or until they’re just tender. Drain them in a colander and rinse under cold water to stop the cooking process. Tip: Rinsing the noodles removes excess starch, preventing them from sticking together.

    Step 2: Prepare the Vegetables

    While the noodles are cooking, julienne the cucumber and carrot, and thinly slice the green onions. Shred the lettuce if you haven’t already. Having all your veggies prepped and ready to go makes assembling the salad a breeze.

    Step 3: Make the Dressing

    In a small mixing bowl, whisk together the soy sauce, rice vinegar, sugar, and sesame oil until the sugar is completely dissolved. This dressing is the secret to the salad’s irresistible flavor, so don’t skip this step!

    Step 4: Assemble the Salad

    In a large serving bowl, layer the shredded lettuce, followed by the somen noodles, and then the julienned vegetables. Drizzle the dressing over the top and sprinkle with sesame seeds. Tip: For the best flavor, let the salad sit for about 10 minutes before serving to allow the noodles to absorb the dressing.

    Step 5: Serve and Enjoy

    Give the salad a gentle toss right before serving to ensure every bite is perfectly dressed. Serve chilled for the most refreshing experience. Tip: For an extra crunch, add some toasted sesame seeds or crushed peanuts on top.

    Tips and Tricks

    To take your somen salad to the next level, consider these advanced tips. First, for a deeper flavor, let the dressing sit for an hour before using it. This allows the flavors to meld together beautifully. Second, if you’re adding protein like chicken or shrimp, marinate it in a bit of the dressing before cooking to infuse it with flavor. Lastly, for a more colorful presentation, use a mix of purple and green cabbage instead of lettuce. These small tweaks can make a big difference in the overall taste and appearance of your dish.

    Recipe Variations

    • Add grilled chicken or shrimp for a protein-packed version.
    • Swap the somen noodles for soba noodles for a heartier texture.
    • Include avocado slices for a creamy, rich addition.
    • Top with a soft-boiled egg for extra richness.
    • Use a spicy mayo drizzle for those who like a bit of heat.

    Frequently Asked Questions

    Can I make this salad ahead of time?

    Absolutely! You can prep all the components a day in advance and store them separately in the fridge. Just assemble and add the dressing right before serving to keep the noodles from getting soggy.

    Is there a gluten-free version of this recipe?

    Yes, you can use gluten-free soy sauce and rice noodles to make this dish gluten-free. Just be sure to check all your ingredients to ensure they meet your dietary needs.

    Can I add other vegetables to the salad?

    Definitely! Feel free to throw in any veggies you have on hand. Bell peppers, radishes, and snap peas would all be great additions. The more colorful, the better!

    Summary

    This somen salad is a light, refreshing dish that’s perfect for summer. With its crisp vegetables, tender noodles, and flavorful dressing, it’s sure to become a favorite. Plus, it’s highly customizable, so you can make it your own. Give it a try and enjoy a taste of summer in every bite!

  • Vietnamese Salad Recipe: A Crunchy, Fresh Delight

    Vietnamese Salad Recipe: A Crunchy, Fresh Delight

    Vietnamese salads are the epitome of freshness and crunch, combining vibrant vegetables, herbs, and a tangy dressing that’ll make your taste buds dance. This recipe is a foolproof way to bring a taste of Vietnam to your kitchen, with a fun twist that’ll keep you coming back for more.

    Why This Recipe Works

    • The combination of crisp vegetables and fresh herbs offers a texture and flavor contrast that’s unbeatable.
    • The homemade dressing strikes the perfect balance between sweet, sour, and savory, elevating the salad to new heights.
    • It’s incredibly versatile, allowing for numerous variations to suit any palate or dietary preference.
    • Quick and easy to prepare, making it perfect for weeknight dinners or impromptu gatherings.
    • Packed with nutrients, it’s as healthy as it is delicious.

    Ingredients

    • 2 cups shredded cabbage
    • 1 cup shredded carrots
    • 1/2 cup thinly sliced cucumber
    • 1/4 cup chopped fresh mint
    • 1/4 cup chopped fresh cilantro
    • 2 tbsp roasted peanuts, crushed
    • For the dressing: 3 tbsp fish sauce, 2 tbsp lime juice, 2 tbsp sugar, 1 minced garlic clove, 1 tsp chili paste

    Equipment Needed

    • Large mixing bowl
    • Small bowl for dressing
    • Whisk
    • Knife and cutting board
    • Measuring cups and spoons

    Instructions

    Vietnamese Salad Recipe

    Step 1: Prepare the Vegetables

    Start by shredding the cabbage and carrots into thin strips. The thinner they are, the better they’ll absorb the dressing. Slice the cucumber into thin half-moons for a nice texture contrast. Toss all the vegetables into a large mixing bowl. Tip: For extra crunch, you can soak the shredded cabbage in ice water for 10 minutes before draining and using.

    Step 2: Make the Dressing

    In a small bowl, whisk together the fish sauce, lime juice, sugar, minced garlic, and chili paste until the sugar is completely dissolved. Taste and adjust the flavors to your liking. Remember, the dressing should be a balance of sweet, sour, and savory. Tip: If you find the dressing too strong, dilute it with a tablespoon of water.

    Step 3: Combine and Toss

    Pour the dressing over the prepared vegetables in the large mixing bowl. Add the chopped mint and cilantro. Using clean hands or salad tongs, gently toss everything together until the vegetables are evenly coated with the dressing. This is where the magic happens, so don’t rush it. Tip: Let the salad sit for 5 minutes before serving to allow the flavors to meld.

    Step 4: Garnish and Serve

    Transfer the salad to a serving dish and sprinkle the crushed peanuts on top for an added crunch and nutty flavor. Serve immediately to enjoy the salad at its freshest. This dish is perfect on its own or as a side to grilled meats or seafood.

    Tips and Tricks

    For those looking to take their Vietnamese salad to the next level, consider these advanced tips. First, toasting the peanuts before crushing them will enhance their flavor significantly. Second, adding a handful of bean sprouts can introduce a delightful crunch and freshness. Third, for a more substantial meal, top the salad with grilled shrimp or chicken. Remember, the key to a great salad is in the balance of textures and flavors, so don’t be afraid to experiment.

    Recipe Variations

    • For a vegetarian version, substitute the fish sauce with soy sauce or a vegan fish sauce alternative.
    • Add mango or papaya for a sweet twist that complements the tangy dressing beautifully.
    • Incorporate rice noodles to turn the salad into a more filling main dish.
    • Use different herbs like Thai basil or Vietnamese coriander for a unique flavor profile.
    • For a spicy kick, increase the amount of chili paste or add fresh sliced chilies.

    Frequently Asked Questions

    Can I make this salad ahead of time?

    Yes, you can prepare the vegetables and dressing separately a few hours in advance. However, it’s best to combine them just before serving to maintain the salad’s crunch and freshness. If you must assemble it ahead, keep the dressing on the side and add it at the last minute.

    What can I use instead of fish sauce?

    If you’re not a fan of fish sauce, you can use soy sauce or tamari for a similar umami flavor. For a completely vegan option, look for vegan fish sauce alternatives available at Asian grocery stores or online.

    How long does the salad keep?

    The salad is best enjoyed fresh but can be stored in the refrigerator for up to a day. Keep in mind that the vegetables will soften over time, especially after being dressed. If you have leftovers, they’ll still be tasty but lack the original crunch.

    Summary

    This Vietnamese salad is a vibrant, crunchy, and flavorful dish that’s easy to make and endlessly customizable. Perfect for a light meal or a side dish, it’s sure to impress with its fresh ingredients and tangy dressing. Give it a try and bring a taste of Vietnam to your table!