Author: onlinefoodrecipes

  • Bobby Flay’s Potato Salad Recipe: A Side Dish That Steals the Show

    Bobby Flay’s Potato Salad Recipe: A Side Dish That Steals the Show

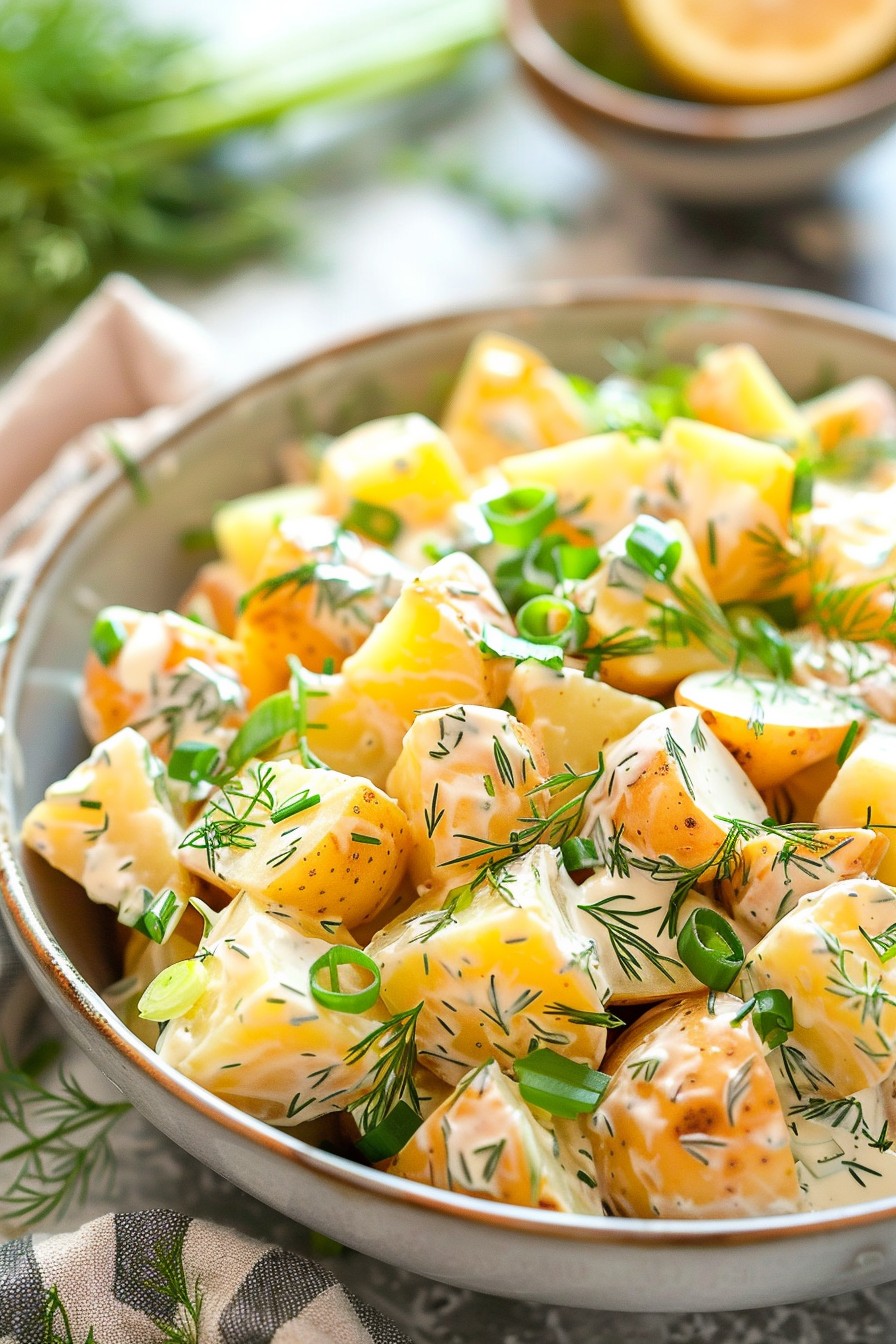
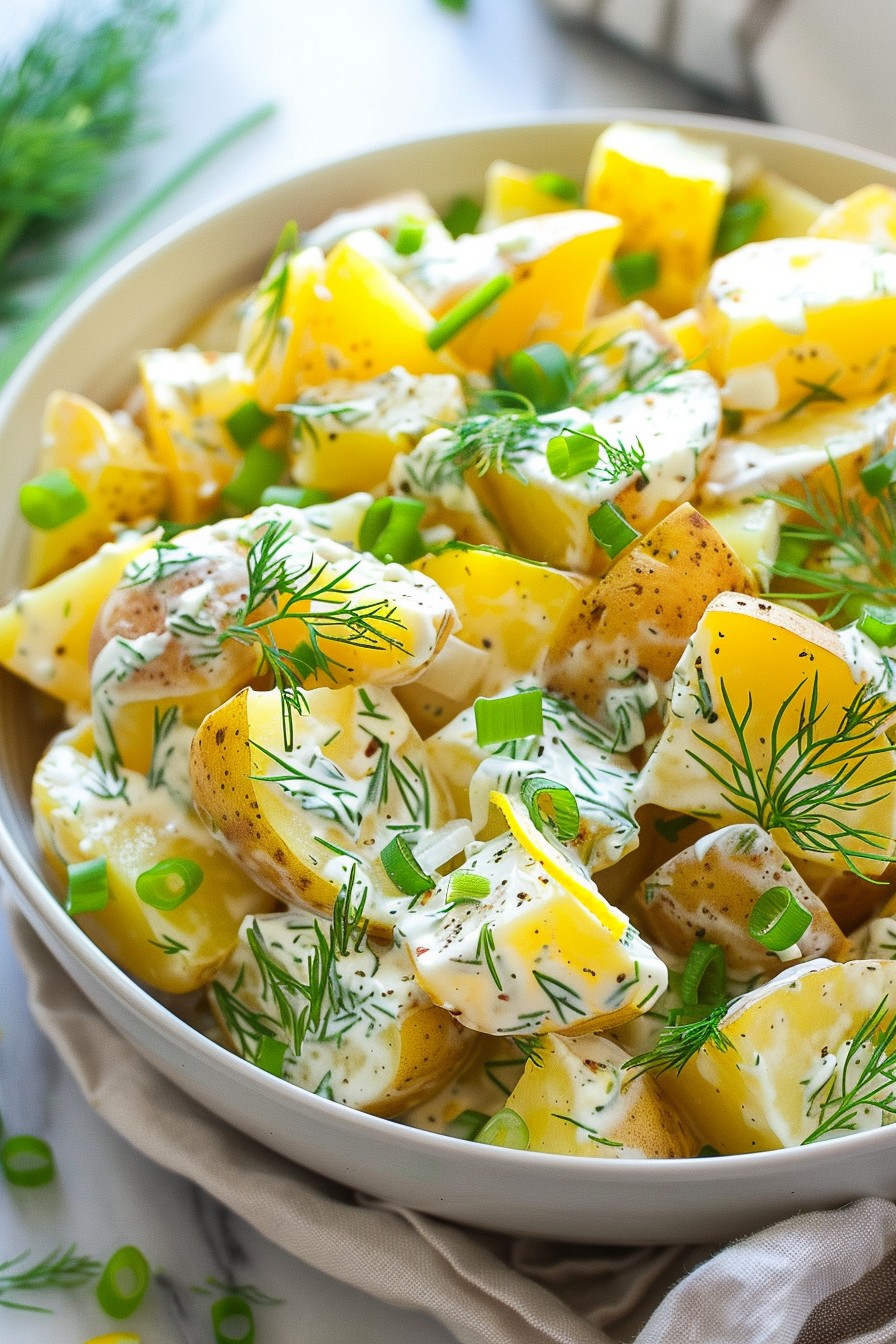
    Back in the kitchen with a recipe that’s bound to be the star of your next barbecue or family gathering. Bobby Flay’s potato salad combines creamy, tangy, and crunchy elements for a dish that’s anything but ordinary.

    Why This Recipe Works

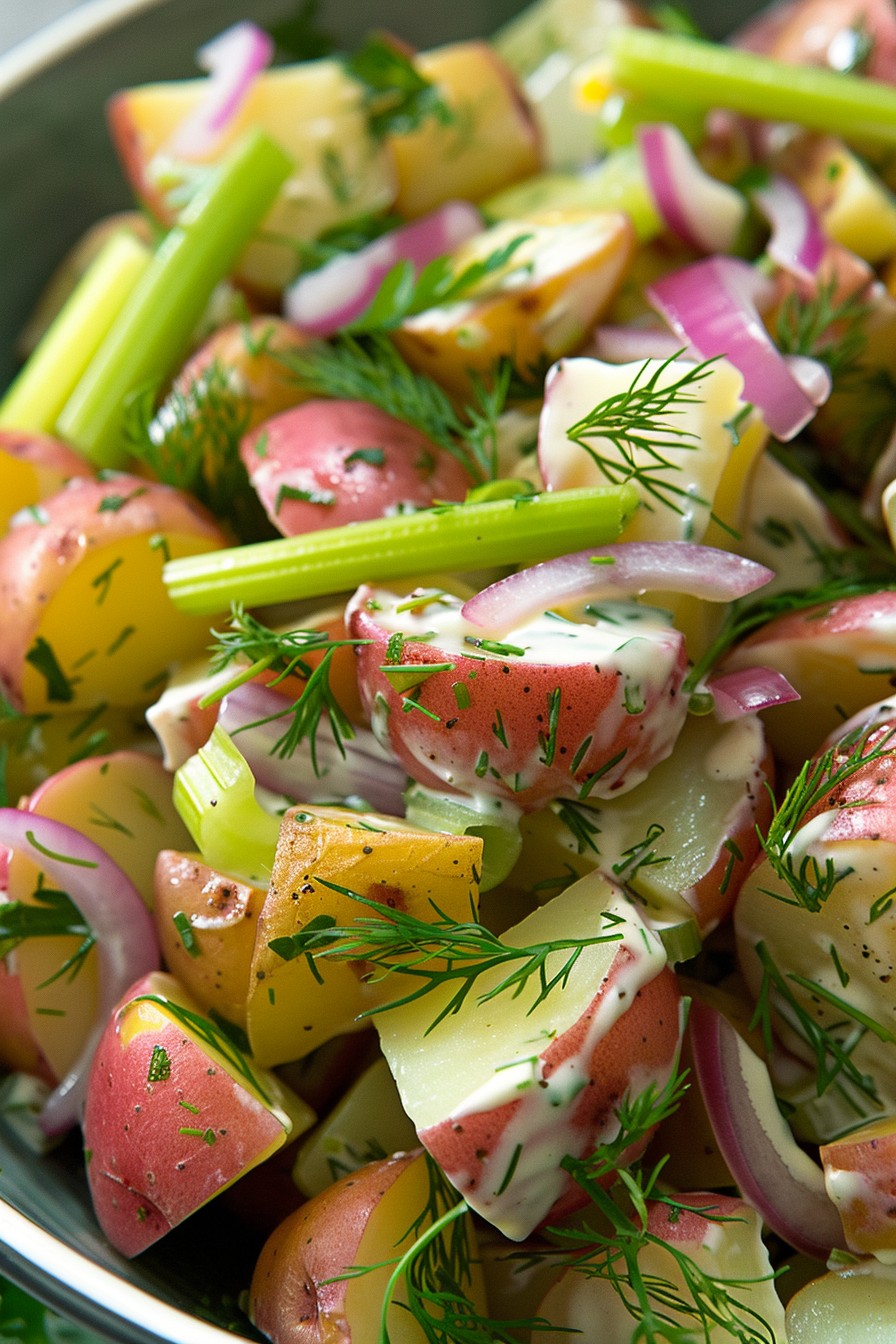
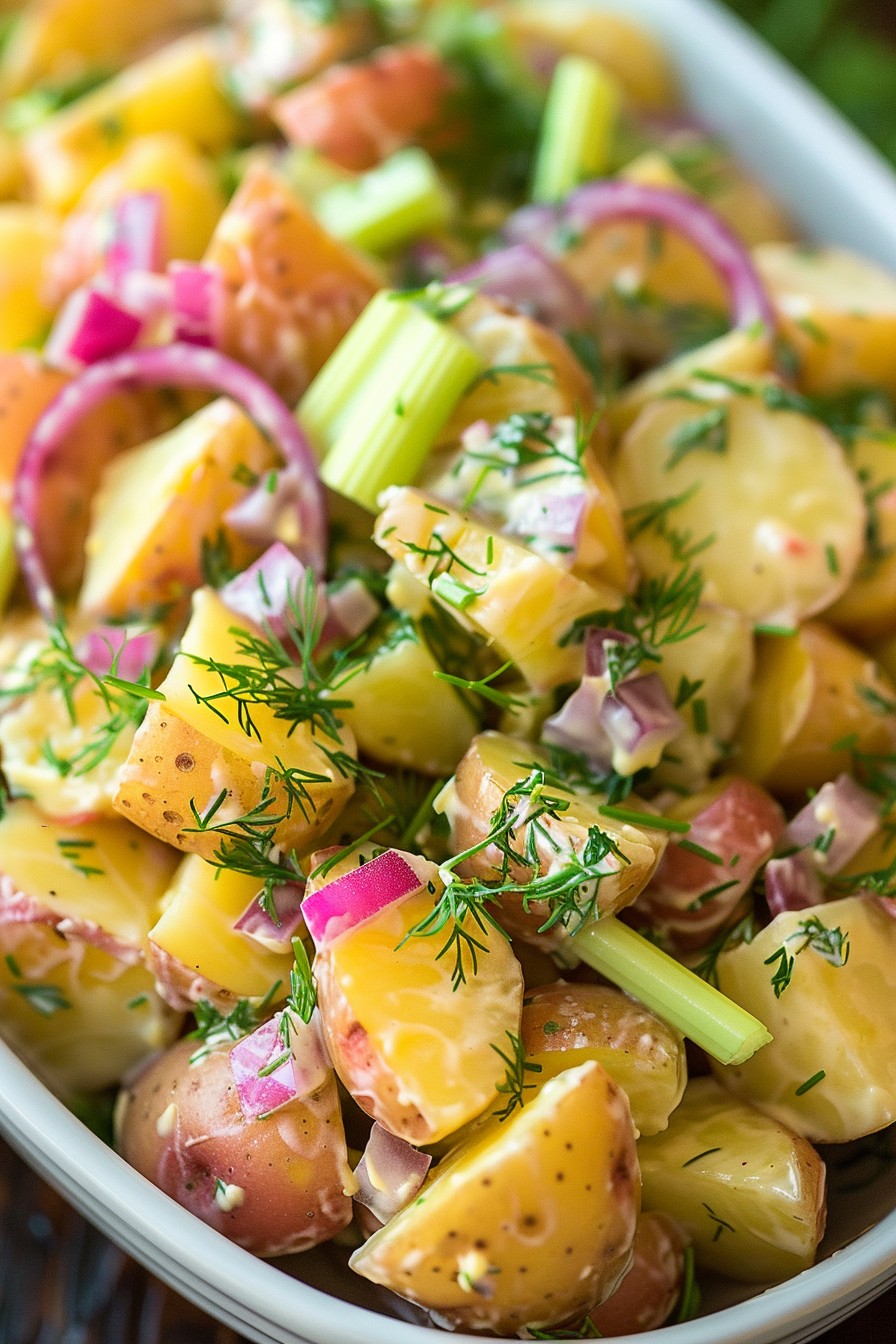
    • The combination of Yukon Gold and red potatoes offers the perfect balance of creaminess and firmness.
    • A homemade dressing with Dijon mustard and apple cider vinegar adds a tangy kick that elevates the flavors.
    • Fresh herbs and crisp vegetables introduce layers of texture and freshness.
    • Letting the salad chill for at least an hour allows the flavors to meld beautifully.
    • It’s versatile enough to pair with any main dish, from grilled meats to vegetarian options.

    Ingredients

    • 2 pounds Yukon Gold potatoes, cubed
    • 1 pound red potatoes, cubed
    • 1 cup mayonnaise
    • 2 tablespoons Dijon mustard
    • 2 tablespoons apple cider vinegar
    • 1/2 cup finely chopped red onion
    • 1/2 cup chopped celery
    • 1/4 cup chopped fresh dill
    • Salt and pepper to taste

    Equipment Needed

    • Large pot
    • Mixing bowls
    • Whisk
    • Knife and cutting board
    • Measuring cups and spoons

    Instructions

    Potato Salad Recipe Bobby Flay

    Step 1: Cook the Potatoes

    Start by placing the cubed Yukon Gold and red potatoes in a large pot. Cover them with cold water by about an inch, then bring to a boil over high heat. Once boiling, reduce the heat to medium and simmer until the potatoes are just tender, about 10 minutes. Tip: To check for doneness, pierce a potato cube with a fork; it should slide off easily.

    Step 2: Prepare the Dressing

    While the potatoes are cooking, whisk together the mayonnaise, Dijon mustard, and apple cider vinegar in a large mixing bowl. Season with salt and pepper to taste. This creamy, tangy dressing is the secret to the salad’s irresistible flavor.

    Step 3: Combine the Ingredients

    Drain the cooked potatoes and let them cool slightly. Add them to the bowl with the dressing, along with the chopped red onion, celery, and fresh dill. Gently fold everything together until the potatoes are evenly coated with the dressing. Tip: For the best flavor, let the salad chill in the refrigerator for at least an hour before serving.

    Tips and Tricks

    For an extra layer of flavor, try roasting the potatoes instead of boiling them. This adds a delightful crispness to the edges. If you’re short on time, you can serve the salad immediately, but the flavors won’t be as developed. For a lighter version, substitute half of the mayonnaise with Greek yogurt. Always taste and adjust the seasoning before serving, as potatoes can absorb a lot of salt.

    Recipe Variations

    • Add hard-boiled eggs for a protein boost and extra creaminess.
    • Mix in crispy bacon bits for a smoky flavor.
    • For a spicy kick, add a diced jalapeño or a dash of hot sauce to the dressing.
    • Swap the dill for parsley or cilantro for a different herbal note.
    • Include a handful of capers or chopped pickles for a briny twist.

    Frequently Asked Questions

    Can I make this potato salad ahead of time?

    Absolutely! In fact, making it a day ahead allows the flavors to meld together even more. Just be sure to keep it refrigerated and give it a good stir before serving.

    What’s the best way to store leftovers?

    Store any leftovers in an airtight container in the refrigerator. They’ll keep for up to 3 days, though the texture of the potatoes may change slightly over time.

    Can I use all one type of potato?

    You can, but using a mix of Yukon Gold and red potatoes gives the salad a more interesting texture and flavor profile. If you must choose one, go with Yukon Gold for their creaminess.

    Summary

    Bobby Flay’s potato salad is a creamy, tangy, and crunchy side dish that’s perfect for any occasion. With its balance of flavors and textures, it’s sure to be a hit at your next gathering.

  • Fennel Apple Salad Recipe: A Crunchy, Refreshing Delight

    Fennel Apple Salad Recipe: A Crunchy, Refreshing Delight

    A absolutely delightful salad that combines the crispness of apples with the unique flavor of fennel for a refreshing side dish or light meal. Perfect for those warm summer days or when you’re craving something fresh and crunchy.

    Why This Recipe Works

    • The combination of crisp apples and crunchy fennel creates a texture that’s irresistibly satisfying.
    • A light lemon dressing enhances the natural flavors without overpowering them.
    • It’s incredibly versatile, serving as a perfect side dish or a light main course.
    • Quick and easy to prepare, making it ideal for last-minute gatherings.
    • Packed with nutrients, offering a healthy option that doesn’t skimp on taste.

    Ingredients

    • 1 large fennel bulb, thinly sliced
    • 2 medium apples, cored and thinly sliced
    • 1/4 cup fresh lemon juice
    • 2 tbsp olive oil
    • Salt and pepper to taste
    • 1/4 cup chopped walnuts (optional)
    • 1/4 cup crumbled feta cheese (optional)

    Equipment Needed

    • Sharp knife
    • Cutting board
    • Large mixing bowl
    • Whisk
    • Measuring cups and spoons

    Instructions

    Fennel Apple Salad Recipe

    Prepare the Ingredients

    Start by washing the fennel and apples thoroughly. Using a sharp knife, thinly slice the fennel bulb, ensuring to remove the tough core. Core the apples and slice them thinly as well. Place all sliced ingredients into a large mixing bowl.

    Make the Dressing

    In a small bowl, whisk together the fresh lemon juice and olive oil until well combined. Season with salt and pepper to taste. This simple dressing will bring out the natural flavors of the fennel and apples.

    Combine and Toss

    Pour the dressing over the sliced fennel and apples in the mixing bowl. Gently toss the ingredients until everything is evenly coated with the dressing. This ensures every bite is flavorful.

    Add Optional Toppings

    If using, sprinkle the chopped walnuts and crumbled feta cheese over the salad. These add a nice crunch and a creamy texture, respectively, elevating the dish.

    Serve Immediately

    For the best texture and flavor, serve the salad immediately after preparation. If you must wait, keep it refrigerated and add the toppings just before serving.

    Tips and Tricks

    For an extra crunch, toast the walnuts lightly before adding them to the salad. This enhances their flavor and adds a deeper dimension to the dish. If you’re preparing the salad ahead of time, keep the dressing separate and toss it in just before serving to prevent the apples and fennel from becoming soggy. For a sweeter version, you can add a teaspoon of honey to the dressing, balancing the tartness of the lemon.

    Recipe Variations

    • Add sliced pears instead of apples for a different but equally delicious fruit component.
    • Include some arugula or spinach to turn it into a more substantial salad.
    • Swap the feta cheese for goat cheese for a creamier texture.
    • Add some dried cranberries or raisins for a sweet contrast.
    • For a nut-free version, omit the walnuts or replace them with sunflower seeds.

    Frequently Asked Questions

    Can I make this salad ahead of time?

    Yes, you can prepare the components ahead of time, but it’s best to combine them just before serving to maintain the crispness of the fennel and apples. Keep the sliced ingredients and dressing separate in the refrigerator until ready to serve.

    What type of apples work best in this salad?

    Crisp, slightly sweet apples like Honeycrisp or Fuji work wonderfully in this salad, offering a nice contrast to the anise flavor of the fennel. However, feel free to use your favorite variety.

    Is there a substitute for fennel?

    If you’re not a fan of fennel, celery can be a good substitute, offering a similar crunch but with a milder flavor. The salad will have a different character but will still be delicious.

    Summary

    This Fennel Apple Salad is a refreshing, crunchy, and versatile dish that’s perfect for any occasion. With its simple preparation and delicious flavors, it’s sure to become a favorite.

  • Round Swamp Chicken Salad Recipe: A Delightfully Unique Twist on Classic Salad

    Round Swamp Chicken Salad Recipe: A Delightfully Unique Twist on Classic Salad

    Get ready to dive into the flavors of the swamp with this round swamp chicken salad recipe. It’s a fun, flavorful twist that’ll have your taste buds dancing with joy.

    Why This Recipe Works

    • The combination of tender chicken and crisp vegetables offers a perfect texture contrast.
    • A unique dressing brings out the earthy flavors reminiscent of a swamp’s freshness.
    • It’s a versatile dish that can be served as a main or a side, making it perfect for any occasion.
    • Easy to prepare with ingredients that are readily available in your local grocery store.
    • The recipe is customizable, allowing you to adjust the flavors to your liking.

    Ingredients

    • 2 cups cooked chicken, shredded
    • 1 cup celery, finely chopped
    • 1/2 cup red onion, diced
    • 1 cup grapes, halved
    • 1/2 cup walnuts, chopped
    • 1/2 cup mayonnaise
    • 1 tbsp lemon juice
    • 1 tsp salt
    • 1/2 tsp black pepper

    Equipment Needed

    • Mixing bowl
    • Measuring cups and spoons
    • Knife and cutting board
    • Wooden spoon or spatula

    Instructions

    Round Swamp Chicken Salad Recipe

    Step 1: Prepare Your Ingredients

    Start by ensuring all your ingredients are prepped and ready to go. Shred the cooked chicken into bite-sized pieces, finely chop the celery, dice the red onion, and halve the grapes. Having everything prepared beforehand makes the assembly process smoother and faster.

    Step 2: Mix the Dressing

    In a small bowl, whisk together the mayonnaise, lemon juice, salt, and black pepper until well combined. This dressing will coat your ingredients evenly, bringing all the flavors together beautifully.

    Step 3: Combine the Salad Ingredients

    In a large mixing bowl, add the shredded chicken, chopped celery, diced red onion, halved grapes, and chopped walnuts. Gently toss these ingredients together to ensure they’re evenly distributed.

    Step 4: Add the Dressing

    Pour the dressing over the salad ingredients. Using a wooden spoon or spatula, fold the dressing into the salad until everything is evenly coated. Be gentle to keep the grapes and walnuts intact.

    Step 5: Chill and Serve

    Cover the bowl with plastic wrap and refrigerate for at least 30 minutes before serving. This chilling time allows the flavors to meld together, enhancing the overall taste of the salad.

    Tips and Tricks

    For an extra crunch, toast the walnuts before adding them to the salad. This simple step elevates the texture and adds a deeper flavor. If you’re not a fan of mayonnaise, Greek yogurt makes a great substitute, offering a tangier taste and lighter texture. Lastly, for a sweeter twist, consider adding a tablespoon of honey to the dressing. It complements the savory elements of the salad beautifully.

    Recipe Variations

    • Swap the walnuts for pecans or almonds for a different nutty flavor.
    • Add diced apples or pears for an extra fruity crunch.
    • Incorporate crumbled blue cheese or feta for a creamy, tangy twist.
    • Use grilled chicken instead of boiled for a smokier taste.
    • For a healthier version, replace half the mayonnaise with avocado.

    Frequently Asked Questions

    Can I make this salad ahead of time?

    Absolutely! This salad actually tastes better after it’s had time to chill in the fridge, making it a perfect make-ahead dish for busy days or gatherings. Just be sure to add the walnuts right before serving to maintain their crunch.

    What can I serve with this salad?

    This round swamp chicken salad pairs wonderfully with crusty bread, crackers, or even as a filling for wraps and sandwiches. It’s also great alongside grilled vegetables or a simple soup for a more substantial meal.

    How long will this salad keep in the fridge?

    Stored in an airtight container, the salad will stay fresh for up to 3 days. However, the sooner you eat it, the better the texture and flavor will be.

    Summary

    This round swamp chicken salad is a delightful mix of textures and flavors, perfect for any occasion. Easy to make and customizable, it’s sure to become a favorite in your recipe collection.

  • Filipino Buko Salad Recipe: A Tropical Delight You Can’t Resist

    Filipino Buko Salad Recipe: A Tropical Delight You Can’t Resist

    Today’s the perfect day to dive into the creamy, fruity goodness of Filipino Buko Salad. This dessert is a party in your mouth, combining the freshness of young coconut with the sweetness of various fruits and creamy goodness. Let’s get started!

    Why This Recipe Works

    • The combination of young coconut and mixed fruits offers a refreshing taste that’s perfect for any season.
    • It’s incredibly easy to make, requiring no cooking, just mixing and chilling.
    • The creamy dressing binds all the flavors together, creating a harmonious blend that’s irresistibly delicious.
    • It’s versatile; you can easily adjust the fruits based on what’s available or your preference.
    • Perfect for gatherings, potlucks, or as a sweet treat to enjoy at home.

    Ingredients

    • 2 cups young coconut (buko), shredded
    • 1 cup canned fruit cocktail, drained
    • 1 cup nata de coco (coconut gel), drained
    • 1 cup kaong (sugar palm fruit), drained
    • 1 cup heavy cream
    • 1/2 cup condensed milk
    • 1/2 cup cheese, cubed (optional)

    Equipment Needed

    • Large mixing bowl
    • Mixing spoon
    • Measuring cups and spoons
    • Refrigerator

    Instructions

    Filipino Buko Salad Recipe

    Step 1: Prepare Your Ingredients

    Start by ensuring all your fruits are drained well to avoid a watery salad. Shred the young coconut into thin strips if it’s not pre-shredded. This ensures every bite has the perfect texture and flavor combination.

    Step 2: Mix the Fruits

    In a large mixing bowl, combine the shredded young coconut, fruit cocktail, nata de coco, and kaong. Gently toss them together to distribute the fruits evenly. This mix is the heart of your salad, so make sure it’s well combined.

    Step 3: Add the Creamy Dressing

    Pour the heavy cream and condensed milk over the fruit mixture. Fold gently until all the fruits are coated with the creamy dressing. The dressing should be evenly distributed to ensure every spoonful is as delicious as the last.

    Step 4: Chill to Perfection

    Cover the bowl with plastic wrap and refrigerate for at least 2 hours. Chilling allows the flavors to meld together beautifully, enhancing the overall taste of your Buko Salad.

    Step 5: Serve and Enjoy

    Once chilled, give your Buko Salad a final gentle mix. Serve in individual bowls or a large serving dish. For an extra touch, sprinkle some cubed cheese on top before serving.

    Tips and Tricks

    For a lighter version, you can substitute the heavy cream with all-purpose cream or even Greek yogurt. If you’re serving this at a party, consider adding a splash of rum for an adult version. Always taste your salad before chilling to adjust the sweetness; you might want to add more condensed milk if you prefer it sweeter. To keep it fresh, consume within two days of making.

    Recipe Variations

    • Add diced mangoes or strawberries for a different fruity twist.
    • Include small tapioca pearls (sago) for added texture.
    • For a richer version, mix in some coconut cream with the heavy cream.
    • Top with toasted coconut flakes for a crunchy contrast.
    • Make it vegan by using coconut condensed milk and omitting the cheese.

    Frequently Asked Questions

    Can I use fresh fruits instead of canned? Absolutely! Fresh fruits can add a vibrant taste to your Buko Salad. Just make sure to adjust the sweetness accordingly since canned fruits are usually preserved in syrup.

    How long can I store Buko Salad? It’s best enjoyed within two days when stored properly in the refrigerator. The fruits may start to release water, making the salad watery over time.

    Can I make Buko Salad ahead of time? Yes, making it a day ahead allows the flavors to meld even more, enhancing the taste. Just add the cheese topping right before serving to keep it from getting soggy.

    Summary

    Filipino Buko Salad is a delightful, easy-to-make dessert that’s perfect for any occasion. With its creamy dressing and mix of tropical fruits, it’s a refreshing treat that’s sure to impress.

  • Golden Potato Salad Recipe: A Sunshiny Side Dish

    Golden Potato Salad Recipe: A Sunshiny Side Dish

    Unleash the sunshine on your plate with this golden potato salad recipe! Perfect for picnics, potlucks, or just because, this dish is a vibrant twist on the classic. With its creamy texture and a hint of tang, it’s sure to be a hit.

    Why This Recipe Works

    • The golden potatoes hold their shape well, offering a perfect bite every time.
    • A creamy, tangy dressing that’s not too heavy, thanks to a clever mix of mayonnaise and Greek yogurt.
    • Fresh herbs and a squeeze of lemon juice brighten up the flavors, making it irresistibly fresh.
    • It’s versatile! Serve it chilled or at room temperature, making it perfect for any occasion.
    • Easy to make ahead, allowing the flavors to meld beautifully overnight.

    Ingredients

    • 2 pounds golden potatoes, cubed
    • 1/2 cup mayonnaise
    • 1/2 cup Greek yogurt
    • 2 tbsp Dijon mustard
    • 1 tbsp lemon juice
    • 1/4 cup chopped fresh dill
    • 1/4 cup chopped green onions
    • Salt and pepper to taste

    Equipment Needed

    • Large pot
    • Mixing bowls
    • Whisk
    • Knife and cutting board
    • Measuring cups and spoons

    Instructions

    Golden Potato Salad Recipe

    Step 1: Cook the Potatoes

    Start by placing the cubed golden potatoes in a large pot and cover them with cold water. Bring to a boil over high heat, then reduce to a simmer. Cook for about 10-12 minutes, or until the potatoes are just tender when pierced with a fork. Tip: Don’t overcook them, or they’ll turn mushy in the salad.

    Step 2: Prepare the Dressing

    While the potatoes cook, whisk together the mayonnaise, Greek yogurt, Dijon mustard, and lemon juice in a large mixing bowl. Season with salt and pepper to taste. This creamy dressing is the secret to the salad’s irresistible flavor.

    Step 3: Combine and Chill

    Drain the potatoes well and let them cool slightly. Add them to the dressing along with the chopped dill and green onions. Gently toss to coat. Cover and refrigerate for at least 1 hour to allow the flavors to meld. Tip: For best results, let it chill overnight.

    Tips and Tricks

    For an extra flavor boost, try adding a teaspoon of garlic powder or a pinch of smoked paprika to the dressing. If you’re short on time, you can serve the salad immediately, but chilling it really enhances the taste. For a lighter version, you can substitute the mayonnaise with more Greek yogurt. Always taste and adjust the seasoning before serving, as chilling can dull flavors slightly.

    Recipe Variations

    • Add crispy bacon bits for a smoky flavor.
    • Mix in hard-boiled eggs for extra protein.
    • Throw in some chopped celery or red onion for added crunch.
    • Swap the dill for parsley or cilantro for a different herbaceous note.
    • Use sweet potatoes instead of golden potatoes for a sweeter twist.

    Frequently Asked Questions

    Can I use another type of potato?

    Yes, you can use red or Yukon gold potatoes, but golden potatoes are recommended for their buttery texture and ability to hold shape well after cooking.

    How long can I store the potato salad?

    This potato salad can be stored in an airtight container in the refrigerator for up to 3 days. Just give it a good stir before serving again.

    Can I make this recipe vegan?

    Absolutely! Just substitute the mayonnaise and Greek yogurt with your favorite vegan alternatives. The taste will still be delicious.

    Summary

    This golden potato salad is a bright, creamy, and tangy side dish that’s perfect for any gathering. Easy to make and even easier to love, it’s sure to become a staple in your recipe collection.

  • Strawberry Walnut Salad Recipe: A Summer Delight

    Strawberry Walnut Salad Recipe: A Summer Delight

    Let’s dive into a refreshing strawberry walnut salad that’s perfect for those warm summer days. This dish combines the sweetness of strawberries with the crunch of walnuts, creating a symphony of flavors that’ll have you coming back for seconds.

    Why This Recipe Works

    • The combination of sweet strawberries and crunchy walnuts offers a perfect balance of textures and flavors.
    • It’s a quick and easy recipe that doesn’t require any cooking, making it ideal for hot days.
    • The salad is packed with nutrients, offering a healthy yet delicious option for any meal.
    • It’s versatile, allowing for various substitutions and additions based on personal preference.
    • The dressing is light and complements the ingredients without overpowering them.

    Ingredients

    • 2 cups fresh strawberries, hulled and sliced
    • 1 cup walnuts, roughly chopped
    • 4 cups mixed greens
    • 1/4 cup feta cheese, crumbled
    • 2 tbsp balsamic vinegar
    • 1 tbsp honey
    • 1/4 cup olive oil
    • Salt and pepper to taste

    Equipment Needed

    • Large salad bowl
    • Small whisk or fork
    • Measuring cups and spoons
    • Knife and cutting board

    Instructions

    Strawberry Walnut Salad Recipe

    Prepare the Dressing

    In a small bowl, whisk together the balsamic vinegar, honey, and olive oil until well combined. Season with salt and pepper to taste. This dressing is the secret to bringing all the flavors together, so don’t skip it! Tip: For a smoother dressing, you can blend the ingredients in a blender for a few seconds.

    Combine the Salad Ingredients

    In a large salad bowl, toss the mixed greens, sliced strawberries, and chopped walnuts together. The key here is to ensure an even distribution of ingredients so every bite is as good as the last. Tip: Toasting the walnuts beforehand can add an extra layer of flavor to your salad.

    Add the Cheese

    Sprinkle the crumbled feta cheese over the salad. The saltiness of the feta complements the sweetness of the strawberries and the richness of the walnuts, creating a perfect flavor balance.

    Dress the Salad

    Drizzle the dressing over the salad and toss gently to coat all the ingredients evenly. Be careful not to overdress the salad; you want to enhance the flavors, not drown them. Tip: Add the dressing just before serving to keep the greens crisp.

    Serve Immediately

    This salad is best enjoyed fresh, so serve it right away. The crispness of the greens, the juiciness of the strawberries, and the crunch of the walnuts make for an irresistible combination.

    Tips and Tricks

    For those looking to elevate their strawberry walnut salad, consider these advanced tips. First, if you’re not a fan of feta, goat cheese makes a fantastic substitute, offering a creamy texture and tangy flavor. Second, adding a handful of fresh mint leaves can introduce a refreshing twist to the salad. Third, for a bit of crunch, sprinkle some toasted coconut flakes on top before serving. Lastly, if you’re preparing this salad ahead of time, keep the dressing separate and add it just before serving to maintain the freshness and crispness of the ingredients.

    Recipe Variations

    • Swap strawberries for raspberries or blackberries for a different berry flavor profile.
    • Use pecans or almonds instead of walnuts for a different nutty crunch.
    • Add grilled chicken or shrimp to turn this salad into a hearty main dish.
    • Incorporate avocado slices for a creamy texture and healthy fats.
    • Try a different dressing, such as a poppy seed or raspberry vinaigrette, for a unique twist.

    Frequently Asked Questions

    Can I make this salad ahead of time?

    Yes, you can prepare the ingredients ahead of time, but it’s best to assemble and dress the salad just before serving to prevent the greens from wilting and the strawberries from becoming too soft. Store the dressing separately in the refrigerator until ready to use.

    Is there a substitute for honey in the dressing?

    Absolutely! If you’re looking for a vegan option or simply don’t have honey on hand, maple syrup or agave nectar are excellent substitutes that will still give you that desired sweetness in the dressing.

    Can I use a different type of cheese?

    Definitely. While feta cheese adds a nice salty tang, you can easily substitute it with goat cheese, blue cheese, or even shaved parmesan, depending on your taste preferences.

    Summary

    This strawberry walnut salad is a refreshing, nutritious, and versatile dish that’s perfect for summer. With its combination of sweet strawberries, crunchy walnuts, and tangy feta, all brought together with a simple balsamic dressing, it’s sure to be a hit at any meal.

  • Hawaiian Fruit Salad Recipe: A Tropical Delight

    Hawaiian Fruit Salad Recipe: A Tropical Delight

    Kickstart your day with a burst of tropical flavors with our Hawaiian Fruit Salad recipe. Perfect for breakfast, brunch, or a refreshing snack, this salad combines the sweetness of tropical fruits with a hint of lime for a zesty twist. Let’s dive into the recipe that will transport your taste buds straight to the islands.

    Why This Recipe Works

    • The combination of tropical fruits like pineapple, mango, and papaya offers a refreshing and exotic flavor profile.
    • A splash of lime juice enhances the natural sweetness of the fruits while adding a bright, citrusy note.
    • This salad is incredibly versatile, serving as a perfect side dish, dessert, or even a main course when paired with protein.
    • It’s a no-cook recipe, making it ideal for hot summer days when you want to avoid turning on the oven.
    • The vibrant colors and textures make it a feast for the eyes as well as the palate.

    Ingredients

    • 2 cups diced fresh pineapple
    • 1 cup diced mango
    • 1 cup diced papaya
    • 1/2 cup sliced strawberries
    • 1/4 cup fresh lime juice
    • 2 tbsp honey (optional)
    • 1/4 cup shredded coconut for garnish

    Equipment Needed

    • Large mixing bowl
    • Sharp knife
    • Cutting board
    • Measuring cups and spoons

    Instructions

    Hawaiian Fruit Salad Recipe

    Step 1: Prepare the Fruits

    Start by washing all the fruits thoroughly under cold running water. Peel and dice the pineapple, mango, and papaya into bite-sized pieces. Slice the strawberries. Ensure all pieces are uniform for a consistent texture in every bite.

    Step 2: Combine the Fruits

    In a large mixing bowl, gently toss together the diced pineapple, mango, papaya, and sliced strawberries. Be careful not to mash the fruits to maintain their integrity and texture.

    Step 3: Add the Lime Juice and Honey

    Drizzle the fresh lime juice over the fruit mixture. If you prefer a sweeter salad, add honey to taste. Gently toss the salad to ensure all the fruits are evenly coated with the lime juice and honey.

    Step 4: Chill the Salad

    Cover the bowl with plastic wrap and refrigerate the salad for at least 30 minutes. This step allows the flavors to meld together and enhances the overall taste of the salad.

    Step 5: Garnish and Serve

    Before serving, sprinkle the shredded coconut over the top of the salad for an extra tropical touch. Serve chilled for the best flavor experience.

    Tips and Tricks

    For an extra burst of flavor, consider adding a pinch of chili powder or Tajin seasoning to the salad. This adds a spicy contrast to the sweet fruits. If you’re preparing the salad ahead of time, add the lime juice just before serving to prevent the fruits from becoming too soggy. For a more substantial meal, mix in some cooked quinoa or serve the salad over a bed of greens.

    Recipe Variations

    • Add diced avocado for a creamy texture and healthy fats.
    • Include kiwi or banana for additional tropical flavors.
    • Swap the honey for agave syrup for a vegan version.
    • Top with toasted macadamia nuts for a crunchy contrast.
    • Use coconut milk instead of lime juice for a creamier dressing.

    Frequently Asked Questions

    Can I use canned fruits instead of fresh?

    While fresh fruits are recommended for the best texture and flavor, you can use canned fruits in a pinch. Just be sure to drain them well to avoid a watery salad.

    How long does the salad last in the fridge?

    The salad is best enjoyed within 24 hours of preparation. After that, the fruits may start to lose their texture and become too soft.

    Can I make this salad ahead of time?

    Yes, you can prepare the fruits ahead of time, but wait to add the lime juice and honey until just before serving to keep the fruits fresh.

    Summary

    This Hawaiian Fruit Salad is a vibrant, refreshing dish that’s perfect for any occasion. With its combination of tropical fruits, zesty lime, and optional honey, it’s a delightful treat that’s as beautiful as it is delicious.

  • Warm Spinach Salad Dressing Recipe: A Tangy Twist to Your Greens

    Warm Spinach Salad Dressing Recipe: A Tangy Twist to Your Greens

    A absolutely delightful way to elevate your salad game is with this warm spinach salad dressing. It’s the perfect blend of tangy and sweet, with a hint of garlic that makes your taste buds dance. Whether you’re a salad lover or just looking for a healthy dressing option, this recipe is a game-changer.

    Why This Recipe Works

    • The combination of olive oil and balsamic vinegar creates a rich, flavorful base that coats the spinach perfectly.
    • Adding a touch of honey balances the acidity of the vinegar, giving the dressing a sweet and tangy profile.
    • Garlic and mustard powder add depth and a slight kick, making the dressing anything but boring.
    • Warming the dressing slightly before tossing it with the spinach helps to wilt the leaves just enough, enhancing the salad’s texture.
    • This recipe is quick and easy, taking less than 10 minutes from start to finish, making it perfect for busy weeknights.

    Ingredients

    • 1/4 cup olive oil
    • 2 tablespoons balsamic vinegar
    • 1 tablespoon honey
    • 1 clove garlic, minced
    • 1/2 teaspoon mustard powder
    • Salt and pepper to taste
    • 4 cups fresh spinach leaves

    Equipment Needed

    • Small saucepan
    • Whisk
    • Measuring cups and spoons
    • Salad bowl

    Instructions

    Warm Spinach Salad Dressing Recipe

    Step 1: Combine the Dressing Ingredients

    In a small saucepan over low heat, combine the olive oil, balsamic vinegar, honey, minced garlic, and mustard powder. Whisk the ingredients together until they are well blended and the honey has dissolved completely. This should take about 2-3 minutes. The key here is to warm the mixture just enough to blend the flavors without boiling it.

    Step 2: Season to Taste

    Once the dressing is well combined, season it with salt and pepper to your liking. Remember, you can always add more, but you can’t take it away, so start with a little and adjust as needed. This is also the time to taste the dressing and adjust any of the other ingredients if necessary.

    Step 3: Prepare the Spinach

    While the dressing is warming, place the fresh spinach leaves in a large salad bowl. Make sure the spinach is dry to prevent the dressing from becoming watery. If you’re using pre-washed spinach, give it a quick pat dry with a clean kitchen towel or paper towels.

    Step 4: Dress the Salad

    Pour the warm dressing over the spinach leaves. Using salad tongs or two large spoons, gently toss the salad to ensure all the leaves are evenly coated with the dressing. The warmth from the dressing will slightly wilt the spinach, which is exactly what you want for a warm spinach salad.

    Step 5: Serve Immediately

    This salad is best served right away while the dressing is still warm. The contrast between the warm dressing and the cool, crisp spinach is what makes this dish special. If you wait too long, the spinach will wilt too much, and the salad will lose its appeal.

    Tips and Tricks

    For an extra layer of flavor, consider adding a pinch of red pepper flakes to the dressing for a subtle heat. If you’re not a fan of balsamic vinegar, apple cider vinegar makes a great substitute with a slightly different but equally delicious flavor profile. To make this dressing ahead of time, prepare it as directed but don’t warm it until you’re ready to serve. Store it in an airtight container in the refrigerator for up to a week. When ready to use, gently warm it on the stove or in the microwave before tossing with the spinach.

    Recipe Variations

    • Add crumbled bacon or pancetta for a smoky, salty twist.
    • Incorporate sliced strawberries or apples for a sweet and fruity variation.
    • Top with toasted nuts or seeds for added crunch and nutrition.
    • Swap out the spinach for kale or arugula for a different green base.
    • Include goat cheese or feta for a creamy, tangy addition.

    Frequently Asked Questions

    Can I make this dressing vegan?

    Absolutely! Simply substitute the honey with maple syrup or agave nectar to keep the sweetness without using animal products. The rest of the ingredients are already vegan-friendly, so this small swap makes the entire recipe suitable for a vegan diet.

    How long does the dressing last?

    When stored properly in an airtight container in the refrigerator, the dressing can last up to a week. Just remember to give it a good shake or stir before using it again, as the ingredients may separate over time.

    Can I use this dressing on other types of salads?

    Definitely! While this dressing is designed with spinach in mind, it’s versatile enough to complement a variety of greens and salad ingredients. Try it on a mixed green salad, or even as a marinade for grilled vegetables.

    Summary

    This warm spinach salad dressing is a simple yet flavorful way to bring your salads to life. With its perfect balance of tangy and sweet, it’s sure to become a staple in your recipe collection. Quick to make and endlessly adaptable, it’s the ideal dressing for any occasion.

  • Smoked Whitefish Salad Recipe: A Smoky Delight

    Smoked Whitefish Salad Recipe: A Smoky Delight

    Forget the same old tuna salad; smoked whitefish salad is here to shake up your lunch routine with its rich, smoky flavors and creamy texture. Perfect for sandwiches, crackers, or straight out of the bowl, this recipe is a game-changer.

    Why This Recipe Works

    • The smoky flavor of the whitefish pairs perfectly with the creamy mayonnaise and tangy lemon juice, creating a balanced taste.
    • It’s incredibly versatile, serving as a great sandwich filler, cracker topping, or salad enhancer.
    • Quick and easy to prepare, this recipe is perfect for busy weekdays or last-minute gatherings.

    Ingredients

    • 1 lb smoked whitefish, skin and bones removed, flaked
    • 1/2 cup mayonnaise
    • 2 tbsp fresh lemon juice
    • 1/4 cup finely chopped red onion
    • 1/4 cup chopped fresh dill
    • Salt and pepper to taste

    Equipment Needed

    • Mixing bowl
    • Fork or spoon for mixing
    • Measuring cups and spoons

    Instructions

    Smoked Whitefish Salad Recipe

    Step 1: Prepare the Whitefish

    Start by carefully removing the skin and bones from the smoked whitefish. Use your fingers to flake the fish into small, bite-sized pieces. This ensures every bite of your salad is perfectly textured. Tip: If you’re short on time, some fishmongers will skin and bone the fish for you.

    Step 2: Mix the Dressing

    In a mixing bowl, combine the mayonnaise and fresh lemon juice. Whisk them together until smooth. This creamy and tangy dressing is the perfect base for your smoked whitefish salad. Tip: For a lighter version, you can substitute half of the mayonnaise with Greek yogurt.

    Step 3: Combine Ingredients

    Add the flaked whitefish, chopped red onion, and dill to the bowl with the dressing. Gently fold everything together until well combined. Be careful not to overmix, as you want to keep the fish flakes intact for texture. Season with salt and pepper to taste.

    Step 4: Chill Before Serving

    Cover the bowl with plastic wrap and refrigerate the salad for at least 30 minutes before serving. This chilling time allows the flavors to meld together beautifully. Tip: This salad tastes even better the next day, making it a great make-ahead option.

    Tips and Tricks

    For an extra smoky flavor, try adding a pinch of smoked paprika to the dressing. If you’re serving this salad at a party, consider presenting it in a hollowed-out bread bowl for a stunning visual effect. Always taste and adjust the seasoning after chilling, as cold temperatures can dull flavors. For a crunchier texture, add some finely chopped celery or cucumber. Remember, the quality of the smoked whitefish is key to this recipe, so don’t skimp on it.

    Recipe Variations

    • Add chopped hard-boiled eggs for a protein boost.
    • Mix in some capers or chopped pickles for a briny twist.
    • For a spicy kick, add a dash of hot sauce or some finely chopped jalapeños.
    • Swap the dill for other fresh herbs like parsley or chives for a different flavor profile.
    • Use smoked trout or salmon instead of whitefish for a variation on the theme.

    Frequently Asked Questions

    Can I make this recipe dairy-free? Absolutely! Just use a dairy-free mayonnaise alternative. There are many great options available that will work perfectly in this recipe.

    How long does smoked whitefish salad last in the fridge? Stored in an airtight container, it should keep for up to 3 days. Just give it a quick stir before serving again.

    Can I freeze smoked whitefish salad? It’s not recommended, as the mayonnaise can separate when thawed, affecting the texture and flavor.

    Summary

    This smoked whitefish salad recipe is a deliciously smoky, creamy, and versatile dish that’s perfect for any occasion. Easy to make and packed with flavor, it’s sure to become a new favorite.

  • Honeycrisp Apple Broccoli Salad Recipe: A Crunchy, Sweet, and Healthy Delight

    Honeycrisp Apple Broccoli Salad Recipe: A Crunchy, Sweet, and Healthy Delight

    Today’s the day to jazz up your salad game with this Honeycrisp Apple Broccoli Salad. Trust me, this isn’t your average salad. It’s a vibrant, crunchy, and slightly sweet masterpiece that’ll have you coming back for seconds.

    Why This Recipe Works

    • The combination of crisp Honeycrisp apples and fresh broccoli creates a texture that’s unbeatable.
    • A light, tangy dressing brings all the flavors together without overpowering the natural sweetness of the apples.
    • It’s a versatile dish that can serve as a side or a main, perfect for any occasion.
    • Quick and easy to prepare, making it ideal for busy weeknights or last-minute gatherings.
    • Packed with nutrients, offering a healthy option that doesn’t skimp on taste.

    Ingredients

    • 2 cups broccoli florets, chopped into bite-sized pieces
    • 1 large Honeycrisp apple, diced
    • 1/4 cup red onion, thinly sliced
    • 1/2 cup dried cranberries
    • 1/4 cup sunflower seeds
    • 1/4 cup Greek yogurt
    • 2 tbsp honey
    • 1 tbsp apple cider vinegar
    • Salt and pepper to taste

    Equipment Needed

    • Large mixing bowl
    • Small mixing bowl
    • Whisk
    • Knife
    • Cutting board

    Instructions

    Honeycrisp Apple Broccoli Salad Recipe

    Step 1: Prepare the Vegetables and Fruit

    Start by washing the broccoli florets under cold water. Pat them dry and chop into bite-sized pieces. Dice the Honeycrisp apple into small cubes, ensuring to remove the core. Thinly slice the red onion. Combine all these in a large mixing bowl. Tip: To prevent the apple from browning, you can toss it with a little lemon juice.

    Step 2: Add the Extras

    Throw in the dried cranberries and sunflower seeds into the bowl with the broccoli, apple, and onion. These add a nice crunch and a burst of sweetness to the salad. Mix everything gently to distribute the ingredients evenly.

    Step 3: Make the Dressing

    In a small mixing bowl, whisk together the Greek yogurt, honey, and apple cider vinegar until smooth. Season with salt and pepper to taste. Tip: For a thinner dressing, you can add a tablespoon of water or more apple cider vinegar.

    Step 4: Combine and Toss

    Pour the dressing over the salad ingredients. Using a large spoon or salad tongs, toss the salad until everything is evenly coated with the dressing. Be gentle to keep the ingredients intact.

    Step 5: Serve or Chill

    You can serve the salad immediately for a crisp texture or chill it in the refrigerator for about 30 minutes to let the flavors meld together. Tip: If chilling, give it a quick toss before serving to redistribute the dressing.

    Tips and Tricks

    For an extra crunch, consider adding some chopped almonds or walnuts. If you’re not a fan of Greek yogurt, mayonnaise or sour cream can be used as a substitute for the dressing. To make this salad ahead of time, prepare the ingredients and dressing separately and combine them just before serving to maintain the crispness of the broccoli and apples. For a vegan version, use agave nectar instead of honey and a plant-based yogurt.

    Recipe Variations

    • Add some grilled chicken or shrimp to turn this salad into a hearty main dish.
    • Swap out the dried cranberries for raisins or chopped dates for a different kind of sweetness.
    • Use kale or spinach instead of broccoli for a different green base.
    • Include some crumbled feta or goat cheese for a creamy, tangy element.
    • For a nuttier flavor, toast the sunflower seeds before adding them to the salad.

    Frequently Asked Questions

    Can I use a different type of apple?

    Absolutely! While Honeycrisp apples are recommended for their sweetness and crispness, you can use any apple variety you prefer. Just keep in mind that the flavor and texture of the salad may vary slightly.

    How long can I store this salad?

    This salad is best enjoyed fresh but can be stored in an airtight container in the refrigerator for up to 2 days. Note that the broccoli and apples may lose some of their crispness over time.

    Is there a way to make this salad less sweet?

    Yes, you can reduce the amount of honey in the dressing or omit the dried cranberries if you prefer a less sweet salad. Adding more apple cider vinegar can also help balance the sweetness.

    Summary

    This Honeycrisp Apple Broccoli Salad is a delightful mix of crunchy, sweet, and tangy flavors, perfect for any occasion. It’s easy to make, customizable, and packed with nutrients. Whether you’re looking for a healthy side dish or a light main, this salad is sure to impress.