Category: Fruit Salad Recipes

  • Filipino Buko Salad Recipe: A Tropical Delight You Can’t Resist

    Filipino Buko Salad Recipe: A Tropical Delight You Can’t Resist

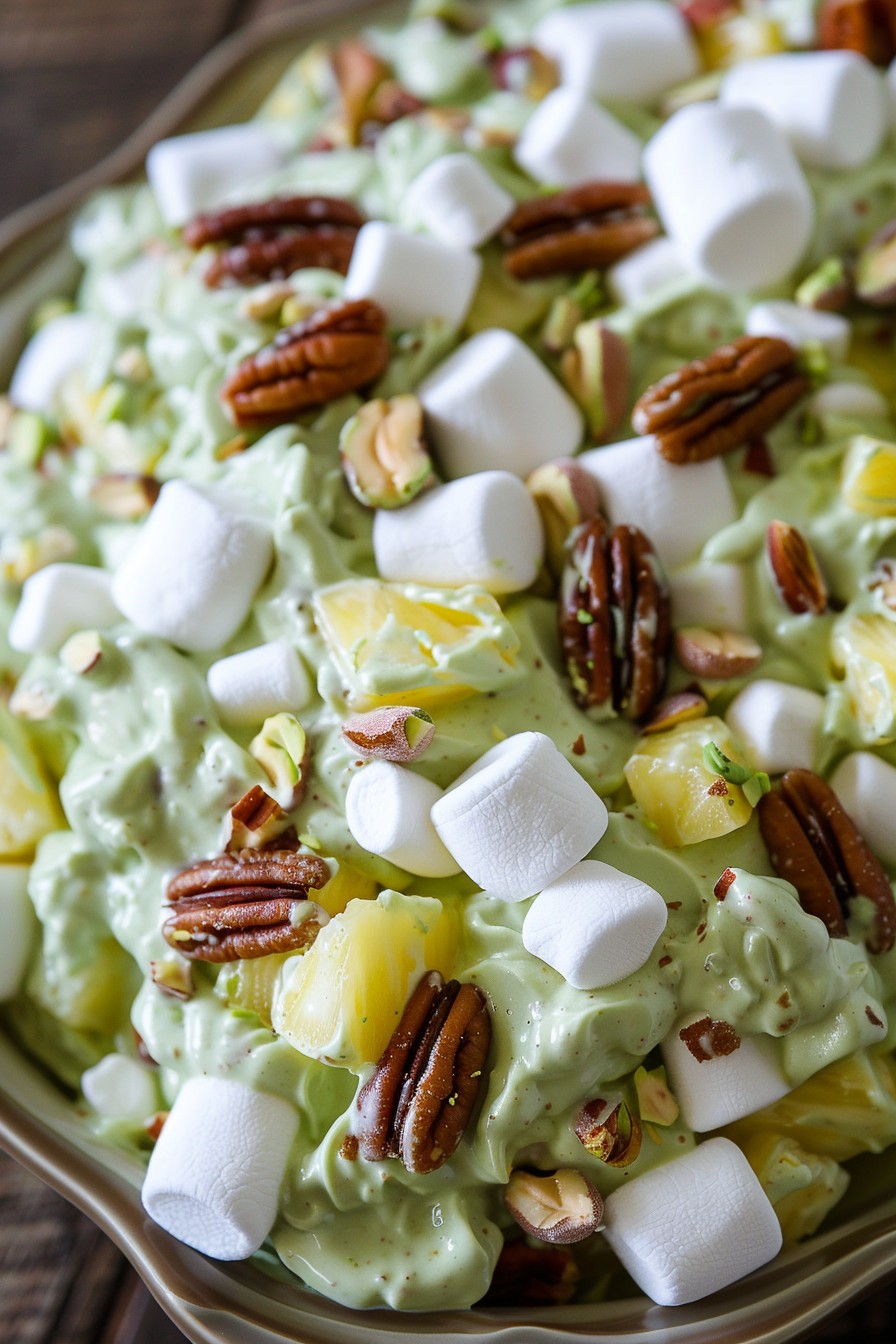
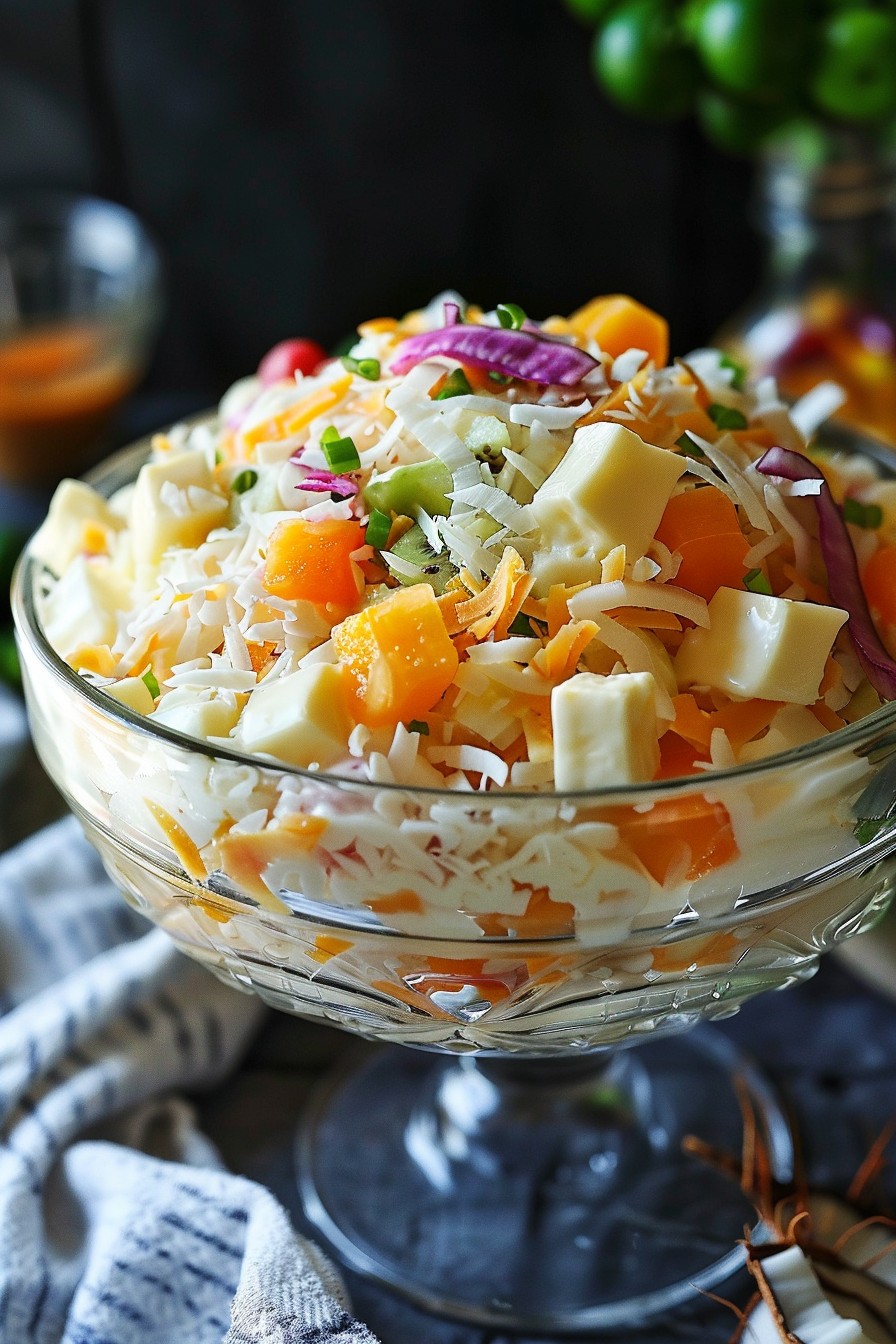
    Today’s the perfect day to dive into the creamy, fruity goodness of Filipino Buko Salad. This dessert is a party in your mouth, combining the freshness of young coconut with the sweetness of various fruits and creamy goodness. Let’s get started!

    Why This Recipe Works

    • The combination of young coconut and mixed fruits offers a refreshing taste that’s perfect for any season.
    • It’s incredibly easy to make, requiring no cooking, just mixing and chilling.
    • The creamy dressing binds all the flavors together, creating a harmonious blend that’s irresistibly delicious.
    • It’s versatile; you can easily adjust the fruits based on what’s available or your preference.
    • Perfect for gatherings, potlucks, or as a sweet treat to enjoy at home.

    Ingredients

    • 2 cups young coconut (buko), shredded
    • 1 cup canned fruit cocktail, drained
    • 1 cup nata de coco (coconut gel), drained
    • 1 cup kaong (sugar palm fruit), drained
    • 1 cup heavy cream
    • 1/2 cup condensed milk
    • 1/2 cup cheese, cubed (optional)

    Equipment Needed

    • Large mixing bowl
    • Mixing spoon
    • Measuring cups and spoons
    • Refrigerator

    Instructions

    Filipino Buko Salad Recipe

    Step 1: Prepare Your Ingredients

    Start by ensuring all your fruits are drained well to avoid a watery salad. Shred the young coconut into thin strips if it’s not pre-shredded. This ensures every bite has the perfect texture and flavor combination.

    Step 2: Mix the Fruits

    In a large mixing bowl, combine the shredded young coconut, fruit cocktail, nata de coco, and kaong. Gently toss them together to distribute the fruits evenly. This mix is the heart of your salad, so make sure it’s well combined.

    Step 3: Add the Creamy Dressing

    Pour the heavy cream and condensed milk over the fruit mixture. Fold gently until all the fruits are coated with the creamy dressing. The dressing should be evenly distributed to ensure every spoonful is as delicious as the last.

    Step 4: Chill to Perfection

    Cover the bowl with plastic wrap and refrigerate for at least 2 hours. Chilling allows the flavors to meld together beautifully, enhancing the overall taste of your Buko Salad.

    Step 5: Serve and Enjoy

    Once chilled, give your Buko Salad a final gentle mix. Serve in individual bowls or a large serving dish. For an extra touch, sprinkle some cubed cheese on top before serving.

    Tips and Tricks

    For a lighter version, you can substitute the heavy cream with all-purpose cream or even Greek yogurt. If you’re serving this at a party, consider adding a splash of rum for an adult version. Always taste your salad before chilling to adjust the sweetness; you might want to add more condensed milk if you prefer it sweeter. To keep it fresh, consume within two days of making.

    Recipe Variations

    • Add diced mangoes or strawberries for a different fruity twist.
    • Include small tapioca pearls (sago) for added texture.
    • For a richer version, mix in some coconut cream with the heavy cream.
    • Top with toasted coconut flakes for a crunchy contrast.
    • Make it vegan by using coconut condensed milk and omitting the cheese.

    Frequently Asked Questions

    Can I use fresh fruits instead of canned? Absolutely! Fresh fruits can add a vibrant taste to your Buko Salad. Just make sure to adjust the sweetness accordingly since canned fruits are usually preserved in syrup.

    How long can I store Buko Salad? It’s best enjoyed within two days when stored properly in the refrigerator. The fruits may start to release water, making the salad watery over time.

    Can I make Buko Salad ahead of time? Yes, making it a day ahead allows the flavors to meld even more, enhancing the taste. Just add the cheese topping right before serving to keep it from getting soggy.

    Summary

    Filipino Buko Salad is a delightful, easy-to-make dessert that’s perfect for any occasion. With its creamy dressing and mix of tropical fruits, it’s a refreshing treat that’s sure to impress.

  • Strawberry Walnut Salad Recipe: A Summer Delight

    Strawberry Walnut Salad Recipe: A Summer Delight

    Let’s dive into a refreshing strawberry walnut salad that’s perfect for those warm summer days. This dish combines the sweetness of strawberries with the crunch of walnuts, creating a symphony of flavors that’ll have you coming back for seconds.

    Why This Recipe Works

    • The combination of sweet strawberries and crunchy walnuts offers a perfect balance of textures and flavors.
    • It’s a quick and easy recipe that doesn’t require any cooking, making it ideal for hot days.
    • The salad is packed with nutrients, offering a healthy yet delicious option for any meal.
    • It’s versatile, allowing for various substitutions and additions based on personal preference.
    • The dressing is light and complements the ingredients without overpowering them.

    Ingredients

    • 2 cups fresh strawberries, hulled and sliced
    • 1 cup walnuts, roughly chopped
    • 4 cups mixed greens
    • 1/4 cup feta cheese, crumbled
    • 2 tbsp balsamic vinegar
    • 1 tbsp honey
    • 1/4 cup olive oil
    • Salt and pepper to taste

    Equipment Needed

    • Large salad bowl
    • Small whisk or fork
    • Measuring cups and spoons
    • Knife and cutting board

    Instructions

    Strawberry Walnut Salad Recipe

    Prepare the Dressing

    In a small bowl, whisk together the balsamic vinegar, honey, and olive oil until well combined. Season with salt and pepper to taste. This dressing is the secret to bringing all the flavors together, so don’t skip it! Tip: For a smoother dressing, you can blend the ingredients in a blender for a few seconds.

    Combine the Salad Ingredients

    In a large salad bowl, toss the mixed greens, sliced strawberries, and chopped walnuts together. The key here is to ensure an even distribution of ingredients so every bite is as good as the last. Tip: Toasting the walnuts beforehand can add an extra layer of flavor to your salad.

    Add the Cheese

    Sprinkle the crumbled feta cheese over the salad. The saltiness of the feta complements the sweetness of the strawberries and the richness of the walnuts, creating a perfect flavor balance.

    Dress the Salad

    Drizzle the dressing over the salad and toss gently to coat all the ingredients evenly. Be careful not to overdress the salad; you want to enhance the flavors, not drown them. Tip: Add the dressing just before serving to keep the greens crisp.

    Serve Immediately

    This salad is best enjoyed fresh, so serve it right away. The crispness of the greens, the juiciness of the strawberries, and the crunch of the walnuts make for an irresistible combination.

    Tips and Tricks

    For those looking to elevate their strawberry walnut salad, consider these advanced tips. First, if you’re not a fan of feta, goat cheese makes a fantastic substitute, offering a creamy texture and tangy flavor. Second, adding a handful of fresh mint leaves can introduce a refreshing twist to the salad. Third, for a bit of crunch, sprinkle some toasted coconut flakes on top before serving. Lastly, if you’re preparing this salad ahead of time, keep the dressing separate and add it just before serving to maintain the freshness and crispness of the ingredients.

    Recipe Variations

    • Swap strawberries for raspberries or blackberries for a different berry flavor profile.
    • Use pecans or almonds instead of walnuts for a different nutty crunch.
    • Add grilled chicken or shrimp to turn this salad into a hearty main dish.
    • Incorporate avocado slices for a creamy texture and healthy fats.
    • Try a different dressing, such as a poppy seed or raspberry vinaigrette, for a unique twist.

    Frequently Asked Questions

    Can I make this salad ahead of time?

    Yes, you can prepare the ingredients ahead of time, but it’s best to assemble and dress the salad just before serving to prevent the greens from wilting and the strawberries from becoming too soft. Store the dressing separately in the refrigerator until ready to use.

    Is there a substitute for honey in the dressing?

    Absolutely! If you’re looking for a vegan option or simply don’t have honey on hand, maple syrup or agave nectar are excellent substitutes that will still give you that desired sweetness in the dressing.

    Can I use a different type of cheese?

    Definitely. While feta cheese adds a nice salty tang, you can easily substitute it with goat cheese, blue cheese, or even shaved parmesan, depending on your taste preferences.

    Summary

    This strawberry walnut salad is a refreshing, nutritious, and versatile dish that’s perfect for summer. With its combination of sweet strawberries, crunchy walnuts, and tangy feta, all brought together with a simple balsamic dressing, it’s sure to be a hit at any meal.

  • Hawaiian Fruit Salad Recipe: A Tropical Delight

    Hawaiian Fruit Salad Recipe: A Tropical Delight

    Kickstart your day with a burst of tropical flavors with our Hawaiian Fruit Salad recipe. Perfect for breakfast, brunch, or a refreshing snack, this salad combines the sweetness of tropical fruits with a hint of lime for a zesty twist. Let’s dive into the recipe that will transport your taste buds straight to the islands.

    Why This Recipe Works

    • The combination of tropical fruits like pineapple, mango, and papaya offers a refreshing and exotic flavor profile.
    • A splash of lime juice enhances the natural sweetness of the fruits while adding a bright, citrusy note.
    • This salad is incredibly versatile, serving as a perfect side dish, dessert, or even a main course when paired with protein.
    • It’s a no-cook recipe, making it ideal for hot summer days when you want to avoid turning on the oven.
    • The vibrant colors and textures make it a feast for the eyes as well as the palate.

    Ingredients

    • 2 cups diced fresh pineapple
    • 1 cup diced mango
    • 1 cup diced papaya
    • 1/2 cup sliced strawberries
    • 1/4 cup fresh lime juice
    • 2 tbsp honey (optional)
    • 1/4 cup shredded coconut for garnish

    Equipment Needed

    • Large mixing bowl
    • Sharp knife
    • Cutting board
    • Measuring cups and spoons

    Instructions

    Hawaiian Fruit Salad Recipe

    Step 1: Prepare the Fruits

    Start by washing all the fruits thoroughly under cold running water. Peel and dice the pineapple, mango, and papaya into bite-sized pieces. Slice the strawberries. Ensure all pieces are uniform for a consistent texture in every bite.

    Step 2: Combine the Fruits

    In a large mixing bowl, gently toss together the diced pineapple, mango, papaya, and sliced strawberries. Be careful not to mash the fruits to maintain their integrity and texture.

    Step 3: Add the Lime Juice and Honey

    Drizzle the fresh lime juice over the fruit mixture. If you prefer a sweeter salad, add honey to taste. Gently toss the salad to ensure all the fruits are evenly coated with the lime juice and honey.

    Step 4: Chill the Salad

    Cover the bowl with plastic wrap and refrigerate the salad for at least 30 minutes. This step allows the flavors to meld together and enhances the overall taste of the salad.

    Step 5: Garnish and Serve

    Before serving, sprinkle the shredded coconut over the top of the salad for an extra tropical touch. Serve chilled for the best flavor experience.

    Tips and Tricks

    For an extra burst of flavor, consider adding a pinch of chili powder or Tajin seasoning to the salad. This adds a spicy contrast to the sweet fruits. If you’re preparing the salad ahead of time, add the lime juice just before serving to prevent the fruits from becoming too soggy. For a more substantial meal, mix in some cooked quinoa or serve the salad over a bed of greens.

    Recipe Variations

    • Add diced avocado for a creamy texture and healthy fats.
    • Include kiwi or banana for additional tropical flavors.
    • Swap the honey for agave syrup for a vegan version.
    • Top with toasted macadamia nuts for a crunchy contrast.
    • Use coconut milk instead of lime juice for a creamier dressing.

    Frequently Asked Questions

    Can I use canned fruits instead of fresh?

    While fresh fruits are recommended for the best texture and flavor, you can use canned fruits in a pinch. Just be sure to drain them well to avoid a watery salad.

    How long does the salad last in the fridge?

    The salad is best enjoyed within 24 hours of preparation. After that, the fruits may start to lose their texture and become too soft.

    Can I make this salad ahead of time?

    Yes, you can prepare the fruits ahead of time, but wait to add the lime juice and honey until just before serving to keep the fruits fresh.

    Summary

    This Hawaiian Fruit Salad is a vibrant, refreshing dish that’s perfect for any occasion. With its combination of tropical fruits, zesty lime, and optional honey, it’s a delightful treat that’s as beautiful as it is delicious.

  • Honeycrisp Apple Broccoli Salad Recipe: A Crunchy, Sweet, and Healthy Delight

    Honeycrisp Apple Broccoli Salad Recipe: A Crunchy, Sweet, and Healthy Delight

    Today’s the day to jazz up your salad game with this Honeycrisp Apple Broccoli Salad. Trust me, this isn’t your average salad. It’s a vibrant, crunchy, and slightly sweet masterpiece that’ll have you coming back for seconds.

    Why This Recipe Works

    • The combination of crisp Honeycrisp apples and fresh broccoli creates a texture that’s unbeatable.
    • A light, tangy dressing brings all the flavors together without overpowering the natural sweetness of the apples.
    • It’s a versatile dish that can serve as a side or a main, perfect for any occasion.
    • Quick and easy to prepare, making it ideal for busy weeknights or last-minute gatherings.
    • Packed with nutrients, offering a healthy option that doesn’t skimp on taste.

    Ingredients

    • 2 cups broccoli florets, chopped into bite-sized pieces
    • 1 large Honeycrisp apple, diced
    • 1/4 cup red onion, thinly sliced
    • 1/2 cup dried cranberries
    • 1/4 cup sunflower seeds
    • 1/4 cup Greek yogurt
    • 2 tbsp honey
    • 1 tbsp apple cider vinegar
    • Salt and pepper to taste

    Equipment Needed

    • Large mixing bowl
    • Small mixing bowl
    • Whisk
    • Knife
    • Cutting board

    Instructions

    Honeycrisp Apple Broccoli Salad Recipe

    Step 1: Prepare the Vegetables and Fruit

    Start by washing the broccoli florets under cold water. Pat them dry and chop into bite-sized pieces. Dice the Honeycrisp apple into small cubes, ensuring to remove the core. Thinly slice the red onion. Combine all these in a large mixing bowl. Tip: To prevent the apple from browning, you can toss it with a little lemon juice.

    Step 2: Add the Extras

    Throw in the dried cranberries and sunflower seeds into the bowl with the broccoli, apple, and onion. These add a nice crunch and a burst of sweetness to the salad. Mix everything gently to distribute the ingredients evenly.

    Step 3: Make the Dressing

    In a small mixing bowl, whisk together the Greek yogurt, honey, and apple cider vinegar until smooth. Season with salt and pepper to taste. Tip: For a thinner dressing, you can add a tablespoon of water or more apple cider vinegar.

    Step 4: Combine and Toss

    Pour the dressing over the salad ingredients. Using a large spoon or salad tongs, toss the salad until everything is evenly coated with the dressing. Be gentle to keep the ingredients intact.

    Step 5: Serve or Chill

    You can serve the salad immediately for a crisp texture or chill it in the refrigerator for about 30 minutes to let the flavors meld together. Tip: If chilling, give it a quick toss before serving to redistribute the dressing.

    Tips and Tricks

    For an extra crunch, consider adding some chopped almonds or walnuts. If you’re not a fan of Greek yogurt, mayonnaise or sour cream can be used as a substitute for the dressing. To make this salad ahead of time, prepare the ingredients and dressing separately and combine them just before serving to maintain the crispness of the broccoli and apples. For a vegan version, use agave nectar instead of honey and a plant-based yogurt.

    Recipe Variations

    • Add some grilled chicken or shrimp to turn this salad into a hearty main dish.
    • Swap out the dried cranberries for raisins or chopped dates for a different kind of sweetness.
    • Use kale or spinach instead of broccoli for a different green base.
    • Include some crumbled feta or goat cheese for a creamy, tangy element.
    • For a nuttier flavor, toast the sunflower seeds before adding them to the salad.

    Frequently Asked Questions

    Can I use a different type of apple?

    Absolutely! While Honeycrisp apples are recommended for their sweetness and crispness, you can use any apple variety you prefer. Just keep in mind that the flavor and texture of the salad may vary slightly.

    How long can I store this salad?

    This salad is best enjoyed fresh but can be stored in an airtight container in the refrigerator for up to 2 days. Note that the broccoli and apples may lose some of their crispness over time.

    Is there a way to make this salad less sweet?

    Yes, you can reduce the amount of honey in the dressing or omit the dried cranberries if you prefer a less sweet salad. Adding more apple cider vinegar can also help balance the sweetness.

    Summary

    This Honeycrisp Apple Broccoli Salad is a delightful mix of crunchy, sweet, and tangy flavors, perfect for any occasion. It’s easy to make, customizable, and packed with nutrients. Whether you’re looking for a healthy side dish or a light main, this salad is sure to impress.

  • Cranberry Salad with Cream Cheese: A Festive Delight

    Cranberry Salad with Cream Cheese: A Festive Delight

    Yummy, tart, and creamy, this cranberry salad with cream cheese is the perfect blend of flavors and textures to brighten up any meal. Whether you’re looking for a refreshing side dish or a unique dessert, this recipe is sure to impress.

    Why This Recipe Works

    • The combination of tart cranberries and smooth cream cheese creates a perfect balance of flavors.
    • It’s incredibly versatile, serving as a side dish or dessert depending on your preference.
    • The recipe is straightforward, requiring no cooking, making it perfect for beginners.
    • It’s a make-ahead dish, allowing flavors to meld beautifully overnight.
    • The vibrant color adds a festive touch to any table setting.

    Ingredients

    • 2 cups fresh cranberries, finely chopped
    • 1 cup granulated sugar
    • 8 oz cream cheese, softened
    • 1 cup heavy whipping cream
    • 1/2 cup powdered sugar
    • 1 tsp vanilla extract
    • 1/2 cup chopped walnuts (optional)

    Equipment Needed

    • Food processor or sharp knife
    • Mixing bowls
    • Electric mixer
    • Spatula
    • Serving dish

    Instructions

    Recipe For Cranberry Salad With Cream Cheese

    Prepare the Cranberries

    Start by finely chopping the fresh cranberries. A food processor works wonders here, but a sharp knife will do the trick if you’re up for a little arm workout. Mix the chopped cranberries with granulated sugar in a bowl, then set aside. This step not only sweetens the cranberries but also draws out their juices, creating a lovely syrup.

    Whip the Cream Cheese Mixture

    In a separate bowl, beat the softened cream cheese until it’s smooth and fluffy. This is where your electric mixer earns its keep. Gradually add the heavy whipping cream, powdered sugar, and vanilla extract, continuing to beat until the mixture is light and airy. The goal is a cloud-like consistency that’ll make your salad irresistibly creamy.

    Combine and Chill

    Gently fold the sweetened cranberries (and any accumulated juice) into the cream cheese mixture. If you’re using walnuts, now’s the time to add them for a crunchy contrast. Transfer the mixture to a serving dish and refrigerate for at least 4 hours, though overnight is better. This chilling time allows the flavors to meld and the salad to set perfectly.

    Tips and Tricks

    For an even smoother cream cheese mixture, ensure your cream cheese is at room temperature before starting. If you’re short on time, you can use frozen cranberries; just thaw and drain them well before chopping. Toasting the walnuts before adding them to the salad can enhance their flavor and add an extra layer of texture. If you prefer a less tart salad, you can reduce the amount of cranberries or increase the sugar slightly. For a decorative touch, reserve a few whole cranberries and walnut halves to garnish the top before serving.

    Recipe Variations

    • For a citrus twist, add the zest of one orange to the cream cheese mixture.
    • Substitute the walnuts with pecans or almonds for a different nutty flavor.
    • Mix in a cup of mini marshmallows for a sweeter, fluffier texture.
    • Use Greek yogurt in place of half the cream cheese for a tangier, lighter version.
    • Add a layer of crushed graham crackers at the bottom for a dessert-like crust.

    Frequently Asked Questions

    Can I use canned cranberry sauce instead of fresh cranberries?

    While you can use canned cranberry sauce in a pinch, the texture and flavor will differ significantly from using fresh cranberries. Fresh cranberries provide a tartness and texture that canned sauce can’t replicate. If you do opt for canned, reduce the added sugar since the sauce is already sweetened.

    How long can I store this salad in the fridge?

    This cranberry salad can be stored in an airtight container in the refrigerator for up to 3 days. The flavors will continue to meld, making it even more delicious over time. However, the texture may become slightly softer the longer it sits.

    Is there a dairy-free alternative to cream cheese?

    Yes, there are several dairy-free cream cheese alternatives available that work well in this recipe. Look for brands that are specifically designed to mimic the texture and flavor of traditional cream cheese for the best results. You can also use coconut cream as a substitute, though the flavor will be slightly different.

    Summary

    This cranberry salad with cream cheese is a delightful combination of tart and sweet, perfect for any occasion. Easy to make and versatile, it’s sure to become a favorite in your recipe collection.

  • Pistachio Pudding Salad Recipe: A Creamy Dream Come True

    Pistachio Pudding Salad Recipe: A Creamy Dream Come True

    Pistachio pudding salad is the unexpected hero of potlucks and family gatherings. Perfectly sweet, delightfully creamy, and with a crunch that’ll have you coming back for seconds, this dish is a crowd-pleaser that’s as easy to make as it is delicious.

    Why This Recipe Works

    • The combination of creamy pistachio pudding and crunchy mix-ins creates a texture that’s irresistibly satisfying.
    • It’s incredibly versatile, allowing for endless variations to suit any taste or occasion.
    • Prep time is minimal, making it perfect for last-minute gatherings or when you need a quick dessert fix.

    Ingredients

    • 1 box (3.4 oz) instant pistachio pudding mix
    • 1 cup cold milk
    • 1 cup crushed pineapple, drained
    • 1 cup mini marshmallows
    • 1/2 cup chopped pecans
    • 1 cup whipped topping, thawed

    Equipment Needed

    • Large mixing bowl
    • Whisk
    • Rubber spatula
    • Measuring cups and spoons

    Instructions

    Pistachio Pudding Salad Recipe

    Step 1: Prepare the Pudding Base

    In a large mixing bowl, whisk together the instant pistachio pudding mix and cold milk until smooth. Let it sit for about 5 minutes to thicken slightly. This is the foundation of your salad, so make sure it’s well mixed.

    Step 2: Add the Fruits and Nuts

    Gently fold in the crushed pineapple, mini marshmallows, and chopped pecans into the pudding mixture. The key here is to fold, not stir, to keep the mixture light and fluffy.

    Step 3: Incorporate the Whipped Topping

    Add the whipped topping to the bowl and fold it into the mixture until everything is evenly combined. This will give your salad its signature creamy texture.

    Step 4: Chill to Perfection

    Cover the bowl with plastic wrap and refrigerate for at least 2 hours before serving. This allows the flavors to meld together beautifully.

    Step 5: Serve and Enjoy

    Give the salad a quick stir before serving to ensure everything is well mixed. Serve chilled for the best taste and texture.

    Tips and Tricks

    For an extra crunch, toast the pecans before adding them to the salad. This will enhance their flavor and add a delightful texture contrast. If you’re serving this salad at a party, consider doubling the recipe—it disappears fast! For a lighter version, you can use low-fat milk and whipped topping. Remember, the salad tastes best when served cold, so don’t skip the chilling step.

    Recipe Variations

    • Add a cup of shredded coconut for a tropical twist.
    • Swap the pecans for walnuts or almonds for a different nutty flavor.
    • Include a cup of diced apples or pears for added freshness and crunch.
    • For a festive touch, mix in a handful of maraschino cherries.
    • Use vanilla pudding mix instead of pistachio for a different flavor profile.

    Frequently Asked Questions

    Can I make this recipe ahead of time?

    Absolutely! This salad actually tastes better after it’s had time to chill and the flavors have melded together. You can make it up to 24 hours in advance.

    Can I use fresh pineapple instead of canned?

    Yes, you can use fresh pineapple, but make sure to drain it well to avoid adding extra liquid to the salad.

    Is there a dairy-free version of this recipe?

    Yes, you can use almond milk or coconut milk instead of regular milk and a dairy-free whipped topping to make this recipe dairy-free.

    Summary

    This pistachio pudding salad is a creamy, crunchy, and utterly delicious dish that’s perfect for any occasion. With minimal prep time and endless variations, it’s sure to become a favorite in your recipe collection.

  • Pear Gorgonzola Salad Recipe: A Sweet and Savory Delight

    Pear Gorgonzola Salad Recipe: A Sweet and Savory Delight

    A absolutely delightful salad that combines the sweetness of pears with the bold flavor of gorgonzola cheese, creating a perfect balance that will tantalize your taste buds. This recipe is not only easy to make but also brings a touch of elegance to any meal.

    Why This Recipe Works

    • The combination of sweet pears and savory gorgonzola cheese creates a perfect flavor balance.
    • Adding walnuts introduces a crunchy texture that contrasts beautifully with the soft ingredients.
    • The homemade vinaigrette dressing enhances the salad’s flavors without overpowering them.
    • It’s a versatile dish that can serve as a refreshing starter or a light main course.
    • This salad is quick to prepare, making it ideal for busy weeknights or last-minute guests.

    Ingredients

    • 2 ripe pears, thinly sliced
    • 4 cups mixed greens
    • 1/2 cup crumbled gorgonzola cheese
    • 1/4 cup walnuts, toasted
    • 2 tbsp olive oil
    • 1 tbsp balsamic vinegar
    • 1 tsp honey
    • Salt and pepper to taste

    Equipment Needed

    • Large salad bowl
    • Small mixing bowl
    • Whisk
    • Knife
    • Cutting board

    Instructions

    Pear Gorgonzola Salad Recipe

    Prepare the Ingredients

    Start by washing and drying the mixed greens thoroughly to ensure they’re clean and crisp. Thinly slice the pears, making sure to remove the cores. Toast the walnuts in a dry pan over medium heat for about 3-5 minutes, until they’re fragrant and slightly browned. Tip: Toasting the walnuts enhances their flavor and adds a nice crunch to the salad.

    Make the Dressing

    In a small mixing bowl, whisk together the olive oil, balsamic vinegar, honey, and a pinch of salt and pepper. The honey will balance the acidity of the vinegar, creating a smooth and flavorful dressing. Tip: Adjust the sweetness or acidity to your liking by adding more honey or vinegar.

    Assemble the Salad

    In a large salad bowl, combine the mixed greens, sliced pears, and toasted walnuts. Drizzle the dressing over the salad and toss gently to coat all the ingredients evenly. The key is to ensure every bite has a bit of everything.

    Add the Gorgonzola

    Sprinkle the crumbled gorgonzola cheese over the top of the salad. The cheese’s bold flavor pairs perfectly with the sweet pears and the nutty walnuts. Tip: For an extra touch of elegance, you can also add a few whole walnuts on top for garnish.

    Serve Immediately

    This salad is best enjoyed fresh, so serve it right away to prevent the greens from wilting and the pears from browning. The crispness of the greens, the sweetness of the pears, and the creaminess of the gorgonzola make for a truly unforgettable dish.

    Tips and Tricks

    For those looking to elevate this salad even further, consider using a mix of different greens like arugula or spinach for added depth of flavor. If you’re not a fan of gorgonzola, blue cheese makes a great substitute. To make this salad more substantial, add grilled chicken or shrimp. When selecting pears, choose ones that are ripe but still firm to ensure they hold up well in the salad. Lastly, if you’re preparing this salad ahead of time, keep the dressing separate and add it just before serving to maintain the greens’ crispness.

    Recipe Variations

    • Swap out the pears for apples or figs for a different sweet element.
    • Use pecans or almonds instead of walnuts for a different crunch.
    • Add dried cranberries or cherries for a pop of color and sweetness.
    • Incorporate some avocado slices for extra creaminess.
    • Try a different dressing, like a maple mustard vinaigrette, for a new flavor profile.

    Frequently Asked Questions

    Can I make this salad ahead of time?

    Yes, you can prepare the ingredients ahead of time, but it’s best to assemble the salad just before serving to keep the greens crisp and the pears from browning. Store the dressing separately and add it at the last minute.

    What type of pears work best for this salad?

    Bartlett or Anjou pears are ideal because they’re sweet and hold their shape well. Make sure they’re ripe but still firm to the touch for the best texture.

    Can I substitute the gorgonzola cheese?

    Absolutely! If gorgonzola is too strong for your taste, try blue cheese or even feta for a milder flavor. The salad will still be delicious.

    Summary

    This Pear Gorgonzola Salad is a perfect blend of sweet and savory flavors, with a delightful crunch from toasted walnuts. It’s easy to make, versatile, and sure to impress at any meal. Whether you’re looking for a light lunch or an elegant starter, this salad is a fantastic choice.

  • Old Fashioned Frozen Fruit Salad Recipe: A Cool Blast from the Past

    Old Fashioned Frozen Fruit Salad Recipe: A Cool Blast from the Past

    Nothing says summer like a refreshing frozen fruit salad. This old-fashioned recipe is a delightful throwback to simpler times, combining the sweetness of fruit with the creamy texture of a classic salad. Perfect for picnics, potlucks, or just a cool treat on a hot day.

    Why This Recipe Works

    • It’s a perfect make-ahead dessert that saves you time on the day of your event.
    • The combination of fruits and creamy ingredients creates a delightful contrast in textures.
    • It’s incredibly versatile, allowing for endless variations based on your favorite fruits or dietary needs.

    Ingredients

    • 2 cups mixed fruit (peaches, strawberries, and pineapple recommended), diced
    • 1 cup heavy cream, whipped to stiff peaks
    • 1/2 cup mayonnaise
    • 1/4 cup honey
    • 1 tbsp lemon juice
    • 1/2 cup chopped nuts (optional)

    Equipment Needed

    • Mixing bowl
    • Electric mixer
    • Freezer-safe container
    • Spatula

    Instructions

    Old Fashioned Frozen Fruit Salad Recipe

    Step 1: Prepare Your Fruits

    Start by dicing your selected fruits into bite-sized pieces. This ensures every spoonful of your frozen fruit salad has a perfect mix of flavors. Tip: For an extra burst of freshness, use fruits that are in season.

    Step 2: Whip the Cream

    Using an electric mixer, whip the heavy cream until it forms stiff peaks. This will give your salad its light and airy texture. Be careful not to overmix, as this can turn your cream into butter.

    Step 3: Combine Ingredients

    In a large mixing bowl, gently fold the whipped cream, mayonnaise, honey, and lemon juice together. Then, add the diced fruits and nuts (if using). The key here is to fold, not stir, to maintain the airiness of the cream.

    Step 4: Freeze to Perfection

    Transfer the mixture into a freezer-safe container. Cover and freeze for at least 4 hours, or until firm. Tip: For easier serving, you can freeze the salad in individual portions.

    Step 5: Serve and Enjoy

    Let the salad sit at room temperature for about 5 minutes before serving to soften slightly. This makes it easier to scoop and enhances the flavors.

    Tips and Tricks

    For those looking to elevate their frozen fruit salad, consider these advanced tips. First, toasting the nuts before adding them to the salad can bring out a deeper flavor. Second, layering the salad with different fruits can create a visually stunning effect when sliced. Lastly, incorporating a splash of vanilla extract into the cream mixture can add a subtle depth of flavor that complements the fruit beautifully.

    Recipe Variations

    • For a tropical twist, use mango, papaya, and coconut flakes instead of the suggested fruits.
    • To make it dairy-free, substitute the heavy cream with coconut cream whipped to stiff peaks.
    • Add a layer of crushed graham crackers at the bottom for a crunchy texture contrast.
    • Incorporate a bit of citrus zest into the cream mixture for an extra zing.
    • For a more indulgent version, drizzle melted chocolate over the top before freezing.

    Frequently Asked Questions

    Can I use frozen fruits instead of fresh? Absolutely! Just make sure to thaw and drain them well to avoid excess water in your salad.

    How long can I keep the frozen fruit salad in the freezer? It’s best enjoyed within a month, as the texture may change over time.

    Can I make this recipe without nuts? Yes, the nuts are optional and can be omitted for those with allergies or preferences.

    Summary

    This old-fashioned frozen fruit salad is a delightful, make-ahead treat that’s perfect for cooling down on hot summer days. With its creamy texture and sweet fruit flavors, it’s sure to be a hit at any gathering.

  • Cherry Jello Salad: A Sweet and Vibrant Delight

    Cherry Jello Salad: A Sweet and Vibrant Delight

    Nothing says celebration like a vibrant Cherry Jello Salad. This easy-to-make dish is a crowd-pleaser, combining the sweetness of cherries with a creamy texture that’s perfect for any gathering. Let’s dive into making this colorful treat!

    Why This Recipe Works

    • The combination of cherry jello and crushed pineapple creates a perfect balance of sweetness and tanginess.
    • Adding whipped topping gives the salad a light and creamy texture that contrasts beautifully with the fruit.
    • It’s incredibly versatile, allowing for numerous variations to suit any taste or occasion.
    • This recipe requires no baking, making it a quick and easy option for last-minute gatherings.
    • The vibrant red color makes it a visually appealing addition to any table.

    Ingredients

    • 1 package (3 oz) cherry flavored gelatin
    • 1 cup boiling water
    • 1 cup cold water
    • 1 can (20 oz) crushed pineapple, drained
    • 1 cup whipped topping
    • 1/2 cup mini marshmallows (optional)

    Equipment Needed

    • Mixing bowl
    • Whisk
    • Measuring cups
    • Spatula
    • Refrigerator

    Instructions

    Recipe For Cherry Jello Salad

    Step 1: Dissolve the Gelatin

    In a large mixing bowl, dissolve the cherry flavored gelatin in 1 cup of boiling water. Stir continuously with a whisk for about 2 minutes until the gelatin is completely dissolved. This ensures a smooth base for your salad.

    Step 2: Add Cold Water

    After the gelatin has dissolved, add 1 cup of cold water to the bowl. Stir well to combine. This step cools down the mixture, preparing it for the next ingredients.

    Step 3: Incorporate the Pineapple

    Gently fold in the drained crushed pineapple into the gelatin mixture. Make sure the pineapple is evenly distributed for a consistent flavor in every bite.

    Step 4: Chill the Mixture

    Pour the mixture into a serving dish and refrigerate for at least 4 hours, or until set. The longer it chills, the firmer it will become.

    Step 5: Add the Finishing Touches

    Once the gelatin is set, spread the whipped topping evenly over the top. For an extra touch of sweetness, sprinkle mini marshmallows on top before serving.

    Tips and Tricks

    For a smoother texture, you can blend the crushed pineapple before adding it to the gelatin. If you’re in a hurry, placing the gelatin in the freezer for about 30 minutes can speed up the setting process, but keep an eye on it to prevent freezing. To make the salad even more festive, consider adding a layer of cream cheese mixed with whipped topping before the final chill.

    Recipe Variations

    • For a tropical twist, substitute the cherry gelatin with pineapple or mango flavored gelatin and add chunks of fresh fruit.
    • Create a layered salad by alternating flavors of gelatin and adding different fruits in each layer.
    • For a richer version, mix in cottage cheese or sour cream with the whipped topping.
    • Add nuts or granola for a crunchy texture contrast.
    • Use sugar-free gelatin and low-fat whipped topping for a lighter version.

    Frequently Asked Questions

    Can I use fresh cherries instead of cherry gelatin?

    While fresh cherries can add a nice touch, cherry gelatin provides the signature flavor and consistency of the salad. If you prefer, you can add pitted and chopped fresh cherries in addition to the gelatin for extra fruitiness.

    How long can I store the Cherry Jello Salad?

    The salad can be stored in the refrigerator for up to 3 days. Make sure it’s covered to prevent it from absorbing other flavors from the fridge.

    Can I make this recipe vegan?

    Yes, you can use agar-agar instead of gelatin and a plant-based whipped topping to make a vegan-friendly version of this salad.

    Summary

    This Cherry Jello Salad is a delightful and easy-to-make dish that’s perfect for any occasion. With its sweet and tangy flavor, creamy texture, and vibrant color, it’s sure to be a hit. Plus, it’s versatile enough to customize to your liking. Give it a try and watch it disappear!

  • Avocado Mango Salad Recipe: A Tropical Twist on Your Greens

    Avocado Mango Salad Recipe: A Tropical Twist on Your Greens

    Oh, the joys of combining creamy avocado with sweet mango in a salad that screams summer! This recipe is your ticket to a refreshing, vibrant dish that’s as nutritious as it is delicious. Perfect for picnics, potlucks, or just spicing up your lunch routine.

    Why This Recipe Works

    • The creamy texture of avocado perfectly complements the juicy sweetness of mango, creating a harmonious flavor profile.
    • It’s packed with vitamins, minerals, and healthy fats, making it a guilt-free indulgence.
    • The addition of lime juice and cilantro adds a zesty freshness that elevates the dish.
    • It’s incredibly versatile; serve it as a side, a main, or even as a salsa!
    • Quick and easy to prepare, it’s a fuss-free recipe that delivers on taste and presentation.

    Ingredients

    • 2 ripe avocados, diced
    • 1 large ripe mango, diced
    • 1/4 cup red onion, finely chopped
    • 1/4 cup fresh cilantro, chopped
    • 2 tbsp lime juice
    • 1 tbsp olive oil
    • Salt and pepper to taste

    Equipment Needed

    • Mixing bowl
    • Sharp knife
    • Cutting board
    • Measuring spoons

    Instructions

    Avocado Mango Salad Recipe

    Step 1: Prepare Your Ingredients

    Start by dicing the avocados and mango into bite-sized pieces. Finely chop the red onion and cilantro. The key here is uniformity in size for a perfect bite every time. Tip: To easily dice the mango, slice off the cheeks, score the flesh in a grid pattern, and scoop out the pieces with a spoon.

    Step 2: Combine the Fruits and Veggies

    In a large mixing bowl, gently toss together the diced avocado, mango, red onion, and cilantro. Be careful not to mash the avocados. The goal is to keep the pieces intact for that beautiful salad texture.

    Step 3: Dress the Salad

    Drizzle the lime juice and olive oil over the salad. Season with salt and pepper to taste. Gently toss the salad to ensure everything is evenly coated. Tip: The lime juice not only adds flavor but also helps prevent the avocado from browning.

    Step 4: Let It Marinate

    Allow the salad to sit for about 10 minutes before serving. This short marination time lets the flavors meld together beautifully. Tip: If you’re preparing this ahead of time, add the avocado just before serving to maintain its freshness and color.

    Step 5: Serve and Enjoy

    Transfer the salad to a serving dish and enjoy immediately. This salad is best served fresh but can be stored in the refrigerator for up to an hour if needed.

    Tips and Tricks

    For an extra kick, add a diced jalapeno or a sprinkle of chili powder. If you’re not a fan of cilantro, substitute it with fresh mint or basil for a different flavor profile. To make this salad more substantial, add grilled chicken or shrimp. Always use ripe but firm avocados and mangoes for the best texture. For a sweeter version, drizzle a bit of honey over the salad before serving.

    Recipe Variations

    • Add quinoa or black beans for a protein-packed version.
    • Swap mango with peaches or pineapple for a different sweet twist.
    • Include cucumber or bell peppers for added crunch.
    • Top with toasted nuts or seeds for extra texture and nutrients.
    • Use a different dressing, like a balsamic reduction or a yogurt-based dressing, for a new flavor experience.

    Frequently Asked Questions

    Can I make this salad ahead of time?

    Yes, but for the best results, add the avocado just before serving to prevent browning. You can prepare the other ingredients ahead and store them in the refrigerator separately.

    How do I pick a ripe mango?

    A ripe mango will give slightly when gently squeezed and have a sweet aroma at the stem end. The skin color can vary, so don’t rely on that alone.

    Can I use frozen mango?

    Yes, but thaw it completely and pat it dry to avoid watering down the salad. Fresh mango is preferred for the best texture and flavor.

    Summary

    This Avocado Mango Salad is a refreshing, nutritious, and versatile dish that’s perfect for any occasion. With its combination of creamy avocado, sweet mango, and zesty lime, it’s a guaranteed crowd-pleaser.