Category: Fruit Salad Recipes

  • Watermelon Feta and Mint Salad Recipe: A Refreshing Summer Delight

    Watermelon Feta and Mint Salad Recipe: A Refreshing Summer Delight

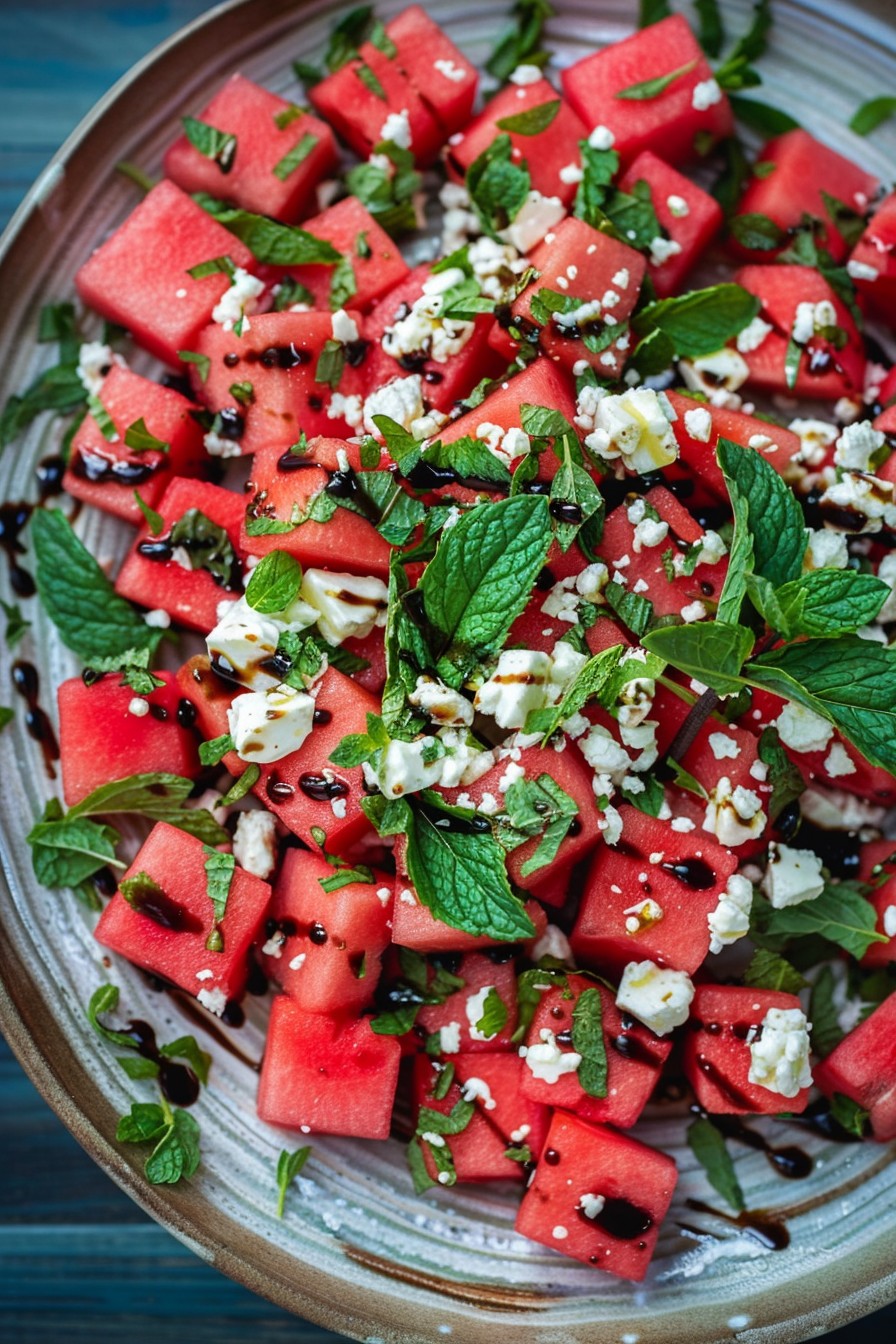
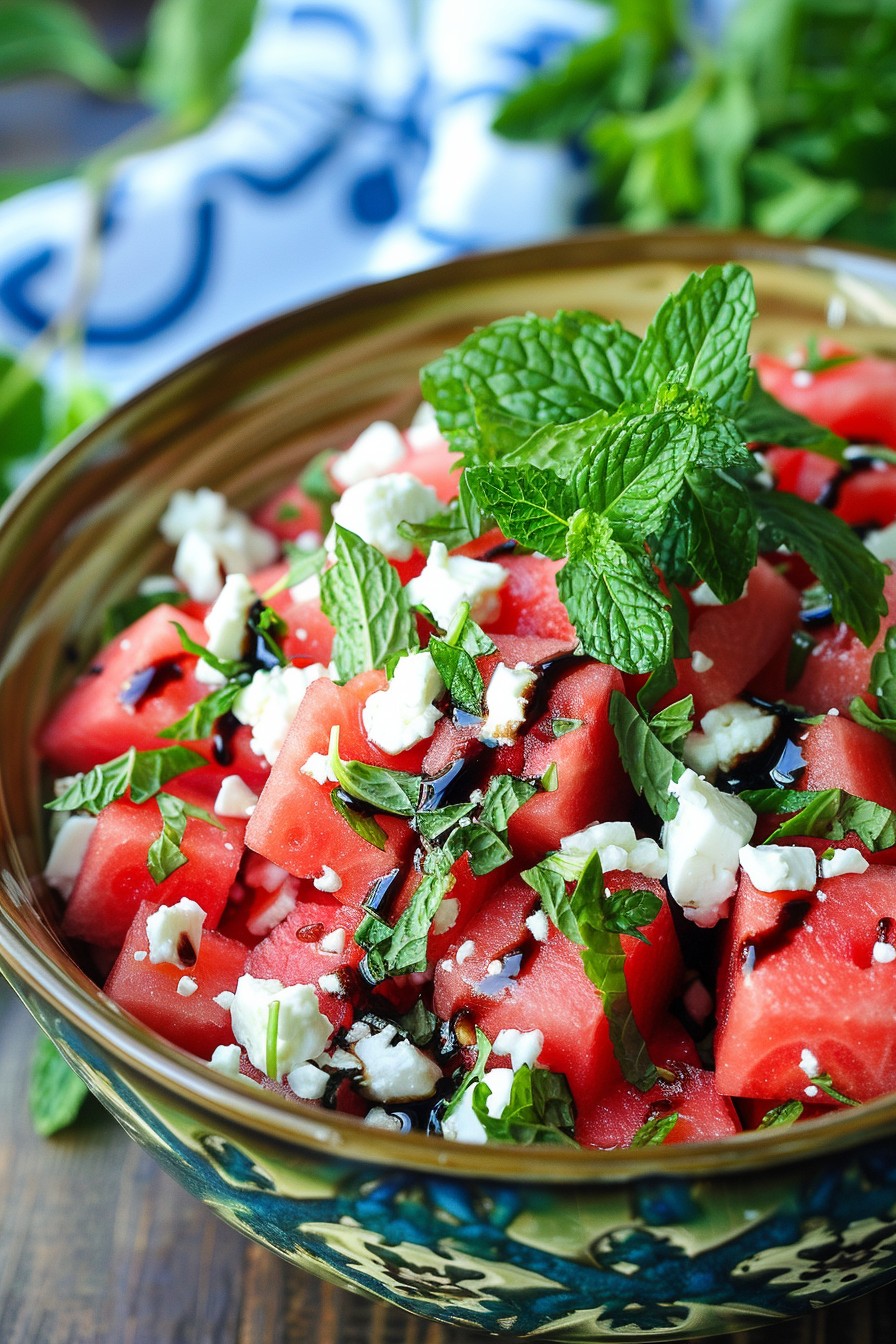
    Bursting with flavors and colors, this watermelon feta and mint salad is the perfect dish to cool down on a hot summer day. It’s a delightful combination of sweet, salty, and fresh that will impress your guests and satisfy your taste buds.

    Why This Recipe Works

    • The sweetness of the watermelon perfectly balances the saltiness of the feta cheese.
    • Fresh mint adds a refreshing twist that elevates the dish.
    • It’s incredibly easy to make, requiring no cooking and just a few simple steps.
    • The vibrant colors make it a visually appealing dish for any occasion.
    • It’s a healthy option that’s both hydrating and packed with nutrients.

    Ingredients

    • 4 cups of watermelon, cubed
    • 1 cup of feta cheese, crumbled
    • 1/4 cup of fresh mint leaves, chopped
    • 2 tablespoons of extra virgin olive oil
    • 1 tablespoon of balsamic glaze
    • Salt and pepper to taste

    Equipment Needed

    • Large mixing bowl
    • Cutting board
    • Sharp knife
    • Measuring cups and spoons

    Instructions

    Watermelon Feta And Mint Salad Recipe

    Prepare Your Ingredients

    Start by cubing your watermelon into bite-sized pieces. Ensure you remove all seeds for a smoother eating experience. Crumble the feta cheese if it’s not already crumbled, and finely chop the fresh mint leaves. Having all your ingredients prepped and ready will make the assembly process a breeze.

    Combine the Watermelon and Feta

    In a large mixing bowl, gently toss the watermelon cubes with the crumbled feta cheese. Be careful not to mash the watermelon as you mix. The goal is to keep those beautiful cubes intact while ensuring every bite has a bit of feta.

    Add the Mint and Drizzle with Olive Oil

    Sprinkle the chopped mint over the watermelon and feta mixture. Then, drizzle the extra virgin olive oil evenly over the salad. The oil will help bring all the flavors together and add a lovely richness to the dish.

    Season and Add the Final Touch

    Season the salad with salt and pepper to taste. Remember, the feta is already salty, so you might not need much salt. Finally, drizzle the balsamic glaze over the top for a sweet and tangy finish that ties everything together beautifully.

    Serve Immediately

    This salad is best served fresh, so plate it up right away. The contrast of the cool watermelon with the creamy feta and the fresh mint is something you’ll want to enjoy immediately.

    Tips and Tricks

    For an extra refreshing twist, chill your watermelon in the fridge before making the salad. If you’re serving this at a party, consider serving it in individual cups for easy handling. To add a bit of crunch, sprinkle some toasted pine nuts or slivered almonds on top. If you’re not a fan of balsamic glaze, a squeeze of fresh lime juice can be a great alternative. Lastly, for a more decadent version, add a drizzle of honey over the top before serving.

    Recipe Variations

    • Add some arugula for a peppery twist and extra greens.
    • Include some sliced cucumbers for additional crunch and freshness.
    • Swap the feta for goat cheese for a different kind of creaminess.
    • Add some sliced red onions for a bit of sharpness and color.
    • For a spicy kick, sprinkle some chili flakes or add some thinly sliced jalapeños.

    Frequently Asked Questions

    Can I make this salad ahead of time?

    While you can prep the ingredients ahead of time, it’s best to assemble the salad just before serving to prevent the watermelon from becoming too watery and the mint from wilting. If you must prepare it in advance, keep the components separate and combine them at the last minute.

    What can I use instead of balsamic glaze?

    If you don’t have balsamic glaze, you can reduce balsamic vinegar by simmering it until it thickens, or use a squeeze of lime or lemon juice for a different but equally delicious tangy flavor.

    How do I pick the best watermelon?

    Look for a watermelon that feels heavy for its size, has a uniform shape, and a creamy yellow spot where it rested on the ground. A ripe watermelon should also sound hollow when tapped.

    Summary

    This watermelon feta and mint salad is a simple, refreshing, and visually stunning dish perfect for summer gatherings. With its balance of sweet, salty, and fresh flavors, it’s sure to be a hit. Plus, it’s easy to customize with your favorite additions or variations.

  • Snickerdoodle Salad Recipe: A Sweet Twist on a Classic

    Snickerdoodle Salad Recipe: A Sweet Twist on a Classic

    Prepare to have your taste buds dazzled with this Snickerdoodle Salad recipe, a delightful concoction that combines the comforting flavors of snickerdoodle cookies with the fresh crispness of a salad. Perfect for potlucks, picnics, or just because, this recipe is sure to be a hit.

    Why This Recipe Works

    • It’s a unique blend of sweet and savory that surprises and delights.
    • The recipe is incredibly easy to make, requiring no baking or complicated steps.
    • It’s versatile, allowing for numerous variations to suit any taste.
    • The combination of textures from the crunchy apples to the soft cookies creates a satisfying eating experience.
    • It’s a great way to enjoy dessert in a slightly healthier, more creative form.

    Ingredients

    • 2 cups of snickerdoodle cookies, crumbled
    • 1 large apple, diced
    • 1 cup of whipped cream
    • 1/2 cup of caramel sauce
    • 1 tsp of cinnamon

    Equipment Needed

    • Mixing bowl
    • Whisk
    • Measuring cups and spoons
    • Serving dish

    Instructions

    Snickerdoodle Salad Recipe

    Step 1: Prepare Your Ingredients

    Start by dicing your apple into small, bite-sized pieces. Crumble your snickerdoodle cookies into chunks, not too fine, to maintain some texture. Measure out your whipped cream and caramel sauce, and have your cinnamon ready. This prep work makes the assembly process smooth and enjoyable.

    Step 2: Mix the Base

    In a large mixing bowl, combine the diced apple and crumbled snickerdoodle cookies. Gently fold in the whipped cream until everything is evenly coated. The key here is to mix gently to keep the cookies from turning into mush.

    Step 3: Add the Flavors

    Drizzle the caramel sauce over the mixture and sprinkle with cinnamon. Fold these in lightly to distribute the flavors without overmixing. The caramel adds a rich sweetness, while the cinnamon brings that classic snickerdoodle warmth.

    Step 4: Chill Before Serving

    Transfer the mixture to a serving dish and chill in the refrigerator for at least 30 minutes. This step allows the flavors to meld together beautifully and the salad to set slightly, making it easier to serve.

    Step 5: Serve and Enjoy

    Once chilled, your Snickerdoodle Salad is ready to serve. Dish it out into bowls or onto plates, and if you’re feeling fancy, a little extra drizzle of caramel and a sprinkle of cinnamon on top won’t hurt.

    Tips and Tricks

    For an extra crunch, consider adding some chopped nuts like pecans or walnuts. If you’re serving this salad at a party, individual servings in small cups or glasses can make for a charming presentation. For a lighter version, substitute the whipped cream with Greek yogurt. Always use fresh apples for the best texture and flavor. And remember, the quality of your snickerdoodle cookies will greatly affect the outcome, so choose your favorite brand or homemade recipe.

    Recipe Variations

    • Swap out the apples for pears or peaches for a different fruit profile.
    • Add a layer of cream cheese mixed with powdered sugar for a cheesecake-like twist.
    • Incorporate some chocolate chips or chunks for a chocolatey surprise.
    • Use ginger snaps instead of snickerdoodles for a spicier version.
    • Top with a sprinkle of granola for added texture and a hint of healthiness.

    Frequently Asked Questions

    Can I make this recipe ahead of time? Absolutely! In fact, making it a few hours ahead allows the flavors to meld together more. Just keep it refrigerated until you’re ready to serve.

    What’s the best way to store leftovers? Store any leftovers in an airtight container in the refrigerator. It’s best enjoyed within a day or two as the cookies will start to soften over time.

    Can I use a different type of cookie? Yes, you can experiment with different cookies, but keep in mind that the flavor profile will change. Snickerdoodles offer a unique cinnamon-sugar flavor that’s hard to beat.

    Summary

    This Snickerdoodle Salad recipe is a fun, easy, and delicious way to enjoy the flavors of your favorite cookie in a new and exciting form. Perfect for any occasion, it’s sure to be a crowd-pleaser.

  • Cranberry Pineapple Salad Recipe: A Tropical Twist on a Classic

    Cranberry Pineapple Salad Recipe: A Tropical Twist on a Classic

    Ready to dive into a dish that’s as vibrant as your summer playlist? This cranberry pineapple salad is the perfect blend of sweet, tangy, and crunchy, making it a hit at any gathering. Let’s get mixing!

    Why This Recipe Works

    • The combination of tart cranberries and sweet pineapple creates a flavor explosion that’s hard to resist.
    • Adding nuts introduces a satisfying crunch that contrasts beautifully with the soft fruits.
    • It’s incredibly versatile, serving as a side dish, dessert, or even a breakfast topping.
    • Prep is a breeze, requiring no cooking and just a few minutes of your time.
    • It’s a colorful addition to any table, guaranteed to brighten up your meal.

    Ingredients

    • 2 cups fresh cranberries, finely chopped
    • 1 cup pineapple chunks, drained and chopped
    • 1/2 cup pecans, toasted and chopped
    • 1/4 cup sugar
    • 1/2 cup whipped cream
    • 1 tbsp lemon juice

    Equipment Needed

    • Mixing bowl
    • Sharp knife
    • Cutting board
    • Measuring cups and spoons

    Instructions

    Cranberry Pineapple Salad Recipe

    Step 1: Prep Your Fruits

    Start by finely chopping your fresh cranberries and pineapple chunks. The smaller the pieces, the better they’ll meld together in the salad. Tip: If you’re not a fan of the tartness of cranberries, you can soak them in orange juice for an hour before chopping to mellow the flavor.

    Step 2: Toast the Pecans

    Spread the pecans on a baking sheet and toast them in a preheated 350°F oven for about 5 minutes, or until they’re fragrant. Let them cool before chopping. This step brings out the nuts’ natural oils, enhancing their flavor.

    Step 3: Combine Ingredients

    In a large mixing bowl, combine the chopped cranberries, pineapple, and pecans. Sprinkle the sugar over the top and drizzle with lemon juice. Gently toss everything together to ensure the sugar is evenly distributed.

    Step 4: Fold in Whipped Cream

    Add the whipped cream to the bowl and fold it into the fruit mixture until everything is lightly coated. Be gentle to keep the whipped cream fluffy. Tip: For a dairy-free version, coconut whipped cream works beautifully.

    Step 5: Chill and Serve

    Cover the bowl and refrigerate the salad for at least an hour before serving. This chilling time allows the flavors to meld together beautifully. Serve chilled for the best taste and texture.

    Tips and Tricks

    For an extra layer of flavor, consider adding a pinch of cinnamon or nutmeg to the salad. If you’re preparing this dish ahead of time, hold off on adding the whipped cream until just before serving to maintain its texture. Toasting the pecans is a step you shouldn’t skip, as it significantly enhances the salad’s overall flavor profile. For a more decadent version, a drizzle of caramel or honey over the top before serving can add a lovely sweetness.

    Recipe Variations

    • Swap pecans for walnuts or almonds for a different crunch.
    • Add shredded coconut for a tropical twist.
    • Mix in some orange zest for a citrusy kick.
    • Use Greek yogurt instead of whipped cream for a healthier version.
    • Include diced apples or pears for additional texture and flavor.

    Frequently Asked Questions

    Can I use dried cranberries instead of fresh?

    Absolutely! Dried cranberries can be a great substitute if fresh ones aren’t available. Just remember that they’re sweeter and chewier, so you might want to reduce the added sugar slightly to balance the flavors.

    How long can I store this salad?

    This salad is best enjoyed within 24 hours of preparation, especially if you’ve added whipped cream. If you need to store it longer, keep it in an airtight container in the fridge, but note that the texture may change slightly over time.

    Can I make this recipe vegan?

    Yes, you can easily make this recipe vegan by using coconut whipped cream and ensuring your sugar is vegan-friendly. It’s a simple swap that doesn’t compromise on taste or texture.

    Summary

    This cranberry pineapple salad is a delightful mix of flavors and textures, perfect for any occasion. Easy to make and versatile, it’s sure to become a favorite in your recipe collection.

  • Blueberry Jello Salad: A Refreshing Summer Delight

    Blueberry Jello Salad: A Refreshing Summer Delight

    Welcome to a world where jello isn’t just a wobbly dessert but a star in a refreshing salad that’ll steal the show at your next summer gathering. This blueberry jello salad is the perfect blend of sweet, tangy, and creamy, making it a hit among both kids and adults.

    Why This Recipe Works

    • It’s a no-bake recipe, perfect for those hot summer days when you don’t want to turn on the oven.
    • The combination of creamy and fruity layers offers a delightful contrast in textures and flavors.
    • It’s incredibly versatile; you can easily swap out ingredients based on what you have on hand or your dietary preferences.
    • This salad can be made ahead of time, making it a stress-free option for parties and potlucks.
    • The vibrant colors make it as visually appealing as it is delicious.

    Ingredients

    • 2 cups fresh blueberries, washed and dried
    • 1 package (3 oz) blueberry jello
    • 1 cup boiling water
    • 1 cup cold water
    • 1 cup sour cream
    • 1/2 cup sugar
    • 1 teaspoon vanilla extract

    Equipment Needed

    • Mixing bowls
    • Whisk
    • Measuring cups and spoons
    • Spatula
    • 9×13 inch baking dish

    Instructions

    Recipe For Blueberry Jello Salad

    Step 1: Dissolve the Jello

    In a large mixing bowl, dissolve the blueberry jello in 1 cup of boiling water. Stir continuously for about 2 minutes until the jello is completely dissolved. This ensures a smooth base for your salad. Tip: For an extra burst of flavor, consider using flavored sparkling water instead of cold water in the next step.

    Step 2: Add Cold Water

    After the jello is fully dissolved, add 1 cup of cold water to the mixture. Stir well to combine. This step cools down the jello mixture, preparing it for the next ingredients. Make sure the mixture is at room temperature before proceeding to avoid curdling the sour cream.

    Step 3: Incorporate the Creamy Layer

    In a separate bowl, whisk together the sour cream, sugar, and vanilla extract until smooth. Gradually add this to the jello mixture, stirring gently to create a marbled effect. This adds a creamy texture and rich flavor to the salad. Tip: For a lighter version, you can substitute Greek yogurt for sour cream.

    Step 4: Add the Blueberries

    Gently fold in the fresh blueberries into the jello mixture, ensuring they’re evenly distributed. The blueberries add a fresh, fruity burst to every bite. Avoid overmixing to keep the blueberries intact.

    Step 5: Chill to Set

    Pour the mixture into a 9×13 inch baking dish and refrigerate for at least 4 hours, or until fully set. The salad should be firm to the touch before serving. Tip: For quicker setting, you can place the salad in the freezer for the first hour, then transfer to the fridge.

    Tips and Tricks

    For those looking to elevate their blueberry jello salad, consider these advanced tips. First, toasting the sugar before adding it to the sour cream can deepen the flavors. Second, layering the salad with a clear jello layer on top can create a stunning visual effect. Lastly, incorporating a layer of crushed graham crackers at the bottom can add a delightful crunch. Remember, the key to a perfect jello salad is patience; allow it enough time to set properly.

    Recipe Variations

    • Swap blueberries for strawberries or raspberries for a different berry flavor.
    • Add a layer of cream cheese mixed with whipped cream for an extra creamy texture.
    • Incorporate mini marshmallows or nuts for added texture and sweetness.
    • Use sugar-free jello and substitute the sugar with a sugar alternative for a healthier version.
    • Layer the salad with different colored jello for a rainbow effect.

    Frequently Asked Questions

    Can I use frozen blueberries instead of fresh?

    Yes, you can use frozen blueberries, but make sure to thaw and drain them well to prevent excess water from diluting the jello mixture. This might slightly alter the texture but won’t significantly impact the flavor.

    How long can I store the blueberry jello salad?

    The salad can be stored in the refrigerator for up to 3 days. Ensure it’s covered tightly with plastic wrap to prevent it from absorbing other flavors from the fridge.

    Can I make this recipe vegan?

    Absolutely! Substitute the sour cream with coconut cream and use agar-agar instead of gelatin for a vegan-friendly version. The taste and texture will be slightly different but still delicious.

    Summary

    This blueberry jello salad is a refreshing, easy-to-make dish that’s perfect for summer gatherings. With its vibrant colors and delightful mix of textures, it’s sure to be a crowd-pleaser. Plus, its versatility allows for endless variations to suit any taste or dietary need.

  • Cranberry Celebration Salad: A Festive Delight

    Cranberry Celebration Salad: A Festive Delight

    Ready to add a pop of color and flavor to your holiday table? This Cranberry Celebration Salad is not just a dish; it’s a conversation starter. Rich, tangy, and sweet, it’s the perfect side to balance out your feast.

    Why This Recipe Works

    • The combination of fresh cranberries and oranges offers a refreshing contrast to heavy holiday meals.
    • Toasted pecans add a crunchy texture that elevates the salad to gourmet status.
    • A homemade citrus dressing brings all the flavors together without overpowering them.
    • It’s make-ahead friendly, allowing you to enjoy the festivities stress-free.

    Ingredients

    • 4 cups fresh cranberries, finely chopped
    • 1 cup granulated sugar
    • 2 large oranges, peeled and diced
    • 1 cup toasted pecans, chopped
    • 1/2 cup orange juice
    • 1/4 cup honey
    • 1 tbsp orange zest

    Equipment Needed

    • Large mixing bowl
    • Sharp knife
    • Cutting board
    • Measuring cups and spoons
    • Small saucepan

    Instructions

    Recipe For Cranberry Celebration Salad

    Step 1: Prepare the Cranberries

    Start by finely chopping 4 cups of fresh cranberries. This can be done quickly in a food processor if you’re short on time. Transfer the chopped cranberries to a large mixing bowl and mix in 1 cup of granulated sugar. Let this sit for about 10 minutes to allow the cranberries to macerate and release their natural juices.

    Step 2: Add the Oranges and Pecans

    Peel and dice 2 large oranges, ensuring to remove any seeds. Add the diced oranges and 1 cup of toasted, chopped pecans to the cranberry mixture. Gently fold everything together to distribute the ingredients evenly.

    Step 3: Make the Citrus Dressing

    In a small saucepan over medium heat, combine 1/2 cup of orange juice, 1/4 cup of honey, and 1 tbsp of orange zest. Heat the mixture just until the honey dissolves, about 3-4 minutes, stirring constantly. Remove from heat and let it cool slightly before drizzling over the salad.

    Step 4: Combine and Chill

    Pour the slightly cooled citrus dressing over the cranberry mixture and toss gently to coat. Cover the bowl with plastic wrap and refrigerate for at least 2 hours, or overnight, to allow the flavors to meld together beautifully.

    Step 5: Serve and Enjoy

    Before serving, give the salad a gentle stir to redistribute the dressing. Serve chilled as a vibrant side dish that’s sure to impress your guests with its balance of sweet, tangy, and crunchy elements.

    Tips and Tricks

    For an extra layer of flavor, consider adding a pinch of cinnamon or nutmeg to the citrus dressing. If you’re not a fan of pecans, walnuts or almonds make excellent substitutes. To save time, you can use pre-chopped pecans, but toasting them yourself brings out a deeper flavor. For a smoother texture, you can pulse the cranberries less if you prefer larger pieces. Lastly, this salad tastes even better the next day, making it a perfect make-ahead dish for busy holidays.

    Recipe Variations

    • Add diced apples or pears for a different kind of crunch and sweetness.
    • Incorporate a handful of dried cherries or raisins for added chewiness.
    • For a tropical twist, mix in some diced pineapple or mango.
    • Swap out the pecans for walnuts or almonds depending on your preference.
    • For a more decadent version, fold in some mini marshmallows or a dollop of whipped cream before serving.

    Frequently Asked Questions

    Can I use frozen cranberries? Yes, you can use frozen cranberries, but make sure to thaw and drain them well before chopping to avoid excess moisture in the salad.

    How long does this salad last in the fridge? Stored in an airtight container, the salad can last up to 5 days in the refrigerator, making it great for leftovers.

    Can I make this salad vegan? Absolutely! Just substitute the honey with maple syrup or agave nectar to keep it vegan-friendly.

    Summary

    This Cranberry Celebration Salad is a must-try for anyone looking to add a vibrant, flavorful side to their holiday table. Easy to make and even easier to love, it’s a dish that’s as fun to prepare as it is to eat.

  • Christmas Pear Salad Recipe: A Festive Twist on a Classic

    Christmas Pear Salad Recipe: A Festive Twist on a Classic

    Let’s dive into a holiday favorite that’s as delightful to look at as it is to eat. This Christmas Pear Salad combines the sweetness of pears with the crunch of walnuts and the tang of blue cheese, all dressed in a homemade vinaigrette. Perfect for your holiday table!

    Why This Recipe Works

    • The combination of sweet pears and tangy blue cheese creates a perfect balance of flavors.
    • Walnuts add a delightful crunch and are packed with healthy fats.
    • The homemade vinaigrette is simple yet elevates the salad to a gourmet level.
    • It’s a quick and easy recipe that looks impressive, making it perfect for holiday gatherings.

    Ingredients

    • 2 ripe pears, thinly sliced
    • 1/2 cup walnuts, toasted
    • 1/4 cup blue cheese, crumbled
    • 4 cups mixed greens
    • 1/4 cup olive oil
    • 2 tbsp balsamic vinegar
    • 1 tsp honey
    • Salt and pepper to taste

    Equipment Needed

    • Large salad bowl
    • Small whisk
    • Measuring cups and spoons
    • Knife and cutting board

    Instructions

    Christmas Pear Salad Recipe

    Prepare the Vinaigrette

    In a small bowl, whisk together the olive oil, balsamic vinegar, honey, salt, and pepper until well combined. Taste and adjust the seasoning if necessary. This vinaigrette can be made ahead and stored in the refrigerator for up to a week.

    Toast the Walnuts

    Preheat your oven to 350°F. Spread the walnuts on a baking sheet and toast for about 5 minutes, or until they’re fragrant and slightly golden. Keep an eye on them to prevent burning. Let them cool before adding to the salad.

    Assemble the Salad

    In a large salad bowl, combine the mixed greens, sliced pears, toasted walnuts, and crumbled blue cheese. Drizzle with the vinaigrette and toss gently to coat all the ingredients evenly. Serve immediately to enjoy the crispness of the greens and the freshness of the pears.

    Tips and Tricks

    For an extra touch of elegance, you can arrange the pear slices in a fan shape on top of the salad before serving. If you’re not a fan of blue cheese, goat cheese makes a great substitute. To save time, you can use pre-washed mixed greens and store-bought vinaigrette, but homemade really makes a difference in flavor.

    Recipe Variations

    • Add dried cranberries for a pop of color and sweetness.
    • Substitute pecans or almonds for the walnuts for a different crunch.
    • Use apples instead of pears for a different fruit profile.
    • Add grilled chicken or shrimp to make it a main dish.

    Frequently Asked Questions

    Can I make this salad ahead of time?

    You can prepare the components ahead of time, but it’s best to assemble the salad just before serving to prevent the greens from wilting and the pears from browning.

    What type of pears work best for this salad?

    Bartlett or Anjou pears are great choices because they’re sweet and hold their shape well when sliced.

    Can I use a different type of cheese?

    Absolutely! Goat cheese, feta, or even gorgonzola would work well in this salad.

    Summary

    This Christmas Pear Salad is a festive, flavorful, and easy-to-make dish that’s perfect for holiday gatherings. With its combination of sweet pears, crunchy walnuts, and tangy blue cheese, it’s sure to be a hit.

  • Ambrosia Salad: A Heavenly Delight for Your Taste Buds

    Ambrosia Salad: A Heavenly Delight for Your Taste Buds

    Zesty, sweet, and utterly divine, this Ambrosia Salad recipe is your ticket to a dessert that’s as fun to make as it is to eat. Perfect for potlucks, family gatherings, or when you’re just in the mood for something sweet and creamy, this dish is a crowd-pleaser that’s surprisingly easy to whip up.

    Why This Recipe Works

    • The combination of fresh fruits and creamy ingredients creates a perfect balance of flavors and textures.
    • It’s incredibly versatile, allowing you to customize it based on your preferences or what you have on hand.
    • This recipe is no-bake, making it a great option for hot summer days or when you’re short on time.
    • The addition of coconut adds a tropical twist that elevates the dish beyond your average fruit salad.
    • It’s a make-ahead dish, meaning the flavors have time to meld together beautifully in the fridge.

    Ingredients

    • 2 cups of mini marshmallows
    • 1 cup of sour cream
    • 1 cup of whipped topping
    • 1 can (20 oz) of pineapple chunks, drained
    • 1 can (11 oz) of mandarin oranges, drained
    • 1 cup of sweetened shredded coconut
    • 1/2 cup of maraschino cherries, halved
    • 1/2 cup of chopped pecans

    Equipment Needed

    • Large mixing bowl
    • Rubber spatula
    • Measuring cups and spoons
    • Serving dish

    Instructions

    Recipe Of Ambrosia Salad

    Step 1: Combine the Creamy Ingredients

    In a large mixing bowl, gently fold together the sour cream and whipped topping until well combined. This creates the creamy base of your Ambrosia Salad. For an extra fluffy texture, make sure your whipped topping is fully thawed before mixing.

    Step 2: Add the Fruits and Marshmallows

    Next, add the pineapple chunks, mandarin oranges, and mini marshmallows to the bowl. Fold them into the creamy mixture carefully to avoid crushing the fruits. This step is where the salad starts to come together, so take your time to ensure everything is evenly distributed.

    Step 3: Incorporate the Coconut and Cherries

    Now, sprinkle in the shredded coconut and halved maraschino cherries. The coconut adds a delightful texture and flavor, while the cherries provide a pop of color and sweetness. If you’re not a fan of cherries, you can easily omit them or substitute with another fruit.

    Step 4: Mix in the Pecans

    Finally, add the chopped pecans to the bowl and give everything one last gentle fold. The pecans add a nice crunch and nutty flavor that contrasts beautifully with the creamy and fruity elements of the salad.

    Step 5: Chill Before Serving

    Transfer the salad to a serving dish, cover, and refrigerate for at least 2 hours before serving. This chilling time allows the flavors to meld together and the marshmallows to soften slightly, making the salad even more delicious.

    Tips and Tricks

    For the best results, make sure all your canned fruits are well-drained to prevent the salad from becoming too watery. If you prefer a lighter version, you can substitute the sour cream with Greek yogurt. Toasting the coconut and pecans before adding them to the salad can enhance their flavors and add an extra layer of texture. If you’re making this salad ahead of time, consider adding the pecans just before serving to maintain their crunch. For a more colorful presentation, reserve a few cherries and some coconut to sprinkle on top before serving.

    Recipe Variations

    • For a tropical twist, add diced mango or banana slices to the salad.
    • Substitute the pecans with walnuts or almonds for a different nutty flavor.
    • Add a splash of citrus juice, like orange or pineapple, for a tangier taste.
    • For a richer salad, mix in a cup of vanilla pudding.
    • If you’re not a fan of coconut, you can leave it out or replace it with granola for crunch.

    Frequently Asked Questions

    Can I make Ambrosia Salad ahead of time?

    Absolutely! In fact, making it ahead of time allows the flavors to meld together beautifully. Just be sure to add any nuts or crunchy toppings right before serving to maintain their texture.

    How long does Ambrosia Salad last in the fridge?

    When stored properly in an airtight container, Ambrosia Salad can last up to 3 days in the refrigerator. However, it’s best enjoyed within the first 24 hours for optimal texture and flavor.

    Can I use fresh fruit instead of canned?

    Yes, you can definitely use fresh fruit. Just keep in mind that fresh fruit may release more juice, so you might need to adjust the amount of creamy ingredients to maintain the desired consistency.

    Summary

    This Ambrosia Salad recipe is a delightful mix of creamy, fruity, and crunchy textures that’s perfect for any occasion. Easy to make and customizable, it’s sure to become a favorite in your recipe collection.

  • Mandarin Orange Salad with Cool Whip: A Zesty, Creamy Delight

    Mandarin Orange Salad with Cool Whip: A Zesty, Creamy Delight

    A absolutely refreshing and easy-to-make dessert that combines the tangy sweetness of mandarin oranges with the creamy lightness of Cool Whip. Perfect for summer picnics or a quick family treat, this salad is a crowd-pleaser that requires minimal effort for maximum flavor.

    Why This Recipe Works

    • The combination of juicy mandarin oranges and fluffy Cool Whip creates a perfect balance of flavors and textures.
    • It’s incredibly easy to make, requiring no cooking and just a few minutes of prep time.
    • The salad is versatile, allowing for numerous variations to suit any taste or occasion.
    • It’s a great make-ahead dish, as the flavors meld together beautifully when chilled.
    • This recipe is a fantastic way to enjoy a light, fruity dessert without feeling guilty.

    Ingredients

    • 2 cans (15 oz each) mandarin oranges, drained
    • 1 tub (8 oz) Cool Whip, thawed
    • 1 cup mini marshmallows
    • 1/2 cup shredded coconut (optional)
    • 1/4 cup chopped pecans (optional)

    Equipment Needed

    • Large mixing bowl
    • Rubber spatula
    • Measuring cups

    Instructions

    Recipe For Mandarin Orange Salad With Cool Whip

    Step 1: Prepare Your Ingredients

    Start by draining the mandarin oranges thoroughly to prevent the salad from becoming too watery. If you’re using coconut or pecans, give them a quick chop to ensure they’re evenly distributed throughout the salad. This step is crucial for achieving the perfect texture in every bite.

    Step 2: Combine the Ingredients

    In a large mixing bowl, gently fold the drained mandarin oranges into the thawed Cool Whip using a rubber spatula. Be careful not to crush the oranges; you want to maintain their integrity for that burst of citrus flavor. If you’re adding marshmallows, coconut, or pecans, now’s the time to mix them in.

    Step 3: Chill the Salad

    Cover the bowl with plastic wrap and refrigerate the salad for at least 1 hour before serving. This chilling time allows the flavors to meld together and the salad to set slightly, making it easier to serve.

    Step 4: Serve and Enjoy

    Once chilled, give the salad a gentle stir to fluff it up before serving. Spoon it into individual bowls or onto a large serving platter. For an extra touch of elegance, garnish with a few whole mandarin orange segments or a sprinkle of coconut.

    Tips and Tricks

    For a lighter version of this salad, you can use Lite Cool Whip or even substitute half of the Cool Whip with Greek yogurt for a protein boost. If you’re serving this at a party, consider adding a splash of orange liqueur to the mix for an adult twist. Always taste as you go, especially if you’re adding optional ingredients, to ensure the balance of flavors is to your liking. Lastly, for the best texture, make sure the Cool Whip is fully thawed before mixing to avoid lumps.

    Recipe Variations

    • Add a can of drained pineapple chunks for a tropical twist.
    • Mix in a cup of fresh berries for a burst of color and antioxidants.
    • Swap the pecans for walnuts or almonds for a different crunch.
    • Incorporate a teaspoon of vanilla extract for added depth of flavor.
    • Use flavored marshmallows, like strawberry or coconut, for a fun variation.

    Frequently Asked Questions

    Can I make this salad ahead of time?

    Absolutely! This salad actually tastes better after it’s had time to chill and the flavors have melded together. You can make it up to 24 hours in advance, just keep it covered in the refrigerator until you’re ready to serve.

    Can I use fresh mandarin oranges instead of canned?

    Yes, you can use fresh mandarin oranges, but you’ll need to peel and segment them yourself, which adds to the prep time. Also, fresh oranges may not be as sweet as canned, so you might want to adjust the sweetness to your liking.

    Is there a dairy-free alternative to Cool Whip?

    Yes, there are several dairy-free whipped toppings available at most grocery stores. You can also make your own using coconut cream for a completely homemade version.

    Summary

    This Mandarin Orange Salad with Cool Whip is a simple, refreshing dessert that’s perfect for any occasion. With its creamy texture and sweet, tangy flavor, it’s sure to be a hit with both kids and adults alike. Plus, it’s incredibly versatile, allowing you to customize it to your heart’s content.

  • Sweet & Simple Fruit Salad Recipe with Honey

    Sweet & Simple Fruit Salad Recipe with Honey

    Craving something sweet, healthy, and easy to whip up? This fruit salad with a drizzle of honey is your go-to recipe for a refreshing treat that’s bursting with flavors.

    Why This Recipe Works

    • The combination of fresh fruits provides a variety of textures and tastes, making every bite exciting.
    • Honey adds a natural sweetness that enhances the fruits’ flavors without overpowering them.
    • It’s incredibly versatile; you can use whatever fruits are in season or your favorites.
    • Prep time is minimal, making it perfect for last-minute gatherings or a quick healthy snack.
    • The recipe is adaptable for dietary restrictions, easily made vegan or adjusted for sugar content.

    Ingredients

    • 2 cups strawberries, hulled and quartered
    • 1 cup blueberries
    • 1 cup grapes, halved
    • 1 banana, sliced
    • 1 apple, diced
    • 2 tbsp honey
    • 1 tbsp lemon juice
    • 1/4 cup mint leaves, chopped (optional)

    Equipment Needed

    • Large mixing bowl
    • Measuring cups and spoons
    • Knife and cutting board
    • Mixing spoon

    Instructions

    Fruit Salad Recipe With Honey

    Step 1: Prepare Your Fruits

    Start by washing all your fruits thoroughly under cold water. Hull the strawberries and cut them into quarters. Halve the grapes, slice the banana, and dice the apple. Place all the prepared fruits into a large mixing bowl. Tip: To prevent the banana and apple from browning, toss them with a bit of lemon juice as you go.

    Step 2: Combine the Fruits

    Gently mix the fruits together in the bowl. Be careful not to mash the softer fruits like bananas and strawberries. The goal is to keep the textures distinct for a more enjoyable eating experience.

    Step 3: Add the Honey Drizzle

    Drizzle the honey over the mixed fruits. If your honey is too thick, you can warm it slightly to make it easier to drizzle. Use a spoon to gently toss the salad, ensuring all the fruits are lightly coated with honey. Tip: Adjust the amount of honey based on your sweetness preference.

    Step 4: Chill Before Serving

    Cover the bowl with plastic wrap and let the fruit salad chill in the refrigerator for at least 30 minutes. This step allows the flavors to meld together beautifully. Serving it chilled also enhances the refreshing quality of the salad.

    Step 5: Garnish and Serve

    Before serving, give the salad a final gentle toss. Garnish with chopped mint leaves for an extra pop of color and freshness. Serve in individual bowls or a large serving dish. Tip: For an elegant touch, serve the salad in hollowed-out fruit shells.

    Tips and Tricks

    For the best fruit salad, choose fruits that are ripe but still firm to avoid a mushy texture. If you’re preparing the salad ahead of time, add the bananas and apples last to prevent browning. Experiment with different types of honey for unique flavors; orange blossom honey adds a floral note, while buckwheat honey offers a deeper, molasses-like taste. To make the salad more filling, add a scoop of Greek yogurt or a handful of nuts for protein and crunch.

    Recipe Variations

    • Add a tropical twist by including mango, pineapple, and kiwi.
    • For a citrusy version, mix in segments of oranges and grapefruits, and use lime juice instead of lemon.
    • Make it a dessert by adding a sprinkle of cinnamon or a dash of vanilla extract to the honey.
    • Include pomegranate seeds and chopped nuts for a festive and crunchy variation.
    • For a savory edge, add a pinch of chili powder or cayenne pepper to the honey drizzle.

    Frequently Asked Questions

    Can I make this fruit salad ahead of time? Yes, you can prepare the salad a few hours in advance. However, for the best texture, add the bananas and apples just before serving to prevent them from becoming too soft or brown.

    What other sweeteners can I use instead of honey? If you prefer not to use honey, maple syrup or agave nectar are great alternatives. They provide a similar sweetness and consistency.

    How long will the fruit salad last in the fridge? The salad is best enjoyed within 24 hours. After that, the fruits may start to release too much juice and become soggy.

    Summary

    This fruit salad with honey is a delightful, easy-to-make dish that’s perfect for any occasion. With its vibrant colors and fresh flavors, it’s sure to be a hit. Plus, it’s customizable to suit your taste and dietary needs.

  • Canned Fruit Salad Recipe: A Quick & Delightful Treat

    Canned Fruit Salad Recipe: A Quick & Delightful Treat

    Welcome to a world where convenience meets deliciousness with our canned fruit salad recipe. Whether you’re in a pinch for time or just craving something sweet and refreshing, this recipe is your go-to solution.

    Why This Recipe Works

    • It’s incredibly easy to make, requiring minimal prep time and no cooking skills.
    • The combination of canned fruits offers a variety of textures and flavors that please any palate.
    • It’s versatile, allowing for endless variations based on what you have in your pantry.
    • Perfect for any occasion, from a quick snack to a potluck contribution.
    • It’s a great way to enjoy fruit year-round, regardless of seasonality.

    Ingredients

    • 1 can (15 oz) peach slices, drained
    • 1 can (15 oz) pear slices, drained
    • 1 can (20 oz) pineapple chunks, drained
    • 1 can (11 oz) mandarin oranges, drained
    • 1 cup mini marshmallows
    • 1/2 cup shredded coconut
    • 1/2 cup whipped topping

    Equipment Needed

    • Large mixing bowl
    • Mixing spoon
    • Measuring cups
    • Can opener

    Instructions

    Canned Fruit Salad Recipe

    Step 1: Prepare Your Fruits

    Start by opening all your canned fruits and draining them well. You want to remove as much liquid as possible to prevent your salad from becoming soggy. Tip: Give the fruits a gentle press with a clean towel to remove excess moisture.

    Step 2: Combine the Fruits

    In your large mixing bowl, combine the peach slices, pear slices, pineapple chunks, and mandarin oranges. Stir them gently to mix without breaking the fruit pieces. This is where the magic starts to happen as the colors and textures come together.

    Step 3: Add the Extras

    Fold in the mini marshmallows and shredded coconut. These ingredients add a delightful sweetness and texture contrast to the soft fruits. Tip: For an extra flavor boost, toast the coconut before adding it to the salad.

    Step 4: Incorporate the Whipped Topping

    Add the whipped topping to the bowl and gently fold it into the fruit mixture until everything is evenly coated. The whipped topping acts as a creamy binder that brings all the elements together beautifully.

    Step 5: Chill and Serve

    Cover the bowl and refrigerate the salad for at least 1 hour before serving. This chilling time allows the flavors to meld together and the marshmallows to soften slightly. Tip: For best results, serve the salad within 24 hours of making it.

    Tips and Tricks

    For those looking to elevate their canned fruit salad, consider these advanced tips. First, adding a splash of citrus juice, like lemon or lime, can brighten the flavors and prevent browning. Second, experimenting with different canned fruits, such as adding cherries or grapes, can introduce new flavors and textures. Lastly, for a healthier version, substitute the whipped topping with Greek yogurt. This not only reduces the sugar content but also adds a protein boost.

    Recipe Variations

    • Tropical Twist: Add canned mango and papaya for a tropical flavor profile.
    • Berry Delight: Mix in canned berries or fresh berries when in season for a burst of color and antioxidants.
    • Nutty Crunch: Stir in chopped nuts like almonds or walnuts for added crunch and healthy fats.
    • Creamy Dream: Use vanilla pudding mix instead of whipped topping for a denser, creamier texture.
    • Spiced Up: A dash of cinnamon or nutmeg can add warmth and depth to the salad.

    Frequently Asked Questions

    Can I use fresh fruit instead of canned?

    Absolutely! Fresh fruit can be a great substitute for canned, especially when in season. Just keep in mind that fresh fruit may not have the same shelf life as canned, so the salad might not last as long in the fridge.

    How long can I store the fruit salad?

    This salad is best enjoyed within 24 hours of preparation, as the fruits can start to release more liquid and the marshmallows may become too soft. However, it can last up to 2 days if stored properly in an airtight container.

    Can I make this recipe vegan?

    Yes, you can easily make this recipe vegan by using a plant-based whipped topping and ensuring that your marshmallows are vegan-friendly. Many brands now offer gelatin-free marshmallows that are perfect for vegan diets.

    Summary

    This canned fruit salad recipe is a quick, easy, and versatile dish that’s perfect for any occasion. With minimal prep time and endless variation possibilities, it’s sure to become a favorite in your recipe collection.