Category: Meat and Protein Salad Recipes

  • Muffaletta Salad Recipe: A Flavor Fiesta in Every Bite

    Muffaletta Salad Recipe: A Flavor Fiesta in Every Bite

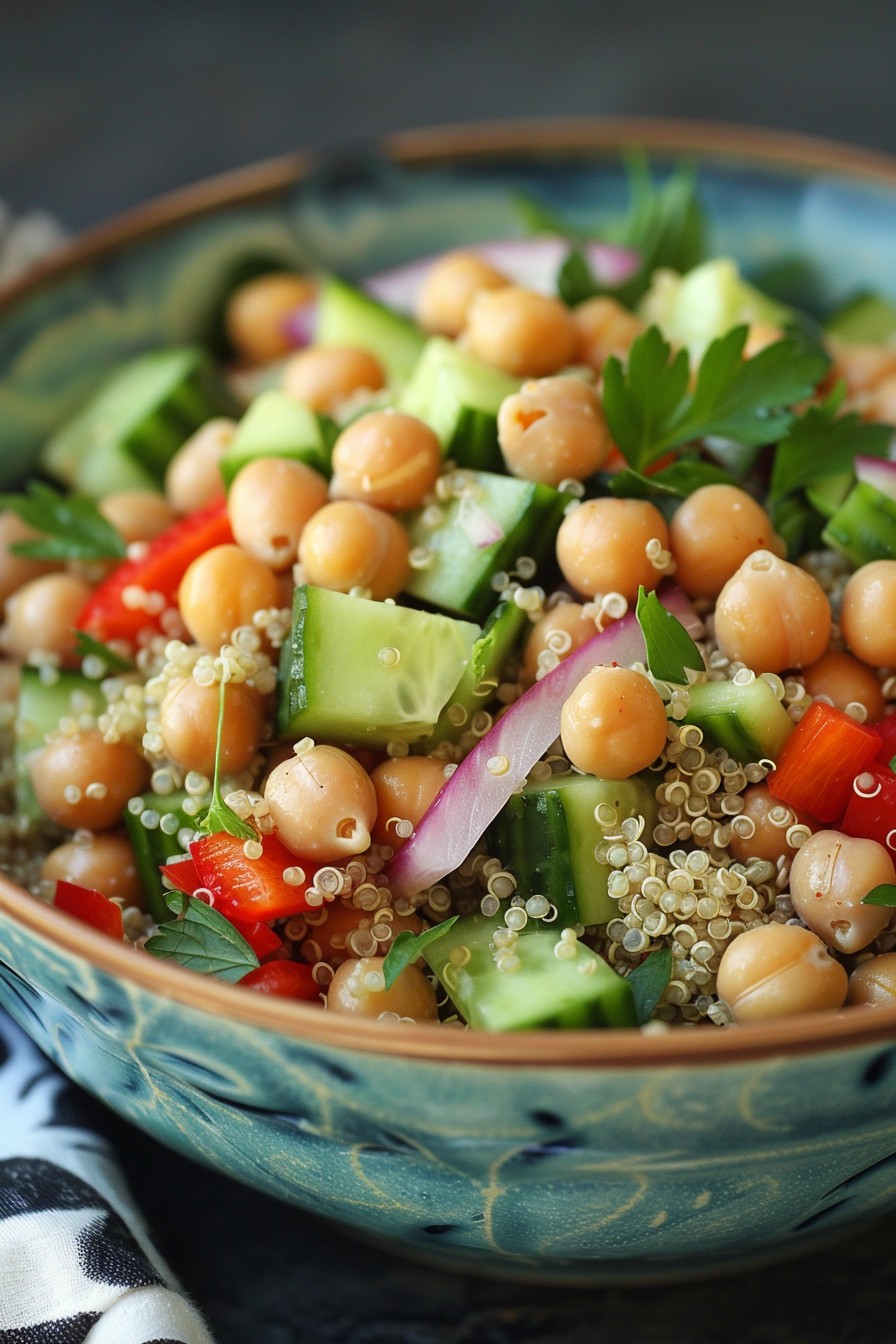
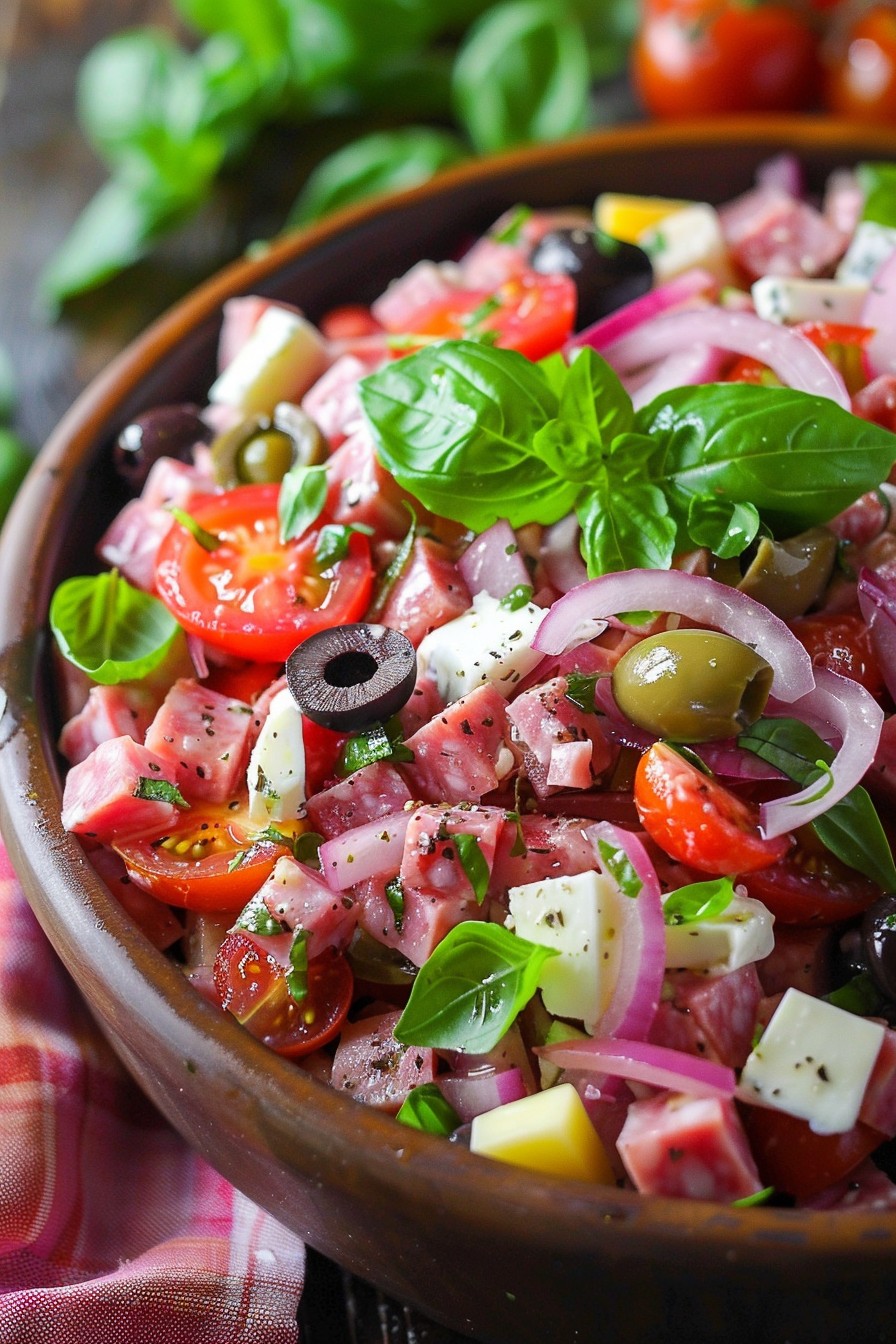
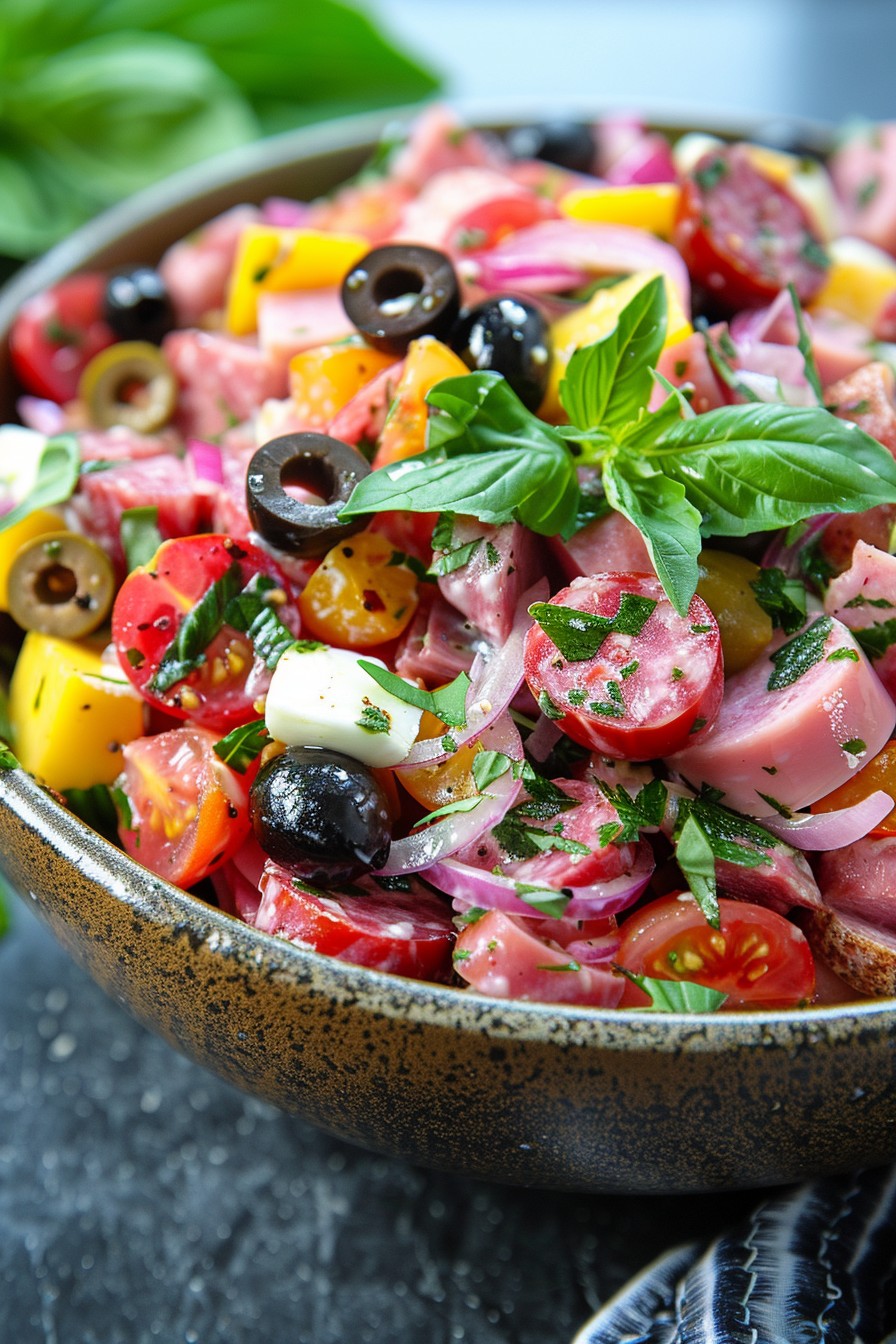
    Unleash the vibrant flavors of New Orleans with this Muffaletta Salad recipe. Perfect for picnics, potlucks, or a hearty lunch, this dish combines the iconic tastes of a traditional muffaletta sandwich into a fresh, easy-to-make salad. Get ready to toss your way to deliciousness!

    Why This Recipe Works

    • Bold flavors from the olive salad dressing bring the essence of a classic muffaletta to life.
    • Combining meats and cheeses in a salad form makes it lighter yet satisfying.
    • Easy to prepare ahead, making it perfect for gatherings or meal prep.
    • Customizable with your favorite deli meats and cheeses for a personal touch.

    Ingredients

    • 1 cup mixed olives, chopped
    • 1/2 cup giardiniera, drained and chopped
    • 1/4 cup olive oil
    • 2 tbsp red wine vinegar
    • 1 tsp dried oregano
    • 1/2 tsp garlic powder
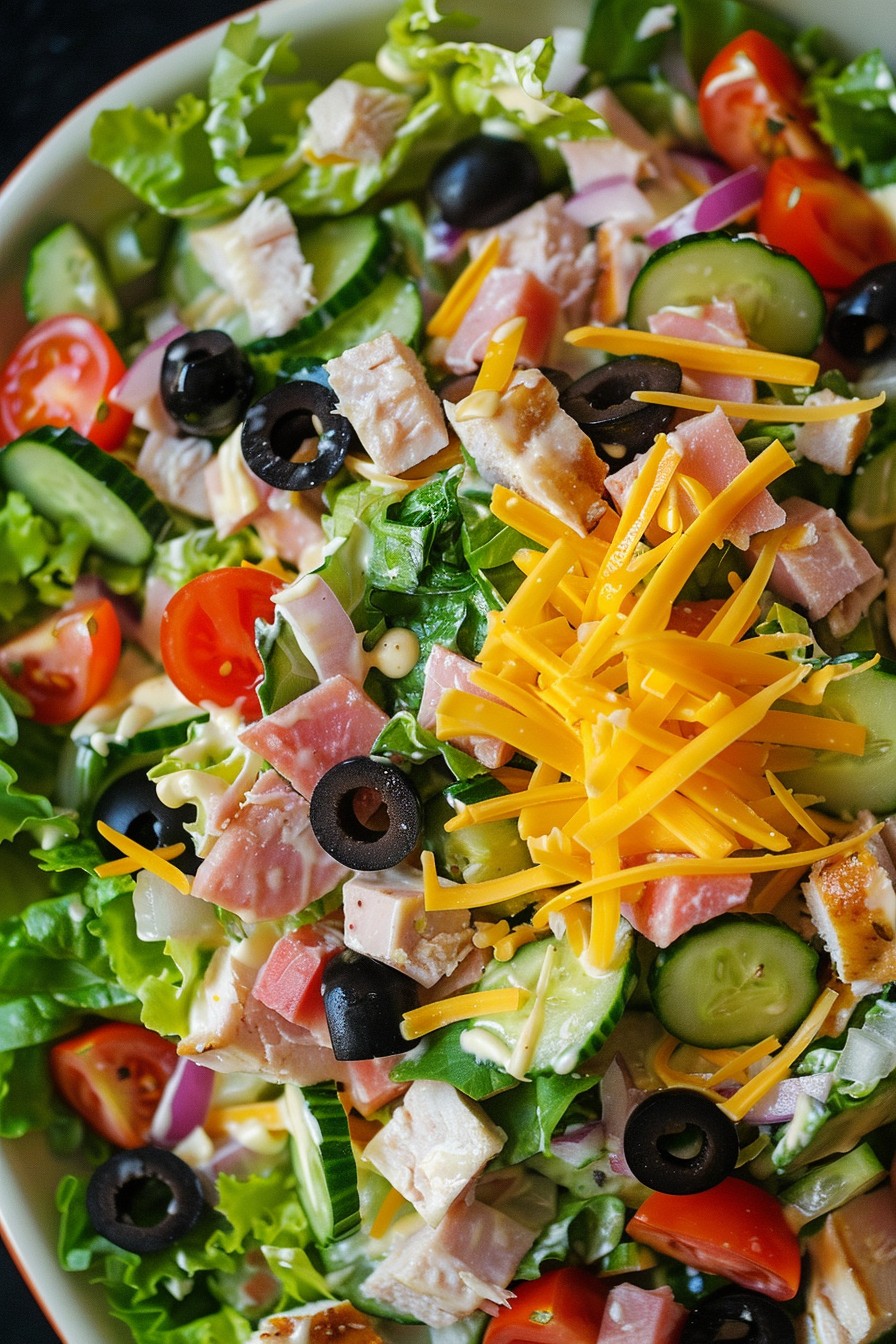
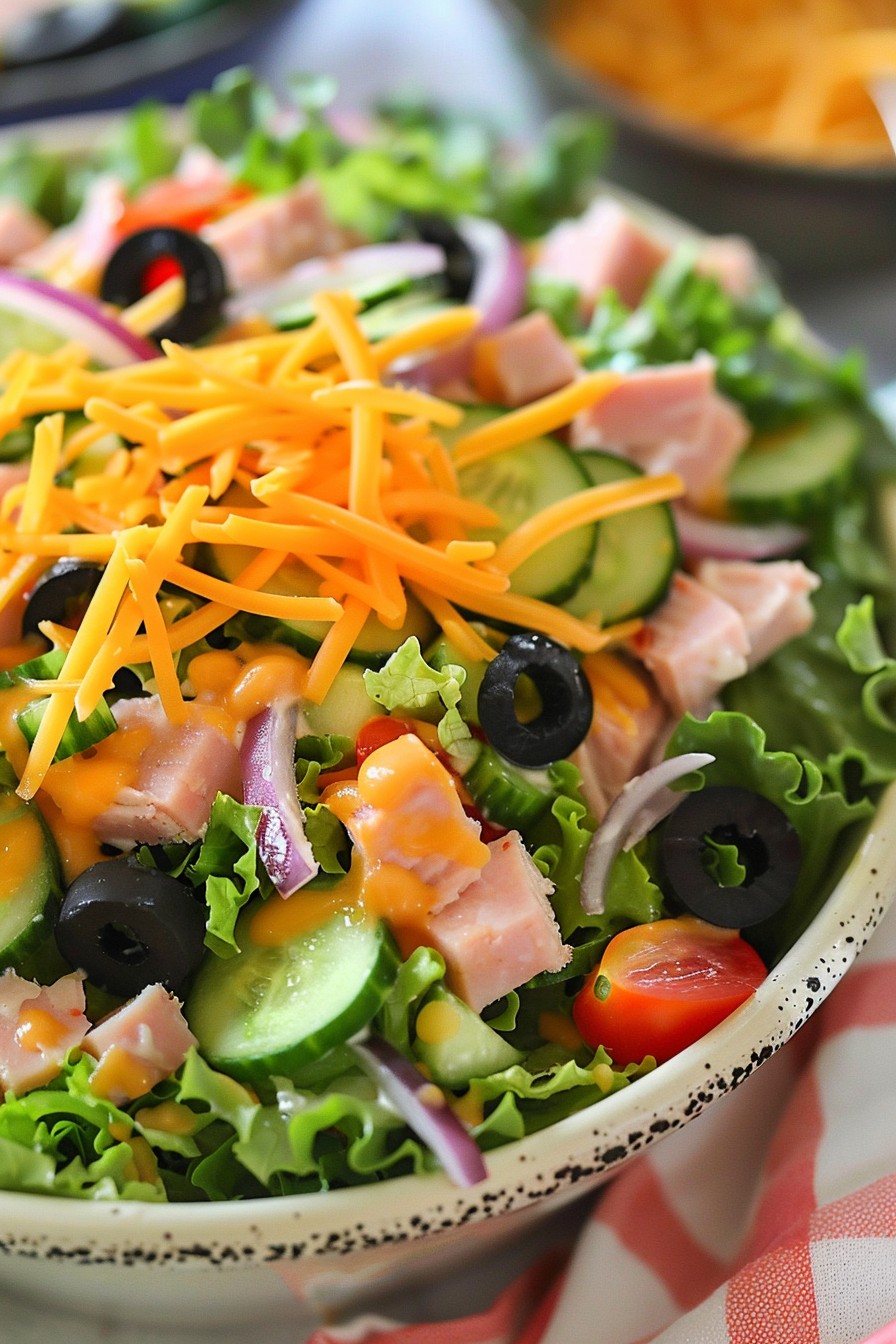
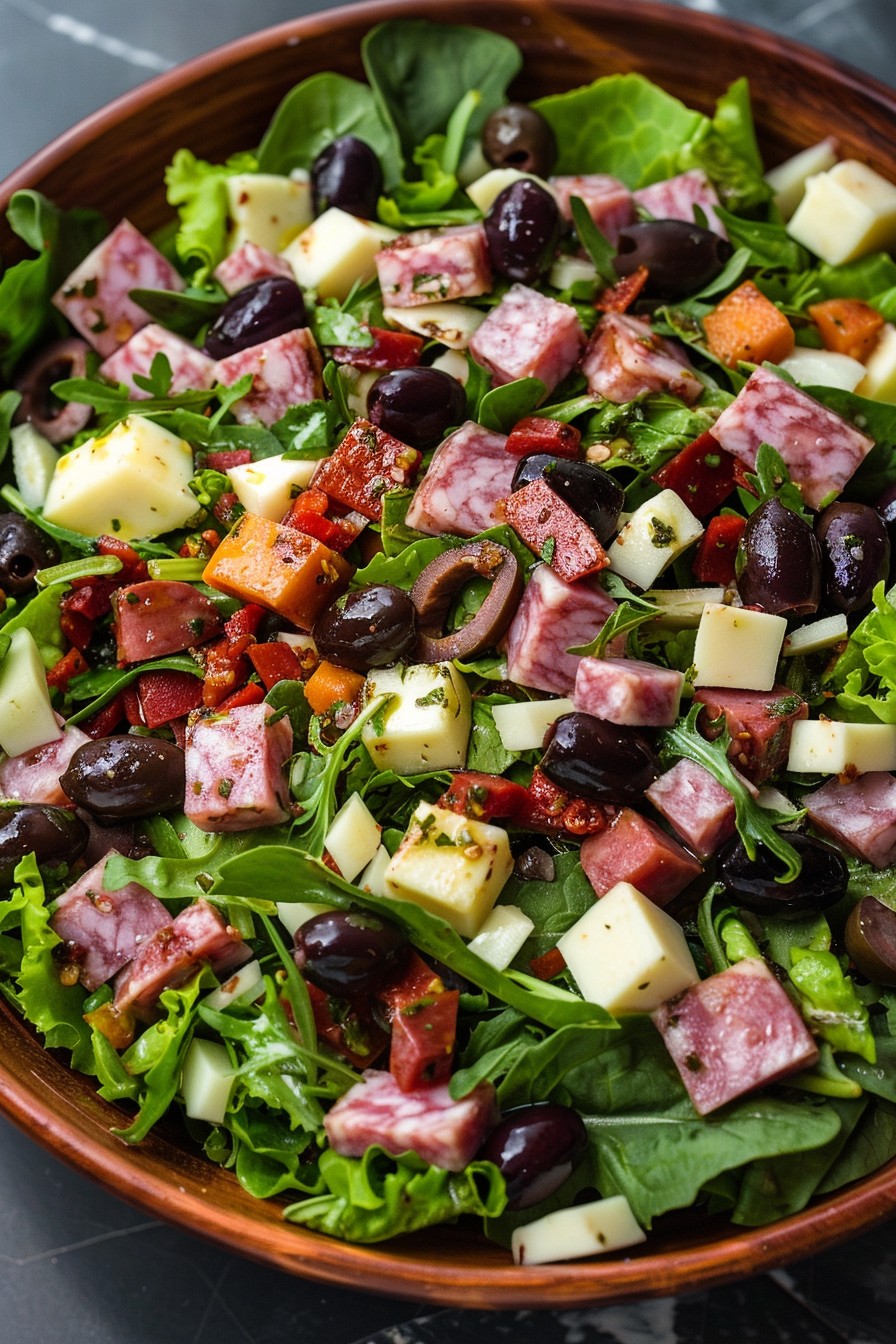
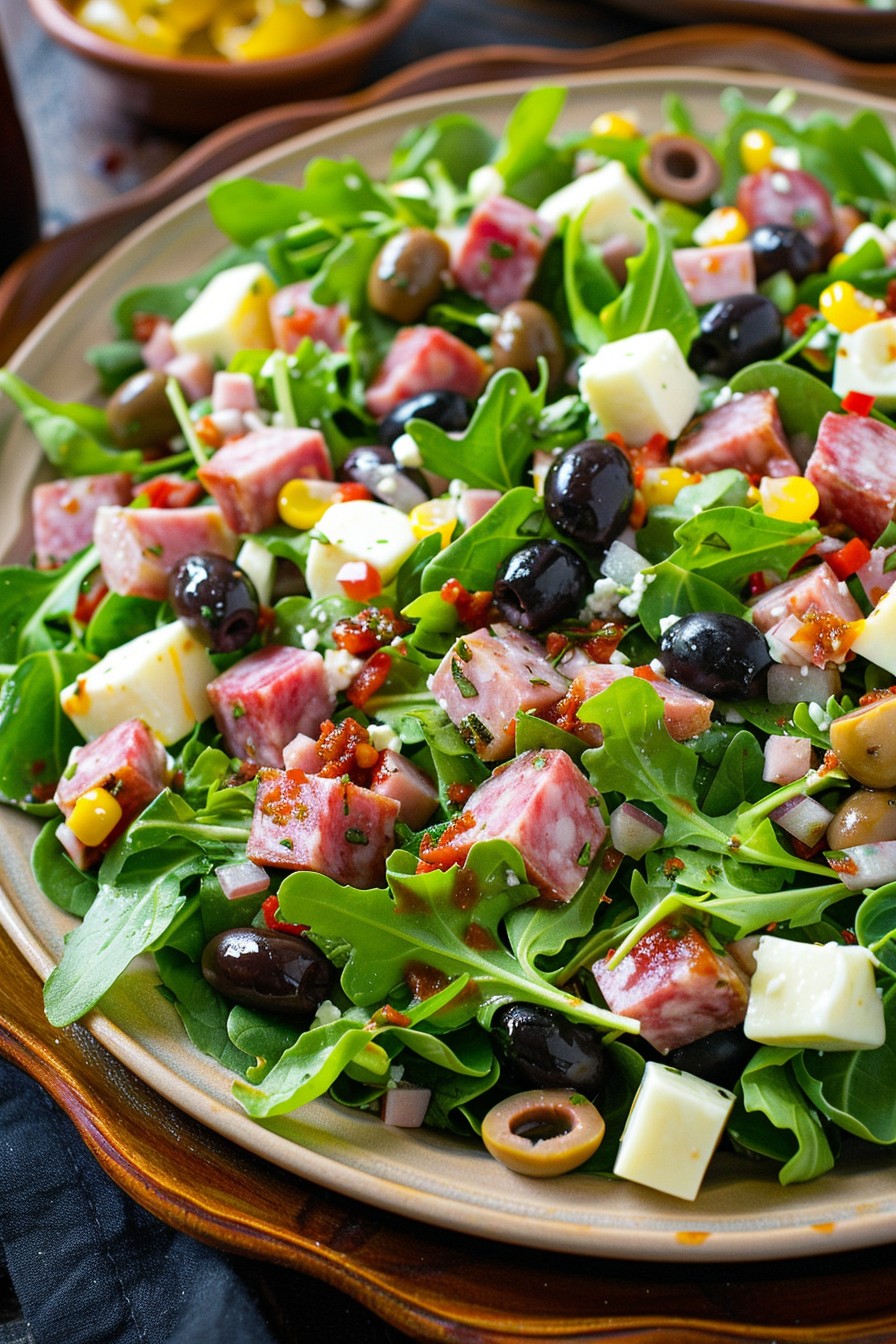
    • 4 cups mixed greens
    • 1/2 lb deli-sliced salami, chopped
    • 1/2 lb deli-sliced ham, chopped
    • 1/2 lb provolone cheese, cubed
    • 1/2 lb mozzarella cheese, cubed

    Equipment Needed

    • Large mixing bowl
    • Small bowl for dressing
    • Whisk
    • Cutting board
    • Chef’s knife

    Instructions

    Muffaletta Salad Recipe

    Step 1: Make the Olive Salad Dressing

    In a small bowl, whisk together the chopped olives, giardiniera, olive oil, red wine vinegar, dried oregano, and garlic powder until well combined. Let it sit for at least 10 minutes to allow the flavors to meld. Tip: For an extra flavor boost, make this dressing a day ahead and store it in the refrigerator.

    Step 2: Prepare the Greens

    Wash and dry the mixed greens thoroughly to ensure your salad isn’t watery. Tear any large leaves into bite-sized pieces for easier eating. Place the greens in a large mixing bowl, ready to be dressed.

    Step 3: Add the Meats and Cheeses

    Chop the salami and ham into bite-sized pieces and cube the provolone and mozzarella cheeses. Add these to the bowl with the greens. The variety of textures and flavors here is what makes the salad so satisfying.

    Step 4: Dress the Salad

    Pour the olive salad dressing over the greens, meats, and cheeses. Using salad tongs or two large spoons, gently toss everything together until evenly coated. Be careful not to overmix, as you don’t want to bruise the greens or break up the cheeses too much.

    Step 5: Serve and Enjoy

    Transfer the salad to a serving dish or individual plates. For the best experience, serve immediately after dressing to maintain the crispness of the greens. Tip: If you’re preparing this salad ahead, keep the dressing separate and toss just before serving.

    Tips and Tricks

    For those looking to elevate their Muffaletta Salad, consider toasting some crusty bread cubes and adding them for a crouton-like crunch. Another tip is to incorporate a variety of olives for a more complex flavor profile in the dressing. If you’re short on time, pre-chopped giardiniera from the store can be a real time-saver. Lastly, for a spicier kick, add a pinch of red pepper flakes to the dressing.

    Recipe Variations

    • Vegetarian Version: Skip the meats and add roasted vegetables like bell peppers and zucchini for a hearty vegetarian option.
    • Seafood Twist: Replace the deli meats with cooked shrimp or lump crab meat for a coastal variation.
    • Low-Carb Option: Serve the salad over a bed of cauliflower rice instead of mixed greens for a lower-carb alternative.
    • Extra Cheesy: Add chunks of your favorite cheeses beyond provolone and mozzarella, such as sharp cheddar or gouda, for cheese lovers.

    Frequently Asked Questions

    Can I make this salad ahead of time?

    Absolutely! You can prepare all the components ahead of time and store them separately in the refrigerator. Combine them just before serving to keep everything fresh and crisp.

    What can I use instead of giardiniera?

    If you can’t find giardiniera, a mix of pickled vegetables like carrots, cauliflower, and bell peppers can be a great substitute. Just chop them up to mimic the texture and tanginess of giardiniera.

    How long does the dressed salad last?

    Once dressed, the salad is best eaten within a few hours as the greens can start to wilt. However, undressed, the components can last in the fridge for up to 3 days.

    Summary

    This Muffaletta Salad is a delightful twist on the classic sandwich, packed with bold flavors and easy to customize. Perfect for any occasion, it’s sure to be a hit with everyone who tries it.

  • Sub Salad Recipe: A Crunchy, Flavorful Twist on the Classic Sub

    Sub Salad Recipe: A Crunchy, Flavorful Twist on the Classic Sub

    Oh, the joys of a sub sandwich—packed with meats, cheeses, and all the fixings. But who says you need bread to enjoy those flavors? Our Sub Salad brings all the beloved elements of a sub into a fresh, fork-friendly dish that’s perfect for any occasion.

    Why This Recipe Works

    • It’s a bread-free way to enjoy all your favorite sub flavors, making it a great option for those watching their carb intake.
    • The combination of crisp vegetables, savory meats, and creamy dressings offers a satisfying texture and taste experience.
    • Customizable to fit any dietary preference or taste, from vegetarian to meat-lovers.
    • Perfect for meal prep, as the flavors meld beautifully when stored in the fridge.
    • A crowd-pleaser that’s as suitable for a quick lunch as it is for a potluck.

    Ingredients

    • 2 cups chopped romaine lettuce
    • 1 cup diced turkey breast
    • 1 cup diced ham
    • 1/2 cup sliced black olives
    • 1/2 cup diced tomatoes
    • 1/2 cup sliced cucumbers
    • 1/4 cup sliced red onions
    • 1/2 cup shredded cheddar cheese
    • 1/4 cup mayonnaise
    • 1/4 cup Italian dressing
    • Salt and pepper to taste

    Equipment Needed

    • Large mixing bowl
    • Cutting board
    • Chef’s knife
    • Measuring cups and spoons
    • Salad tongs or large spoon

    Instructions

    Sub Salad Recipe

    Step 1: Prep Your Vegetables

    Start by washing all your vegetables thoroughly under cold water. Chop the romaine lettuce into bite-sized pieces and dice the tomatoes and cucumbers. Slice the red onions thinly to ensure they distribute evenly throughout the salad. Tip: For a milder onion flavor, soak the sliced onions in cold water for 10 minutes before adding them to the salad.

    Step 2: Dice the Meats

    Using a sharp chef’s knife, dice the turkey breast and ham into small, bite-sized pieces. This ensures every forkful has a bit of meaty goodness. Tip: For an extra flavor boost, consider using smoked turkey or honey ham.

    Step 3: Combine Ingredients

    In a large mixing bowl, combine the chopped romaine, diced meats, black olives, tomatoes, cucumbers, and red onions. Toss gently to mix the ingredients without bruising the lettuce.

    Step 4: Add Cheese and Dressings

    Sprinkle the shredded cheddar cheese over the salad. In a small bowl, whisk together the mayonnaise and Italian dressing until smooth. Drizzle the dressing over the salad and toss to coat evenly. Tip: Add the dressing just before serving to keep the salad crisp.

    Step 5: Season and Serve

    Season the salad with salt and pepper to taste. Give it one final toss and serve immediately for the best texture and flavor.

    Tips and Tricks

    For those looking to elevate their Sub Salad, consider these advanced tips. First, toasting the cheese before adding it to the salad can add a delightful crunch and depth of flavor. Second, incorporating a variety of dressings, such as ranch or balsamic vinaigrette, can cater to different taste preferences. Lastly, adding croutons made from sub bread can bring back that classic sub texture without overwhelming the dish with bread.

    Recipe Variations

    • Vegetarian Sub Salad: Omit the meats and add chickpeas or tofu for protein.
    • Italian Sub Salad: Use salami, pepperoni, and provolone cheese for an Italian twist.
    • Spicy Sub Salad: Add jalapeños or a spicy dressing to kick up the heat.
    • Seafood Sub Salad: Replace the meats with shrimp or crab meat for a seafood version.
    • Low-Fat Sub Salad: Use low-fat cheeses and dressings to lighten up the dish.

    Frequently Asked Questions

    Can I make this salad ahead of time?

    Absolutely! You can prep all the ingredients ahead of time and store them separately in the fridge. Combine them and add the dressing just before serving to keep everything fresh and crisp.

    What other dressings work well with this salad?

    Besides Italian dressing, ranch, Caesar, or even a simple olive oil and vinegar combination work beautifully. The key is to choose a dressing that complements the flavors of the meats and cheeses you’ve selected.

    How long will leftovers last in the fridge?

    Leftovers can be stored in an airtight container in the fridge for up to 2 days. However, the salad is best enjoyed fresh, as the vegetables may wilt over time.

    Summary

    This Sub Salad is a versatile, flavorful dish that brings all the joys of a sub sandwich into a healthy, bread-free format. Perfect for any meal, it’s customizable to suit any taste and is sure to be a hit with everyone.

  • Cowboy Salad Recipe: A Hearty, Flavor-Packed Dish for Any Occasion

    Cowboy Salad Recipe: A Hearty, Flavor-Packed Dish for Any Occasion

    Ready to rustle up something delicious? This Cowboy Salad is a riot of flavors and textures that’ll make your taste buds dance. Perfect for picnics, potlucks, or just a hearty meal at home, it’s as fun to make as it is to eat.

    Why This Recipe Works

    • It’s a perfect balance of protein, veggies, and grains, making it a nutritious one-bowl meal.
    • The dressing is a tangy, sweet, and spicy concoction that brings all the ingredients together beautifully.
    • It’s incredibly versatile; you can easily swap out ingredients based on what you have on hand.
    • Prep is a breeze, and it gets better as it sits, making it ideal for meal prep.
    • It’s a crowd-pleaser that appeals to both kids and adults alike.

    Ingredients

    • 2 cups cooked quinoa, cooled
    • 1 can (15 oz) black beans, rinsed and drained
    • 1 cup corn kernels (fresh, frozen, or canned)
    • 1 red bell pepper, diced
    • 1 avocado, diced
    • 1/4 cup cilantro, chopped
    • 1/4 cup lime juice
    • 2 tbsp olive oil
    • 1 tsp cumin
    • Salt and pepper to taste

    Equipment Needed

    • Large mixing bowl
    • Measuring cups and spoons
    • Knife and cutting board
    • Whisk

    Instructions

    Cowboy Salad Recipe

    Step 1: Prepare the Base

    In a large mixing bowl, combine the cooled quinoa, black beans, corn, and diced red bell pepper. Toss gently to mix. Tip: For extra flavor, you can toast the quinoa before cooking it.

    Step 2: Make the Dressing

    In a small bowl, whisk together lime juice, olive oil, cumin, salt, and pepper until well combined. Tip: Adjust the lime juice and salt to taste; the dressing should be bright and flavorful.

    Step 3: Combine and Toss

    Pour the dressing over the quinoa mixture and toss until everything is evenly coated. Tip: Let the salad sit for 10 minutes before serving to allow the flavors to meld.

    Step 4: Add the Avocado and Cilantro

    Gently fold in the diced avocado and chopped cilantro. Be careful not to mash the avocado.

    Step 5: Serve and Enjoy

    Serve the salad immediately, or refrigerate for up to 2 days. The flavors will continue to develop over time.

    Tips and Tricks

    For the best texture, make sure the quinoa is completely cooled before adding the other ingredients. If you’re in a hurry, spread it on a baking sheet to cool faster. You can also add a pinch of sugar to the dressing to balance the acidity. For a creamier texture, mash half of the avocado before adding it to the salad. If you’re not a fan of cilantro, parsley makes a great substitute.

    Recipe Variations

    • Swap quinoa for brown rice or farro for a different grain base.
    • Add diced chicken or shrimp for extra protein.
    • Include diced mango or pineapple for a sweet twist.
    • Use black-eyed peas instead of black beans for a Southern flair.
    • Add a diced jalapeño for an extra kick.

    Frequently Asked Questions

    Can I make this salad ahead of time?

    Absolutely! This salad actually tastes better after it’s had time to sit. Just hold off on adding the avocado until you’re ready to serve to prevent it from browning.

    Is this salad gluten-free?

    Yes, as long as you ensure that all your ingredients, especially the quinoa and any added sauces, are certified gluten-free.

    How long does this salad keep?

    Stored in an airtight container in the refrigerator, it’ll last for up to 3 days. The avocado may brown slightly, but it’ll still taste great.

    Summary

    This Cowboy Salad is a vibrant, nutritious dish that’s as versatile as it is delicious. Perfect for any occasion, it’s sure to become a staple in your recipe repertoire.

  • Crunchy & Satisfying Roasted Chickpea Salad Recipe

    Crunchy & Satisfying Roasted Chickpea Salad Recipe

    A delightful twist on your everyday salad, this roasted chickpea salad is not only packed with flavors but also offers a satisfying crunch that will make you forget you’re eating healthy. Perfect for lunch, dinner, or even as a hearty side, this recipe is a game-changer for salad lovers.

    Why This Recipe Works

    • The roasted chickpeas add a crunchy texture and protein boost, making the salad more filling.
    • A mix of fresh vegetables ensures a colorful, nutrient-rich meal that’s as good for your body as it is for your taste buds.
    • The homemade dressing ties all the flavors together with a perfect balance of tanginess and sweetness.
    • It’s versatile; easily customizable based on what you have in your fridge or pantry.
    • Quick and easy to prepare, this salad is perfect for busy weeknights or meal prep.

    Ingredients

    • 2 cups chickpeas, drained and rinsed
    • 1 tbsp olive oil
    • 1/2 tsp salt
    • 1/2 tsp paprika
    • 4 cups mixed greens (spinach, arugula, or your choice)
    • 1 cup cherry tomatoes, halved
    • 1/2 cucumber, diced
    • 1/4 red onion, thinly sliced
    • 1 avocado, diced
    • For the dressing: 3 tbsp olive oil, 1 tbsp lemon juice, 1 tsp honey, 1/2 tsp Dijon mustard, salt and pepper to taste

    Equipment Needed

    • Baking sheet
    • Mixing bowls
    • Whisk
    • Measuring cups and spoons

    Instructions

    Roasted Chickpea Salad Recipe

    Preheat and Prep Your Chickpeas

    Preheat your oven to 400°F. While the oven is heating, pat the chickpeas dry with a paper towel to remove any excess moisture. This step is crucial for achieving that perfect crunch. Toss the chickpeas with olive oil, salt, and paprika until evenly coated. Spread them out on a baking sheet in a single layer to ensure even roasting.

    Roast to Perfection

    Place the baking sheet in the preheated oven and roast the chickpeas for 20-25 minutes, shaking the pan halfway through. You’ll know they’re done when they’re golden brown and crispy. Let them cool slightly before adding to the salad to maintain their crunch.

    Assemble Your Salad Base

    In a large bowl, combine the mixed greens, cherry tomatoes, cucumber, red onion, and avocado. The variety of colors not only makes the salad visually appealing but also ensures a range of nutrients and flavors.

    Whisk Up the Dressing

    In a small bowl, whisk together the olive oil, lemon juice, honey, Dijon mustard, salt, and pepper until well combined. The honey adds a touch of sweetness that balances the tanginess of the lemon juice perfectly.

    Bring It All Together

    Add the roasted chickpeas to the salad bowl, drizzle with the dressing, and toss gently to combine. Serve immediately to enjoy the contrast of the warm chickpeas with the cool, crisp vegetables.

    Tips and Tricks

    For an extra flavor boost, try adding different spices to your chickpeas before roasting, such as cumin or garlic powder. If you’re meal prepping, keep the dressing separate until you’re ready to eat to prevent the greens from getting soggy. For a nuttier flavor, toast the chickpeas a few minutes longer, but keep an eye on them to avoid burning. Adding a handful of nuts or seeds can introduce another layer of texture and nutrition. Lastly, if you’re not a fan of honey, maple syrup makes a great substitute in the dressing.

    Recipe Variations

    • Mediterranean Twist: Add feta cheese, olives, and a sprinkle of oregano to the salad for a Mediterranean flair.
    • Spicy Kick: Toss the chickpeas with chili powder or cayenne pepper before roasting for those who like it hot.
    • Asian Inspired: Substitute the dressing with a mix of sesame oil, soy sauce, and a dash of rice vinegar for an Asian twist.
    • Summer Fresh: Add fresh corn, peaches, and a basil vinaigrette for a summery version.
    • Protein Packed: Top with grilled chicken or shrimp for an extra protein boost.

    Frequently Asked Questions

    Can I use canned chickpeas?

    Absolutely! Canned chickpeas are a convenient option. Just make sure to drain and rinse them well before roasting to remove any excess sodium and to help them crisp up better in the oven.

    How do I store leftovers?

    Store the salad and dressing separately in airtight containers in the fridge. The salad will keep for up to 2 days, but it’s best enjoyed fresh. The chickpeas may lose some of their crunch over time.

    Can I make this recipe vegan?

    Yes, this recipe is naturally vegan as long as you ensure your dressing ingredients are vegan-friendly. Substitute honey with maple syrup or agave nectar if needed.

    Summary

    This roasted chickpea salad is a crunchy, flavorful, and nutritious meal that’s easy to make and customizable to your taste. Perfect for any occasion, it’s a healthy option that doesn’t skimp on satisfaction.

  • Steak Taco Salad Recipe: A Fiesta in a Bowl

    Steak Taco Salad Recipe: A Fiesta in a Bowl

    Welcome to a dish that combines the heartiness of steak tacos with the freshness of a salad, creating a meal that’s both satisfying and vibrant. Whether it’s Taco Tuesday or you’re just craving something deliciously different, this recipe is your ticket to flavor town.

    Why This Recipe Works

    • The marinade infuses the steak with bold flavors, ensuring every bite is packed with taste.
    • Combining warm steak with cool salad ingredients creates a delightful contrast in temperatures and textures.
    • It’s customizable, allowing everyone to tweak the toppings to their liking.
    • Perfect for meal prep, as components can be prepared ahead and assembled when ready to eat.
    • It’s a balanced meal with protein, veggies, and carbs, making it a wholesome choice.

    Ingredients

    • 1 lb flank steak, thinly sliced
    • 2 tbsp olive oil
    • 1 tbsp lime juice
    • 2 cloves garlic, minced
    • 1 tsp cumin
    • 1 tsp chili powder
    • Salt and pepper to taste
    • 4 cups mixed greens
    • 1 cup cherry tomatoes, halved
    • 1 avocado, diced
    • 1/2 cup corn kernels
    • 1/4 cup red onion, thinly sliced
    • 1/2 cup shredded cheese
    • 1/4 cup cilantro, chopped
    • 1 cup tortilla chips, crushed
    • 1/2 cup ranch dressing

    Equipment Needed

    • Grill or large skillet
    • Mixing bowls
    • Knife and cutting board
    • Measuring cups and spoons

    Instructions

    Steak Taco Salad Recipe

    Marinate the Steak

    In a mixing bowl, combine olive oil, lime juice, minced garlic, cumin, chili powder, salt, and pepper. Add the sliced flank steak, ensuring each piece is well coated. Let it marinate for at least 30 minutes, or overnight for deeper flavor.

    Cook the Steak

    Heat your grill or skillet over medium-high heat. Cook the steak for about 3-4 minutes per side, or until it reaches your desired level of doneness. Let it rest for 5 minutes before slicing into strips.

    Prepare the Salad Base

    In a large bowl, toss together the mixed greens, cherry tomatoes, avocado, corn, red onion, and cilantro. Add the crushed tortilla chips for crunch.

    Assemble the Salad

    Top the salad with the warm steak strips and shredded cheese. Drizzle with ranch dressing or your favorite dressing.

    Serve Immediately

    Enjoy your steak taco salad fresh, ensuring the warmth of the steak slightly wilts the greens for the perfect texture contrast.

    Tips and Tricks

    For an even more flavorful steak, consider marinating it overnight. The acids in the lime juice will tenderize the meat, while the spices permeate deeply. If you’re short on time, a 30-minute marinade will still yield tasty results. When cooking the steak, avoid moving it around too much to get a nice sear. Letting the steak rest after cooking ensures the juices redistribute, making it more succulent. For the salad, adding the tortilla chips last keeps them crunchy. If you’re meal prepping, keep the dressing separate until you’re ready to eat to prevent sogginess.

    Recipe Variations

    • Swap the steak for chicken or shrimp for a different protein option.
    • Use a different dressing, like cilantro lime or chipotle ranch, to change the flavor profile.
    • Add black beans or pinto beans for extra fiber and protein.
    • Include different veggies like bell peppers or cucumbers for added crunch and nutrition.
    • For a low-carb version, skip the tortilla chips or use a lettuce wrap instead of a salad base.

    Frequently Asked Questions

    Can I use a different cut of steak?

    Absolutely! While flank steak is great for its flavor and tenderness when sliced thinly, you can also use skirt steak or sirloin. Just adjust cooking times based on thickness and desired doneness.

    How can I make this recipe vegetarian?

    For a vegetarian twist, substitute the steak with grilled portobello mushrooms or tofu. Marinate them similarly for a flavorful punch, and follow the same preparation steps.

    What’s the best way to store leftovers?

    Store the components separately to maintain freshness. Keep the steak, salad greens, and dressing in individual containers in the fridge. Assemble when ready to eat to prevent sogginess.

    Summary

    This steak taco salad is a perfect blend of flavors and textures, offering a hearty yet fresh meal option. It’s versatile, easy to customize, and great for any occasion, from weeknight dinners to entertaining guests.

  • Green Lentil Salad Recipe: A Fresh Twist on a Classic

    Green Lentil Salad Recipe: A Fresh Twist on a Classic

    How about we shake up your salad game with this vibrant green lentil salad? Packed with nutrients and bursting with flavors, it’s the perfect dish to brighten up your meal prep. Let’s dive into making this easy, wholesome, and downright delicious salad.

    Why This Recipe Works

    • Green lentils are a fantastic source of protein and fiber, making this salad both filling and nutritious.
    • The combination of fresh herbs and a zesty lemon dressing brings a refreshing taste that’s hard to resist.
    • It’s incredibly versatile; serve it as a main, a side, or even as a topping for toast.
    • Prep is a breeze, and the salad keeps well, making it perfect for meal prep.
    • Every bite offers a delightful mix of textures, from the tender lentils to the crisp vegetables.

    Ingredients

    • 1 cup green lentils, rinsed and drained
    • 2 cups water
    • 1/2 cup diced cucumber
    • 1/2 cup cherry tomatoes, halved
    • 1/4 cup red onion, finely diced
    • 1/4 cup fresh parsley, chopped
    • 2 tbsp olive oil
    • 1 tbsp lemon juice
    • 1 tsp salt
    • 1/2 tsp black pepper

    Equipment Needed

    • Medium saucepan
    • Mixing bowl
    • Knife and cutting board
    • Measuring cups and spoons

    Instructions

    Green Lentil Salad Recipe

    Step 1: Cook the Lentils

    In a medium saucepan, combine the green lentils and water. Bring to a boil over high heat, then reduce the heat to low and simmer for about 20 minutes, or until the lentils are tender but still hold their shape. Drain any excess water and let them cool slightly.

    Step 2: Prepare the Vegetables

    While the lentils are cooking, dice the cucumber, halve the cherry tomatoes, finely dice the red onion, and chop the fresh parsley. This is your chance to get all your veggies ready for the big mix.

    Step 3: Make the Dressing

    In a small bowl, whisk together the olive oil, lemon juice, salt, and black pepper. This simple dressing will bring all the flavors of your salad together beautifully.

    Step 4: Combine Everything

    In a large mixing bowl, combine the cooked lentils, prepared vegetables, and dressing. Gently toss everything together until well mixed. Taste and adjust the seasoning if necessary.

    Step 5: Serve or Store

    You can serve the salad immediately for a warm dish, or refrigerate it for an hour to let the flavors meld together for a cooler option. Either way, it’s delicious.

    Tips and Tricks

    For an extra flavor boost, consider adding a pinch of cumin or smoked paprika to the dressing. If you’re not a fan of raw onion, you can soak the diced onion in cold water for 10 minutes to mellow its bite. Lastly, for added texture, sprinkle some toasted nuts or seeds on top before serving.

    Recipe Variations

    • Add feta cheese or goat cheese for a creamy twist.
    • Include avocado slices for extra richness and healthy fats.
    • Swap the lemon juice for balsamic vinegar for a different flavor profile.
    • Mix in some quinoa or bulgur for an even heartier salad.
    • For a spicy kick, add diced jalapeños or a dash of chili flakes.

    Frequently Asked Questions

    Can I use canned lentils instead of dried?

    Absolutely! If you’re short on time, canned lentils are a great shortcut. Just be sure to rinse them well under cold water to remove any excess sodium or canning liquid before using them in the salad.

    How long does this salad keep in the fridge?

    This green lentil salad will stay fresh in the refrigerator for up to 3 days when stored in an airtight container. The flavors actually improve over time, making it a great make-ahead option.

    Can I make this salad vegan?

    This recipe is naturally vegan as written, making it a great option for those following a plant-based diet. Just be sure to check all your ingredients to ensure they meet your dietary needs.

    Summary

    This green lentil salad is a nutritious, flavorful, and versatile dish that’s perfect for any occasion. Easy to make and packed with wholesome ingredients, it’s sure to become a staple in your recipe collection.

  • Spinach Salad with Hot Bacon Dressing Recipe: A Sizzling Twist on a Classic

    Spinach Salad with Hot Bacon Dressing Recipe: A Sizzling Twist on a Classic

    Now, let’s dive into a dish that combines the freshness of spinach with the rich, smoky flavors of hot bacon dressing. This recipe is a game-changer for salad lovers looking for something with a bit more oomph.

    Why This Recipe Works

    • The contrast between the crisp, fresh spinach and the warm, savory bacon dressing creates a delightful sensory experience.
    • Using the bacon fat to make the dressing infuses it with deep, smoky flavors that store-bought dressings can’t match.
    • It’s incredibly versatile, serving as a perfect side dish or a hearty main with the right additions.

    Ingredients

    • 6 cups fresh spinach leaves, washed and dried
    • 6 slices bacon, chopped
    • 1 small red onion, thinly sliced
    • 2 hard-boiled eggs, sliced
    • 1/4 cup apple cider vinegar
    • 1 tablespoon sugar
    • 1 teaspoon Dijon mustard
    • Salt and pepper to taste

    Equipment Needed

    • Large skillet
    • Mixing bowl
    • Whisk
    • Salad spinner (optional)

    Instructions

    Spinach Salad With Hot Bacon Dressing Recipe

    Step 1: Cook the Bacon

    In a large skillet over medium heat, cook the chopped bacon until it’s crispy and the fat has rendered, about 8-10 minutes. Remove the bacon with a slotted spoon and set aside on paper towels to drain. Keep the bacon fat in the skillet.

    Step 2: Prepare the Dressing

    To the bacon fat in the skillet, add the apple cider vinegar, sugar, and Dijon mustard. Whisk together over medium heat until the sugar is dissolved and the dressing is slightly thickened, about 2-3 minutes. Season with salt and pepper to taste.

    Step 3: Assemble the Salad

    In a large mixing bowl, combine the fresh spinach leaves, sliced red onion, and hard-boiled eggs. Pour the hot bacon dressing over the salad and toss gently to coat all the ingredients evenly.

    Step 4: Add the Bacon

    Sprinkle the crispy bacon pieces over the top of the salad. The heat from the dressing will slightly wilt the spinach, which is exactly what you want for that perfect texture.

    Step 5: Serve Immediately

    This salad is best enjoyed right away while the dressing is still warm. Serve it as a side dish or add some grilled chicken to make it a main course.

    Tips and Tricks

    For an extra layer of flavor, consider adding a pinch of smoked paprika to the dressing. If you’re not a fan of red onion, thinly sliced shallots make a great substitute. To save time, you can cook the bacon and prepare the dressing ahead of time, then reheat the dressing just before serving. Always taste your dressing before adding it to the salad to adjust the seasoning as needed.

    Recipe Variations

    • Add some crumbled blue cheese or goat cheese for a creamy contrast.
    • Throw in some toasted pecans or walnuts for added crunch.
    • Substitute the spinach with kale or arugula for a different flavor profile.
    • For a sweeter twist, add some sliced strawberries or apples.
    • Make it a meal by topping with grilled chicken or shrimp.

    Frequently Asked Questions

    Can I make this salad ahead of time?

    While you can prepare the components ahead, it’s best to assemble the salad just before serving to prevent the spinach from getting too wilted. The dressing can be reheated gently before tossing with the salad.

    Is there a vegetarian version of this recipe?

    Absolutely! Skip the bacon and use a tablespoon of olive oil to make the dressing. Add some smoked paprika to mimic the smoky flavor of bacon.

    How can I store leftovers?

    Leftovers can be stored in an airtight container in the refrigerator for up to a day. Note that the spinach will wilt further, so it’s best enjoyed fresh.

    Summary

    This spinach salad with hot bacon dressing is a perfect blend of flavors and textures, making it a standout dish for any occasion. Easy to prepare and endlessly customizable, it’s sure to become a favorite.

  • Quinoa Chickpea Salad Recipe: A Flavor Fiesta in a Bowl

    Quinoa Chickpea Salad Recipe: A Flavor Fiesta in a Bowl

    Oh, the joys of a salad that’s both nutritious and bursting with flavors! This quinoa chickpea salad is your ticket to a hearty, healthy meal that’s as easy to make as it is delicious. Perfect for meal prep, picnics, or a quick lunch, this recipe is a game-changer.

    Why This Recipe Works

    • Packed with protein from quinoa and chickpeas, keeping you full and energized.
    • Loaded with fresh veggies for a crunch in every bite.
    • The lemon-tahini dressing adds a creamy, tangy twist that ties everything together beautifully.
    • It’s versatile – swap ingredients based on what’s in your fridge.
    • Meal-prep friendly, tastes even better the next day.

    Ingredients

    • 1 cup quinoa, rinsed
    • 2 cups water
    • 1 can (15 oz) chickpeas, drained and rinsed
    • 1 cucumber, diced
    • 1 red bell pepper, diced
    • 1/4 red onion, finely chopped
    • 1/2 cup parsley, chopped
    • 1/4 cup tahini
    • 2 tbsp lemon juice
    • 1 tbsp olive oil
    • 1 tsp garlic powder
    • Salt and pepper to taste

    Equipment Needed

    • Medium saucepan
    • Mixing bowls
    • Whisk
    • Knife and cutting board
    • Measuring cups and spoons

    Instructions

    Quinoa Chickpea Salad Recipe

    Step 1: Cook the Quinoa

    Bring 2 cups of water to a boil in a medium saucepan. Add the rinsed quinoa, reduce heat to low, cover, and simmer for 15 minutes. Remove from heat and let it sit, covered, for 5 minutes. Fluff with a fork and let it cool. Tip: For extra flavor, cook quinoa in vegetable broth instead of water.

    Step 2: Prepare the Vegetables

    While the quinoa cooks, dice the cucumber and red bell pepper, finely chop the red onion, and chop the parsley. Combine these in a large mixing bowl. Add the drained and rinsed chickpeas to the bowl. Tip: For a less pungent onion flavor, soak the chopped onion in cold water for 10 minutes, then drain.

    Step 3: Make the Dressing

    In a small bowl, whisk together tahini, lemon juice, olive oil, garlic powder, salt, and pepper until smooth. If the dressing is too thick, add a tablespoon of water at a time until desired consistency is reached. Tip: For a sweeter dressing, add a teaspoon of honey or maple syrup.

    Step 4: Combine Everything

    Add the cooled quinoa to the bowl with the vegetables and chickpeas. Pour the dressing over the salad and toss until everything is evenly coated. Taste and adjust seasoning if necessary.

    Step 5: Serve or Store

    Serve immediately, or cover and refrigerate for up to 3 days. The flavors will meld together over time, making the salad even more delicious.

    Tips and Tricks

    For an extra crunch, add some toasted nuts or seeds like almonds or sunflower seeds. If you’re not a fan of tahini, you can substitute it with Greek yogurt for a different creamy texture. To make this salad more filling, add some avocado or feta cheese. For a spicy kick, add a pinch of cayenne pepper or some diced jalapeños to the dressing. Always taste and adjust the seasoning before serving, as flavors can vary based on the ingredients used.

    Recipe Variations

    • Mediterranean Twist: Add kalamata olives, feta cheese, and swap the tahini dressing for a lemon-olive oil vinaigrette.
    • Asian Inspired: Use a sesame-ginger dressing and add some edamame and shredded carrots.
    • Southwest Style: Add black beans, corn, and a lime-cilantro dressing. Top with some crushed tortilla chips for crunch.
    • Berry Delight: For a sweet and savory version, add some strawberries or blueberries and use a balsamic vinaigrette.
    • Green Goddess: Load up on greens like spinach or kale, and add some avocado for extra creaminess.

    Frequently Asked Questions

    Can I use another grain instead of quinoa? Absolutely! This salad is versatile, so feel free to use brown rice, farro, or even couscous as a base. Just adjust the cooking time according to the grain you choose.

    How long does this salad last in the fridge? Stored in an airtight container, it should last for up to 3 days. The vegetables might soften a bit over time, but the flavors will only get better.

    Is this salad gluten-free? Yes, as long as you ensure that all your ingredients, especially the tahini, are certified gluten-free, this salad is safe for those avoiding gluten.

    Summary

    This quinoa chickpea salad is a nutritious, flavorful, and versatile dish that’s perfect for any occasion. Easy to make and packed with protein and fresh veggies, it’s a meal that satisfies on all levels.

  • Taco Salad in Shell Recipe: A Crunchy Fiesta in Every Bite!

    Taco Salad in Shell Recipe: A Crunchy Fiesta in Every Bite!

    Kickstart your meal prep with this taco salad in shell recipe that promises a delightful crunch and a burst of flavors. Perfect for those who love their salads with a side of fun and a whole lot of texture.

    Why This Recipe Works

    • The edible shell adds a crunchy contrast to the fresh and zesty salad filling.
    • Customizable toppings allow everyone to tailor their salad to their taste preferences.
    • It’s a one-dish meal that combines protein, veggies, and carbs for a balanced diet.
    • Perfect for meal prep, as the components can be prepared ahead and assembled when ready to eat.
    • The recipe is versatile, allowing for various dietary substitutions without compromising on taste.

    Ingredients

    • 1 lb ground beef (or turkey for a lighter option)
    • 1 packet taco seasoning
    • 4 large flour tortillas
    • 1 cup shredded lettuce
    • 1 cup diced tomatoes
    • 1/2 cup shredded cheddar cheese
    • 1/4 cup sour cream
    • 1/4 cup salsa
    • 1 avocado, diced
    • 1/2 cup black olives, sliced

    Equipment Needed

    • Oven
    • Muffin tin
    • Skillet
    • Mixing bowls
    • Knife and cutting board

    Instructions

    Taco Salad In Shell Recipe

    Preheat and Prepare the Shells

    Preheat your oven to 375°F. Gently press each flour tortilla into a muffin tin to form a bowl shape. Bake for 10-12 minutes until golden and crisp. Tip: For extra crispiness, brush the tortillas with a little oil before baking.

    Cook the Meat

    In a skillet over medium heat, cook the ground beef until no longer pink, about 5-7 minutes. Drain excess fat, then stir in the taco seasoning and 1/4 cup water. Simmer for 5 minutes until the mixture thickens. Tip: For a vegetarian version, substitute the beef with cooked lentils or black beans.

    Assemble the Salad

    Fill each tortilla shell with a layer of shredded lettuce, followed by the cooked meat, diced tomatoes, cheese, avocado, and black olives. Tip: Layer the ingredients in the order listed to ensure each bite has a bit of everything.

    Add the Toppings

    Drizzle sour cream and salsa over the top of each salad. For an extra kick, add a sprinkle of chili flakes or a dash of hot sauce.

    Serve Immediately

    Enjoy your taco salad in shell right away to maintain the crunch of the tortilla bowl. Serve with extra salsa and sour cream on the side for those who like it saucy.

    Tips and Tricks

    For those looking to elevate their taco salad game, consider these advanced tips. First, toasting the tortillas before shaping them into bowls can add an extra layer of flavor. Second, marinating the meat in the taco seasoning overnight will deepen the flavors. Third, using a mix of cheeses, like Monterey Jack and cheddar, can add complexity to the dish. Lastly, for a healthier version, opt for Greek yogurt instead of sour cream and load up on more veggies like bell peppers and corn.

    Recipe Variations

    • Seafood Twist: Replace the ground beef with grilled shrimp or fish for a pescatarian option.
    • Vegan Delight: Use plant-based meat substitutes and vegan cheese to cater to vegan diets.
    • Breakfast Version: Swap the meat for scrambled eggs and add breakfast potatoes for a morning twist.
    • Low-Carb Option: Skip the tortilla shell and serve the salad in a bowl lined with lettuce leaves.
    • Global Flavors: Experiment with different seasonings, like curry powder or Italian herbs, for a unique take.

    Frequently Asked Questions

    Can I make the shells ahead of time?

    Absolutely! The tortilla shells can be baked up to two days in advance. Just store them in an airtight container at room temperature and re-crisp in the oven for a few minutes before serving.

    How can I prevent the shells from getting soggy?

    To keep the shells crispy, assemble the salad just before serving. If you’re meal prepping, keep the components separate and combine them when ready to eat.

    What are some alternative toppings?

    The sky’s the limit! Consider adding corn, jalapeños, red onions, or even pineapple for a sweet and spicy twist. Don’t forget fresh herbs like cilantro for a burst of freshness.

    Summary

    This taco salad in shell recipe is a fun, flavorful, and versatile dish that’s perfect for any occasion. With its crunchy shell, savory filling, and endless topping possibilities, it’s sure to be a hit with everyone at the table.

  • Italian Grinder Salad Recipe: A Flavor Fiesta in Every Bite!

    Italian Grinder Salad Recipe: A Flavor Fiesta in Every Bite!

    Howdy, food lovers! Today, we’re diving into the world of Italian grinders, but with a twist. This salad version packs all the punch of the classic sandwich without the bread, making it a perfect light yet satisfying meal. Let’s get chopping!

    Why This Recipe Works

    • It’s a deconstructed version of the beloved Italian grinder, offering all the flavors without the carbs.
    • The combination of cured meats, cheeses, and crisp veggies creates a symphony of textures.
    • It’s customizable, allowing you to adjust the ingredients based on your preferences or dietary needs.
    • The dressing is a simple yet vibrant mix that ties all the components together beautifully.
    • It’s a make-ahead dream, tasting even better as the flavors meld overnight.

    Ingredients

    • 1 cup diced salami
    • 1 cup diced ham
    • 1 cup diced provolone cheese
    • 1 cup diced mozzarella cheese
    • 1/2 cup sliced black olives
    • 1/2 cup sliced pepperoncini
    • 1/2 cup diced red onion
    • 1/2 cup diced tomatoes
    • 1/4 cup chopped fresh basil
    • 1/4 cup olive oil
    • 2 tbsp red wine vinegar
    • 1 tsp dried oregano
    • Salt and pepper to taste

    Equipment Needed

    • Large mixing bowl
    • Cutting board
    • Sharp knife
    • Measuring cups and spoons
    • Whisk

    Instructions

    Italian Grinder Salad Recipe

    Step 1: Prep Your Ingredients

    Start by dicing all your meats and cheeses into bite-sized pieces. Slice the black olives, pepperoncini, and red onion. Dice the tomatoes and chop the fresh basil. Having everything prepped and ready to go makes the assembly process a breeze.

    Step 2: Make the Dressing

    In a small bowl, whisk together the olive oil, red wine vinegar, dried oregano, and a pinch of salt and pepper. Taste and adjust the seasoning as needed. This simple dressing is the secret to bringing all the flavors together.

    Step 3: Combine the Salad

    In a large mixing bowl, combine the diced salami, ham, provolone, mozzarella, black olives, pepperoncini, red onion, tomatoes, and basil. Pour the dressing over the top and gently toss to ensure everything is evenly coated.

    Step 4: Let It Marinate

    Cover the bowl with plastic wrap and let the salad marinate in the fridge for at least an hour. This step is crucial as it allows the flavors to meld together beautifully.

    Step 5: Serve and Enjoy

    Give the salad a final toss before serving. It’s perfect on its own, over a bed of greens, or even stuffed into a pita for a more traditional feel. Enjoy the burst of flavors in every bite!

    Tips and Tricks

    For an extra kick, add a pinch of red pepper flakes to the dressing. If you’re short on time, you can serve the salad immediately, but the flavors won’t be as developed. For a healthier version, opt for low-sodium meats and cheeses. The salad can be stored in the fridge for up to 3 days, making it a great option for meal prep. Don’t skip the fresh basil—it adds a bright, herby note that dried basil just can’t match.

    Recipe Variations

    • Swap out the meats for grilled chicken or turkey for a lighter version.
    • Add avocado for a creamy texture and healthy fats.
    • Include artichoke hearts for an extra layer of flavor.
    • Use different cheeses like feta or gouda to change up the taste profile.
    • For a vegetarian version, omit the meats and add more veggies like cucumbers and bell peppers.

    Frequently Asked Questions

    Can I make this salad ahead of time?

    Absolutely! In fact, this salad tastes even better after it’s had time to marinate in the fridge for a few hours or overnight. The flavors meld together, creating a more cohesive and delicious dish.

    What can I serve with this salad?

    This salad is versatile. Serve it over a bed of greens, with crusty bread on the side, or even stuffed into a pita or wrap. It’s also great as a side dish at BBQs or potlucks.

    Can I use different meats or cheeses?

    Definitely! The beauty of this recipe is its flexibility. Feel free to swap out the meats and cheeses based on your preferences or what you have on hand. Just keep the ratios roughly the same for the best results.

    Summary

    This Italian Grinder Salad is a deconstructed version of the classic sandwich, packed with all the flavors you love. It’s easy to make, customizable, and perfect for any occasion. Give it a try and enjoy a flavor fiesta in every bite!