Category: Seafood Salad Recipes

  • Pasta Shrimp Salad Recipe: A Summer Delight

    Pasta Shrimp Salad Recipe: A Summer Delight

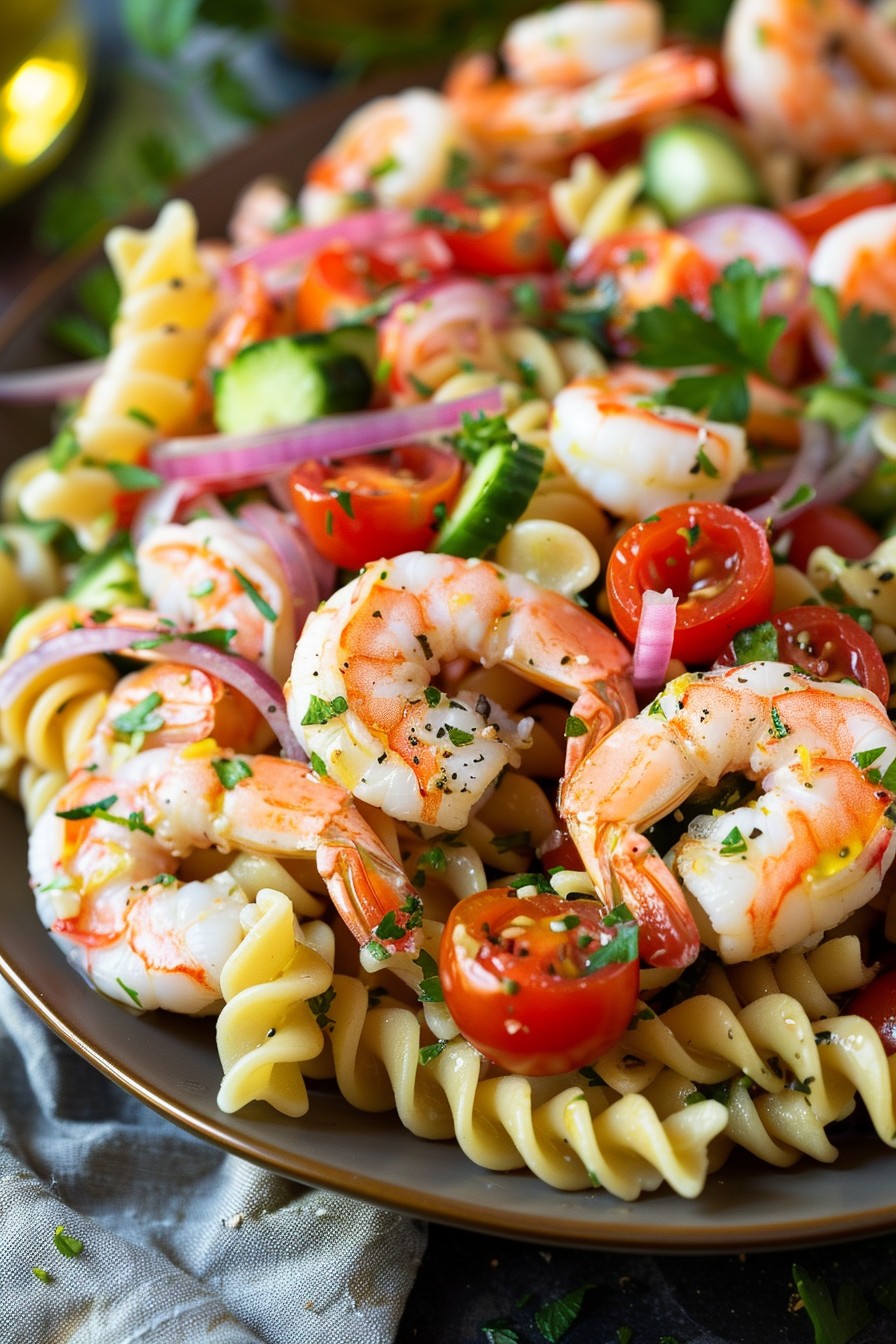
    Every summer gathering deserves a dish that’s both refreshing and satisfying, and this pasta shrimp salad is just that. Easy to whip up and packed with flavors, it’s the perfect blend of hearty pasta, succulent shrimp, and crisp vegetables, all tossed in a zesty dressing that’ll have everyone asking for seconds.

    Why This Recipe Works

    • The combination of al dente pasta and juicy shrimp offers a delightful texture contrast.
    • A homemade dressing brings a bright and tangy flavor that elevates the entire dish.
    • It’s versatile, allowing for endless variations based on what’s in your fridge or pantry.
    • Perfect for meal prep, as it tastes even better the next day after the flavors have melded.
    • Quick and easy to make, it’s a lifesaver for last-minute gatherings or weeknight dinners.

    Ingredients

    • 8 oz pasta (your choice, but fusilli or penne work great)
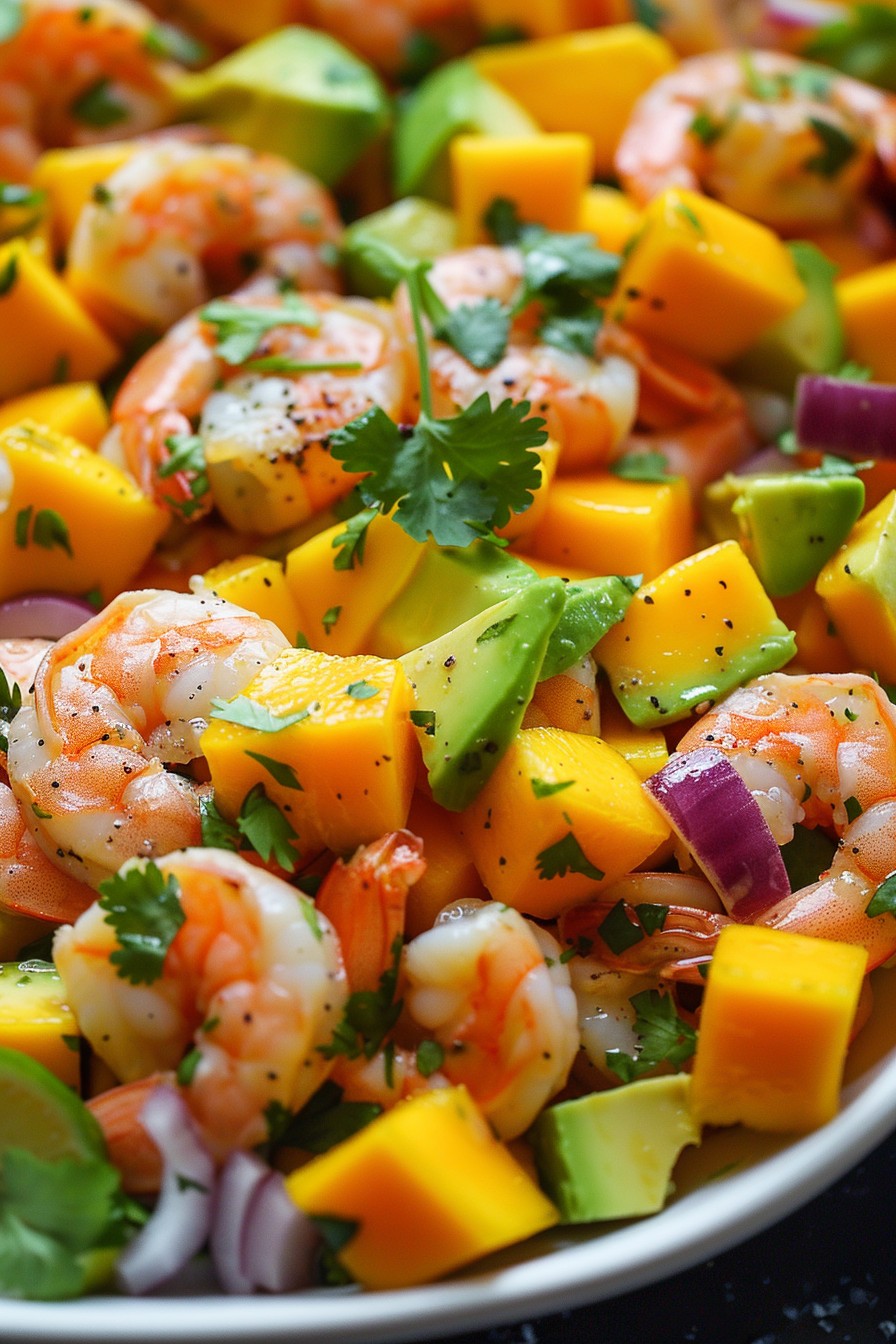
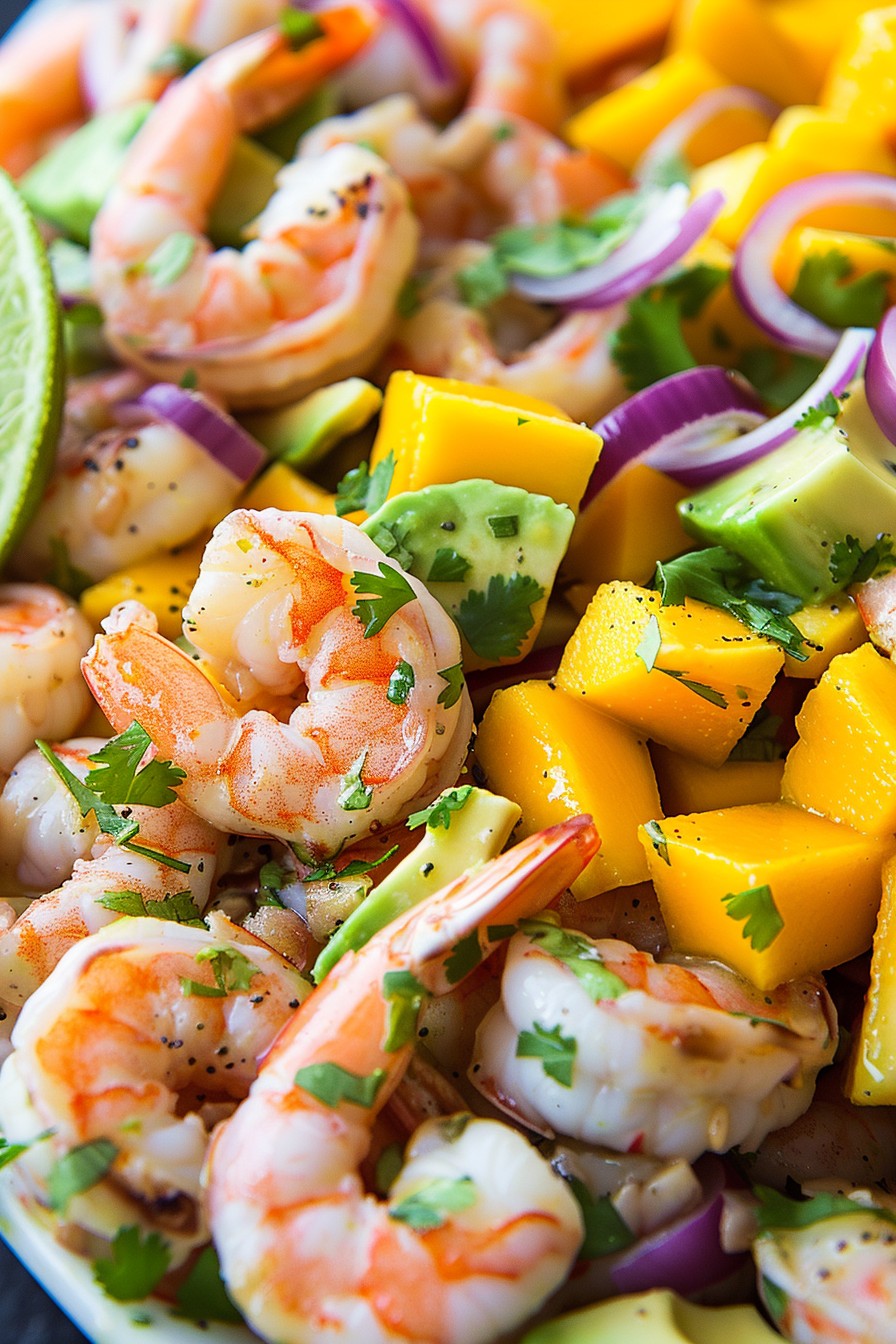
    • 1 lb shrimp, peeled and deveined
    • 1 cup cherry tomatoes, halved
    • 1/2 cucumber, diced
    • 1/4 red onion, thinly sliced
    • 1/4 cup olive oil
    • 2 tbsp lemon juice
    • 1 garlic clove, minced
    • Salt and pepper to taste
    • 1/4 cup fresh parsley, chopped

    Equipment Needed

    • Large pot
    • Colander
    • Mixing bowls
    • Whisk
    • Skillet

    Instructions

    Pasta Shrimp Salad Recipe

    Step 1: Cook the Pasta

    Bring a large pot of salted water to a boil. Add the pasta and cook according to package instructions until al dente, usually about 8-10 minutes. Drain the pasta in a colander and rinse under cold water to stop the cooking process. This ensures your pasta stays perfectly firm and doesn’t turn mushy in the salad.

    Step 2: Prepare the Shrimp

    While the pasta cooks, heat a skillet over medium heat. Add a tablespoon of olive oil, then the shrimp. Cook for about 2-3 minutes per side until they turn pink and opaque. Be careful not to overcook, as shrimp can become rubbery. Once done, set aside to cool slightly before adding to the salad.

    Step 3: Make the Dressing

    In a small bowl, whisk together the remaining olive oil, lemon juice, minced garlic, salt, and pepper. This simple dressing packs a punch and ties all the salad components together beautifully. Taste and adjust the seasoning as needed.

    Step 4: Combine Everything

    In a large mixing bowl, combine the cooled pasta, shrimp, cherry tomatoes, cucumber, and red onion. Pour the dressing over the top and gently toss to ensure everything is evenly coated. The key here is to be gentle to keep the shrimp and pasta intact.

    Step 5: Garnish and Serve

    Sprinkle the chopped parsley over the salad for a fresh, herby finish. You can serve the salad immediately or let it chill in the fridge for an hour to allow the flavors to meld together even more. Either way, it’s delicious!

    Tips and Tricks

    For the best texture, make sure to rinse the pasta under cold water after draining to stop the cooking process immediately. When cooking shrimp, watch them closely as they cook quickly and can go from perfect to overdone in seconds. To save time, you can use pre-cooked shrimp; just thaw them if frozen and add them directly to the salad. For an extra flavor boost, consider adding a pinch of red pepper flakes to the dressing or a handful of crumbled feta cheese to the salad before serving.

    Recipe Variations

    • Swap the shrimp for grilled chicken or salmon for a different protein option.
    • Add avocado slices for extra creaminess and healthy fats.
    • Include other vegetables like bell peppers or olives for more color and flavor.
    • Try using whole wheat or gluten-free pasta if you’re catering to dietary restrictions.
    • For a dairy-free version, skip the cheese or use a vegan alternative.

    Frequently Asked Questions

    Can I make this salad ahead of time?

    Absolutely! This pasta shrimp salad actually tastes better after sitting in the fridge for a few hours as the flavors have time to meld together. Just be sure to add any delicate ingredients like avocado right before serving to prevent them from browning.

    How long will leftovers last in the fridge?

    Stored in an airtight container, the salad will keep for up to 3 days in the refrigerator. The pasta may absorb some of the dressing over time, so you might want to drizzle a little extra olive oil or lemon juice when serving leftovers.

    Can I use frozen shrimp?

    Yes, frozen shrimp work just fine. Thaw them overnight in the fridge or under cold running water before cooking. Just make sure to pat them dry to remove excess moisture, which helps them sear better in the pan.

    Summary

    This pasta shrimp salad is a versatile, flavorful dish perfect for summer gatherings or a quick weeknight meal. With its combination of al dente pasta, succulent shrimp, and fresh vegetables, all tossed in a zesty dressing, it’s sure to be a hit. Plus, it’s easy to customize based on your preferences or what you have on hand.

  • Mango Shrimp Salad Recipe: A Tropical Twist on a Classic

    Mango Shrimp Salad Recipe: A Tropical Twist on a Classic

    Craving something light, refreshing, and packed with flavor? This mango shrimp salad is your ticket to a tropical paradise, combining juicy mangoes, succulent shrimp, and a zesty dressing that’ll make your taste buds dance.

    Why This Recipe Works

    • The sweetness of ripe mangoes perfectly balances the savory, slightly briny flavor of the shrimp.
    • A homemade lime dressing adds a bright, citrusy kick that ties all the flavors together.
    • It’s incredibly versatile—serve it as a main dish, a side, or even as a fancy appetizer.
    • Quick and easy to prepare, making it perfect for busy weeknights or last-minute gatherings.
    • Packed with nutrients, offering a healthy dose of protein, vitamins, and antioxidants.

    Ingredients

    • 1 lb large shrimp, peeled and deveined
    • 2 ripe mangoes, diced
    • 1 avocado, diced
    • 1/4 cup red onion, finely chopped
    • 1/4 cup cilantro, chopped
    • 2 tbsp olive oil
    • 1 lime, juiced
    • Salt and pepper to taste

    Equipment Needed

    • Large mixing bowl
    • Sharp knife
    • Cutting board
    • Measuring spoons
    • Juicer or fork for lime juice

    Instructions

    Mango Shrimp Salad Recipe

    Step 1: Prepare the Shrimp

    Start by heating the olive oil in a large skillet over medium-high heat. Add the shrimp, seasoning them with salt and pepper. Cook for about 2-3 minutes per side, until they turn pink and opaque. Remove from heat and let them cool slightly before adding to the salad.

    Step 2: Chop the Fruits and Veggies

    While the shrimp are cooling, dice the mangoes and avocado into bite-sized pieces. Finely chop the red onion and cilantro. The key here is uniformity in size for a perfect bite every time.

    Step 3: Make the Dressing

    In a small bowl, whisk together the lime juice, a pinch of salt, and a dash of pepper. This simple dressing will enhance the natural flavors of the salad without overpowering them.

    Step 4: Combine Everything

    In a large mixing bowl, gently toss the cooled shrimp, mangoes, avocado, red onion, and cilantro. Drizzle the dressing over the top and toss again to ensure everything is evenly coated.

    Step 5: Serve and Enjoy

    Transfer the salad to a serving dish or individual plates. For an extra touch, garnish with additional cilantro leaves or lime wedges. Serve immediately to enjoy the freshest flavors.

    Tips and Tricks

    For the best texture, make sure your mangoes are ripe but still firm. Overripe mangoes can make the salad mushy. If you’re not a fan of cilantro, fresh basil or mint makes a great substitute. To save time, you can use pre-cooked shrimp; just thaw if frozen and pat dry before adding to the salad. For a spicier kick, add a finely chopped jalapeño to the mix. Lastly, this salad is best enjoyed fresh but can be refrigerated for up to 2 hours before serving if needed.

    Recipe Variations

    • Add a cup of cooked quinoa or brown rice to make it more filling.
    • Swap the shrimp for grilled chicken or tofu for a different protein option.
    • Include other fruits like pineapple or peaches for additional sweetness.
    • For a creamier texture, mix in a tablespoon of Greek yogurt to the dressing.
    • Top with toasted coconut flakes or chopped nuts for added crunch.

    Frequently Asked Questions

    Can I make this salad ahead of time? While you can prep the ingredients ahead, it’s best to assemble the salad just before serving to prevent the avocado from browning and the greens from wilting.

    Is there a substitute for lime juice? Lemon juice works well as a substitute, though it will slightly alter the flavor profile of the dressing.

    How can I tell if the shrimp are cooked properly? Shrimp are done when they turn pink and opaque. Overcooking can make them rubbery, so keep an eye on them during cooking.

    Summary

    This mango shrimp salad is a delightful combination of sweet, savory, and zesty flavors, perfect for any occasion. Easy to make and customizable, it’s a surefire way to impress your guests or treat yourself to a healthy, delicious meal.

  • Hawaiian Poke Salad Recipe: A Taste of the Islands in Your Kitchen

    Hawaiian Poke Salad Recipe: A Taste of the Islands in Your Kitchen

    How about bringing a slice of Hawaiian paradise to your dinner table tonight? This poke salad recipe is not just a meal; it’s a vibrant, flavorful journey to the islands, no plane ticket required. Perfect for a light lunch, dinner, or even as a show-stopping appetizer at your next gathering.

    Why This Recipe Works

    • Freshness First: Using sashimi-grade fish ensures your poke is safe to eat raw and packed with flavor.
    • Balance of Flavors: The combination of soy sauce, sesame oil, and a hint of spice creates a harmonious blend that dances on your palate.
    • Customizable: Easily adjust the ingredients to suit your taste preferences or dietary needs.
    • Quick and Easy: From prep to plate, this dish comes together in under 30 minutes, making it perfect for busy weeknights.

    Ingredients

    • 1 lb sashimi-grade ahi tuna, cubed
    • 1/4 cup soy sauce
    • 2 tbsp sesame oil
    • 1 tbsp rice vinegar
    • 1 tsp red pepper flakes
    • 1/2 cup green onions, thinly sliced
    • 1/2 cup cucumber, diced
    • 1 avocado, cubed
    • 1 tbsp sesame seeds

    Equipment Needed

    • Sharp knife
    • Cutting board
    • Mixing bowl
    • Measuring cups and spoons

    Instructions

    Poke Salad Recipe

    Step 1: Prepare the Fish

    Start by ensuring your ahi tuna is fully thawed if previously frozen. Using a sharp knife, cube the tuna into bite-sized pieces, about 1/2 inch thick. This size ensures each piece is hearty enough to stand up to the marinade but small enough to absorb all the delicious flavors.

    Step 2: Mix the Marinade

    In a mixing bowl, whisk together the soy sauce, sesame oil, rice vinegar, and red pepper flakes. This combination will give your poke that signature umami and slightly spicy kick. Tip: For a smoother marinade, you can warm the sesame oil slightly before mixing.

    Step 3: Combine Ingredients

    Add the cubed tuna to the marinade, gently tossing to ensure each piece is evenly coated. Then, fold in the green onions and cucumber. The key here is to mix gently to keep the tuna pieces intact. Let the mixture sit for about 10 minutes to allow the flavors to meld.

    Step 4: Add the Avocado

    Just before serving, add the cubed avocado to the bowl. Gently mix to incorporate the avocado without mashing it. The avocado adds a creamy texture that contrasts beautifully with the firmness of the tuna.

    Step 5: Garnish and Serve

    Sprinkle sesame seeds over the top for a nutty crunch and a touch of elegance. Serve your poke salad over a bed of rice or enjoy it as is for a low-carb option. Tip: For an extra burst of flavor, drizzle a little more sesame oil on top before serving.

    Tips and Tricks

    When selecting your ahi tuna, look for pieces that are bright red and have a firm texture. If you’re unable to find sashimi-grade tuna, you can use cooked shrimp or even tofu as a substitute. For those who love a bit of heat, increase the amount of red pepper flakes or add a dash of sriracha to the marinade. If you’re preparing this dish ahead of time, wait to add the avocado until just before serving to prevent it from browning. Lastly, for an authentic Hawaiian touch, serve your poke with a side of seaweed salad and a sprinkle of furikake seasoning.

    Recipe Variations

    • Spicy Mayo Poke: Mix in a tablespoon of mayonnaise and a teaspoon of sriracha to the marinade for a creamy, spicy version.
    • Vegetarian Poke: Replace the tuna with cubed tofu or a mix of hearty vegetables like mushrooms and zucchini.
    • Mango Poke: Add diced mango to the salad for a sweet and tangy twist that complements the savory flavors.
    • Wasabi Poke: Stir in a teaspoon of wasabi paste for an extra kick that sushi lovers will adore.

    Frequently Asked Questions

    Can I use frozen tuna for poke?

    Yes, you can use frozen tuna for poke, but it’s crucial to ensure it’s sashimi-grade and properly thawed in the refrigerator before use. Freezing can kill parasites, making the fish safer to eat raw, but always check the quality and source of your fish.

    How long can I store poke salad in the fridge?

    Poke salad is best enjoyed fresh but can be stored in an airtight container in the refrigerator for up to 24 hours. Keep in mind that the texture of the fish and avocado may change slightly upon sitting.

    What can I serve with poke salad?

    Poke salad is versatile and can be served over rice, with seaweed salad, or alongside crispy wonton chips for dipping. For a low-carb option, try serving it over a bed of greens or zucchini noodles.

    Summary

    This Hawaiian poke salad recipe is a quick, easy, and delicious way to bring the flavors of the islands into your home. With fresh ingredients and simple steps, you’ll have a vibrant, flavorful dish that’s perfect for any occasion.

  • Calamari Seafood Salad Recipe: A Zesty Summer Delight

    Calamari Seafood Salad Recipe: A Zesty Summer Delight

    A absolutely delightful calamari seafood salad that’s perfect for those warm summer days or when you’re craving something light yet flavorful. This recipe combines tender calamari with crisp vegetables and a tangy dressing for a dish that’s sure to impress.

    Why This Recipe Works

    • The calamari is cooked just right – tender, not rubbery, with a quick blanching method that locks in flavor.
    • A vibrant mix of vegetables adds crunch and color, making the salad as beautiful as it is tasty.
    • The homemade dressing is a simple yet powerful combination of lemon juice, olive oil, and herbs that elevates the seafood.
    • It’s versatile – serve as a main dish, side, or even as a fancy appetizer at your next gathering.
    • Prep and cook time is under 30 minutes, making it a quick option for busy weeknights.

    Ingredients

    • 1 lb calamari, cleaned and sliced into rings
    • 2 cups mixed salad greens
    • 1 cup cherry tomatoes, halved
    • 1/2 red onion, thinly sliced
    • 1/4 cup Kalamata olives, pitted and halved
    • 2 tbsp fresh parsley, chopped
    • 1/4 cup olive oil
    • 2 tbsp lemon juice
    • 1 garlic clove, minced
    • Salt and pepper to taste

    Equipment Needed

    • Large pot
    • Mixing bowls
    • Whisk
    • Colander
    • Knife and cutting board

    Instructions

    Calamari Seafood Salad Recipe

    Step 1: Prepare the Calamari

    Bring a large pot of salted water to a boil. Add the calamari rings and cook for exactly 1 minute – any longer and they’ll become tough. Immediately drain and rinse under cold water to stop the cooking process. Tip: For extra tender calamari, you can soak them in milk for 30 minutes before cooking.

    Step 2: Mix the Dressing

    In a small bowl, whisk together the olive oil, lemon juice, minced garlic, salt, and pepper until well combined. Taste and adjust the seasoning as needed. This dressing is key to the salad’s flavor, so don’t skimp on the quality of your olive oil and lemon juice.

    Step 3: Combine the Salad

    In a large mixing bowl, toss together the cooled calamari, salad greens, cherry tomatoes, red onion, and Kalamata olives. Drizzle the dressing over the top and gently toss to coat all the ingredients evenly. Tip: Let the salad sit for 5 minutes before serving to allow the flavors to meld together.

    Step 4: Garnish and Serve

    Sprinkle the chopped parsley over the top of the salad for a fresh, herby finish. Serve immediately for the best texture and flavor. This salad is best enjoyed fresh but can be refrigerated for up to 2 hours if needed.

    Tips and Tricks

    For those looking to take their calamari seafood salad to the next level, consider these advanced tips. First, if you’re able to source fresh calamari, it makes a world of difference in texture and taste. Second, adding a pinch of red pepper flakes to the dressing can give the salad a nice spicy kick. Third, for an extra layer of flavor, consider grilling the calamari instead of boiling it. Just be sure to keep a close eye on it, as it cooks quickly. Lastly, incorporating other seafood like shrimp or scallops can add variety and make the dish even more luxurious.

    Recipe Variations

    • Mediterranean Twist: Add feta cheese and cucumber for a Greek-inspired version.
    • Spicy Upgrade: Include diced jalapeños or a dash of hot sauce in the dressing for heat lovers.
    • Avocado Addition: Creamy avocado slices can add richness and balance the tanginess of the dressing.
    • Pasta Salad: Mix in cooked pasta shells or orzo to turn it into a hearty pasta salad.
    • Herb Varieties: Experiment with different herbs like dill or basil for a unique flavor profile.

    Frequently Asked Questions

    Can I use frozen calamari?

    Absolutely! Frozen calamari works well in this recipe. Just be sure to thaw it completely and pat it dry before cooking to prevent excess water from diluting the flavors of your salad.

    How long can I store the salad?

    This salad is best enjoyed the day it’s made, but you can store it in the refrigerator for up to 24 hours. Keep in mind that the vegetables may soften slightly over time.

    Can I make the dressing ahead of time?

    Yes, the dressing can be prepared up to 3 days in advance and stored in an airtight container in the refrigerator. Just give it a good shake or whisk before using to recombine the ingredients.

    Summary

    This calamari seafood salad is a light, flavorful dish perfect for summer gatherings or a quick weeknight meal. With tender calamari, crisp vegetables, and a zesty dressing, it’s sure to become a favorite.

  • Chinese Crab Salad Recipe: A Delightful Twist on a Classic

    Chinese Crab Salad Recipe: A Delightful Twist on a Classic

    So, you’re craving something light, refreshing, and packed with flavor? Look no further than this Chinese Crab Salad recipe. It’s the perfect blend of sweet, savory, and a hint of spice, making it an ideal dish for any occasion.

    Why This Recipe Works

    • The combination of fresh crab meat with crisp vegetables offers a satisfying crunch in every bite.
    • A homemade dressing with soy sauce, sesame oil, and a touch of honey brings the salad together with a perfect balance of flavors.
    • It’s incredibly versatile, allowing for numerous variations to suit any taste or dietary preference.
    • Quick and easy to prepare, this salad is perfect for busy weeknights or last-minute gatherings.

    Ingredients

    • 1 lb fresh crab meat, shredded
    • 2 cups shredded cabbage
    • 1 cup shredded carrots
    • 1/2 cup sliced cucumbers
    • 1/4 cup chopped green onions
    • 2 tbsp soy sauce
    • 1 tbsp sesame oil
    • 1 tbsp honey
    • 1 tsp grated ginger
    • 1 clove garlic, minced
    • 1/2 tsp red pepper flakes (optional)

    Equipment Needed

    • Large mixing bowl
    • Whisk
    • Measuring cups and spoons
    • Salad spinner (optional, for drying vegetables)

    Instructions

    Chinese Crab Salad Recipe

    Step 1: Prepare the Vegetables

    Start by washing all your vegetables thoroughly. Shred the cabbage and carrots using a grater or a food processor for uniformity. Slice the cucumbers thinly and chop the green onions. If you’re using a salad spinner, now’s the time to dry those veggies to prevent a soggy salad.

    Step 2: Make the Dressing

    In a small bowl, whisk together the soy sauce, sesame oil, honey, grated ginger, minced garlic, and red pepper flakes if you’re using them. Taste and adjust the seasoning as needed. Remember, the dressing should be a balance of sweet, salty, and a bit tangy.

    Step 3: Combine Crab and Vegetables

    In your large mixing bowl, gently toss the shredded crab meat with the prepared vegetables. Be careful not to break up the crab meat too much; you want to keep those lovely chunks intact for texture.

    Step 4: Dress the Salad

    Pour the dressing over the crab and vegetable mixture. Using a large spoon or your hands (clean, of course), gently toss everything together until evenly coated. Let the salad sit for about 10 minutes to allow the flavors to meld together beautifully.

    Step 5: Serve and Enjoy

    Transfer the salad to a serving dish or individual plates. Garnish with extra green onions or a sprinkle of sesame seeds for an extra touch of elegance. Serve immediately for the best texture and flavor.

    Tips and Tricks

    For the best results, use the freshest crab meat you can find. If fresh isn’t an option, high-quality canned crab meat can work in a pinch, but be sure to drain it well. To add more crunch, consider tossing in some toasted almonds or sesame seeds. If you’re serving this salad ahead of time, keep the dressing separate until just before serving to maintain the vegetables’ crispness. For a spicier kick, increase the amount of red pepper flakes or add a dash of sriracha to the dressing.

    Recipe Variations

    • For a vegetarian version, substitute the crab meat with shredded tofu or chickpeas.
    • Add some fruit like mango or pineapple for a sweet contrast to the savory flavors.
    • Incorporate different vegetables such as bell peppers or snap peas for added color and crunch.
    • Swap the honey in the dressing for maple syrup or agave for a vegan alternative.
    • For a more substantial meal, serve the salad over a bed of rice or noodles.

    Frequently Asked Questions

    Can I use imitation crab meat for this recipe?

    Absolutely! While fresh crab meat offers the best flavor and texture, imitation crab is a more affordable and readily available option. Just be mindful that imitation crab is already seasoned, so you may want to adjust the amount of soy sauce in the dressing accordingly.

    How long can I store this salad in the fridge?

    This salad is best enjoyed fresh but can be stored in an airtight container in the refrigerator for up to two days. Keep in mind that the vegetables may lose some of their crispness over time, so it’s ideal to consume it within the first day.

    Is there a way to make this salad less spicy?

    Of course! Simply omit the red pepper flakes from the dressing. The salad will still be packed with flavor from the soy sauce, sesame oil, and other ingredients without the heat.

    Summary

    This Chinese Crab Salad is a refreshing, flavorful dish that’s perfect for any occasion. With its combination of fresh ingredients and a homemade dressing, it’s sure to be a hit. Plus, it’s versatile enough to customize to your liking. Give it a try and enjoy a taste of something truly special.

  • Crab Salad Recipe with Cream Cheese: A Creamy Dream Come True

    Crab Salad Recipe with Cream Cheese: A Creamy Dream Come True

    You’re about to dive into the creamiest, dreamiest crab salad you’ve ever tasted. Perfect for sandwiches, dips, or just eating straight out of the bowl, this recipe is a game-changer.

    Why This Recipe Works

    • The cream cheese adds a rich, velvety texture that pairs perfectly with the delicate flavor of crab.
    • It’s incredibly versatile—serve it as a dip, a sandwich filling, or a standalone salad.
    • Quick and easy to make, it’s perfect for last-minute gatherings or a fancy lunch at home.

    Ingredients

    • 1 cup lump crab meat, carefully picked over for shells
    • 8 oz cream cheese, softened to room temperature
    • 1/4 cup mayonnaise
    • 2 tbsp lemon juice, freshly squeezed
    • 1/4 cup finely chopped celery
    • 2 tbsp finely chopped green onions
    • 1 tsp Old Bay seasoning
    • Salt and pepper to taste

    Equipment Needed

    • Mixing bowl
    • Rubber spatula
    • Measuring cups and spoons

    Instructions

    Crab Salad Recipe With Cream Cheese

    Step 1: Prepare Your Ingredients

    Start by ensuring your cream cheese is softened to room temperature for easy mixing. Chop your celery and green onions finely to ensure every bite has a bit of crunch and flavor. Carefully pick through your crab meat to remove any shells, because nobody likes a surprise crunch that isn’t supposed to be there.

    Step 2: Mix the Cream Cheese and Mayonnaise

    In your mixing bowl, combine the softened cream cheese and mayonnaise. Use your rubber spatula to blend them together until the mixture is smooth and uniform. This is the base of your salad, so make sure it’s well combined.

    Step 3: Add the Flavors

    Now, stir in the lemon juice, Old Bay seasoning, and a pinch of salt and pepper. The lemon juice adds a bright acidity that cuts through the richness of the cream cheese, while the Old Bay gives it that classic seafood seasoning flavor.

    Step 4: Fold in the Crab and Veggies

    Gently fold in the crab meat, celery, and green onions. Be careful not to overmix—you want to keep those lovely lumps of crab intact for texture. Taste and adjust the seasoning if necessary.

    Step 5: Chill and Serve

    Cover the bowl with plastic wrap and refrigerate for at least an hour before serving. This allows the flavors to meld together beautifully. Serve chilled with crackers, on a sandwich, or as part of a salad.

    Tips and Tricks

    For an extra touch of luxury, consider adding a tablespoon of finely chopped fresh dill or a teaspoon of Worcestershire sauce to the mix. If you’re serving this as a dip, a sprinkle of paprika on top adds color and a slight smokiness. Always use fresh lemon juice rather than bottled for the best flavor. And remember, the quality of your crab meat will make or break this dish—splurge on the good stuff if you can.

    Recipe Variations

    • Swap out the crab for cooked shrimp or lobster for a different seafood twist.
    • Add a diced avocado for extra creaminess and a boost of healthy fats.
    • For a spicy kick, mix in a tablespoon of sriracha or some diced jalapeños.
    • Turn it into a pasta salad by folding in cooked pasta shells and some extra mayonnaise.
    • Make it a wrap by spreading it on a tortilla with some lettuce and tomato.

    Frequently Asked Questions

    Can I use imitation crab meat?

    Yes, you can use imitation crab meat if you’re on a budget or prefer its flavor. Just keep in mind that the texture and taste will be slightly different from real crab meat.

    How long does this crab salad last in the fridge?

    Properly stored in an airtight container, this crab salad will last for up to 3 days in the refrigerator. After that, the quality starts to decline.

    Can I freeze crab salad?

    Freezing is not recommended, as the cream cheese and mayonnaise can separate and become grainy upon thawing, and the texture of the crab will suffer.

    Summary

    This crab salad with cream cheese is a creamy, dreamy delight that’s perfect for any occasion. Easy to make and endlessly versatile, it’s sure to become a favorite.

  • Bean and Tuna Salad Recipe: A Quick, Nutritious Delight

    Bean and Tuna Salad Recipe: A Quick, Nutritious Delight

    How about we dive into a recipe that’s not only a breeze to whip up but also packs a punch in the nutrition department? This bean and tuna salad is your go-to for a quick lunch, a hearty side, or even a light dinner. It’s versatile, delicious, and, most importantly, ridiculously easy to make.

    Why This Recipe Works

    • It’s a protein powerhouse, thanks to the tuna and beans, keeping you full and energized.
    • The combination of textures from the creamy beans, flaky tuna, and crisp veggies makes every bite interesting.
    • It’s incredibly versatile; serve it on its own, over greens, or as a sandwich filler.
    • Prep is a snap, making it perfect for meal prep or last-minute meals.
    • The flavors meld beautifully as it sits, so it’s even better the next day.

    Ingredients

    • 1 can (15 oz) white beans, drained and rinsed
    • 1 can (5 oz) tuna in water, drained
    • 1/2 cup red onion, finely diced
    • 1/2 cup celery, finely diced
    • 1/4 cup olive oil
    • 2 tbsp lemon juice
    • 1 tsp Dijon mustard
    • Salt and pepper to taste
    • 1/4 cup fresh parsley, chopped

    Equipment Needed

    • Mixing bowl
    • Whisk
    • Measuring cups and spoons
    • Can opener
    • Knife and cutting board

    Instructions

    Bean And Tuna Salad Recipe

    Step 1: Prep Your Ingredients

    Start by draining and rinsing your white beans to remove any excess sodium and to give them a fresh taste. Drain the tuna well to avoid a watery salad. Finely dice the red onion and celery to ensure every bite has a bit of crunch and flavor. Chop the parsley for a fresh, herby finish.

    Step 2: Make the Dressing

    In a small bowl, whisk together the olive oil, lemon juice, and Dijon mustard until well combined. This simple dressing brings a tangy brightness to the salad, enhancing the flavors of the tuna and beans. Season with salt and pepper to taste, remembering that the tuna might already be salty.

    Step 3: Combine the Salad

    In a large mixing bowl, gently toss the beans, tuna, red onion, celery, and parsley together. Be careful not to mash the beans or break up the tuna too much; you want to maintain some texture. Pour the dressing over the salad and toss lightly to coat everything evenly.

    Step 4: Let It Marinate

    Cover the bowl and let the salad sit in the refrigerator for at least 30 minutes. This resting time allows the flavors to meld together beautifully. If you’re in a hurry, you can serve it immediately, but the taste improves with a bit of patience.

    Step 5: Serve and Enjoy

    Give the salad a final toss before serving to redistribute the dressing. Serve it on a bed of greens, with crackers, or as is for a simple, satisfying meal. Garnish with extra parsley if you’re feeling fancy.

    Tips and Tricks

    For an extra flavor boost, try adding a pinch of red pepper flakes or a dash of smoked paprika to the dressing. If you’re not a fan of raw onion, soak the diced onion in cold water for 10 minutes before adding it to the salad to mellow its bite. For a creamier texture, mash a quarter of the beans before mixing them in. Always taste and adjust the seasoning after the salad has marinated, as flavors can change as they sit.

    Recipe Variations

    • Swap white beans for chickpeas or kidney beans for a different texture and flavor profile.
    • Add diced avocado for creaminess and healthy fats.
    • Include chopped hard-boiled eggs for extra protein.
    • Mix in some capers or olives for a briny, salty kick.
    • Use a different protein, like cooked chicken or salmon, instead of tuna.

    Frequently Asked Questions

    Can I make this salad ahead of time? Absolutely! This salad actually tastes better after it’s had time to sit and the flavors have melded. Just keep it covered in the fridge for up to 3 days.

    Is there a substitute for tuna? Yes, you can use cooked chicken, salmon, or even chickpeas for a vegetarian version. The key is to maintain the protein content for a filling meal.

    Can I use a different type of bean? Of course! While white beans are classic, feel free to experiment with chickpeas, black beans, or kidney beans based on your preference or what you have on hand.

    Summary

    This bean and tuna salad is a quick, nutritious, and versatile dish that’s perfect for any meal. With simple ingredients and easy prep, it’s a no-fuss recipe that delivers on flavor and satisfaction.

  • Kani Salad Recipe: A Crunchy, Creamy Delight

    Kani Salad Recipe: A Crunchy, Creamy Delight

    A absolutely delightful dish that brings the taste of the sea to your table with minimal effort, our Kani Salad recipe is a must-try for seafood lovers. This Japanese-inspired salad combines the sweetness of crab sticks with the crunch of fresh vegetables, all tossed in a creamy, tangy dressing that’ll have you coming back for more.

    Why This Recipe Works

    • The combination of creamy dressing and crunchy vegetables offers a perfect texture contrast.
    • Using imitation crab sticks makes this dish affordable without sacrificing flavor.
    • It’s a versatile recipe that can be served as an appetizer, side, or main dish.
    • Quick and easy to prepare, perfect for busy weeknights or last-minute gatherings.
    • The dressing can be made ahead, saving you time when you’re ready to serve.

    Ingredients

    • 8 oz imitation crab sticks (kani), shredded
    • 1 cup cucumber, julienned
    • 1 cup carrots, julienned
    • 1/2 cup mayonnaise
    • 1 tbsp rice vinegar
    • 1 tsp sugar
    • 1/2 tsp salt
    • 1/4 tsp black pepper
    • 1 tbsp sesame seeds, for garnish

    Equipment Needed

    • Mixing bowls
    • Whisk
    • Measuring cups and spoons
    • Julienne peeler or knife

    Instructions

    Kani Salad Recipe

    Prepare the Vegetables

    Start by washing and peeling the cucumber and carrots. Using a julienne peeler or a sharp knife, cut them into thin, matchstick-sized pieces. This not only ensures they blend well with the crab sticks but also makes the salad easier to eat. Tip: For extra crunch, you can soak the julienned vegetables in ice water for 10 minutes before draining and adding to the salad.

    Shred the Crab Sticks

    Take the imitation crab sticks and gently shred them into thin strips with your fingers. This mimics the texture of real crab meat and allows the dressing to coat each piece evenly. Be careful not to over-shred, as the sticks can become too mushy.

    Make the Dressing

    In a small bowl, whisk together the mayonnaise, rice vinegar, sugar, salt, and black pepper until smooth. The sugar balances the tanginess of the vinegar, while the salt enhances all the flavors. Tip: For a lighter version, you can substitute half of the mayonnaise with Greek yogurt.

    Combine All Ingredients

    In a large mixing bowl, combine the shredded crab sticks, julienned cucumber, and carrots. Pour the dressing over the top and gently toss until everything is evenly coated. The key is to mix gently to keep the vegetables crisp and the crab sticks intact.

    Garnish and Serve

    Transfer the salad to a serving dish and sprinkle sesame seeds on top for a nutty flavor and a bit of crunch. Serve immediately or chill in the refrigerator for 30 minutes to let the flavors meld together. Tip: For an extra pop of color and flavor, add a sprinkle of chopped green onions or a dash of paprika.

    Tips and Tricks

    For those looking to elevate their Kani Salad, consider these advanced tips. First, if you’re using real crab meat, lightly steam it before shredding to enhance its sweetness. Second, toasting the sesame seeds before garnishing can add a deeper, more complex flavor. Lastly, incorporating a small amount of wasabi into the dressing can give the salad a spicy kick that pairs wonderfully with the sweetness of the crab.

    Recipe Variations

    • Add avocado slices for a creamy texture and healthy fats.
    • Include mango strips for a sweet and tropical twist.
    • Swap the mayonnaise dressing with a spicy Sriracha mayo for heat lovers.
    • Mix in some cooked soba noodles to turn the salad into a more substantial meal.
    • Use daikon radish instead of carrots for a different kind of crunch.

    Frequently Asked Questions

    Can I make Kani Salad ahead of time?

    Yes, you can prepare Kani Salad a few hours in advance. However, it’s best to add the dressing just before serving to prevent the vegetables from becoming soggy. If you must dress it ahead, keep it refrigerated and give it a quick stir before serving.

    Is there a substitute for imitation crab sticks?

    Absolutely! Real crab meat is the best substitute, offering a richer flavor. For a vegetarian version, try using heart of palm or jackfruit, shredded to mimic the texture of crab.

    How long does Kani Salad last in the fridge?

    Properly stored in an airtight container, Kani Salad can last up to 2 days in the refrigerator. Beyond that, the vegetables may start to lose their crunch, and the quality will diminish.

    Summary

    Our Kani Salad recipe is a quick, easy, and delicious way to enjoy the flavors of the sea with a crunchy, creamy twist. Perfect for any occasion, it’s sure to be a hit with seafood lovers and salad enthusiasts alike.

  • Crispy Rice Salad Recipe: A Crunchy Twist on a Classic

    Crispy Rice Salad Recipe: A Crunchy Twist on a Classic

    Unleash the power of texture with this crispy rice salad recipe that’s sure to become your new favorite. Perfect for picnics, potlucks, or a refreshing weeknight dinner, this dish combines the satisfying crunch of crispy rice with fresh, vibrant veggies and a tangy dressing.

    Why This Recipe Works

    • The contrast between the crispy rice and fresh vegetables creates a delightful texture that’s hard to resist.
    • It’s incredibly versatile, allowing you to use whatever veggies you have on hand.
    • The dressing is a simple yet flavorful combination that ties all the ingredients together perfectly.
    • It’s a great way to use up leftover rice, reducing food waste.
    • This salad is as visually appealing as it is delicious, making it a hit at any gathering.

    Ingredients

    • 2 cups cooked rice, cooled
    • 1 tbsp olive oil
    • 1 cup diced cucumbers
    • 1 cup diced tomatoes
    • 1/2 cup diced red onion
    • 1/4 cup chopped fresh cilantro
    • 2 tbsp lime juice
    • 1 tbsp soy sauce
    • 1 tsp honey
    • Salt and pepper to taste

    Equipment Needed

    • Large mixing bowl
    • Small mixing bowl
    • Whisk
    • Baking sheet
    • Parchment paper

    Instructions

    Crispy Rice Salad Recipe

    Step 1: Crisp the Rice

    Preheat your oven to 375°F. Spread the cooled rice on a parchment-lined baking sheet in an even layer. Drizzle with olive oil and season with salt. Bake for 20-25 minutes, stirring halfway through, until the rice is golden and crispy. Tip: For extra crispiness, let the rice cool on the baking sheet after baking.

    Step 2: Prepare the Vegetables

    While the rice is crisping, dice the cucumbers, tomatoes, and red onion. Chop the cilantro. Combine all in a large mixing bowl. Tip: For a milder onion flavor, soak the diced red onion in cold water for 10 minutes, then drain.

    Step 3: Make the Dressing

    In a small bowl, whisk together the lime juice, soy sauce, honey, and a pinch of salt and pepper until well combined. Taste and adjust seasoning as needed. Tip: For a spicier dressing, add a pinch of red pepper flakes.

    Step 4: Combine Everything

    Once the rice is crispy and cooled slightly, add it to the bowl with the vegetables. Pour the dressing over the top and gently toss to combine. Serve immediately for the best texture.

    Tips and Tricks

    For the crispiest rice, make sure it’s spread in a thin, even layer on the baking sheet. Don’t skip the stirring halfway through baking to ensure even browning. If you’re short on time, you can use day-old rice straight from the fridge—it actually crisps up better than freshly cooked rice. For added protein, toss in some cooked chickpeas or shredded chicken. And remember, the dressing is key, so don’t be shy with the lime juice and soy sauce for that perfect balance of tangy and savory.

    Recipe Variations

    • Add avocado for a creamy texture and healthy fats.
    • Swap the cilantro for basil or mint for a different herbal note.
    • Include some diced mango or pineapple for a sweet and tangy twist.
    • For a heartier salad, add quinoa or farro along with the crispy rice.
    • Top with toasted nuts or seeds for extra crunch and nutrition.

    Frequently Asked Questions

    Can I make this salad ahead of time?

    Yes, but for the best texture, keep the crispy rice separate until just before serving. You can prepare all the other components ahead of time and combine them when ready to eat.

    What type of rice works best?

    Any type of cooked rice will work, but jasmine or basmati rice adds a nice fragrance. Just make sure it’s cooled before crisping in the oven.

    Can I use a different dressing?

    Absolutely! Feel free to experiment with your favorite vinaigrette or even a creamy dressing like ranch or tahini-based.

    Summary

    This crispy rice salad is a textural delight, combining crunchy rice with fresh veggies and a tangy dressing. It’s versatile, easy to make, and perfect for any occasion.

  • Tantalizing Octopus Salad Recipe: A Sea-Inspired Delight

    Tantalizing Octopus Salad Recipe: A Sea-Inspired Delight

    Venture into the culinary depths with this octopus salad recipe that promises to transport your taste buds straight to the Mediterranean. Perfect for summer gatherings or a fancy dinner at home, this dish combines tender octopus with crisp vegetables and a zesty dressing for a refreshing and flavorful experience.

    Why This Recipe Works

    • The octopus is boiled with aromatics to ensure it’s tender and flavorful, not rubbery.
    • A mix of fresh vegetables adds crunch and color, making the salad as visually appealing as it is delicious.
    • The lemon-olive oil dressing brightens the dish, balancing the richness of the octopus.
    • Quick and easy to prepare, this salad is perfect for impressing guests without spending hours in the kitchen.
    • It’s a versatile recipe that can be customized with your favorite ingredients or whatever you have on hand.

    Ingredients

    • 1 lb octopus, cleaned
    • 2 cups water
    • 1 lemon, sliced
    • 2 garlic cloves, smashed
    • 1 bay leaf
    • 1 cup cherry tomatoes, halved
    • 1/2 red onion, thinly sliced
    • 1 cucumber, diced
    • 1/4 cup Kalamata olives, pitted and halved
    • 2 tbsp extra virgin olive oil
    • 1 tbsp lemon juice
    • Salt and pepper to taste

    Equipment Needed

    • Large pot
    • Mixing bowl
    • Sharp knife
    • Cutting board

    Instructions

    Octopus Salad Recipe

    Prepare the Octopus

    In a large pot, combine the octopus, water, lemon slices, garlic, and bay leaf. Bring to a boil over high heat, then reduce to a simmer. Cover and cook for about 45 minutes, or until the octopus is tender when pierced with a fork. Remove from heat and let cool in the cooking liquid for 10 minutes. Drain and slice the octopus into bite-sized pieces.

    Chop the Vegetables

    While the octopus is cooking, prepare your vegetables. Halve the cherry tomatoes, thinly slice the red onion, and dice the cucumber. Place all the vegetables in a large mixing bowl. Add the Kalamata olives for a briny contrast.

    Make the Dressing

    In a small bowl, whisk together the extra virgin olive oil and lemon juice. Season with salt and pepper to taste. This simple dressing will bring all the flavors of the salad together.

    Combine and Toss

    Add the sliced octopus to the bowl with the vegetables. Drizzle the dressing over the top and gently toss to combine. Ensure everything is evenly coated with the dressing for maximum flavor in every bite.

    Serve and Enjoy

    Transfer the salad to a serving dish and let it sit for about 10 minutes to allow the flavors to meld. Serve chilled or at room temperature, garnished with additional lemon slices if desired.

    Tips and Tricks

    For the most tender octopus, consider freezing it before cooking. This breaks down the fibers, resulting in a more tender texture. When boiling the octopus, adding a wine cork to the pot is an old chef’s trick said to tenderize it further, though the science behind this is debated. To save time, you can cook the octopus a day ahead and store it in the refrigerator until you’re ready to make the salad. For an extra burst of flavor, add some chopped fresh herbs like parsley or dill to the salad before serving.

    Recipe Variations

    • Add avocado for creaminess and healthy fats.
    • Include capers for an extra tangy punch.
    • Swap the lemon juice with lime for a different citrus note.
    • Mix in some arugula or spinach for added greens.
    • For a spicy kick, add some chopped chili peppers or a dash of hot sauce to the dressing.

    Frequently Asked Questions

    Can I use frozen octopus?

    Absolutely! Frozen octopus works just as well as fresh, especially since it’s often pre-cleaned, saving you time and effort. Just make sure to thaw it completely in the refrigerator before cooking to ensure even cooking.

    How do I know when the octopus is done?

    The octopus is ready when it’s tender enough to pierce easily with a fork. Overcooking can make it rubbery, so keep an eye on it, especially towards the end of the cooking time.

    Can I make this salad ahead of time?

    Yes, this salad can be assembled a few hours ahead of serving. Just wait to add the dressing until you’re ready to serve to keep the vegetables crisp.

    Summary

    This octopus salad is a refreshing, flavorful dish that’s perfect for any occasion. With tender octopus, crisp vegetables, and a zesty dressing, it’s sure to impress. Plus, it’s customizable to suit your taste preferences.