Category: Vegetable Salad Recipes

  • Avocado Corn Salad: A Summer Delight You Can’t Resist

    Avocado Corn Salad: A Summer Delight You Can’t Resist

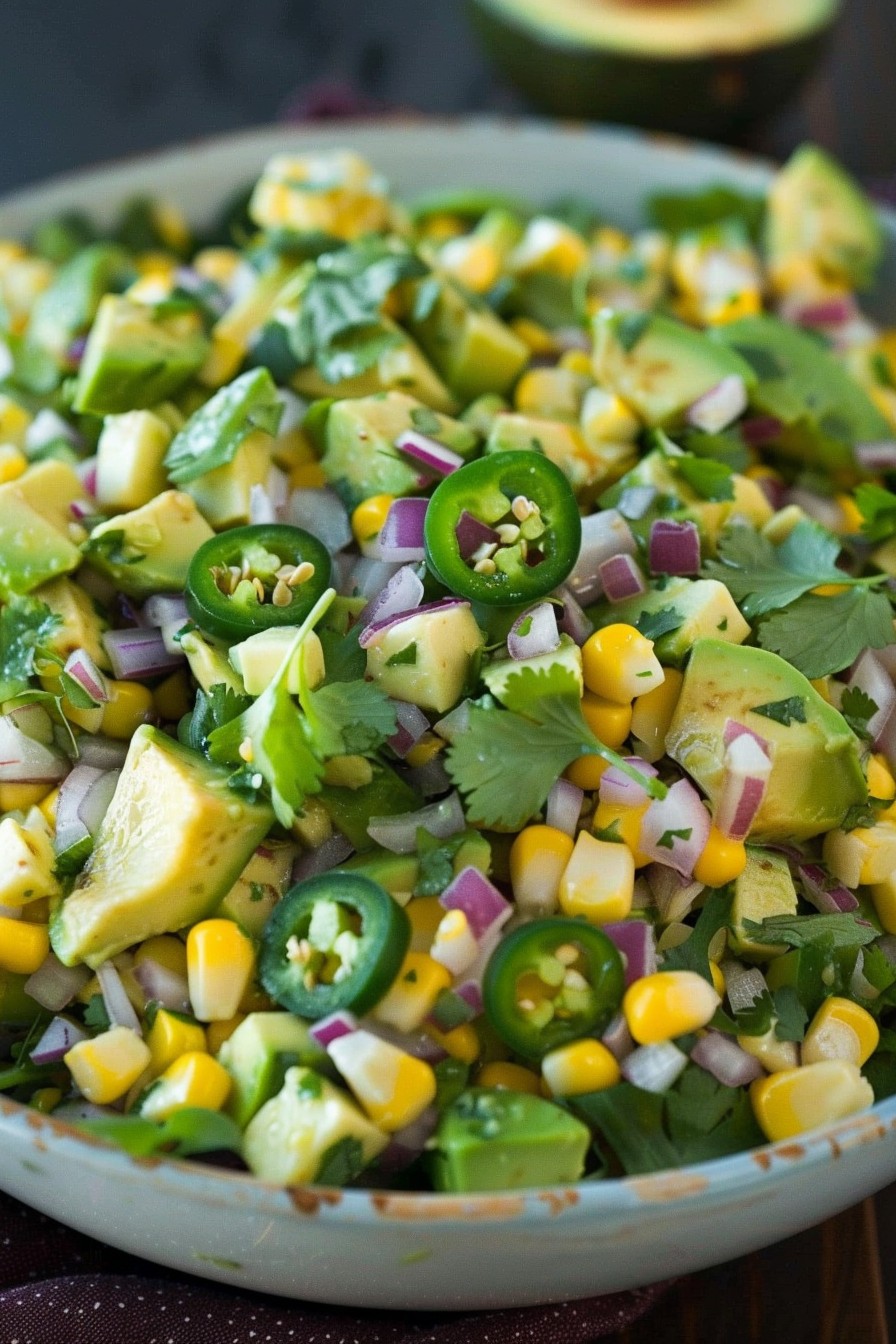
    Crisp, creamy, and bursting with flavors, this avocado corn salad is your go-to summer dish. Combining the buttery texture of avocados with the sweet crunch of corn, it’s a refreshing side that pairs perfectly with any barbecue or picnic. Let’s dive into making this colorful and nutritious salad that’s as easy to prepare as it is delicious.

    Why This Recipe Works

    • The combination of creamy avocado and sweet corn creates a perfect balance of textures and flavors.
    • Fresh lime juice adds a zesty kick, enhancing the overall taste and preventing the avocado from browning.
    • It’s incredibly versatile, allowing for numerous variations to suit any palate or dietary preference.
    • Quick and easy to prepare, making it ideal for last-minute gatherings or a healthy weekday lunch.
    • Packed with nutrients, offering a good source of healthy fats, fiber, and vitamins.

    Ingredients

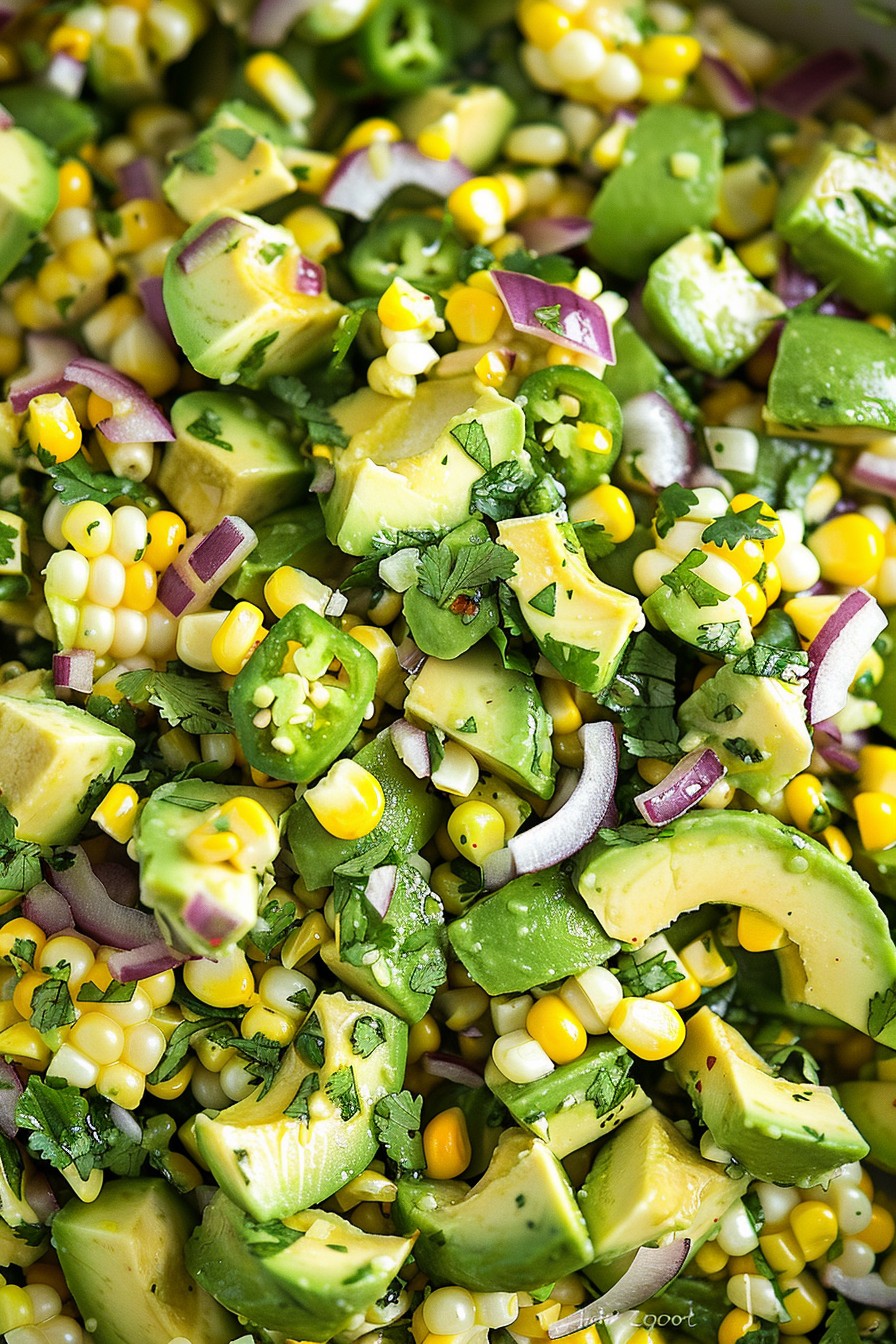
    • 2 ripe avocados, diced
    • 2 cups fresh corn kernels (about 3 ears)
    • 1/4 cup red onion, finely chopped
    • 1 jalapeño, seeded and minced (optional)
    • 1/4 cup cilantro, chopped
    • 2 tbsp lime juice
    • 1 tbsp olive oil
    • Salt and pepper to taste

    Equipment Needed

    • Mixing bowl
    • Sharp knife
    • Cutting board
    • Measuring spoons and cups

    Instructions

    Recipe For Avocado Corn Salad

    Prepare Your Ingredients

    Start by dicing the avocados into bite-sized pieces and place them in a large mixing bowl. Add the fresh corn kernels, finely chopped red onion, and minced jalapeño for a bit of heat. Tip: To easily remove corn kernels, stand the ear of corn upright in the bowl and slice downward with a sharp knife.

    Add the Flavors

    Sprinkle the chopped cilantro over the salad for a fresh, herby flavor. Drizzle with lime juice and olive oil, then season with salt and pepper to taste. Tip: The lime juice not only adds flavor but also helps keep the avocados from turning brown.

    Mix Gently

    Using a large spoon, gently toss all the ingredients together until well combined. Be careful not to mash the avocados too much; you want to maintain some of their texture. Tip: For best results, let the salad sit for about 10 minutes before serving to allow the flavors to meld together.

    Serve and Enjoy

    Transfer the salad to a serving dish and enjoy immediately. This salad is best served fresh but can be stored in the refrigerator for up to a day. Just give it a quick stir before serving again.

    Tips and Tricks

    For an extra layer of flavor, consider grilling the corn before cutting off the kernels. This adds a smoky depth that pairs beautifully with the creamy avocado. If you’re short on time, frozen corn can be a quick substitute; just thaw and drain it well before using. To make this salad ahead of time, prepare all the ingredients except the avocado. Add the avocado just before serving to keep it fresh and green. For a creamier texture, mash one avocado and dice the other, then mix as directed. This variation offers a richer consistency while still maintaining some chunks for texture.

    Recipe Variations

    • Add diced tomatoes or cucumbers for extra freshness and crunch.
    • Incorporate black beans or quinoa for a protein-packed version.
    • Swap the jalapeño for bell peppers if you prefer a milder flavor.
    • Use lemon juice instead of lime for a slightly different citrus note.
    • Top with crumbled feta or cotija cheese for a salty, tangy finish.

    Frequently Asked Questions

    Can I make this salad ahead of time?

    Yes, but for the best texture and color, add the avocado just before serving. You can prepare the other ingredients a day in advance and store them in the refrigerator. The lime juice will help keep the flavors fresh.

    Is there a substitute for fresh corn?

    Absolutely! Frozen or canned corn can be used in a pinch. If using canned, be sure to drain and rinse it well to remove any excess sodium or canning liquid. Frozen corn should be thawed and drained before adding to the salad.

    How can I make this salad spicier?

    For those who love heat, consider leaving the seeds in the jalapeño or adding a pinch of cayenne pepper. You could also incorporate diced serrano peppers for an extra kick.

    Summary

    This avocado corn salad is a vibrant, flavorful dish that’s perfect for summer gatherings. Easy to make and customizable, it’s a healthy option that doesn’t skimp on taste. Whether you’re looking for a side dish or a light lunch, this salad is sure to impress.

  • Crunchy & Cool: The Ultimate Cold Broccoli Salad Recipe

    Crunchy & Cool: The Ultimate Cold Broccoli Salad Recipe

    Oh, the joys of a cold broccoli salad on a warm day! This recipe is your ticket to a refreshing, crunchy, and utterly delicious side dish that’s perfect for picnics, potlucks, or just because. Packed with flavors and textures, it’s a crowd-pleaser that’s as easy to make as it is to love.

    Why This Recipe Works

    • The combination of raw broccoli with a creamy, tangy dressing creates a perfect balance of flavors.
    • Adding crispy bacon and sharp cheddar cheese introduces a savory depth that’s irresistible.
    • Sunflower seeds bring a delightful crunch, elevating the texture profile.
    • It’s a make-ahead dish, meaning the flavors meld and improve over time.
    • Versatile and customizable, you can tweak it to suit your taste or dietary needs.

    Ingredients

    • 4 cups broccoli florets, chopped into bite-sized pieces
    • 1/2 cup mayonnaise
    • 2 tablespoons apple cider vinegar
    • 1 tablespoon sugar
    • 1/2 teaspoon salt
    • 1/4 teaspoon black pepper
    • 1/2 cup shredded sharp cheddar cheese
    • 1/4 cup red onion, finely diced
    • 1/4 cup sunflower seeds
    • 6 slices bacon, cooked and crumbled

    Equipment Needed

    • Large mixing bowl
    • Whisk
    • Measuring cups and spoons
    • Knife and cutting board
    • Skillet (for bacon)

    Instructions

    Cold Broccoli Salad Recipe

    Step 1: Prep Your Broccoli

    Start by washing your broccoli florets under cold water. Pat them dry with a clean towel or paper towels to remove excess moisture. Chop the florets into bite-sized pieces, ensuring they’re small enough to eat comfortably but large enough to retain a satisfying crunch. Place the chopped broccoli in a large mixing bowl. Tip: For extra crispiness, you can chill the broccoli in the fridge for about 30 minutes before mixing.

    Step 2: Make the Dressing

    In a small bowl, whisk together the mayonnaise, apple cider vinegar, sugar, salt, and black pepper until smooth. The sugar helps balance the vinegar’s acidity, creating a dressing that’s tangy yet sweet. Adjust the seasoning to your taste, keeping in mind that the flavors will intensify as the salad chills. Tip: For a lighter version, you can substitute half of the mayonnaise with Greek yogurt.

    Step 3: Combine the Ingredients

    Pour the dressing over the broccoli in the large mixing bowl. Add the shredded cheddar cheese, diced red onion, sunflower seeds, and crumbled bacon. Gently toss everything together until the broccoli is evenly coated with the dressing and the other ingredients are well distributed. Tip: If you’re not a fan of raw onion, you can soak the diced pieces in cold water for 10 minutes to mellow their flavor.

    Step 4: Chill Before Serving

    Cover the bowl with plastic wrap or transfer the salad to an airtight container. Refrigerate for at least 1 hour before serving. This resting period allows the flavors to meld together and the broccoli to slightly soften, making the salad even more delicious. For best results, chill for 2-4 hours.

    Tips and Tricks

    For those looking to take their cold broccoli salad to the next level, consider these advanced tips. First, toasting the sunflower seeds in a dry skillet over medium heat for 2-3 minutes can enhance their nutty flavor. Second, if you’re preparing this salad for a crowd, doubling the recipe is easy, but remember to mix in the bacon and sunflower seeds just before serving to maintain their crunch. Lastly, for a vegetarian version, omit the bacon and add smoked almonds for a similar depth of flavor.

    Recipe Variations

    • Swap the cheddar cheese for feta or goat cheese for a different flavor profile.
    • Add dried cranberries or raisins for a sweet contrast to the savory elements.
    • Include chopped apples or grapes for a fruity twist.
    • Use kale or Brussels sprouts instead of broccoli for a different green base.
    • For a spicy kick, add a pinch of cayenne pepper or diced jalapeños to the dressing.

    Frequently Asked Questions

    Can I make this salad ahead of time?

    Absolutely! In fact, making it a day in advance allows the flavors to develop more fully. Just hold off on adding the bacon and sunflower seeds until you’re ready to serve to keep them crispy.

    How long does the salad last in the fridge?

    Stored in an airtight container, the salad will keep for up to 3 days. However, it’s best enjoyed within the first 24-48 hours for optimal texture and freshness.

    Can I use frozen broccoli?

    While you can use thawed frozen broccoli, the texture will be softer than with fresh. For the best crunch and flavor, fresh broccoli is recommended.

    Summary

    This cold broccoli salad is a refreshing, crunchy, and flavorful dish perfect for any occasion. Easy to make and customizable, it’s sure to become a favorite in your recipe collection.

  • Tabouli Salad Recipe Couscous: A Fresh Twist on a Classic

    Tabouli Salad Recipe Couscous: A Fresh Twist on a Classic

    Unleash the flavors of the Mediterranean with this easy-to-make tabouli salad that swaps traditional bulgur for fluffy couscous. Perfect for picnics, potlucks, or a light lunch, this dish is as nutritious as it is delicious.

    Why This Recipe Works

    • Couscous cooks faster than bulgur, making this recipe a time-saver without sacrificing texture or taste.
    • The combination of fresh herbs and vegetables offers a refreshing crunch and a burst of flavor in every bite.
    • Lemon juice and olive oil dressing keeps it light and tangy, perfectly complementing the earthy tones of the couscous.

    Ingredients

    • 1 cup couscous
    • 1 1/4 cups boiling water
    • 1/2 cup finely chopped parsley
    • 1/4 cup finely chopped mint
    • 2 medium tomatoes, diced
    • 1 cucumber, diced
    • 3 green onions, thinly sliced
    • 1/4 cup olive oil
    • 3 tablespoons lemon juice
    • 1 teaspoon salt
    • 1/2 teaspoon black pepper

    Equipment Needed

    • Medium bowl
    • Fine mesh strainer
    • Knife
    • Cutting board
    • Measuring cups and spoons

    Instructions

    Tabouli Salad Recipe Couscous

    Step 1: Prepare the Couscous

    Place the couscous in a medium bowl and pour the boiling water over it. Cover the bowl with a lid or plate and let it sit for about 5 minutes, until the couscous has absorbed all the water. Fluff it with a fork to separate the grains. Tip: For extra flavor, you can cook the couscous in vegetable broth instead of water.

    Step 2: Chop the Vegetables and Herbs

    While the couscous is resting, finely chop the parsley, mint, tomatoes, cucumber, and green onions. The key to a great tabouli is finely chopped ingredients, so take your time with this step. Tip: Using a sharp knife will make this process easier and quicker.

    Step 3: Mix the Salad

    In a large bowl, combine the fluffed couscous with the chopped vegetables and herbs. Drizzle with olive oil and lemon juice, then sprinkle with salt and black pepper. Toss everything together until well combined. Tip: Let the salad sit for about 10 minutes before serving to allow the flavors to meld together.

    Step 4: Serve and Enjoy

    Transfer the tabouli salad to a serving dish and enjoy immediately, or refrigerate it for up to 2 days. The flavors will continue to develop over time, making it even more delicious the next day.

    Tips and Tricks

    For an even more vibrant tabouli salad, consider adding diced bell peppers or radishes for extra color and crunch. If you’re not a fan of mint, you can substitute it with more parsley or even cilantro for a different flavor profile. To make this dish ahead of time, prepare all the ingredients but wait to add the dressing until just before serving to keep the salad fresh and crisp.

    Recipe Variations

    • Add feta cheese or chickpeas for a protein boost.
    • Swap the couscous for quinoa or bulgur wheat for a different texture.
    • Include avocado for a creamy twist.
    • Use lime juice instead of lemon juice for a slightly different tang.
    • Add a pinch of cumin or coriander for an extra layer of flavor.

    Frequently Asked Questions

    Q: Can I make this recipe gluten-free?
    A: Absolutely! Just substitute the couscous with a gluten-free grain like quinoa or rice. The rest of the ingredients are naturally gluten-free, so you won’t need to make any other changes.

    Q: How long does tabouli salad last in the fridge?
    A: Stored in an airtight container, tabouli salad can last up to 2 days in the refrigerator. However, the longer it sits, the more the herbs will wilt, so it’s best enjoyed fresh.

    Q: Can I freeze tabouli salad?
    A: Freezing is not recommended as the fresh vegetables and herbs will lose their texture and flavor when thawed.

    Summary

    This couscous tabouli salad is a quick, flavorful, and versatile dish that’s perfect for any occasion. With its fresh ingredients and simple preparation, it’s sure to become a favorite in your recipe collection.

  • Roasted Butternut Salad Recipe: A Fall Favorite That’s Easy to Love

    Roasted Butternut Salad Recipe: A Fall Favorite That’s Easy to Love

    Very few dishes capture the essence of fall quite like a roasted butternut salad. This recipe combines the sweet, nutty flavors of roasted butternut squash with fresh greens, creating a dish that’s as nutritious as it is delicious. Perfect for a cozy dinner or a festive gathering, this salad is sure to impress.

    Why This Recipe Works

    • The roasting process caramelizes the butternut squash, enhancing its natural sweetness and adding a depth of flavor that raw squash just can’t match.
    • Combining the warm squash with cool, crisp greens creates a delightful contrast in temperatures and textures.
    • The addition of a tangy vinaigrette balances the sweetness of the squash, tying all the elements together beautifully.
    • This salad is incredibly versatile, allowing for numerous variations to suit any taste or dietary preference.
    • It’s a great way to incorporate more vegetables into your diet in a delicious and satisfying way.

    Ingredients

    • 1 medium butternut squash, peeled, seeded, and cubed (about 4 cups)
    • 2 tablespoons olive oil
    • 1/2 teaspoon salt
    • 1/4 teaspoon black pepper
    • 4 cups mixed greens
    • 1/4 cup dried cranberries
    • 1/4 cup crumbled feta cheese
    • 1/4 cup chopped pecans
    • 2 tablespoons balsamic vinaigrette

    Equipment Needed

    • Baking sheet
    • Parchment paper
    • Large mixing bowl
    • Salad spinner
    • Chef’s knife
    • Cutting board

    Instructions

    Roasted Butternut Salad Recipe

    Preheat and Prepare

    Preheat your oven to 400°F (204°C). Line a baking sheet with parchment paper for easy cleanup. This step ensures your butternut squash roasts evenly without sticking to the pan.

    Roast the Butternut Squash

    Toss the cubed butternut squash with olive oil, salt, and pepper on the prepared baking sheet. Spread the squash in a single layer to ensure each piece roasts perfectly. Roast for 25-30 minutes, or until the squash is tender and caramelized around the edges.

    Prepare the Salad Base

    While the squash roasts, wash and dry the mixed greens using a salad spinner. This removes excess water, ensuring your salad dressing coats the greens evenly. Place the greens in a large mixing bowl.

    Assemble the Salad

    Once the squash is roasted, let it cool slightly before adding it to the greens. Top with dried cranberries, crumbled feta cheese, and chopped pecans. Drizzle with balsamic vinaigrette and toss gently to combine.

    Serve and Enjoy

    Divide the salad among plates and serve immediately. The warmth of the squash slightly wilts the greens, creating a perfect harmony of flavors and textures.

    Tips and Tricks

    For an extra flavor boost, try roasting the butternut squash with a sprinkle of cinnamon or nutmeg. These spices complement the squash’s natural sweetness beautifully. If you’re preparing this salad ahead of time, keep the roasted squash separate until just before serving to maintain the greens’ crispness. For a nuttier flavor, toast the pecans in a dry skillet over medium heat for a few minutes before adding them to the salad.

    Recipe Variations

    • Swap the feta cheese for goat cheese or blue cheese for a different flavor profile.
    • Add sliced apples or pears for extra crunch and sweetness.
    • Include quinoa or farro to make the salad more filling.
    • Use walnuts or almonds instead of pecans for a different nutty flavor.
    • Try a maple vinaigrette instead of balsamic for a sweeter dressing option.

    Frequently Asked Questions

    Can I make this salad ahead of time?

    Yes, you can prepare the components ahead of time, but it’s best to assemble the salad just before serving to keep the greens fresh and crisp. Store the roasted squash, greens, and toppings separately in the refrigerator.

    Is there a substitute for butternut squash?

    Acorn squash or sweet potatoes make great substitutes for butternut squash in this recipe. Both options roast well and offer a similar sweetness and texture.

    Can I make this salad vegan?

    Absolutely! Simply omit the feta cheese or use a vegan cheese alternative. Ensure your vinaigrette is vegan-friendly as well.

    Summary

    This roasted butternut salad is a delightful blend of sweet and savory flavors, perfect for any fall meal. With its easy preparation and versatile nature, it’s sure to become a seasonal favorite.

  • Creamy Vegan Potato Salad: A Plant-Based Delight That Wins Hearts

    Creamy Vegan Potato Salad: A Plant-Based Delight That Wins Hearts

    Let’s dive into a dish that’s as comforting as it is cruelty-free. This vegan potato salad is the perfect side for any summer BBQ or a hearty meal on its own. Packed with flavor and texture, it’s a crowd-pleaser that even the most devout meat-eaters will love.

    Why This Recipe Works

    • Creamy without the cream: We use a clever combination of avocado and vegan mayo to achieve that rich, creamy texture without any dairy.
    • Flavor-packed: A mix of mustard, apple cider vinegar, and fresh herbs gives this salad a tangy and fresh taste profile.
    • Easy to make: With simple ingredients and straightforward steps, this recipe is accessible to cooks of all levels.
    • Versatile: Perfect for picnics, potlucks, or as a satisfying side dish.

    Ingredients

    • 2 lbs potatoes, cubed
    • 1 ripe avocado, mashed
    • 1/2 cup vegan mayonnaise
    • 2 tbsp apple cider vinegar
    • 1 tbsp Dijon mustard
    • 1/2 cup red onion, finely diced
    • 1/4 cup fresh dill, chopped
    • Salt and pepper to taste

    Equipment Needed

    • Large pot
    • Mixing bowl
    • Knife and cutting board
    • Measuring cups and spoons

    Instructions

    Potato Salad Vegan Recipe

    Step 1: Cook the Potatoes

    Start by placing your cubed potatoes in a large pot and cover them with cold water. Bring the water to a boil over high heat, then reduce to a simmer. Cook the potatoes for about 10-12 minutes, or until they’re tender but not mushy. Drain them well and let them cool slightly.

    Step 2: Prepare the Dressing

    In a mixing bowl, combine the mashed avocado, vegan mayonnaise, apple cider vinegar, and Dijon mustard. Whisk these ingredients together until smooth. This mixture will be the creamy base of your salad, so make sure it’s well blended.

    Step 3: Combine Ingredients

    Add the slightly cooled potatoes to the bowl with the dressing. Gently fold in the red onion and fresh dill, ensuring everything is evenly coated. Season with salt and pepper to taste. The key here is to mix gently to keep the potatoes from breaking apart.

    Step 4: Chill Before Serving

    For the best flavor, cover the salad and refrigerate it for at least an hour before serving. This allows the flavors to meld together beautifully.

    Step 5: Serve and Enjoy

    Once chilled, give the salad a quick stir and adjust the seasoning if necessary. Serve it cold as a refreshing side dish that’s sure to impress.

    Tips and Tricks

    For an extra crunch, consider adding some celery or pickles to the mix. If you’re not a fan of dill, parsley or cilantro can be great substitutes. To make the salad even creamier, you can add a tablespoon of tahini to the dressing. For those who like a bit of heat, a dash of cayenne pepper or some diced jalapenos can add a nice kick. Remember, the salad will thicken as it chills, so don’t worry if it seems a bit loose at first.

    Recipe Variations

    • Sweet Potato Version: Swap regular potatoes for sweet potatoes for a sweeter, nutrient-packed alternative.
    • Protein Boost: Add chickpeas or tofu cubes to turn this side into a hearty main dish.
    • Herb Variations: Experiment with different herbs like basil or tarragon for a unique flavor profile.
    • Spicy Twist: Incorporate some smoked paprika or chipotle powder for a smoky, spicy version.

    Frequently Asked Questions

    Can I make this salad ahead of time?

    Absolutely! This salad actually tastes better after it’s had time to chill and the flavors have melded together. You can make it up to two days in advance, just keep it covered in the refrigerator.

    How long does it last in the fridge?

    Stored properly in an airtight container, this vegan potato salad will stay fresh for up to 3-4 days. Just give it a good stir before serving again.

    Can I freeze this potato salad?

    Freezing is not recommended as the texture of the potatoes and avocado will change significantly upon thawing, resulting in a less appealing dish.

    Summary

    This creamy vegan potato salad is a delightful, plant-based alternative to the classic dish. Easy to make and packed with flavor, it’s perfect for any occasion. Whether you’re vegan or just looking to try something new, this recipe is sure to become a favorite.

  • Crunchy & Fresh: The Ultimate String Bean Salad Recipe

    Crunchy & Fresh: The Ultimate String Bean Salad Recipe

    A absolutely delightful dish that brings crunch and freshness to your table, this string bean salad is a must-try for anyone looking to add a vibrant, healthy side to their meal repertoire. Perfect for picnics, potlucks, or a simple family dinner, this recipe is as easy to make as it is delicious.

    Why This Recipe Works

    • The crisp texture of fresh string beans provides a satisfying crunch that contrasts beautifully with the softness of the other ingredients.
    • A simple yet flavorful dressing enhances the natural flavors of the beans without overpowering them.
    • This salad is incredibly versatile, allowing for numerous variations to suit any taste or dietary preference.
    • It’s a quick and easy recipe that doesn’t require any cooking, making it perfect for hot summer days when you don’t want to turn on the stove.
    • The combination of colors and textures makes this salad as visually appealing as it is tasty.

    Ingredients

    • 1 pound fresh string beans, trimmed and halved
    • 1/2 cup cherry tomatoes, halved
    • 1/4 cup red onion, thinly sliced
    • 1/4 cup feta cheese, crumbled
    • 2 tbsp olive oil
    • 1 tbsp lemon juice
    • 1 tsp honey
    • Salt and pepper to taste

    Equipment Needed

    • Large mixing bowl
    • Small whisk or fork
    • Measuring cups and spoons
    • Knife and cutting board

    Instructions

    String Bean Salad Recipe

    Prepare the Vegetables

    Start by washing all your vegetables thoroughly under cold water. Trim the ends off the string beans and cut them in half for bite-sized pieces. Halve the cherry tomatoes and thinly slice the red onion to ensure every bite has a bit of everything. Tip: For an extra crisp texture, you can soak the string beans in ice water for 10 minutes before preparing.

    Make the Dressing

    In a small bowl, whisk together the olive oil, lemon juice, honey, salt, and pepper until well combined. The honey will balance the acidity of the lemon juice, creating a perfectly balanced dressing. Tip: Adjust the sweetness or acidity to your liking by adding more honey or lemon juice as needed.

    Combine the Salad

    In a large mixing bowl, combine the prepared string beans, cherry tomatoes, and red onion. Drizzle the dressing over the top and toss gently to ensure all the vegetables are evenly coated. The key here is to be gentle to avoid bruising the beans or squishing the tomatoes.

    Add the Finishing Touches

    Sprinkle the crumbled feta cheese over the top of the salad for a creamy, salty contrast to the crisp vegetables. Tip: For a vegan version, simply omit the feta or substitute it with a plant-based alternative.

    Serve and Enjoy

    Let the salad sit for about 5 minutes before serving to allow the flavors to meld together. This salad is best enjoyed fresh but can be stored in the refrigerator for up to two days.

    Tips and Tricks

    For those looking to elevate their string bean salad, consider blanching the beans for about 2 minutes before adding them to the salad. This will soften them slightly while still maintaining a crunch. Another tip is to toast some nuts, like almonds or walnuts, and sprinkle them on top for added texture and flavor. If you’re making this salad ahead of time, wait to add the dressing until just before serving to keep the vegetables crisp. Experimenting with different types of vinegar in the dressing, such as balsamic or apple cider, can also add a unique twist to the flavor profile.

    Recipe Variations

    • Add grilled chicken or shrimp for a protein-packed meal.
    • Incorporate different vegetables like cucumbers or bell peppers for added color and crunch.
    • Swap the feta cheese for goat cheese or blue cheese for a different flavor profile.
    • Use a different dressing, such as a creamy avocado or tahini-based dressing, for a richer taste.
    • Add grains like quinoa or farro to make the salad more filling and nutritious.

    Frequently Asked Questions

    Can I use frozen string beans instead of fresh?

    While fresh string beans are recommended for the best texture and flavor, frozen string beans can be used in a pinch. Just be sure to thaw and drain them well before adding to the salad to prevent it from becoming watery.

    How long does this salad last in the fridge?

    This salad is best enjoyed within two days of making it. After that, the vegetables may start to lose their crunch, and the dressing can cause them to become soggy.

    Can I make this salad ahead of time?

    Yes, you can prepare the vegetables and dressing separately up to a day in advance. Just combine them right before serving to maintain the freshness and crunch of the salad.

    Summary

    This string bean salad is a crisp, refreshing, and versatile dish that’s perfect for any occasion. With its simple ingredients and easy preparation, it’s a healthy and delicious way to enjoy the bounty of the season.

  • Ramen Slaw Salad Recipe: A Crunchy, Flavorful Twist on a Classic

    Ramen Slaw Salad Recipe: A Crunchy, Flavorful Twist on a Classic

    How about we shake up your salad game with something unexpectedly delicious? This Ramen Slaw Salad combines the crunch of ramen noodles with the freshness of coleslaw, creating a dish that’s as fun to eat as it is to make. Perfect for picnics, potlucks, or just because you deserve something awesome.

    Why This Recipe Works

    • The crunch from the ramen noodles adds an unexpected texture that elevates the salad from good to unforgettable.
    • It’s a versatile dish that can serve as a side or a main, depending on your mood or the occasion.
    • The dressing is a perfect balance of sweet, tangy, and savory, making every bite a flavor explosion.
    • It’s incredibly easy to make, requiring no cooking skills, just a willingness to mix things together.
    • This salad gets better as it sits, making it a great make-ahead option for busy days.

    Ingredients

    • 1 package (3 oz) ramen noodles, crushed (flavor packet reserved)
    • 1/2 cup sliced almonds
    • 1/4 cup sunflower seeds
    • 1/4 cup vegetable oil
    • 3 tbsp apple cider vinegar
    • 2 tbsp sugar
    • 1/2 tsp salt
    • 1/4 tsp black pepper
    • 1 bag (14 oz) coleslaw mix
    • 4 green onions, thinly sliced

    Equipment Needed

    • Large mixing bowl
    • Small mixing bowl
    • Whisk
    • Measuring cups and spoons

    Instructions

    Ramen Slaw Salad Recipe

    Step 1: Toast the Noodles and Nuts

    Heat a large skillet over medium heat. Add the crushed ramen noodles, sliced almonds, and sunflower seeds. Toast them for about 5 minutes, stirring frequently, until they’re golden and fragrant. This step is crucial for unlocking all those nutty flavors and adding that irresistible crunch.

    Step 2: Whisk Together the Dressing

    In a small bowl, whisk together the vegetable oil, apple cider vinegar, sugar, salt, black pepper, and the reserved ramen flavor packet. The flavor packet is the secret weapon here, so don’t skip it! Taste and adjust the seasoning if needed.

    Step 3: Combine the Salad

    In a large bowl, toss together the coleslaw mix, green onions, and the toasted noodle mixture. Pour the dressing over the top and toss everything until well coated. The salad should be evenly dressed but not soggy.

    Step 4: Let It Marinate

    Cover the bowl and refrigerate the salad for at least 30 minutes before serving. This waiting period allows the flavors to meld together and the noodles to soften slightly, creating the perfect texture.

    Step 5: Serve and Enjoy

    Give the salad a final toss before serving to redistribute the dressing. Serve chilled for the best flavor and texture experience. Watch as this humble salad becomes the star of the meal.

    Tips and Tricks

    For an extra layer of flavor, consider adding a teaspoon of sesame oil to the dressing. If you’re serving this salad at a gathering, keep the toasted noodle mixture separate until just before serving to maintain maximum crunch. For a healthier version, you can substitute the sugar with honey or maple syrup and use olive oil instead of vegetable oil. Don’t be afraid to add other veggies like shredded carrots or bell peppers for extra color and nutrition. Lastly, if you’re not a fan of almonds, any other nuts like pecans or walnuts would work beautifully.

    Recipe Variations

    • Add shredded chicken or tofu to turn this salad into a hearty main dish.
    • Swap the apple cider vinegar for rice vinegar for a slightly different tang.
    • Include dried cranberries or raisins for a sweet contrast to the savory elements.
    • Use kale or Brussels sprouts instead of coleslaw mix for a different green base.
    • Spice it up with a dash of chili flakes or sriracha in the dressing for those who like it hot.

    Frequently Asked Questions

    Can I make this salad ahead of time? Absolutely! In fact, it’s better if you do. The flavors have time to meld, and the noodles soften to the perfect texture. Just add the toasted noodle mixture right before serving to keep it crunchy.

    How long does this salad keep? Stored in an airtight container in the fridge, it’ll stay fresh for up to 3 days. After that, the noodles may get too soft.

    Can I use a different type of noodle? Sure, but the ramen noodles are key for that unique texture and flavor. If you must substitute, try chow mein noodles, but the result won’t be quite the same.

    Summary

    This Ramen Slaw Salad is a crunchy, flavorful twist on traditional coleslaw, perfect for any occasion. Easy to make and even easier to love, it’s sure to become a go-to recipe in your collection.

  • Farro and Kale Salad Recipe: A Hearty, Healthy Bowl of Goodness

    Farro and Kale Salad Recipe: A Hearty, Healthy Bowl of Goodness

    You’re about to dive into a recipe that’s as nutritious as it is delicious. This farro and kale salad is packed with flavors and textures that will make your taste buds dance. Perfect for meal prep or a fancy dinner side, it’s a versatile dish that everyone will love.

    Why This Recipe Works

    • Farro adds a nutty flavor and chewy texture that makes the salad satisfying.
    • Kale is a superfood that brings crunch and a plethora of health benefits.
    • The lemon vinaigrette ties everything together with its bright and zesty flavor.
    • It’s customizable with your favorite add-ins like nuts, cheese, or dried fruit.
    • This salad gets better as it sits, making it perfect for leftovers.

    Ingredients

    • 1 cup farro, rinsed
    • 2 cups water
    • 1 bunch kale, stems removed and leaves chopped
    • 1/4 cup olive oil
    • 2 tbsp lemon juice
    • 1 tsp honey
    • 1/2 tsp salt
    • 1/4 tsp black pepper
    • 1/4 cup grated Parmesan cheese
    • 1/4 cup chopped walnuts

    Equipment Needed

    • Medium saucepan
    • Mixing bowls
    • Whisk
    • Knife and cutting board
    • Measuring cups and spoons

    Instructions

    Farro And Kale Salad Recipe

    Cook the Farro

    In a medium saucepan, combine the farro and water. Bring to a boil, then reduce heat to low, cover, and simmer for 25 minutes or until the farro is tender but still chewy. Drain any excess water and let it cool slightly.

    Prepare the Kale

    While the farro cooks, chop the kale into bite-sized pieces. In a large mixing bowl, massage the kale with a bit of olive oil to soften it. This step is crucial for removing the bitterness and making the kale more palatable.

    Make the Dressing

    In a small bowl, whisk together the olive oil, lemon juice, honey, salt, and pepper until well combined. Taste and adjust the seasoning as needed. This dressing is the secret to the salad’s vibrant flavor.

    Combine Everything

    Add the cooked farro to the bowl with the kale. Pour the dressing over the top and toss to combine. Sprinkle with Parmesan cheese and walnuts for added texture and flavor.

    Serve or Store

    This salad can be served immediately or stored in the refrigerator for up to 3 days. The flavors will meld together over time, making it even more delicious.

    Tips and Tricks

    For an extra flavor boost, toast the walnuts before adding them to the salad. If you’re not a fan of walnuts, try almonds or pecans instead. To make this salad vegan, omit the Parmesan cheese or use a vegan alternative. For a more filling meal, add grilled chicken or chickpeas. Always taste and adjust the dressing before adding it to the salad to ensure it’s perfectly balanced.

    Recipe Variations

    • Swap farro for quinoa or brown rice for a different grain base.
    • Add dried cranberries or cherries for a sweet contrast to the savory elements.
    • Include avocado slices for creaminess and healthy fats.
    • Use a different dressing, such as balsamic vinaigrette or tahini lemon.
    • Incorporate other greens like spinach or arugula for variety.

    Frequently Asked Questions

    Can I use another grain instead of farro?

    Absolutely! Quinoa, brown rice, or even barley would work well in this recipe. Just adjust the cooking time according to the grain you choose.

    How do I store leftovers?

    Store the salad in an airtight container in the refrigerator for up to 3 days. The flavors will continue to develop, making it even tastier the next day.

    Can I make this salad ahead of time?

    Yes, this salad is perfect for meal prep. Just wait to add the nuts and cheese until you’re ready to serve to keep them fresh and crunchy.

    Summary

    This farro and kale salad is a nutritious, flavorful dish that’s perfect for any occasion. With its hearty grains, crunchy greens, and zesty dressing, it’s a meal that satisfies on all levels.

  • Vietnamese Salad Recipe: A Crunchy, Fresh Delight

    Vietnamese Salad Recipe: A Crunchy, Fresh Delight

    Vietnamese salads are the epitome of freshness and crunch, combining vibrant vegetables, herbs, and a tangy dressing that’ll make your taste buds dance. This recipe is a foolproof way to bring a taste of Vietnam to your kitchen, with a fun twist that’ll keep you coming back for more.

    Why This Recipe Works

    • The combination of crisp vegetables and fresh herbs offers a texture and flavor contrast that’s unbeatable.
    • The homemade dressing strikes the perfect balance between sweet, sour, and savory, elevating the salad to new heights.
    • It’s incredibly versatile, allowing for numerous variations to suit any palate or dietary preference.
    • Quick and easy to prepare, making it perfect for weeknight dinners or impromptu gatherings.
    • Packed with nutrients, it’s as healthy as it is delicious.

    Ingredients

    • 2 cups shredded cabbage
    • 1 cup shredded carrots
    • 1/2 cup thinly sliced cucumber
    • 1/4 cup chopped fresh mint
    • 1/4 cup chopped fresh cilantro
    • 2 tbsp roasted peanuts, crushed
    • For the dressing: 3 tbsp fish sauce, 2 tbsp lime juice, 2 tbsp sugar, 1 minced garlic clove, 1 tsp chili paste

    Equipment Needed

    • Large mixing bowl
    • Small bowl for dressing
    • Whisk
    • Knife and cutting board
    • Measuring cups and spoons

    Instructions

    Vietnamese Salad Recipe

    Step 1: Prepare the Vegetables

    Start by shredding the cabbage and carrots into thin strips. The thinner they are, the better they’ll absorb the dressing. Slice the cucumber into thin half-moons for a nice texture contrast. Toss all the vegetables into a large mixing bowl. Tip: For extra crunch, you can soak the shredded cabbage in ice water for 10 minutes before draining and using.

    Step 2: Make the Dressing

    In a small bowl, whisk together the fish sauce, lime juice, sugar, minced garlic, and chili paste until the sugar is completely dissolved. Taste and adjust the flavors to your liking. Remember, the dressing should be a balance of sweet, sour, and savory. Tip: If you find the dressing too strong, dilute it with a tablespoon of water.

    Step 3: Combine and Toss

    Pour the dressing over the prepared vegetables in the large mixing bowl. Add the chopped mint and cilantro. Using clean hands or salad tongs, gently toss everything together until the vegetables are evenly coated with the dressing. This is where the magic happens, so don’t rush it. Tip: Let the salad sit for 5 minutes before serving to allow the flavors to meld.

    Step 4: Garnish and Serve

    Transfer the salad to a serving dish and sprinkle the crushed peanuts on top for an added crunch and nutty flavor. Serve immediately to enjoy the salad at its freshest. This dish is perfect on its own or as a side to grilled meats or seafood.

    Tips and Tricks

    For those looking to take their Vietnamese salad to the next level, consider these advanced tips. First, toasting the peanuts before crushing them will enhance their flavor significantly. Second, adding a handful of bean sprouts can introduce a delightful crunch and freshness. Third, for a more substantial meal, top the salad with grilled shrimp or chicken. Remember, the key to a great salad is in the balance of textures and flavors, so don’t be afraid to experiment.

    Recipe Variations

    • For a vegetarian version, substitute the fish sauce with soy sauce or a vegan fish sauce alternative.
    • Add mango or papaya for a sweet twist that complements the tangy dressing beautifully.
    • Incorporate rice noodles to turn the salad into a more filling main dish.
    • Use different herbs like Thai basil or Vietnamese coriander for a unique flavor profile.
    • For a spicy kick, increase the amount of chili paste or add fresh sliced chilies.

    Frequently Asked Questions

    Can I make this salad ahead of time?

    Yes, you can prepare the vegetables and dressing separately a few hours in advance. However, it’s best to combine them just before serving to maintain the salad’s crunch and freshness. If you must assemble it ahead, keep the dressing on the side and add it at the last minute.

    What can I use instead of fish sauce?

    If you’re not a fan of fish sauce, you can use soy sauce or tamari for a similar umami flavor. For a completely vegan option, look for vegan fish sauce alternatives available at Asian grocery stores or online.

    How long does the salad keep?

    The salad is best enjoyed fresh but can be stored in the refrigerator for up to a day. Keep in mind that the vegetables will soften over time, especially after being dressed. If you have leftovers, they’ll still be tasty but lack the original crunch.

    Summary

    This Vietnamese salad is a vibrant, crunchy, and flavorful dish that’s easy to make and endlessly customizable. Perfect for a light meal or a side dish, it’s sure to impress with its fresh ingredients and tangy dressing. Give it a try and bring a taste of Vietnam to your table!

  • Quick Cucumber Salad Recipe: Crisp, Cool, and Crazy Easy

    Quick Cucumber Salad Recipe: Crisp, Cool, and Crazy Easy

    Hello, salad lovers and busy bees! Here’s a recipe that’s as refreshing as a dive into the pool on a hot summer day. Perfect for those who crave something light, crunchy, and bursting with flavor without spending hours in the kitchen.

    Why This Recipe Works

    • It’s incredibly quick to prepare, taking less than 15 minutes from start to finish.
    • The combination of crisp cucumbers and a tangy dressing is irresistibly refreshing.
    • It’s versatile enough to serve as a side dish or a light main course.
    • Requires no cooking, making it perfect for hot days when you don’t want to turn on the stove.
    • It’s a great way to use up those garden-fresh cucumbers.

    Ingredients

    • 2 large cucumbers, thinly sliced
    • 1/4 cup red onion, thinly sliced
    • 2 tbsp fresh dill, chopped
    • 1/4 cup apple cider vinegar
    • 2 tbsp olive oil
    • 1 tsp sugar
    • 1/2 tsp salt
    • 1/4 tsp black pepper

    Equipment Needed

    • Mixing bowl
    • Whisk
    • Measuring cups and spoons
    • Knife and cutting board

    Instructions

    Quick Cucumber Salad Recipe

    Prepare the Cucumbers and Onions

    Start by washing the cucumbers thoroughly. No one likes a gritty salad! Thinly slice the cucumbers and red onion. The thinner, the better for maximum flavor absorption. Toss them into a large mixing bowl. Tip: If you’re not a fan of raw onion’s bite, soak the slices in cold water for 10 minutes before adding them to the salad.

    Whisk Together the Dressing

    In a small bowl, whisk together the apple cider vinegar, olive oil, sugar, salt, and black pepper until the sugar and salt are completely dissolved. This is your salad’s magic potion, so make sure it’s well combined. Tip: For a creamier dressing, add a tablespoon of Greek yogurt or mayonnaise.

    Combine and Toss

    Pour the dressing over the cucumbers and onions. Add the chopped dill. Now, roll up your sleeves and give everything a good toss. You want every slice coated in that tangy, herby goodness. Tip: Let the salad sit for 5 minutes before serving to allow the flavors to meld together beautifully.

    Tips and Tricks

    For an extra crunch, add some toasted sunflower seeds or chopped walnuts. If you’re making this salad ahead of time, hold off on adding the dressing until you’re ready to serve to keep the cucumbers crisp. For a spicy kick, add a pinch of red pepper flakes or a few slices of jalapeño. Experiment with different herbs like mint or parsley for a new flavor profile. And remember, the quality of your cucumbers makes a big difference, so choose fresh, firm ones.

    Recipe Variations

    • Add sliced avocado for a creamy texture and healthy fats.
    • Mix in some cherry tomatoes and feta cheese for a Greek twist.
    • Swap the apple cider vinegar for rice vinegar and add a splash of soy sauce for an Asian-inspired version.
    • Include some sliced radishes for an extra peppery crunch.
    • For a sweeter salad, add some thinly sliced apples or pears.

    Frequently Asked Questions

    Can I make this salad ahead of time?

    Absolutely! You can prepare the ingredients and dressing separately a day in advance. Just combine them when you’re ready to serve to keep the cucumbers crisp and fresh.

    How long does this salad last in the fridge?

    Stored in an airtight container, this salad will stay fresh for up to 2 days. However, the cucumbers may start to lose their crunch after the first day.

    Can I use a different type of vinegar?

    Yes, feel free to experiment with white wine vinegar, balsamic vinegar, or even lemon juice for a different flavor profile. Each will bring its own unique tang to the dish.

    Summary

    This quick cucumber salad is the epitome of summer freshness. With its crisp cucumbers, tangy dressing, and easy preparation, it’s sure to become a staple in your recipe collection. Perfect for picnics, potlucks, or a light weekday lunch.