Category: Vegetable Salad Recipes

  • Boiled Potato Salad Recipe: A Classic Side Dish with a Twist

    Boiled Potato Salad Recipe: A Classic Side Dish with a Twist

    Potatoes are the unsung heroes of the culinary world, and this boiled potato salad recipe is here to prove just that. Perfect for picnics, potlucks, or just because, this dish is a crowd-pleaser that’s as easy to make as it is delicious.

    Why This Recipe Works

    • The simplicity of boiled potatoes allows the flavors of the dressing and add-ins to shine.
    • Using a mix of mayonnaise and mustard creates a creamy yet tangy dressing that coats every bite.
    • Adding crunchy celery and onions provides a nice texture contrast to the soft potatoes.
    • This recipe is customizable, so you can adjust the ingredients to suit your taste.
    • It’s a make-ahead dish that tastes even better after the flavors have melded together in the fridge.

    Ingredients

    • 2 pounds of potatoes, peeled and cut into 1-inch cubes
    • 1 cup mayonnaise
    • 2 tablespoons mustard
    • 1/2 cup celery, finely chopped
    • 1/4 cup onion, finely chopped
    • Salt and pepper to taste

    Equipment Needed

    • Large pot
    • Mixing bowl
    • Knife
    • Cutting board
    • Measuring cups and spoons

    Instructions

    Boiled Potato Salad Recipe

    Step 1: Boil the Potatoes

    Fill a large pot with water and bring it to a boil over high heat. Add the potato cubes and cook for about 10-12 minutes, or until they are fork-tender but still hold their shape. Drain the potatoes and let them cool slightly.

    Step 2: Prepare the Dressing

    In a mixing bowl, combine the mayonnaise and mustard. Stir until the mixture is smooth and well blended. This will be the base of your dressing, so make sure it’s thoroughly mixed.

    Step 3: Combine Ingredients

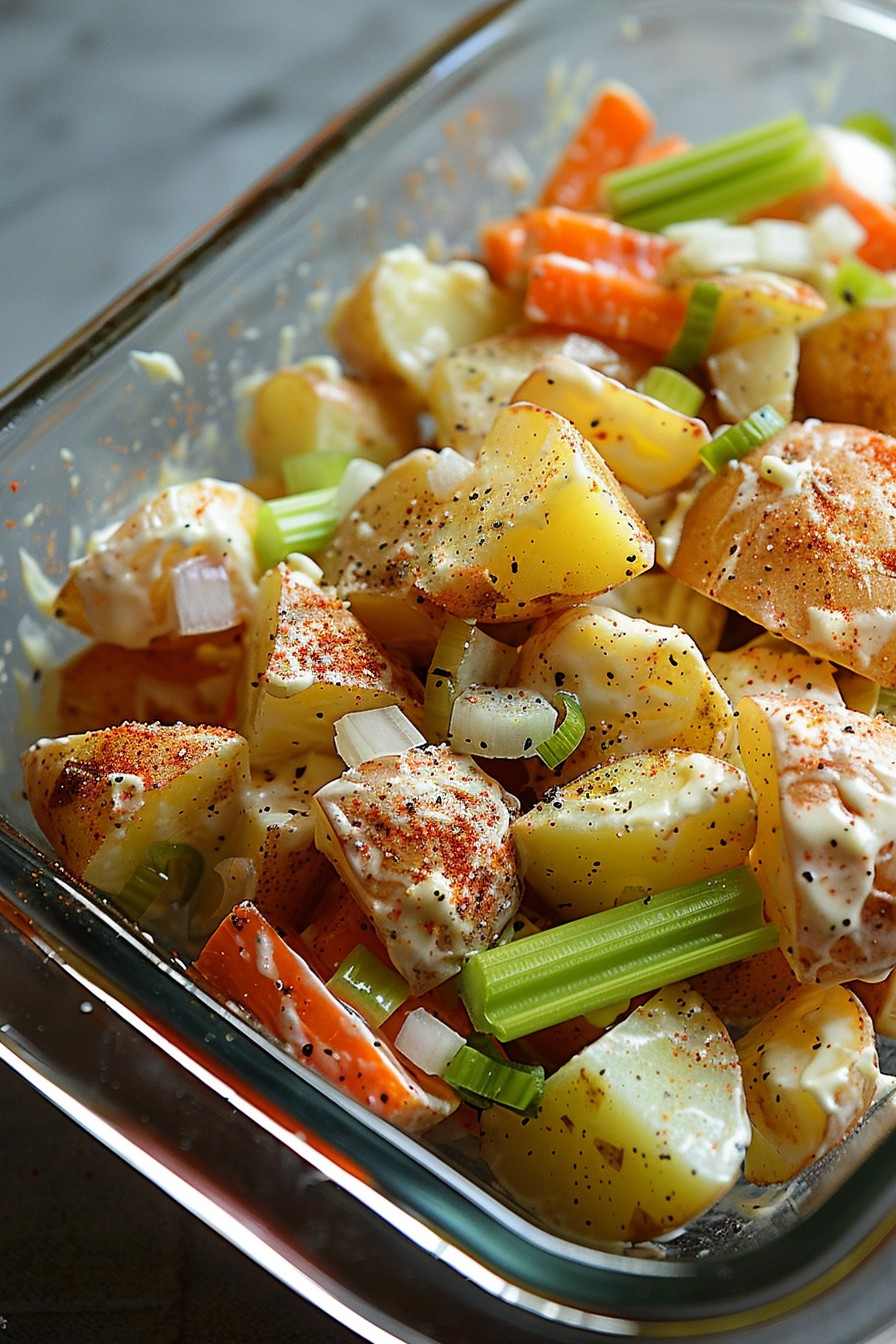
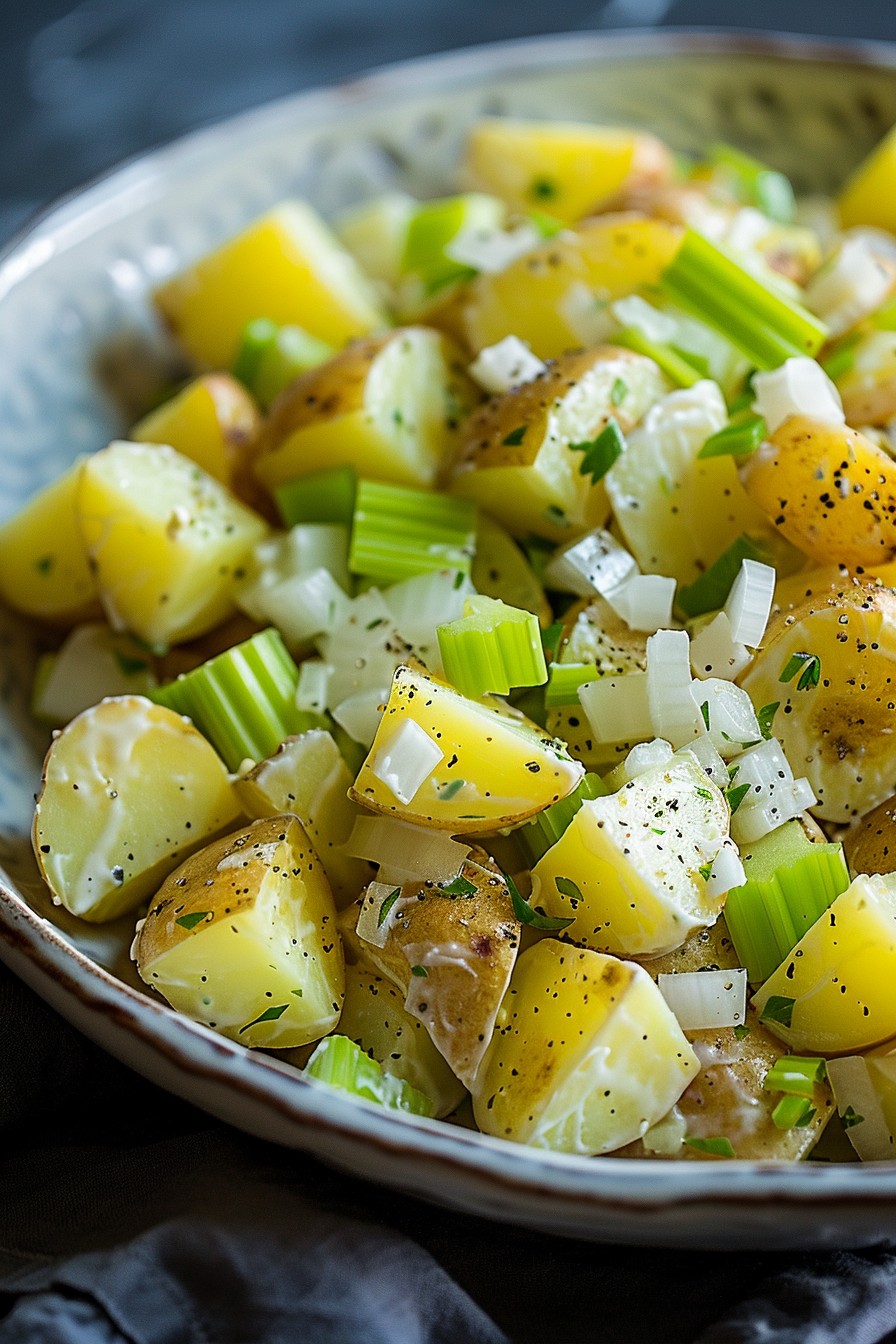
    Add the slightly cooled potatoes to the bowl with the dressing. Gently fold in the celery and onion, making sure not to mash the potatoes. Season with salt and pepper to taste.

    Step 4: Chill the Salad

    Cover the bowl with plastic wrap and refrigerate the salad for at least 1 hour before serving. This allows the flavors to meld together and the salad to chill to the perfect temperature.

    Step 5: Serve and Enjoy

    Give the salad a quick stir before serving to redistribute the dressing. Serve chilled as a side dish to your favorite main courses.

    Tips and Tricks

    For the best texture, don’t overcook the potatoes. They should be tender but still firm enough to hold their shape when mixed with the other ingredients. If you’re in a hurry, you can spread the boiled potatoes on a baking sheet to cool them faster. For extra flavor, consider adding a splash of vinegar or a sprinkle of paprika to the dressing. Always taste and adjust the seasoning before serving, as potatoes can absorb a lot of salt.

    Recipe Variations

    • Add hard-boiled eggs for a protein boost and extra texture.
    • Mix in some chopped pickles or relish for a tangy twist.
    • For a healthier version, substitute Greek yogurt for half of the mayonnaise.
    • Include fresh herbs like dill or parsley for a burst of freshness.
    • For a smoky flavor, add a bit of crumbled bacon on top before serving.

    Frequently Asked Questions

    Can I use red potatoes instead?

    Absolutely! Red potatoes hold their shape well and add a nice color to the salad. Just be sure to cut them into even-sized pieces so they cook uniformly.

    How long can I store the potato salad?

    This potato salad can be stored in an airtight container in the refrigerator for up to 3 days. Just give it a stir before serving again to refresh the flavors.

    Can I make this recipe vegan?

    Yes, you can easily make this recipe vegan by using vegan mayonnaise and omitting any animal-based add-ins like eggs or bacon.

    Summary

    This boiled potato salad recipe is a versatile and delicious side dish that’s perfect for any occasion. With its creamy dressing and customizable add-ins, it’s sure to become a favorite in your recipe collection.

  • Cucumber Salad California Roll Recipe: A Fresh Twist on a Classic

    Cucumber Salad California Roll Recipe: A Fresh Twist on a Classic

    Yes, you heard it right! We’re taking the beloved California roll and giving it a refreshing cucumber salad twist. Perfect for those hot summer days or when you’re craving something light yet satisfying. Let’s dive into this culinary adventure together!

    Why This Recipe Works

    • Combines the freshness of cucumber salad with the heartiness of a California roll for a perfect balance.
    • Uses simple, accessible ingredients to create a gourmet experience at home.
    • The recipe is versatile, allowing for numerous variations to suit any palate.

    Ingredients

    • 2 cups sushi rice, cooked and cooled
    • 1 large cucumber, thinly sliced
    • 1 avocado, sliced
    • 1/2 cup crab meat, imitation or real
    • 2 tbsp mayonnaise
    • 1 tbsp rice vinegar
    • 1 tsp sugar
    • 1/2 tsp salt
    • Nori sheets, cut into strips

    Equipment Needed

    • Bamboo sushi mat
    • Sharp knife
    • Mixing bowls

    Instructions

    Cucumber Salad California Roll Recipe

    Step 1: Prepare the Cucumber Salad

    In a mixing bowl, combine the thinly sliced cucumber with rice vinegar, sugar, and salt. Let it sit for about 10 minutes to marinate. This step ensures your cucumber salad is perfectly tangy and sweet, adding a burst of flavor to your rolls.

    Step 2: Mix the Crab Salad

    In another bowl, mix the crab meat with mayonnaise until well combined. This creamy mixture will add a rich texture and depth to your California rolls, making them irresistibly delicious.

    Step 3: Assemble the Rolls

    Lay a nori strip on your bamboo mat, spread a thin layer of sushi rice over it, then add a line of cucumber salad, avocado slices, and crab mixture. Carefully roll everything together using the mat to press firmly.

    Step 4: Slice and Serve

    Using a sharp knife, slice the roll into bite-sized pieces. Serve immediately for the best taste and texture. The contrast between the crunchy cucumber and the creamy avocado and crab is simply divine.

    Tips and Tricks

    For the best results, ensure your sushi rice is at room temperature before assembling the rolls. This prevents the nori from getting soggy. Additionally, wetting your knife slightly before slicing the rolls can help achieve cleaner cuts. Experiment with the thickness of your cucumber slices to find your perfect balance between crunch and flavor.

    Recipe Variations

    • Swap the crab meat for cooked shrimp or smoked salmon for a different protein twist.
    • Add a sprinkle of sesame seeds inside the roll or on top for extra crunch and nuttiness.
    • For a vegetarian version, omit the crab and add more avocado or include mango slices for sweetness.

    Frequently Asked Questions

    Can I make these rolls ahead of time?

    Yes, you can prepare the components ahead and assemble the rolls when ready to serve. However, for the best texture, it’s recommended to assemble no more than a few hours in advance to prevent the nori from becoming too soft.

    What can I use instead of a bamboo mat?

    If you don’t have a bamboo mat, a clean kitchen towel or even parchment paper can work in a pinch. The key is to have something that can help you roll the sushi tightly.

    How do I store leftovers?

    Leftover rolls can be stored in an airtight container in the refrigerator for up to a day. Note that the texture may not be as perfect as when freshly made, but they’ll still be tasty.

    Summary

    This Cucumber Salad California Roll recipe is a delightful twist on the classic, offering a refreshing and light option for sushi lovers. With simple ingredients and easy steps, it’s perfect for any occasion.

  • Turkish Shepherd Salad Recipe: A Refreshing Summer Delight

    Turkish Shepherd Salad Recipe: A Refreshing Summer Delight

    Zesty, vibrant, and bursting with fresh flavors, this Turkish Shepherd Salad is the perfect dish to cool down on a hot summer day. Easy to make and requiring no cooking, it’s a hassle-free recipe that brings a taste of the Mediterranean to your table.

    Why This Recipe Works

    • It’s a no-cook recipe, perfect for hot days when you don’t want to turn on the stove.
    • The combination of crisp vegetables and a tangy dressing creates a refreshing and satisfying dish.
    • It’s versatile and can be served as a side dish or a light main course.
    • The ingredients are simple and easily accessible, making it a great last-minute option.
    • It’s healthy, low in calories, and packed with vitamins and minerals.

    Ingredients

    • 2 large cucumbers, diced
    • 4 medium tomatoes, diced
    • 1 large green bell pepper, diced
    • 1 small red onion, finely chopped
    • 1/2 cup fresh parsley, chopped
    • 1/4 cup fresh mint, chopped
    • 1/4 cup olive oil
    • 2 tbsp lemon juice
    • 1 tsp salt
    • 1/2 tsp black pepper

    Equipment Needed

    • Large mixing bowl
    • Sharp knife
    • Cutting board
    • Measuring cups and spoons
    • Whisk

    Instructions

    Turkish Shepherd Salad Recipe

    Step 1: Prepare the Vegetables

    Start by washing all the vegetables thoroughly under cold running water. Dice the cucumbers, tomatoes, and green bell pepper into small, bite-sized pieces. Finely chop the red onion to ensure it distributes evenly throughout the salad. Place all the chopped vegetables into a large mixing bowl.

    Step 2: Add the Herbs

    Chop the fresh parsley and mint finely, then add them to the bowl with the vegetables. The herbs will add a fresh and aromatic flavor to the salad, enhancing its overall taste.

    Step 3: Make the Dressing

    In a small bowl, whisk together the olive oil, lemon juice, salt, and black pepper until well combined. This simple dressing will bring all the flavors of the salad together, adding a tangy and slightly spicy note.

    Step 4: Combine Everything

    Pour the dressing over the vegetables and herbs in the large mixing bowl. Gently toss everything together until all the ingredients are evenly coated with the dressing. Be careful not to mash the vegetables while mixing.

    Step 5: Serve and Enjoy

    Transfer the salad to a serving dish and let it sit for about 10 minutes before serving to allow the flavors to meld together. Serve chilled or at room temperature for the best taste experience.

    Tips and Tricks

    For an extra crunch, you can add some diced radishes or green onions to the salad. If you prefer a spicier kick, a pinch of red pepper flakes or a diced jalapeno can be mixed into the dressing. To make the salad ahead of time, prepare the vegetables and dressing separately and combine them just before serving to maintain the freshness and crunch of the vegetables.

    Recipe Variations

    • Add some crumbled feta cheese for a creamy and salty twist.
    • Include some olives or capers for a briny flavor.
    • Swap the lemon juice with pomegranate molasses for a sweeter and tangier dressing.
    • Add some grilled chicken or shrimp to turn the salad into a hearty main dish.
    • Use quinoa or bulgur wheat to add some grains and make the salad more filling.

    Frequently Asked Questions

    Can I make this salad ahead of time?

    Yes, you can prepare the vegetables and dressing a few hours in advance, but it’s best to combine them just before serving to keep the vegetables crisp and fresh.

    How long does the salad last in the fridge?

    The salad is best enjoyed the day it’s made, but it can be stored in an airtight container in the refrigerator for up to 2 days. Note that the vegetables may soften over time.

    Can I use dried herbs instead of fresh?

    While fresh herbs are recommended for their vibrant flavor, you can use dried herbs in a pinch. Use about one-third the amount of dried herbs as you would fresh, as they are more concentrated.

    Summary

    This Turkish Shepherd Salad is a light, refreshing, and easy-to-make dish that’s perfect for summer. With its crisp vegetables, fresh herbs, and tangy dressing, it’s a healthy and delicious option for any meal.

  • 3 Bean Salad Recipe with Corn: A Summer Delight

    3 Bean Salad Recipe with Corn: A Summer Delight

    Every summer gathering needs a dish that’s as vibrant as the season itself, and this 3 bean salad with corn is just that. Easy to whip up and packed with flavors, it’s the perfect side dish that promises to be a crowd-pleaser.

    Why This Recipe Works

    • It’s a no-cook recipe, making it perfect for hot summer days when you’d rather not turn on the stove.
    • The combination of beans and corn provides a delightful texture contrast and a protein-packed meal.
    • It’s versatile; serve it as a side, a main, or even as a salsa with chips.
    • The dressing is simple yet flavorful, enhancing the natural tastes of the ingredients without overpowering them.
    • It gets better with time, making it a great make-ahead dish for picnics and potlucks.

    Ingredients

    • 1 can (15 oz) black beans, drained and rinsed
    • 1 can (15 oz) kidney beans, drained and rinsed
    • 1 can (15 oz) garbanzo beans, drained and rinsed
    • 1 cup corn kernels (fresh, frozen, or canned)
    • 1/2 red onion, finely diced
    • 1/4 cup cilantro, chopped
    • 1/4 cup olive oil
    • 2 tbsp apple cider vinegar
    • 1 tbsp honey
    • 1 tsp cumin
    • Salt and pepper to taste

    Equipment Needed

    • Large mixing bowl
    • Whisk
    • Measuring cups and spoons
    • Can opener
    • Knife and cutting board

    Instructions

    3 Bean Salad Recipe With Corn

    Step 1: Prep Your Beans and Corn

    Start by draining and rinsing all three types of beans under cold water to remove any excess sodium and canning liquids. If you’re using frozen corn, thaw it by running under warm water. Fresh corn can be used raw or lightly blanched for a minute in boiling water. Add the beans and corn to a large mixing bowl.

    Step 2: Add the Aromatics

    Finely dice the red onion and chop the cilantro. Add them to the bowl with the beans and corn. The red onion adds a nice crunch and a bit of sharpness, while the cilantro brings a fresh, herby note to the salad.

    Step 3: Whisk Together the Dressing

    In a small bowl, whisk together the olive oil, apple cider vinegar, honey, and cumin until well combined. The honey balances the acidity of the vinegar, and the cumin adds a warm, earthy flavor that ties everything together.

    Step 4: Combine and Season

    Pour the dressing over the bean mixture and toss gently to combine. Season with salt and pepper to taste. Let the salad sit for at least 30 minutes before serving to allow the flavors to meld together.

    Step 5: Serve and Enjoy

    Give the salad a final toss before serving. It can be served immediately, but it’s even better if you let it chill in the fridge for a couple of hours. This salad is perfect on its own, as a side, or even as a topping for grilled meats.

    Tips and Tricks

    For an extra burst of flavor, try adding a diced avocado or some crumbled feta cheese right before serving. If you’re making this salad ahead of time, hold off on adding the cilantro until just before serving to keep it fresh and vibrant. For a spicier kick, add a diced jalapeño or a sprinkle of chili flakes. Always taste and adjust the seasoning after the salad has had time to sit, as the flavors will develop and change over time.

    Recipe Variations

    • Swap out the beans for your favorites or what you have on hand. Pinto beans or white beans would work great in this salad.
    • Add some diced bell peppers or cucumbers for extra crunch and color.
    • For a more substantial meal, add some cooked quinoa or farro.
    • Change up the dressing by using lime juice instead of vinegar and adding some chopped mint for a different flavor profile.
    • Make it creamy by stirring in a couple of tablespoons of Greek yogurt or mayonnaise into the dressing.

    Frequently Asked Questions

    Can I use dried beans instead of canned?

    Absolutely! You’ll need to cook them first until tender. About 1/2 cup of dried beans will yield the equivalent of one can. Just make sure to cool them completely before adding to the salad.

    How long does this salad keep?

    Stored in an airtight container in the fridge, this salad will keep for up to 3 days. The flavors will continue to meld, making it even more delicious over time.

    Can I make this salad vegan?

    Yes, this recipe is easily made vegan by substituting the honey with maple syrup or agave nectar. Just make sure all your other ingredients are vegan-friendly as well.

    Summary

    This 3 bean salad with corn is a refreshing, protein-packed dish that’s perfect for summer gatherings. Easy to make and full of flavor, it’s a versatile recipe that can be customized to suit your tastes. Whether you’re looking for a side dish or a light main, this salad is sure to impress.

  • Zucchini Salad Recipe: A Refreshing Summer Delight

    Zucchini Salad Recipe: A Refreshing Summer Delight

    Just when you thought zucchini couldn’t get any more versatile, here comes a salad that’s as refreshing as a dip in the pool on a hot summer day. Perfect for picnics, potlucks, or just because you deserve something light and tasty.

    Why This Recipe Works

    • It’s a fantastic way to use up that summer zucchini bounty.
    • The dressing is a zesty lemon vinaigrette that brings out the best in the zucchini.
    • It’s quick to prepare, making it perfect for last-minute gatherings.
    • The addition of nuts adds a delightful crunch.
    • It’s a healthy, low-calorie option that doesn’t skimp on flavor.

    Ingredients

    • 2 medium zucchinis, thinly sliced
    • 1/4 cup extra virgin olive oil
    • 2 tbsp lemon juice
    • 1 clove garlic, minced
    • 1/4 cup chopped walnuts
    • Salt and pepper to taste

    Equipment Needed

    • Mixing bowl
    • Whisk
    • Knife
    • Cutting board

    Instructions

    Zucchini Salad Recipe

    Prepare the Zucchini

    Start by washing your zucchinis thoroughly under cold water. Using a sharp knife, slice them into thin rounds. If you’re feeling fancy, a mandoline can give you even, paper-thin slices. Tip: Salting the zucchini lightly and letting it sit for 10 minutes can draw out excess moisture, making your salad even crisper.

    Make the Dressing

    In a mixing bowl, whisk together the olive oil, lemon juice, minced garlic, and a pinch of salt and pepper. Taste and adjust the seasoning as needed. This dressing is all about balance, so don’t be shy to tweak it to your liking.

    Combine and Toss

    Add the sliced zucchini to the bowl with the dressing. Gently toss to ensure every piece is lightly coated. The key here is to be gentle to avoid breaking the zucchini slices.

    Add the Crunch

    Sprinkle the chopped walnuts over the dressed zucchini. Toss once more to distribute the nuts evenly throughout the salad. Tip: Toasting the walnuts beforehand can add an extra layer of flavor.

    Serve Immediately

    This salad is best enjoyed fresh, so serve it right away. If you must wait, keep it chilled and add the walnuts just before serving to maintain their crunch.

    Tips and Tricks

    For an extra burst of flavor, consider adding some freshly grated Parmesan cheese or a sprinkle of red pepper flakes for heat. If you’re not a fan of walnuts, almonds or pecans make great substitutes. And for those who love a bit of sweetness, adding some dried cranberries can be a delightful twist. Remember, the key to a great zucchini salad is in the freshness of the ingredients, so always opt for the best you can find.

    Recipe Variations

    • Add some cherry tomatoes for a pop of color and sweetness.
    • Incorporate some sliced avocado for creaminess.
    • Swap the lemon juice for balsamic vinegar for a different flavor profile.
    • Add some cooked quinoa or chickpeas to turn it into a more substantial meal.
    • Use a mix of yellow and green zucchinis for a visually stunning dish.

    Frequently Asked Questions

    Can I make this salad ahead of time? While you can prepare the ingredients ahead, it’s best to dress and assemble the salad just before serving to prevent the zucchini from becoming soggy.

    Is there a substitute for walnuts? Absolutely! Any nut you prefer can work here, or you can omit them entirely if you’re allergic or not a fan.

    Can I grill the zucchini instead of using it raw? Yes, grilling the zucchini can add a smoky flavor to the salad. Just let it cool before adding the dressing and other ingredients.

    Summary

    This zucchini salad is a light, refreshing, and versatile dish that’s perfect for summer. With its simple ingredients and easy preparation, it’s sure to become a staple in your recipe collection.

  • Cucumber Cobb Salad Recipe: A Crispy Twist on a Classic

    Cucumber Cobb Salad Recipe: A Crispy Twist on a Classic

    Kickstarting your meal prep with a refreshing twist, this Cucumber Cobb Salad is your go-to for a light yet satisfying dish. Perfect for those warm summer days or when you’re craving something crunchy and colorful. Let’s dive into making this vibrant salad that’s as pleasing to the eye as it is to the palate.

    Why This Recipe Works

    • The crispness of fresh cucumbers adds a refreshing crunch that contrasts beautifully with the creamy avocado and tender chicken.
    • Hard-boiled eggs and crispy bacon bring a protein-packed punch, making this salad a hearty meal on its own.
    • A homemade buttermilk dressing ties all the flavors together with a tangy and herby note that’s irresistibly delicious.
    • It’s customizable, allowing you to adjust ingredients based on what’s in your fridge or your dietary preferences.
    • Perfect for meal prep, as the components can be prepared ahead and assembled when ready to eat.

    Ingredients

    • 2 cups diced cucumbers
    • 1 cup cherry tomatoes, halved
    • 1 avocado, diced
    • 2 hard-boiled eggs, chopped
    • 1 cup cooked chicken breast, diced
    • 4 strips bacon, cooked and crumbled
    • 1/2 cup blue cheese, crumbled
    • 1/4 cup red onion, thinly sliced
    • For the dressing: 1/2 cup buttermilk, 1/4 cup mayonnaise, 1 tbsp lemon juice, 1 tsp garlic powder, salt and pepper to taste

    Equipment Needed

    • Large mixing bowl
    • Small bowl for dressing
    • Whisk
    • Knife and cutting board
    • Measuring cups and spoons

    Instructions

    Cucumber Cobb Salad Recipe

    Prepare Your Ingredients

    Start by dicing the cucumbers, avocado, and chicken breast into bite-sized pieces. Halve the cherry tomatoes and thinly slice the red onion. Chop the hard-boiled eggs and crumble the cooked bacon. Having all your ingredients prepped and ready to go makes the assembly process a breeze.

    Make the Buttermilk Dressing

    In a small bowl, whisk together the buttermilk, mayonnaise, lemon juice, garlic powder, salt, and pepper until smooth. Taste and adjust the seasoning as needed. This dressing can be made ahead and stored in the refrigerator for up to 3 days.

    Assemble the Salad

    In a large mixing bowl, combine the diced cucumbers, cherry tomatoes, avocado, hard-boiled eggs, chicken breast, bacon, blue cheese, and red onion. Drizzle with the buttermilk dressing and gently toss to coat all the ingredients evenly.

    Serve Immediately

    For the best texture and flavor, serve the salad immediately after assembling. If you need to prepare it ahead, store the dressing separately and add it just before serving to keep the ingredients crisp.

    Tips and Tricks

    For an extra crunch, consider adding toasted nuts or seeds like almonds or sunflower seeds. If you’re not a fan of blue cheese, feta or goat cheese make excellent substitutes. To make this salad vegetarian, simply omit the chicken and bacon and add more avocado or chickpeas for protein. For a low-carb version, skip the croutons and add more cucumbers and tomatoes. Always taste your dressing before adding it to the salad to ensure it’s perfectly seasoned.

    Recipe Variations

    • Swap the chicken for grilled shrimp or salmon for a seafood twist.
    • Add quinoa or farro for an extra grain component that makes the salad even more filling.
    • Use a mix of different colored cherry tomatoes for a more visually appealing dish.
    • Try a different dressing, like a balsamic vinaigrette or a creamy ranch, to change up the flavor profile.
    • Incorporate different herbs like dill or cilantro for a fresh flavor boost.

    Frequently Asked Questions

    Can I make this salad ahead of time?

    Yes, you can prep all the ingredients ahead of time, but it’s best to assemble and add the dressing just before serving to prevent the salad from becoming soggy.

    How long does the dressing last in the fridge?

    The buttermilk dressing can be stored in an airtight container in the refrigerator for up to 3 days. Give it a good stir before using.

    Can I use a different type of cheese?

    Absolutely! While blue cheese adds a distinct flavor, feta, goat cheese, or even cheddar can be used as substitutes based on your preference.

    Summary

    This Cucumber Cobb Salad is a refreshing and hearty dish that’s perfect for any occasion. With its crisp cucumbers, creamy avocado, and tangy buttermilk dressing, it’s a delightful twist on the classic Cobb salad that’s sure to impress.

  • Sweet Potato and Kale Salad Recipe: A Flavor Fiesta in Every Bite

    Sweet Potato and Kale Salad Recipe: A Flavor Fiesta in Every Bite

    Welcome to a dish that’s as nutritious as it is delicious! This sweet potato and kale salad is the perfect blend of sweet and savory, with a crunch that’ll have you coming back for more. It’s a crowd-pleaser that’s as easy to make as it is to love.

    Why This Recipe Works

    • The combination of roasted sweet potatoes and fresh kale offers a perfect balance of textures and flavors.
    • A homemade dressing adds a zesty kick that ties all the ingredients together beautifully.
    • It’s packed with nutrients, making it a healthy choice for any meal.
    • This salad is versatile and can be customized to suit any taste preference.
    • It’s quick to prepare, making it ideal for busy weeknights or last-minute gatherings.

    Ingredients

    • 2 medium sweet potatoes, peeled and diced into 1-inch cubes
    • 1 bunch kale, stems removed and leaves chopped
    • 1/4 cup olive oil
    • 2 tbsp apple cider vinegar
    • 1 tbsp honey
    • 1/2 tsp salt
    • 1/4 tsp black pepper
    • 1/4 cup dried cranberries
    • 1/4 cup chopped walnuts

    Equipment Needed

    • Baking sheet
    • Mixing bowls
    • Whisk
    • Knife and cutting board

    Instructions

    Sweet Potato And Kale Salad Recipe

    Preheat and Prepare

    Preheat your oven to 400°F. While the oven heats, toss the diced sweet potatoes with 2 tablespoons of olive oil, salt, and pepper. Spread them out on a baking sheet in a single layer to ensure even roasting.

    Roast to Perfection

    Roast the sweet potatoes for 25-30 minutes, stirring halfway through, until they’re tender and slightly caramelized. This roasting time brings out their natural sweetness and adds a delightful texture to the salad.

    Whisk Up the Dressing

    In a small bowl, whisk together the remaining olive oil, apple cider vinegar, and honey until well combined. This dressing will add a bright and tangy flavor to the salad, perfectly complementing the sweetness of the potatoes.

    Massage the Kale

    Place the chopped kale in a large mixing bowl and drizzle with half of the dressing. Use your hands to gently massage the kale for about 2 minutes. This step softens the kale, making it more tender and easier to eat.

    Combine and Serve

    Add the roasted sweet potatoes, dried cranberries, and chopped walnuts to the bowl with the kale. Drizzle with the remaining dressing and toss everything together until well combined. Serve immediately for the freshest taste.

    Tips and Tricks

    For an extra flavor boost, try adding a sprinkle of feta cheese or goat cheese to the salad before serving. If you’re not a fan of walnuts, pecans or almonds make great substitutes. To save time, you can roast the sweet potatoes ahead of time and store them in the fridge until you’re ready to assemble the salad. For a more substantial meal, add grilled chicken or tofu to the salad. Always taste the dressing before adding it to the salad and adjust the seasoning as needed.

    Recipe Variations

    • Swap the sweet potatoes for butternut squash for a different flavor profile.
    • Use spinach instead of kale for a milder green.
    • Add quinoa or farro to make the salad more filling.
    • Try different nuts like pecans or almonds for a change in texture.
    • Experiment with different dressings, such as balsamic vinaigrette or tahini lemon.

    Frequently Asked Questions

    Can I make this salad ahead of time?

    Yes, you can prepare the components ahead of time, but it’s best to assemble the salad just before serving to keep the kale fresh and crisp. Store the roasted sweet potatoes, chopped kale, and dressing separately in the fridge.

    Is there a substitute for honey in the dressing?

    Absolutely! Maple syrup or agave nectar are great vegan alternatives to honey. They’ll provide a similar sweetness to the dressing without compromising the flavor.

    How can I make this salad more protein-rich?

    Adding grilled chicken, tofu, or chickpeas are excellent ways to boost the protein content of this salad. These additions make it a more balanced and satisfying meal.

    Summary

    This sweet potato and kale salad is a vibrant, flavorful, and nutritious dish that’s perfect for any occasion. With its easy preparation and customizable options, it’s sure to become a staple in your recipe collection.

  • Crunchy Raw Cauliflower Salad: A Veggie Delight That’s Anything But Boring

    Crunchy Raw Cauliflower Salad: A Veggie Delight That’s Anything But Boring

    Veggies often get a bad rap for being bland, but this raw cauliflower salad is here to change that narrative. Packed with flavors, textures, and a whole lot of crunch, it’s the perfect side dish or light meal that’ll have even the pickiest eaters coming back for seconds.

    Why This Recipe Works

    • Texture Galore: The combination of raw cauliflower, nuts, and seeds offers an irresistible crunch that makes every bite satisfying.
    • Flavor Bomb: A tangy dressing with a hint of sweetness brings all the ingredients together, creating a harmonious flavor profile.
    • Nutritious & Delicious: Cauliflower is a low-calorie veggie packed with vitamins, making this salad as healthy as it is tasty.
    • Quick & Easy: With no cooking required, this salad comes together in minutes, perfect for busy weeknights.

    Ingredients

    • 1 medium head of cauliflower, cut into small florets
    • 1/2 cup chopped almonds
    • 1/4 cup sunflower seeds
    • 1/4 cup dried cranberries
    • 2 tbsp olive oil
    • 1 tbsp apple cider vinegar
    • 1 tsp honey
    • Salt and pepper to taste

    Equipment Needed

    • Large mixing bowl
    • Small whisk or fork
    • Measuring cups and spoons
    • Knife and cutting board

    Instructions

    Recipe For Raw Cauliflower Salad

    Step 1: Prep Your Cauliflower

    Start by washing your cauliflower head under cold water. Pat it dry, then cut it into small, bite-sized florets. The smaller the pieces, the easier they are to eat and the more they’ll absorb the dressing. Tip: Use a sharp knife for clean cuts and to prevent the cauliflower from crumbling.

    Step 2: Toast the Nuts and Seeds

    In a dry skillet over medium heat, toast the chopped almonds and sunflower seeds for about 3-5 minutes, or until they’re golden and fragrant. Stir frequently to prevent burning. This step enhances their flavor and adds an extra crunch to your salad.

    Step 3: Whisk Together the Dressing

    In a small bowl, whisk together the olive oil, apple cider vinegar, honey, salt, and pepper until well combined. Taste and adjust the seasoning as needed. The dressing should be tangy with a slight sweetness to balance the flavors.

    Step 4: Combine All Ingredients

    In a large mixing bowl, combine the cauliflower florets, toasted nuts and seeds, and dried cranberries. Pour the dressing over the top and toss everything together until evenly coated. Tip: Let the salad sit for 10 minutes before serving to allow the flavors to meld together.

    Step 5: Serve and Enjoy

    Transfer the salad to a serving dish and enjoy immediately for the best texture. If you’re making it ahead, store it in the fridge and give it a quick toss before serving. Tip: Add a sprinkle of fresh herbs like parsley or cilantro for a pop of color and freshness.

    Tips and Tricks

    For those looking to elevate their raw cauliflower salad, consider these advanced tips. First, try roasting the cauliflower lightly for a different texture and depth of flavor. Second, experiment with different nuts and seeds like walnuts or pumpkin seeds for variety. Third, add a pinch of curry powder or smoked paprika to the dressing for an unexpected twist. Lastly, incorporating fresh fruits like diced apples or pears can add a refreshing sweetness that complements the tangy dressing perfectly.

    Recipe Variations

    • Mediterranean Twist: Add chopped Kalamata olives, feta cheese, and a lemon-olive oil dressing for a Mediterranean flair.
    • Asian Inspired: Toss in some shredded carrots, snap peas, and a dressing made with sesame oil, rice vinegar, and a touch of soy sauce.
    • Spicy Kick: Include diced jalapeños or a dash of hot sauce in the dressing for those who like it hot.
    • Protein Packed: Add grilled chicken or chickpeas to turn this salad into a hearty main dish.

    Frequently Asked Questions

    Can I make this salad ahead of time?

    Absolutely! This salad actually gets better as it sits, allowing the flavors to meld together. Just be sure to store it in an airtight container in the fridge and give it a good toss before serving. The nuts may lose a bit of their crunch over time, so you can always add a fresh handful before serving.

    Is there a substitute for honey in the dressing?

    Yes, if you’re looking for a vegan option or just don’t have honey on hand, maple syrup or agave nectar are great substitutes. They’ll provide the same sweetness with a slightly different flavor profile.

    Can I use frozen cauliflower?

    While fresh cauliflower is preferred for its crisp texture, you can use thawed frozen cauliflower in a pinch. Just be sure to pat it very dry to prevent the salad from becoming watery.

    Summary

    This raw cauliflower salad is a crunchy, flavorful, and nutritious dish that’s quick to prepare and versatile enough to suit any taste. Whether you’re looking for a light side or a hearty main, it’s sure to impress.

  • Quinoa Craisin Salad Recipe: A Nutritious & Delicious Bowl of Joy

    Quinoa Craisin Salad Recipe: A Nutritious & Delicious Bowl of Joy

    Today’s the day to shake up your salad game with this quinoa craisin salad that’s as nutritious as it is delicious. Trust me, your taste buds will thank you for this vibrant, flavorful, and utterly satisfying dish that’s perfect for any occasion.

    Why This Recipe Works

    • Quinoa is a powerhouse of protein and fiber, making this salad both filling and nutritious.
    • The sweet and tart craisins add a burst of flavor and a chewy texture that contrasts beautifully with the fluffy quinoa.
    • It’s incredibly versatile, allowing for endless variations to suit your taste or what you have in your pantry.
    • Prep is a breeze, and it keeps well, making it perfect for meal prep or potlucks.
    • The dressing is simple yet packs a punch, tying all the ingredients together harmoniously.

    Ingredients

    • 1 cup quinoa, rinsed and drained
    • 2 cups water
    • 1/2 cup craisins
    • 1/4 cup sliced almonds, toasted
    • 1/4 cup fresh parsley, chopped
    • 2 tbsp olive oil
    • 1 tbsp lemon juice
    • 1 tsp honey
    • Salt and pepper to taste

    Equipment Needed

    • Medium saucepan with lid
    • Mixing bowl
    • Whisk
    • Measuring cups and spoons
    • Knife and cutting board

    Instructions

    Quinoa Craisin Salad Recipe

    Step 1: Cook the Quinoa

    In a medium saucepan, bring the quinoa and water to a boil over high heat. Once boiling, reduce the heat to low, cover, and simmer for 15 minutes, or until the water is absorbed and the quinoa is fluffy. Remove from heat and let it sit covered for 5 minutes, then fluff with a fork. Tip: Rinsing quinoa before cooking removes its natural coating, which can taste bitter.

    Step 2: Toast the Almonds

    While the quinoa cooks, toast the sliced almonds in a dry skillet over medium heat for 3-5 minutes, stirring frequently, until they’re golden and fragrant. Watch them closely to prevent burning. Tip: Toasting nuts enhances their flavor and adds a delightful crunch to the salad.

    Step 3: Prepare the Dressing

    In a small bowl, whisk together the olive oil, lemon juice, honey, salt, and pepper until well combined. Taste and adjust the seasoning as needed. This simple dressing brings a bright and tangy flavor to the salad.

    Step 4: Combine the Salad

    In a large mixing bowl, combine the cooked quinoa, craisins, toasted almonds, and chopped parsley. Drizzle the dressing over the salad and toss gently to combine. Tip: Letting the salad sit for 10 minutes before serving allows the flavors to meld together beautifully.

    Step 5: Serve and Enjoy

    Transfer the salad to a serving dish and enjoy immediately, or refrigerate for up to 3 days. This salad is delicious on its own or as a side dish with grilled chicken or fish.

    Tips and Tricks

    For an extra flavor boost, consider adding a pinch of cinnamon or cumin to the dressing. If you’re not a fan of almonds, try substituting with pecans or walnuts for a different crunch. To make this salad even more nutritious, add some diced avocado or cucumber for extra freshness and texture. Remember, the key to a great salad is balancing flavors and textures, so don’t be afraid to experiment with what you have on hand.

    Recipe Variations

    • Swap craisins for dried cherries or apricots for a different sweet twist.
    • Add some crumbled feta or goat cheese for a creamy, tangy element.
    • Incorporate some fresh mint or basil for an herby freshness.
    • For a heartier salad, mix in some chickpeas or grilled chicken.
    • Try using lime juice instead of lemon for a different citrus note.

    Frequently Asked Questions

    Can I make this salad ahead of time? Absolutely! This salad keeps well in the fridge for up to 3 days, making it perfect for meal prep. Just give it a quick stir before serving to refresh the flavors.

    Is there a substitute for quinoa? If you’re not a fan of quinoa, you can use couscous or bulgur wheat as a substitute. Keep in mind that the cooking times may vary.

    Can I use fresh cranberries instead of craisins? While you can use fresh cranberries, they’ll add a tartness that’s different from the sweet and chewy craisins. If you do use fresh, consider sweetening them slightly before adding to the salad.

    Summary

    This quinoa craisin salad is a delightful mix of textures and flavors, offering a nutritious and delicious option for any meal. Easy to make and versatile, it’s sure to become a staple in your recipe collection.

  • Fresh & Fabulous Salad Greens Recipe: A Crunchy Delight

    Fresh & Fabulous Salad Greens Recipe: A Crunchy Delight

    Unleash the power of greens with this vibrant salad recipe that’s as nutritious as it is delicious. Perfect for a quick lunch or a side dish that steals the show.

    Why This Recipe Works

    • Combines a variety of textures and flavors for a satisfying crunch and taste.
    • Uses fresh, seasonal greens for maximum nutrition and flavor.
    • Easy to customize with your favorite toppings and dressings.
    • Quick to prepare, making it perfect for busy weeknights.
    • A great way to incorporate more vegetables into your diet.

    Ingredients

    • 4 cups mixed salad greens (washed and dried)
    • 1/2 cup cherry tomatoes (halved)
    • 1/4 cup red onion (thinly sliced)
    • 1/4 cup cucumber (sliced)
    • 1/4 cup feta cheese (crumbled)
    • 2 tbsp olive oil
    • 1 tbsp balsamic vinegar
    • Salt and pepper to taste

    Equipment Needed

    • Large salad bowl
    • Salad spinner (optional for drying greens)
    • Knife and cutting board
    • Measuring cups and spoons

    Instructions

    Salad Greens Recipe

    Step 1: Prepare Your Greens

    Start by washing your mixed salad greens thoroughly under cold water. Use a salad spinner to dry them completely, or pat them dry with a clean kitchen towel. This step ensures your salad isn’t watered down and the dressing sticks better.

    Step 2: Chop and Slice Your Veggies

    Halve the cherry tomatoes, thinly slice the red onion, and slice the cucumber into thin rounds. Uniform cuts not only make your salad look more appealing but also ensure every bite has a bit of everything.

    Step 3: Assemble Your Salad

    In a large salad bowl, combine the dried greens, cherry tomatoes, red onion, and cucumber. Toss them gently to mix. This is where your salad starts to come together, so take a moment to admire your handiwork.

    Step 4: Add the Finishing Touches

    Sprinkle the crumbled feta cheese over the top of your salad. The saltiness of the feta will complement the freshness of the greens and veggies beautifully.

    Step 5: Dress and Serve

    Drizzle olive oil and balsamic vinegar over the salad. Season with salt and pepper to taste. Toss everything together right before serving to keep the greens crisp and fresh.

    Tips and Tricks

    For an extra crunch, consider adding toasted nuts or seeds like almonds or sunflower seeds. If you’re not a fan of balsamic vinegar, lemon juice makes a great alternative for a tangy dressing. Always dress your salad right before serving to prevent the greens from wilting. Experiment with different greens like arugula or spinach for varied flavors and textures.

    Recipe Variations

    • Add grilled chicken or shrimp for a protein-packed meal.
    • Swap feta cheese for goat cheese or blue cheese for a different flavor profile.
    • Include fruits like strawberries or apples for a sweet twist.
    • Try different dressings such as honey mustard or ranch for variety.
    • Add avocado slices for a creamy texture and healthy fats.

    Frequently Asked Questions

    Can I make this salad ahead of time? Yes, you can prep the ingredients ahead, but wait to dress the salad until just before serving to keep the greens crisp.

    What other dressings work well with this salad? Almost any vinaigrette or creamy dressing pairs well. Consider a lemon tahini or a classic Caesar for something different.

    How can I make this salad more filling? Adding a protein like grilled chicken, tofu, or beans can turn this side dish into a satisfying main course.

    Summary

    This salad greens recipe is a quick, versatile, and delicious way to enjoy fresh vegetables. With endless customization options, it’s perfect for any occasion.