Category: Vegetable Salad Recipes

  • Hot Cabbage Salad Recipe: A Sizzling Twist on a Classic

    Hot Cabbage Salad Recipe: A Sizzling Twist on a Classic

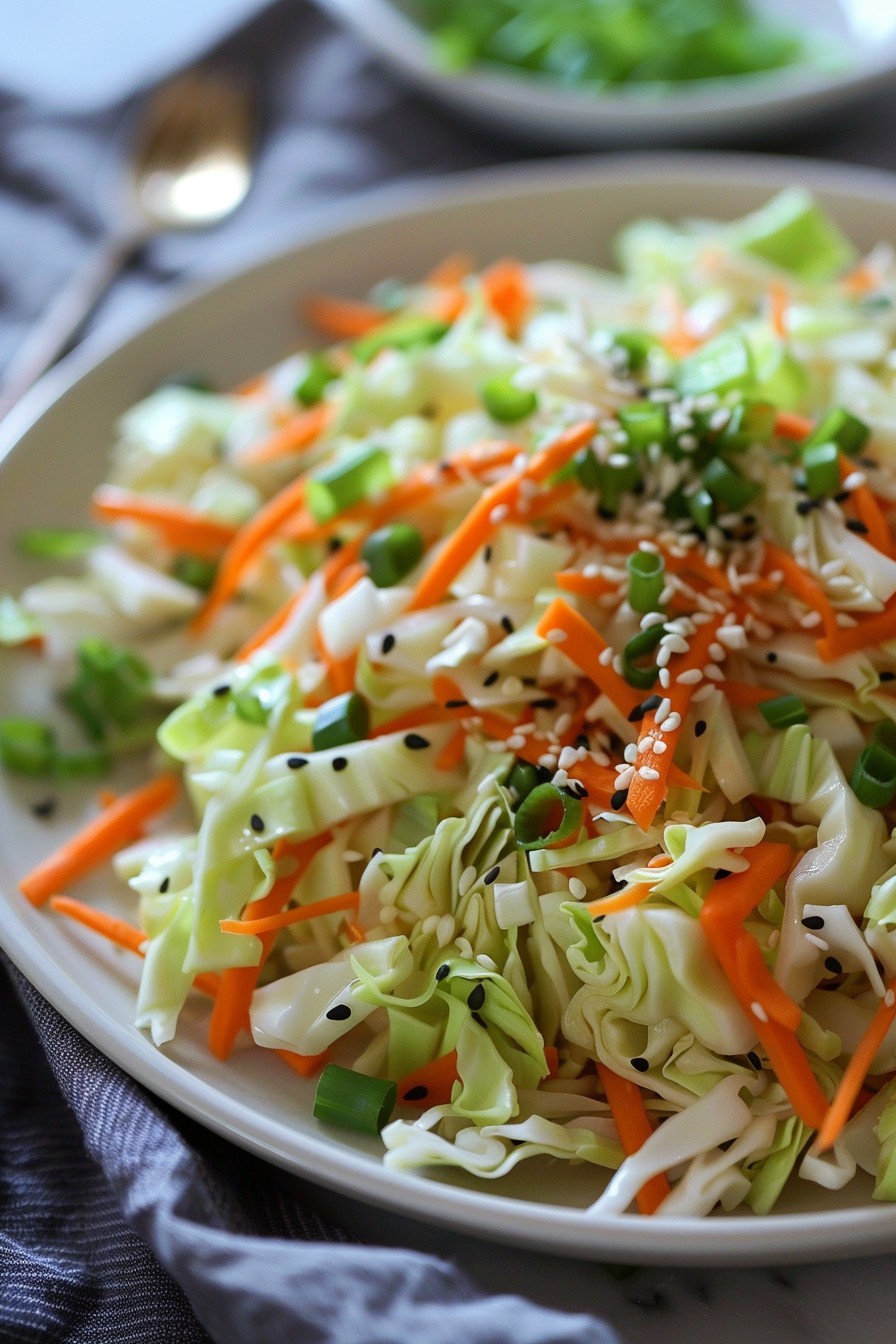
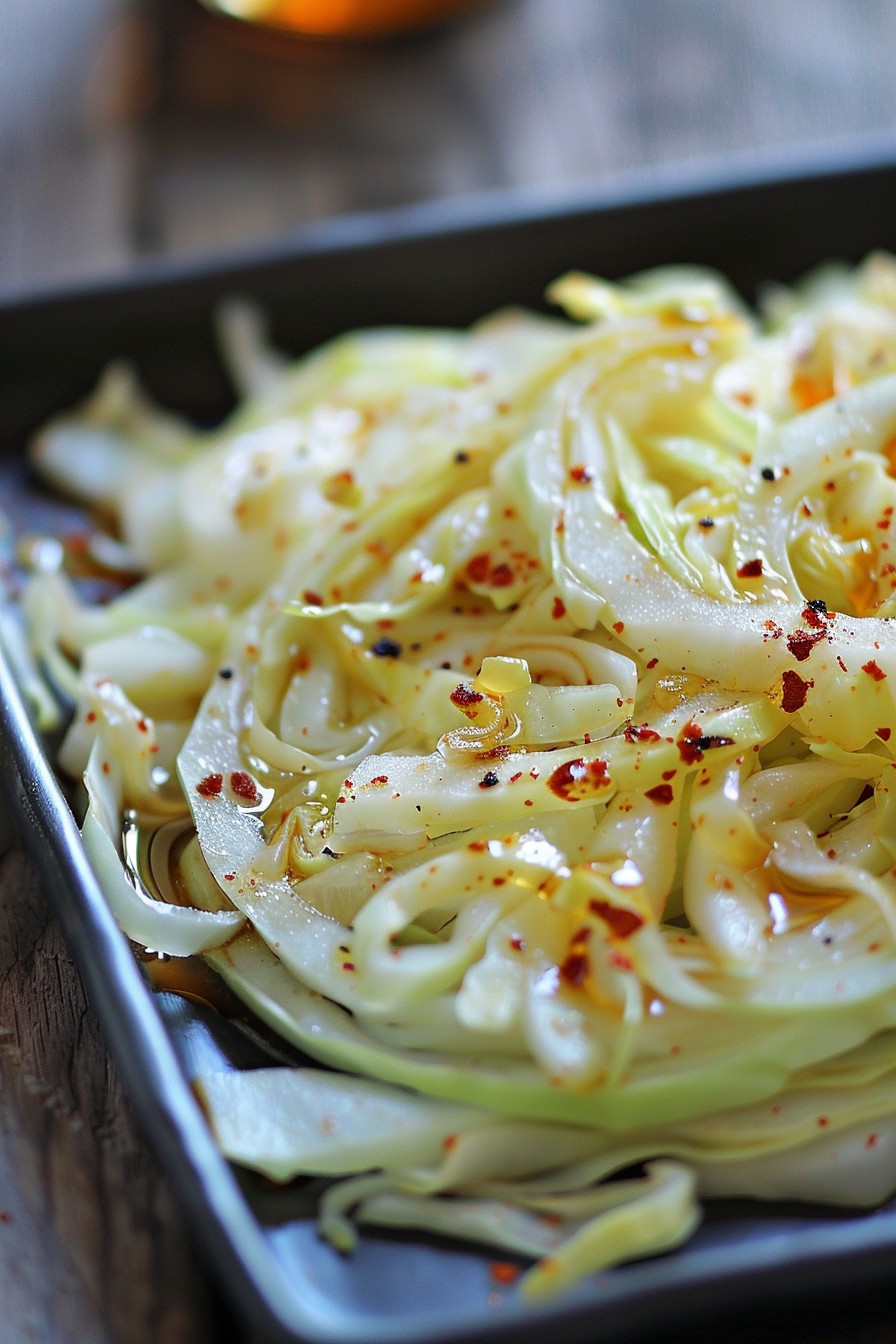
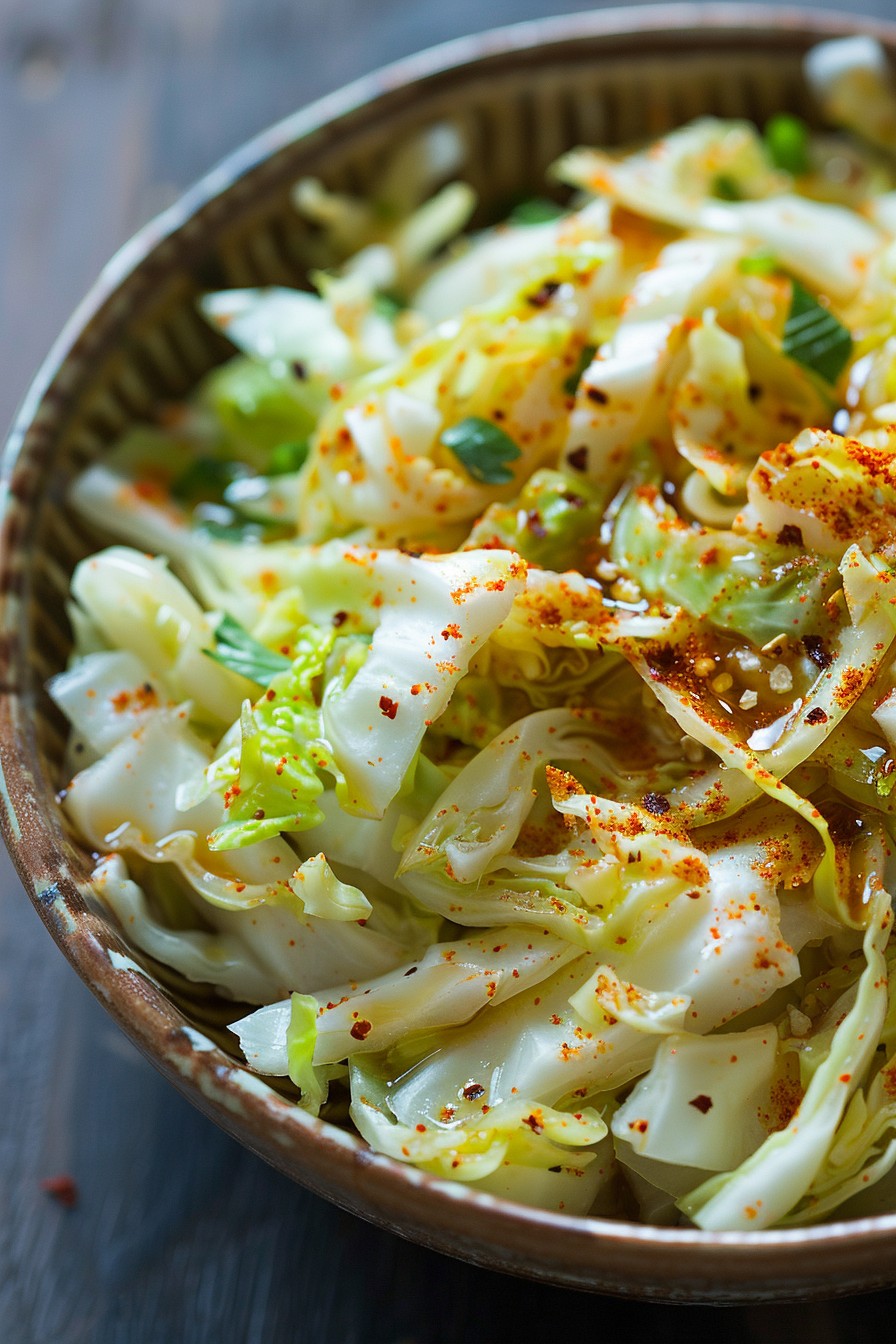
    Many think salads are just cold dishes, but this hot cabbage salad will change your mind. It’s a vibrant, flavorful dish that brings warmth and comfort to any table, perfect for those who love a little heat in their meals.

    Why This Recipe Works

    • The combination of crispy cabbage and a warm dressing creates a delightful contrast in textures.
    • It’s incredibly versatile, allowing for various additions like bacon or nuts for extra crunch.
    • This recipe is a quick fix for a nutritious side dish, ready in under 30 minutes.

    Ingredients

    • 1 medium head of cabbage, thinly sliced
    • 2 tbsp olive oil
    • 1 tbsp apple cider vinegar
    • 1 tsp honey
    • 1/2 tsp red pepper flakes
    • Salt and pepper to taste

    Equipment Needed

    • Large skillet
    • Mixing bowl
    • Whisk

    Instructions

    Hot Cabbage Salad Recipe

    Step 1: Prepare the Cabbage

    Start by thinly slicing the cabbage to ensure it cooks evenly. The thinner the slices, the better the texture will be in the final dish. Tip: Use a mandoline for uniform slices if you have one.

    Step 2: Heat the Skillet

    Heat the olive oil in a large skillet over medium heat. You’ll know it’s ready when the oil shimmers slightly. This is crucial for getting that perfect sauté on the cabbage.

    Step 3: Sauté the Cabbage

    Add the cabbage to the skillet, stirring occasionally. Cook for about 5-7 minutes until it starts to soften but still retains some crunch. Tip: Don’t overcrowd the skillet to ensure even cooking.

    Step 4: Prepare the Dressing

    In a mixing bowl, whisk together the apple cider vinegar, honey, red pepper flakes, salt, and pepper. This combination will give the salad a sweet and spicy kick.

    Step 5: Combine and Serve

    Pour the dressing over the warm cabbage and toss to coat evenly. Serve immediately to enjoy the contrast of temperatures and flavors. Tip: Garnish with sesame seeds for an extra layer of texture.

    Tips and Tricks

    For those looking to elevate this dish, consider roasting the cabbage instead of sautéing for a deeper flavor. Adding a splash of soy sauce to the dressing can introduce a umami element. If you’re serving this to guests, a sprinkle of fresh herbs like cilantro or parsley can add a pop of color and freshness. Remember, the key to this recipe is balancing the heat from the pepper flakes with the sweetness of the honey, so adjust according to your taste.

    Recipe Variations

    • Add crispy bacon bits for a smoky flavor.
    • Incorporate sliced almonds or walnuts for added crunch.
    • Swap the apple cider vinegar for balsamic for a sweeter dressing.
    • Include other vegetables like bell peppers or carrots for more color and nutrition.
    • For a vegan version, ensure the honey is substituted with maple syrup.

    Frequently Asked Questions

    Can I make this salad ahead of time?

    While it’s best served fresh, you can prepare the components ahead and combine them just before serving to maintain the texture and temperature contrast.

    Is there a substitute for apple cider vinegar?

    Yes, white wine vinegar or lemon juice can be used as alternatives, though they will slightly alter the flavor profile of the dish.

    How can I make this dish spicier?

    Increase the amount of red pepper flakes or add a dash of hot sauce to the dressing for an extra kick.

    Summary

    This hot cabbage salad is a game-changer for salad lovers, offering a warm, spicy, and sweet experience that’s both nutritious and easy to make. Perfect for any season, it’s a versatile dish that can be customized to suit any taste.

  • Crunchy Cucumber Salad with Vinegar: A Refreshing Summer Delight

    Crunchy Cucumber Salad with Vinegar: A Refreshing Summer Delight

    Perfect for those sweltering summer days, this cucumber salad recipe with vinegar is your go-to for a quick, refreshing side dish. Packed with crisp cucumbers and a tangy vinegar dressing, it’s a foolproof way to beat the heat.

    Why This Recipe Works

    • The combination of crisp cucumbers and tangy vinegar creates a refreshing flavor profile that’s hard to resist.
    • It’s incredibly easy to make, requiring just a few simple ingredients and minimal prep time.
    • This salad is versatile, serving as a perfect side dish for barbecues, picnics, or any summer meal.
    • The vinegar not only adds flavor but also helps to preserve the cucumbers, making the salad last longer in the fridge.
    • It’s a healthy, low-calorie option that doesn’t skimp on taste.

    Ingredients

    • 2 large cucumbers, thinly sliced
    • 1/2 cup white vinegar
    • 1/4 cup water
    • 2 tbsp sugar
    • 1 tsp salt
    • 1/2 tsp black pepper
    • 1/4 red onion, thinly sliced
    • 2 tbsp fresh dill, chopped

    Equipment Needed

    • Large mixing bowl
    • Whisk
    • Measuring cups and spoons
    • Sharp knife
    • Cutting board

    Instructions

    Cucumber Salad Recipe Vinegar

    Step 1: Prepare the Cucumbers

    Start by washing the cucumbers thoroughly under cold water. Using a sharp knife, slice them as thinly as possible for the best texture. If you prefer, you can peel the cucumbers, but leaving the skin on adds a nice color and extra nutrients.

    Step 2: Make the Vinegar Dressing

    In a large mixing bowl, whisk together the white vinegar, water, sugar, salt, and black pepper until the sugar and salt are completely dissolved. This creates a perfectly balanced dressing that’s tangy, sweet, and savory all at once.

    Step 3: Combine the Ingredients

    Add the sliced cucumbers and red onion to the bowl with the vinegar dressing. Gently toss to ensure every slice is coated. This is where the magic happens, as the cucumbers start to absorb the flavors of the dressing.

    Step 4: Add the Final Touches

    Sprinkle the chopped fresh dill over the salad and give it one final gentle toss. The dill adds a burst of freshness that complements the tangy vinegar perfectly.

    Step 5: Chill Before Serving

    For the best flavor, cover the bowl and refrigerate the salad for at least 30 minutes before serving. This allows the flavors to meld together beautifully.

    Tips and Tricks

    For an extra crunch, consider adding some thinly sliced radishes or bell peppers to the salad. If you’re not a fan of dill, parsley or cilantro can be great substitutes. To make the salad ahead of time, prepare the dressing and slice the cucumbers, but wait to combine them until just before serving to maintain the cucumbers’ crispness. For a sweeter version, increase the sugar to 3 tbsp. If you’re watching your sodium intake, you can reduce the salt to 1/2 tsp without sacrificing flavor.

    Recipe Variations

    • Asian-Inspired: Add a tablespoon of soy sauce and a teaspoon of sesame oil to the dressing, and garnish with sesame seeds.
    • Spicy Kick: Include a thinly sliced jalapeño or a dash of red pepper flakes for some heat.
    • Creamy Version: Stir in a couple of tablespoons of Greek yogurt or sour cream for a richer texture.
    • Herb Garden: Mix in other fresh herbs like mint or basil for a different flavor profile.
    • Fruit Twist: Add some thinly sliced apples or pears for a sweet and tangy contrast.

    Frequently Asked Questions

    Can I use apple cider vinegar instead of white vinegar?

    Absolutely! Apple cider vinegar will give the salad a slightly sweeter, fruitier flavor. It’s a great substitute if that’s what you have on hand or prefer.

    How long can I store this salad in the fridge?

    This cucumber salad will keep well in the refrigerator for up to 3 days. Just make sure it’s covered tightly to maintain freshness.

    Can I make this salad without sugar?

    Yes, you can omit the sugar or substitute it with a sugar alternative like honey or agave syrup for a different taste profile.

    Summary

    This cucumber salad with vinegar is a simple, refreshing dish that’s perfect for summer. With its crisp texture and tangy flavor, it’s sure to be a hit at any gathering.

  • Chiparelli Salad Recipe: A Crunchy, Zesty Delight

    Chiparelli Salad Recipe: A Crunchy, Zesty Delight

    Every now and then, a salad comes along that shakes up your taste buds and leaves you craving more. This Chiparelli Salad is that dish—packed with crisp vegetables, a tangy dressing, and a sprinkle of magic that makes it unforgettable.

    Why This Recipe Works

    • The combination of crunchy vegetables and a zesty dressing creates a perfect balance of textures and flavors.
    • It’s incredibly versatile, allowing you to tweak ingredients based on what’s in your fridge.
    • Prep time is minimal, making it an ideal choice for busy weeknights or last-minute gatherings.

    Ingredients

    • 2 cups chopped romaine lettuce
    • 1 cup sliced cucumber
    • 1/2 cup sliced red onion
    • 1/2 cup chopped chiparelli peppers
    • 1/4 cup olive oil
    • 2 tbsp red wine vinegar
    • 1 tsp honey
    • Salt and pepper to taste

    Equipment Needed

    • Large mixing bowl
    • Whisk
    • Measuring cups and spoons
    • Knife and cutting board

    Instructions

    Chiparelli Salad Recipe

    Step 1: Prep Your Vegetables

    Start by washing all your vegetables under cold water. Chop the romaine lettuce into bite-sized pieces, slice the cucumber and red onion thinly, and chop the chiparelli peppers. Ensuring your vegetables are uniformly cut not only makes the salad look better but also ensures every bite is perfect.

    Step 2: Make the Dressing

    In a small bowl, whisk together the olive oil, red wine vinegar, honey, and a pinch of salt and pepper. The key here is to whisk until the mixture is emulsified—meaning the oil and vinegar have come together into a smooth dressing. This usually takes about a minute of vigorous whisking.

    Step 3: Combine and Toss

    Add all your prepped vegetables to the large mixing bowl. Drizzle the dressing over the top. Using salad tongs or two large spoons, gently toss the salad until all the vegetables are evenly coated with the dressing. Be careful not to overmix, as this can make the greens wilt.

    Step 4: Season to Taste

    Give your salad a quick taste test. Depending on your preference, you might want to add a bit more salt, pepper, or even a splash more vinegar for extra tang. Remember, seasoning is key to bringing out the flavors of your ingredients.

    Step 5: Serve Immediately

    This salad is best enjoyed right after it’s made, while the vegetables are still crisp and the flavors are fresh. Serve it in a large salad bowl or divide it among individual plates for a beautiful presentation.

    Tips and Tricks

    For an extra crunch, consider adding some toasted nuts or seeds to your salad. Walnuts or sunflower seeds work particularly well. If you’re preparing the salad ahead of time, keep the dressing separate and only toss it in right before serving to prevent the vegetables from getting soggy. Lastly, for a creamier dressing, you can add a tablespoon of Greek yogurt to the mix.

    Recipe Variations

    • Add some protein: Grilled chicken, shrimp, or tofu can turn this salad into a hearty main dish.
    • Switch up the greens: Try using kale or spinach instead of romaine for a different nutrient profile.
    • Fruit it up: Adding diced apples or pears can introduce a sweet contrast to the tangy dressing.

    Frequently Asked Questions

    Can I make this salad ahead of time? Yes, but keep the dressing separate until you’re ready to serve to maintain the crispness of the vegetables.

    What can I use instead of chiparelli peppers? Banana peppers or jalapeños can be a good substitute, depending on your heat preference.

    Is there a way to make this salad vegan? Absolutely! Just ensure the honey is replaced with maple syrup or agave nectar to keep it vegan-friendly.

    Summary

    This Chiparelli Salad is a vibrant, flavorful dish that’s as easy to make as it is delicious. With its crisp vegetables and zesty dressing, it’s sure to become a go-to recipe for any occasion.

  • Pickled Beet Salad Recipe: A Vibrant Veggie Delight

    Pickled Beet Salad Recipe: A Vibrant Veggie Delight

    Tantalizingly tangy and bursting with color, this pickled beet salad is a feast for the senses. Transform humble beets into a dazzling dish that’s as nutritious as it is delicious. Perfect for picnics, potlucks, or a fancy weeknight dinner, this recipe is sure to impress.

    Why This Recipe Works

    • The natural sweetness of beets is perfectly balanced by the tangy pickling liquid, creating a flavor profile that’s complex and satisfying.
    • Pickling the beets not only enhances their taste but also preserves their vibrant color, making this salad a visual standout.
    • This recipe is incredibly versatile, allowing for numerous variations to suit any taste or occasion.
    • It’s a make-ahead dream, as the flavors only get better with time, making it perfect for meal prep or entertaining.
    • With simple ingredients and straightforward steps, this recipe is accessible to cooks of all skill levels.

    Ingredients

    • 4 medium beets, peeled and thinly sliced
    • 1 cup apple cider vinegar
    • 1/2 cup water
    • 1/4 cup sugar
    • 1 teaspoon salt
    • 1/2 teaspoon black peppercorns
    • 2 cloves garlic, thinly sliced
    • 1/2 red onion, thinly sliced
    • 2 tablespoons olive oil
    • 1/4 cup chopped walnuts, toasted
    • 2 ounces goat cheese, crumbled
    • Fresh parsley, for garnish

    Equipment Needed

    • Medium saucepan
    • Mixing bowls
    • Whisk
    • Sharp knife
    • Cutting board
    • Measuring cups and spoons

    Instructions

    Pickled Beet Salad Recipe

    Step 1: Prepare the Pickling Liquid

    In a medium saucepan, combine the apple cider vinegar, water, sugar, salt, and black peppercorns. Bring the mixture to a boil over medium-high heat, stirring occasionally to ensure the sugar dissolves completely. Once boiling, remove the saucepan from the heat and let the pickling liquid cool slightly. This liquid is the secret to transforming your beets into something extraordinary.

    Step 2: Pickle the Beets

    Place the thinly sliced beets and garlic in a large mixing bowl. Pour the warm pickling liquid over the beets, ensuring they are fully submerged. Let the beets marinate at room temperature for at least 1 hour, or for deeper flavor, cover and refrigerate overnight. The longer they pickle, the more vibrant and flavorful they’ll become.

    Step 3: Assemble the Salad

    Once the beets have pickled to your liking, drain them, reserving a tablespoon of the pickling liquid. In a large serving bowl, combine the pickled beets, sliced red onion, and olive oil. Toss gently to combine. Drizzle with the reserved pickling liquid for an extra tangy kick.

    Step 4: Add the Finishing Touches

    Sprinkle the toasted walnuts and crumbled goat cheese over the salad. Garnish with fresh parsley for a pop of color and freshness. The combination of textures and flavors here is nothing short of magical.

    Step 5: Serve and Enjoy

    This salad is best served at room temperature, allowing all the flavors to shine. It pairs beautifully with grilled meats or can stand alone as a light, refreshing meal. Either way, it’s sure to be a hit.

    Tips and Tricks

    For those looking to elevate their pickled beet salad even further, consider these advanced tips. First, experiment with different types of vinegar for the pickling liquid; balsamic or red wine vinegar can add depth and complexity. Second, toasting the walnuts brings out their nutty flavor, adding another layer of taste to the salad. Lastly, if you’re short on time, store-bought pickled beets can be a quick substitute, though homemade will always have that special touch.

    Recipe Variations

    • For a sweeter twist, add orange segments or a drizzle of honey to the salad.
    • Incorporate different nuts like pecans or almonds for varied texture and flavor.
    • Add arugula or spinach to turn this side dish into a hearty main course salad.
    • For a dairy-free version, omit the goat cheese or substitute with avocado for creaminess.
    • Spice it up by adding thinly sliced jalapeños to the pickling liquid for a kick.

    Frequently Asked Questions

    Can I use canned beets instead of fresh?

    While canned beets are convenient, they lack the firm texture and fresh flavor of raw beets. If you’re in a pinch, they can be used, but for the best results, fresh beets are recommended.

    How long will the pickled beets last in the fridge?

    Properly stored in an airtight container, pickled beets can last up to 2 weeks in the refrigerator. The flavors will continue to develop over time, making them even more delicious.

    Can I make this salad vegan?

    Absolutely! Simply omit the goat cheese or use a vegan cheese alternative. The salad is still packed with flavor and texture without the dairy.

    Summary

    This pickled beet salad is a vibrant, flavorful dish that’s as easy to make as it is impressive. With its perfect balance of sweet and tangy, and endless possibilities for customization, it’s sure to become a staple in your recipe repertoire.

  • Napa Salad Recipe: A Crunchy, Fresh Delight

    Napa Salad Recipe: A Crunchy, Fresh Delight

    Craving something light yet satisfying? This Napa salad is your go-to dish, blending crisp textures with a tangy dressing that’ll make your taste buds dance. Perfect for summer picnics or a quick weeknight side, it’s a versatile recipe that’s as easy to make as it is delicious.

    Why This Recipe Works

    • The combination of crunchy Napa cabbage and sweet carrots offers a perfect texture contrast.
    • A homemade dressing with just the right balance of tangy and sweet elevates the simple ingredients.
    • It’s incredibly versatile; add your favorite protein to turn it into a main dish.
    • Prep time is minimal, making it ideal for last-minute gatherings.
    • Healthy and refreshing, it’s a guilt-free option that doesn’t skimp on flavor.

    Ingredients

    • 1 head Napa cabbage, thinly sliced
    • 2 large carrots, julienned
    • 1/4 cup rice vinegar
    • 2 tbsp soy sauce
    • 1 tbsp sesame oil
    • 1 tbsp honey
    • 1 tsp grated ginger
    • 1 clove garlic, minced
    • 1/4 cup chopped green onions
    • 1 tbsp sesame seeds

    Equipment Needed

    • Large mixing bowl
    • Whisk
    • Measuring cups and spoons
    • Knife and cutting board

    Instructions

    Napa Salad Recipe

    Step 1: Prepare the Vegetables

    Start by washing the Napa cabbage and carrots thoroughly. Thinly slice the cabbage and julienne the carrots for uniform pieces that will ensure every bite is packed with crunch. Tip: For extra crispness, soak the sliced cabbage in ice water for 10 minutes before draining well.

    Step 2: Make the Dressing

    In a small bowl, whisk together the rice vinegar, soy sauce, sesame oil, honey, grated ginger, and minced garlic until well combined. The honey should be fully dissolved to achieve a smooth dressing. Tip: Adjust the honey or vinegar to suit your taste preference for sweetness or tanginess.

    Step 3: Combine the Salad

    In a large mixing bowl, toss the prepared Napa cabbage and carrots with the dressing until evenly coated. Sprinkle with chopped green onions and sesame seeds for an extra layer of flavor and texture. Tip: Let the salad sit for 5 minutes before serving to allow the flavors to meld together beautifully.

    Tips and Tricks

    For those looking to elevate their Napa salad, consider toasting the sesame seeds before adding them to the salad for a deeper, nuttier flavor. If you’re preparing the salad ahead of time, keep the dressing separate until just before serving to maintain the cabbage’s crunch. For a spicier kick, add a dash of chili oil or red pepper flakes to the dressing. Experiment with adding different vegetables like thinly sliced bell peppers or cucumbers for additional crunch and color.

    Recipe Variations

    • Add grilled chicken or shrimp for a protein-packed main dish.
    • Incorporate mandarin oranges and sliced almonds for a sweet and nutty twist.
    • Swap the honey for maple syrup in the dressing for a different kind of sweetness.
    • Use lime juice instead of rice vinegar for a citrusy dressing variation.
    • Add avocado slices for creaminess and healthy fats.

    Frequently Asked Questions

    Can I use regular cabbage instead of Napa cabbage?

    Absolutely! While Napa cabbage offers a unique texture and mild flavor, regular green cabbage can be a great substitute. Just keep in mind that green cabbage is more robust, so you might want to slice it thinner to mimic Napa cabbage’s tenderness.

    How long does this salad keep in the fridge?

    This salad is best enjoyed fresh but can be stored in an airtight container in the refrigerator for up to 2 days. Note that the cabbage will start to lose its crunch over time, so it’s ideal to eat it sooner rather than later.

    Is there a substitute for sesame oil?

    If you’re out of sesame oil, olive oil can be used as a substitute, though it will change the flavor profile of the dressing. For a closer match, try a small amount of tahini mixed with a neutral oil to mimic sesame oil’s nuttiness.

    Summary

    This Napa salad recipe is a testament to how simple ingredients can come together to create something truly special. With its crisp textures, balanced dressing, and endless customization options, it’s a dish that’s sure to impress. Whether you’re looking for a light side or a hearty main, this salad has you covered.

  • Beet and Potato Salad Recipe: A Colorful Twist on a Classic

    Beet and Potato Salad Recipe: A Colorful Twist on a Classic

    Craving something vibrant and delicious? This beet and potato salad is your ticket to flavor town. Combining the earthy sweetness of beets with the hearty comfort of potatoes, this dish is a feast for the eyes and the palate.

    Why This Recipe Works

    • The combination of beets and potatoes offers a perfect balance of sweetness and earthiness.
    • Roasting the vegetables enhances their natural flavors, making the salad more delicious.
    • The addition of a tangy dressing cuts through the richness, adding a refreshing contrast.
    • It’s a versatile dish that can be served warm or cold, making it perfect for any occasion.
    • This salad is not only tasty but also packed with nutrients, offering a healthy option for any meal.

    Ingredients

    • 2 medium beets, peeled and diced into 1/2-inch cubes
    • 2 medium potatoes, peeled and diced into 1/2-inch cubes
    • 2 tablespoons olive oil
    • 1 tablespoon balsamic vinegar
    • 1 teaspoon Dijon mustard
    • Salt and pepper to taste
    • 1/4 cup chopped fresh parsley
    • 1/4 cup crumbled feta cheese (optional)

    Equipment Needed

    • Baking sheet
    • Mixing bowls
    • Whisk
    • Measuring cups and spoons
    • Knife and cutting board

    Instructions

    Beet And Potato Salad Recipe

    Preheat and Prep

    Preheat your oven to 400°F. While the oven is heating, peel and dice the beets and potatoes into 1/2-inch cubes. Tip: Cutting them into uniform sizes ensures even cooking.

    Roast the Vegetables

    Toss the diced beets and potatoes with 1 tablespoon of olive oil, salt, and pepper. Spread them out on a baking sheet in a single layer. Roast for 25-30 minutes, or until tender and slightly caramelized. Tip: Stir halfway through to ensure even roasting.

    Make the Dressing

    In a small bowl, whisk together the remaining olive oil, balsamic vinegar, Dijon mustard, and a pinch of salt and pepper. Adjust the seasoning to taste.

    Combine and Serve

    Once the vegetables are done, let them cool slightly before transferring to a mixing bowl. Drizzle with the dressing and toss gently to combine. Garnish with chopped parsley and crumbled feta cheese if using. Tip: Letting the salad sit for a few minutes before serving allows the flavors to meld.

    Tips and Tricks

    For an extra flavor boost, try adding roasted garlic or a sprinkle of smoked paprika to the dressing. If you’re short on time, you can microwave the diced beets and potatoes for a few minutes before roasting to speed up the cooking process. For a creamier texture, mash some of the roasted potatoes before adding the dressing. Always taste and adjust the seasoning before serving, as the flavors can change during cooking.

    Recipe Variations

    • Add roasted walnuts or pecans for a crunchy texture.
    • Swap the feta cheese for goat cheese for a creamier taste.
    • Include other roasted vegetables like carrots or sweet potatoes for more color and flavor.
    • Use a different dressing, such as a lemon tahini or honey mustard, to change the flavor profile.
    • For a vegan version, omit the cheese or use a plant-based alternative.

    Frequently Asked Questions

    Can I make this salad ahead of time? Yes, you can prepare the salad up to a day in advance. Just keep the dressing separate and add it before serving to keep the vegetables from getting soggy.

    How do I store leftovers? Store any leftovers in an airtight container in the refrigerator for up to 3 days. The flavors will continue to develop, making it even more delicious the next day.

    Can I use canned beets? While you can use canned beets for convenience, roasting fresh beets will give the salad a better texture and more intense flavor.

    Summary

    This beet and potato salad is a delightful mix of flavors and textures, perfect for any meal. With its vibrant colors and delicious taste, it’s sure to become a favorite.

  • 7 Layer Pea Salad Recipe: A Crunchy, Creamy Dream

    7 Layer Pea Salad Recipe: A Crunchy, Creamy Dream

    Welcome to a dish that’s as fun to make as it is to eat! This 7 Layer Pea Salad is a vibrant, crunchy, and creamy delight that’s perfect for picnics, potlucks, or just because you deserve something delicious today.

    Why This Recipe Works

    • The combination of textures from the crunchy peas, crisp bacon, and creamy dressing creates a symphony in every bite.
    • It’s a make-ahead marvel, tasting even better after the flavors meld in the fridge.
    • With layers of color and flavor, it’s as visually appealing as it is tasty.
    • Simple ingredients come together for a surprisingly sophisticated dish.
    • It’s versatile, allowing for easy swaps to suit dietary needs or preferences.

    Ingredients

    • 4 cups frozen peas, thawed
    • 1 cup shredded cheddar cheese
    • 1/2 cup red onion, finely diced
    • 1 cup celery, diced
    • 6 strips bacon, cooked and crumbled
    • 1 cup mayonnaise
    • 1/2 cup sour cream
    • 1 tbsp sugar
    • 1 tsp apple cider vinegar
    • Salt and pepper to taste

    Equipment Needed

    • Large mixing bowl
    • Whisk
    • Measuring cups and spoons
    • Sharp knife
    • Cutting board

    Instructions

    7 Layer Pea Salad Recipe

    Step 1: Prepare the Dressing

    In a large mixing bowl, whisk together the mayonnaise, sour cream, sugar, and apple cider vinegar until smooth. Season with salt and pepper to taste. This creamy, tangy dressing is the glue that holds our salad together, so make sure it’s well blended.

    Step 2: Layer the Peas

    Spread the thawed peas evenly at the bottom of your serving dish. The peas are the foundation of our salad, providing a sweet, crunchy base that contrasts beautifully with the creamy layers above.

    Step 3: Add the Veggies

    Sprinkle the diced red onion and celery over the peas. These add a crisp texture and a burst of flavor that cuts through the richness of the dressing.

    Step 4: Sprinkle the Cheese

    Evenly distribute the shredded cheddar cheese over the vegetables. The cheese adds a sharp, creamy element that complements the sweetness of the peas.

    Step 5: Top with Bacon

    Finish by scattering the crumbled bacon over the top. The bacon adds a smoky, salty crunch that makes this salad irresistible.

    Step 6: Chill and Serve

    Cover the salad and refrigerate for at least 2 hours before serving. This allows the flavors to meld and the salad to reach the perfect temperature.

    Tips and Tricks

    For an extra crunch, consider adding some toasted almonds or sunflower seeds. If you’re short on time, you can use pre-cooked bacon. For a lighter version, substitute Greek yogurt for the sour cream. Always taste your dressing before adding it to the salad to ensure it’s perfectly seasoned. If you’re making this salad ahead, add the bacon just before serving to keep it crispy.

    Recipe Variations

    • Swap the cheddar cheese for feta or blue cheese for a different flavor profile.
    • Add hard-boiled eggs for extra protein.
    • Use green onions instead of red for a milder taste.
    • Incorporate diced ham instead of bacon for a different kind of smokiness.
    • For a vegetarian version, omit the bacon and add smoked paprika for that smoky flavor.

    Frequently Asked Questions

    Can I use fresh peas instead of frozen?

    Absolutely! Fresh peas can be a great substitute, but you’ll want to blanch them first to soften them slightly. Frozen peas are convenient and already perfectly tender, which is why we recommend them.

    How long does this salad keep in the fridge?

    This salad is best enjoyed within 2-3 days. After that, the vegetables may start to lose their crunch, and the dressing can become too watery.

    Can I make this salad dairy-free?

    Yes! Use dairy-free mayonnaise and sour cream alternatives, and skip the cheese or use a dairy-free cheese substitute. The salad will still be delicious.

    Summary

    This 7 Layer Pea Salad is a delightful mix of textures and flavors, perfect for any occasion. Easy to make and even easier to love, it’s sure to become a staple in your recipe collection.

  • Baby Red Potato Salad Recipe: A Creamy Dream Come True

    Baby Red Potato Salad Recipe: A Creamy Dream Come True

    Delight your taste buds with this irresistibly creamy baby red potato salad. Perfect for picnics, potlucks, or just because, this recipe is a crowd-pleaser that combines simplicity with flavor in every bite.

    Why This Recipe Works

    • The baby red potatoes hold their shape well after cooking, providing the perfect texture.
    • A creamy dressing made with mayonnaise and a touch of mustard adds richness without overpowering the potatoes.
    • Fresh herbs and crisp vegetables add brightness and crunch, balancing the creaminess of the dressing.
    • It’s versatile; serve it warm, at room temperature, or chilled, making it perfect for any occasion.
    • Easy to make ahead, allowing the flavors to meld together beautifully.

    Ingredients

    • 2 pounds baby red potatoes, halved
    • 1/2 cup mayonnaise
    • 2 tablespoons Dijon mustard
    • 1 tablespoon apple cider vinegar
    • 1/2 teaspoon salt
    • 1/4 teaspoon black pepper
    • 1/4 cup red onion, finely diced
    • 2 celery stalks, diced
    • 2 tablespoons fresh dill, chopped
    • 2 tablespoons fresh parsley, chopped

    Equipment Needed

    • Large pot
    • Mixing bowl
    • Whisk
    • Knife
    • Cutting board

    Instructions

    Baby Red Potato Salad Recipe

    Step 1: Cook the Potatoes

    Place the halved baby red potatoes in a large pot and cover with cold water by about an inch. Bring to a boil over high heat, then reduce to a simmer and cook until the potatoes are just tender, about 10-12 minutes. Tip: To check for doneness, pierce a potato with a fork; it should slide in easily but the potato should still hold its shape.

    Step 2: Prepare the Dressing

    While the potatoes cook, whisk together the mayonnaise, Dijon mustard, apple cider vinegar, salt, and black pepper in a large mixing bowl. This creamy dressing is the secret to the salad’s irresistible flavor.

    Step 3: Combine the Ingredients

    Drain the potatoes and let them cool slightly. Add the warm potatoes to the dressing along with the red onion, celery, dill, and parsley. Gently toss to combine, ensuring each potato piece is coated in the dressing. Tip: Adding the potatoes while they’re still warm helps them absorb the dressing better.

    Step 4: Chill and Serve

    Cover the salad and refrigerate for at least 1 hour to allow the flavors to meld. Before serving, give it a gentle stir and adjust the seasoning if necessary. Tip: For best results, let the salad sit at room temperature for about 15 minutes before serving to take the chill off.

    Tips and Tricks

    For an extra layer of flavor, consider adding crispy bacon bits or a sprinkle of smoked paprika. If you’re short on time, you can serve the salad immediately without chilling, though the flavors won’t be as developed. For a lighter version, substitute half of the mayonnaise with Greek yogurt. Always taste and adjust the seasoning after the salad has chilled, as flavors can mellow out in the fridge.

    Recipe Variations

    • Add hard-boiled eggs for a protein boost and extra creaminess.
    • Swap the dill and parsley for other fresh herbs like chives or tarragon for a different flavor profile.
    • Include a handful of pickles or capers for a tangy twist.
    • For a smoky flavor, add a teaspoon of smoked paprika to the dressing.
    • Make it vegan by using plant-based mayonnaise.

    Frequently Asked Questions

    Can I use a different type of potato?

    Yes, while baby red potatoes are ideal for their texture and flavor, you can use Yukon Gold or even fingerling potatoes. Just adjust the cooking time as needed based on the size and type of potato.

    How long can I store the potato salad?

    Properly stored in an airtight container in the refrigerator, the potato salad will last for up to 3 days. Be sure to give it a good stir before serving again.

    Can I make this recipe ahead of time?

    Absolutely! Making it ahead allows the flavors to meld together even more. Just keep it refrigerated and give it a final stir before serving.

    Summary

    This baby red potato salad is creamy, flavorful, and versatile, making it a must-try for any occasion. With simple ingredients and easy steps, it’s a recipe that’s sure to become a favorite.

  • Ensalada Rusa Recipe: A Creamy, Dreamy Potato Salad

    Ensalada Rusa Recipe: A Creamy, Dreamy Potato Salad

    Welcome to a twist on the classic potato salad that will have your taste buds dancing. Ensalada Rusa, or Russian Salad, is a vibrant mix of potatoes, carrots, peas, and mayonnaise that’s as fun to make as it is to eat. Let’s dive into this creamy, dreamy dish that’s perfect for picnics, potlucks, or just because.

    Why This Recipe Works

    • The combination of soft potatoes, crunchy carrots, and sweet peas creates a delightful texture contrast.
    • Using homemade mayonnaise elevates the flavor to a whole new level, but store-bought works in a pinch.
    • It’s a versatile dish that can be served as a side or a main, making it a crowd-pleaser for any occasion.
    • The recipe is easily customizable with your favorite add-ins, like boiled eggs or pickles, for an extra flavor kick.
    • It’s a make-ahead dish that tastes even better the next day, as the flavors have time to meld together beautifully.

    Ingredients

    • 2 cups diced potatoes, boiled until tender
    • 1 cup diced carrots, boiled until tender
    • 1 cup green peas, cooked
    • 1/2 cup mayonnaise
    • 1 tbsp mustard
    • Salt and pepper to taste

    Equipment Needed

    • Large pot for boiling
    • Mixing bowl
    • Knife and cutting board
    • Measuring cups and spoons

    Instructions

    Ensalada Rusa Recipe

    Step 1: Boil the Vegetables

    Start by boiling the diced potatoes and carrots in a large pot of salted water until they’re tender but still hold their shape, about 10-12 minutes. Add the green peas in the last 2 minutes of cooking. Drain well and let them cool to room temperature. Tip: Don’t overcook the vegetables to avoid a mushy salad.

    Step 2: Prepare the Dressing

    In a small bowl, whisk together the mayonnaise and mustard until smooth. This will be the creamy base of your Ensalada Rusa. Taste and adjust the seasoning with salt and pepper as needed. Tip: For a lighter version, you can substitute half of the mayonnaise with Greek yogurt.

    Step 3: Combine Everything

    In a large mixing bowl, gently fold the cooled vegetables into the dressing until everything is evenly coated. Be careful not to mash the potatoes. The salad should be creamy but still have some texture. Tip: Letting the salad chill in the fridge for at least an hour before serving enhances the flavors.

    Tips and Tricks

    For an extra layer of flavor, consider adding a tablespoon of lemon juice or vinegar to the dressing for a slight tang. If you’re making the salad ahead of time, hold off on adding the dressing until just before serving to keep the vegetables from getting soggy. For a more colorful presentation, sprinkle some chopped parsley or dill on top before serving. Experiment with the ratio of mayonnaise to mustard to find your perfect balance of creaminess and tang. Lastly, if you’re short on time, frozen mixed vegetables can be a quick and convenient substitute for fresh ones.

    Recipe Variations

    • Add diced boiled eggs for a protein boost and extra creaminess.
    • Mix in some chopped pickles or capers for a briny contrast to the sweet vegetables.
    • For a meaty version, fold in some diced ham or chicken.
    • Try using sweet potatoes instead of regular potatoes for a sweeter, more vibrant salad.
    • For a vegan version, use vegan mayonnaise and skip the eggs.

    Frequently Asked Questions

    Can I make Ensalada Rusa ahead of time?

    Absolutely! In fact, it tastes even better the next day as the flavors have more time to meld together. Just keep it refrigerated in an airtight container and give it a good stir before serving.

    How long does Ensalada Rusa last in the fridge?

    When stored properly in an airtight container, it can last up to 3-4 days in the refrigerator. Just make sure it’s kept cold and not left out at room temperature for more than 2 hours.

    Can I freeze Ensalada Rusa?

    Freezing is not recommended as the mayonnaise can separate and the vegetables may become watery upon thawing, resulting in a less than ideal texture.

    Summary

    Ensalada Rusa is a versatile, creamy, and delicious salad that’s perfect for any occasion. With its simple ingredients and easy preparation, it’s sure to become a favorite in your recipe collection.

  • Crunchy & Fresh Raw Broccoli Salad Recipe: A Veggie Delight!

    Crunchy & Fresh Raw Broccoli Salad Recipe: A Veggie Delight!

    Great news for all the veggie lovers out there! This raw broccoli salad is not only packed with nutrients but also bursting with flavors and textures that will make you forget you’re eating something so healthy. Perfect for picnics, potlucks, or just a refreshing side dish at home.

    Why This Recipe Works

    • The combination of raw broccoli with a creamy dressing creates a perfect balance of crunch and smoothness.
    • Adding nuts and dried fruits introduces a sweet and savory element that elevates the dish.
    • It’s incredibly versatile; you can easily swap out ingredients based on what you have in your pantry.
    • This salad gets better as it sits, making it a great make-ahead option for busy days.
    • It’s a crowd-pleaser that even the pickiest eaters will enjoy.

    Ingredients

    • 4 cups raw broccoli florets, chopped into bite-sized pieces
    • 1/2 cup red onion, finely diced
    • 1/2 cup dried cranberries
    • 1/2 cup sunflower seeds
    • 1/2 cup mayonnaise
    • 2 tablespoons apple cider vinegar
    • 1 tablespoon honey
    • Salt and pepper to taste

    Equipment Needed

    • Large mixing bowl
    • Whisk
    • Measuring cups and spoons
    • Knife and cutting board

    Instructions

    Raw Broccoli Salad Recipe

    Prepare the Broccoli

    Start by washing the broccoli florets under cold water. Pat them dry with a clean towel to remove any excess moisture. Chop the florets into bite-sized pieces, ensuring they’re small enough to be easily eaten but large enough to retain their crunch. Place the chopped broccoli in a large mixing bowl.

    Mix the Dressing

    In a small bowl, whisk together the mayonnaise, apple cider vinegar, and honey until smooth. The honey adds a touch of sweetness that balances the tanginess of the vinegar. Season with salt and pepper to taste. Tip: For a lighter version, you can substitute Greek yogurt for half of the mayonnaise.

    Combine the Ingredients

    Add the finely diced red onion, dried cranberries, and sunflower seeds to the bowl with the broccoli. Pour the dressing over the top and toss everything together until well coated. Tip: Letting the salad sit for at least 30 minutes before serving allows the flavors to meld together beautifully.

    Chill Before Serving

    Cover the bowl with plastic wrap and refrigerate the salad for at least 30 minutes. This step is crucial as it helps the broccoli soften slightly and absorb the dressing, making every bite flavorful. Tip: For an extra crunch, add the sunflower seeds just before serving to keep them from getting soggy.

    Serve and Enjoy

    Give the salad a final toss before serving to redistribute the dressing. Serve chilled as a refreshing side dish or a light main course. This salad pairs wonderfully with grilled meats or can stand alone as a healthy lunch option.

    Tips and Tricks

    For those looking to take this salad to the next level, consider roasting the sunflower seeds before adding them to the salad for an enhanced nutty flavor. If you’re not a fan of mayonnaise, avocado makes a great creamy substitute that adds healthy fats. To add a bit of heat, a pinch of red pepper flakes can give this salad a nice kick. For a more colorful presentation, mix in some shredded purple cabbage or carrot strips. Lastly, if you’re preparing this salad ahead of time, hold off on adding the dressing until just before serving to keep the broccoli as crisp as possible.

    Recipe Variations

    • Swap out the dried cranberries for raisins or chopped apricots for a different kind of sweetness.
    • Use almonds or walnuts instead of sunflower seeds for a different texture and flavor profile.
    • Add crumbled bacon or diced chicken for a protein-packed version that can serve as a main dish.
    • Incorporate some grated Parmesan or feta cheese for a salty, umami element.
    • For a vegan version, replace the honey with maple syrup and use vegan mayonnaise.

    Frequently Asked Questions

    Can I use frozen broccoli for this salad?

    While you can use frozen broccoli, it’s not recommended for this recipe. Frozen broccoli tends to be softer and more watery once thawed, which can make the salad soggy. Fresh broccoli provides the best crunch and texture for this dish.

    How long can I store this salad in the fridge?

    This salad can be stored in an airtight container in the refrigerator for up to 3 days. However, the longer it sits, the softer the broccoli will become. If you prefer a crunchier texture, it’s best enjoyed within the first 24 hours.

    Can I make this salad dairy-free?

    Absolutely! The recipe as written is already dairy-free, as it doesn’t call for any dairy products. Just ensure that your mayonnaise is dairy-free if you’re strictly avoiding dairy.

    Summary

    This raw broccoli salad is a crunchy, flavorful, and nutritious dish that’s perfect for any occasion. With its simple ingredients and easy preparation, it’s a versatile recipe that can be customized to suit any taste. Whether you’re looking for a healthy side dish or a light main course, this salad is sure to impress.