Blog

  • Southern Potato Salad Recipe with Egg: A Creamy Classic

    Southern Potato Salad Recipe with Egg: A Creamy Classic

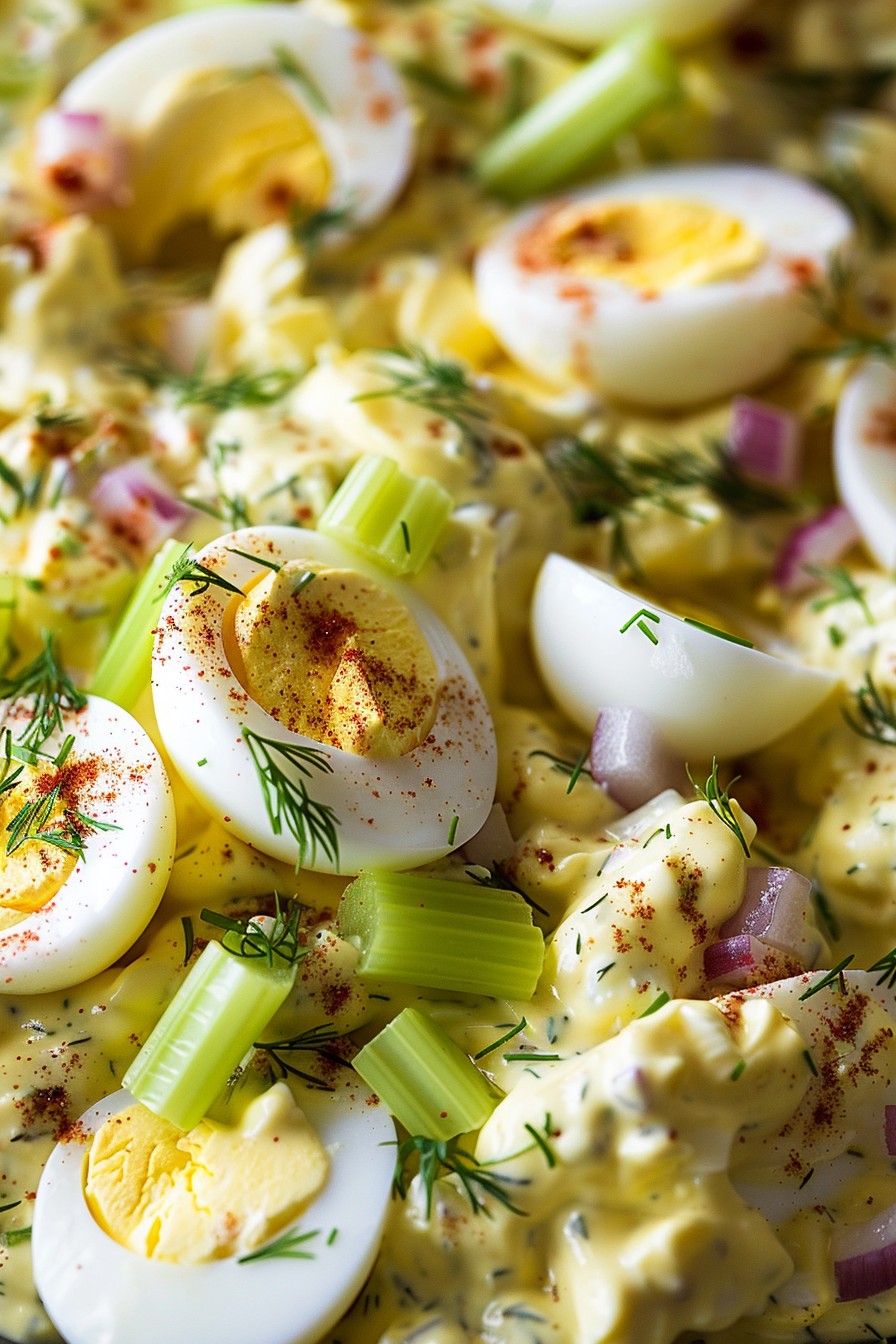
    Let’s dive into the heart of Southern cooking with this timeless potato salad recipe. Packed with creamy textures and a hint of tang, it’s the perfect side for any barbecue or family gathering. And yes, the eggs are non-negotiable!

    Why This Recipe Works

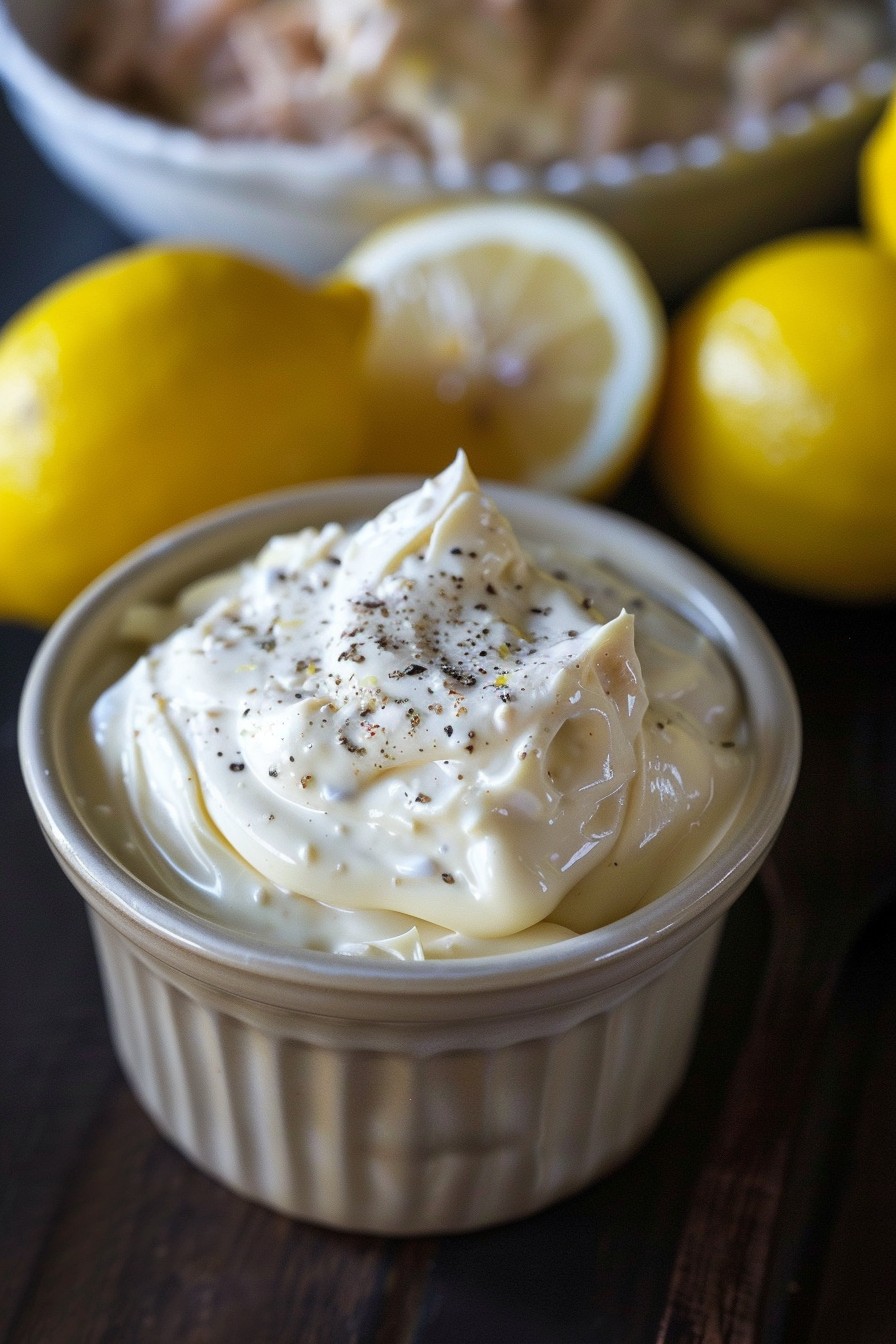
    • The combination of creamy mayonnaise and tangy mustard creates a balanced dressing that coats every potato piece perfectly.
    • Hard-boiled eggs add a rich texture and protein boost, making the salad more satisfying.
    • Using russet potatoes ensures a fluffy interior and a skin that holds up well when mixed.
    • A touch of sweet pickle relish introduces a subtle sweetness that contrasts beautifully with the savory elements.
    • Chilling the salad before serving allows the flavors to meld together, enhancing the overall taste.

    Ingredients

    • 2 lbs russet potatoes, peeled and cubed
    • 4 large eggs
    • 1 cup mayonnaise
    • 2 tbsp yellow mustard
    • 1/4 cup sweet pickle relish
    • 1/2 cup finely chopped celery
    • 1/4 cup finely chopped onion
    • Salt and pepper to taste
    • Paprika for garnish

    Equipment Needed

    • Large pot
    • Mixing bowls
    • Knife and cutting board
    • Measuring cups and spoons
    • Spatula

    Instructions

    Southern Potato Salad Recipe With Egg

    Boil the Potatoes and Eggs

    Start by placing the peeled and cubed potatoes in a large pot. Cover them with water and bring to a boil over high heat. Once boiling, reduce the heat to medium and let them simmer until tender, about 10-15 minutes. In the last 10 minutes of cooking, add the eggs to the pot to hard-boil them. Drain everything and let it cool slightly.

    Prepare the Dressing

    In a large mixing bowl, whisk together the mayonnaise, mustard, and sweet pickle relish until smooth. This combination will give your potato salad that signature Southern tang and creaminess. Season with salt and pepper to taste.

    Mix the Salad

    Add the cooled potatoes, chopped celery, and onion to the dressing. Gently fold everything together to avoid mashing the potatoes. Peel and chop the hard-boiled eggs, then add them to the salad, reserving a few slices for garnish.

    Chill Before Serving

    Transfer the salad to a serving dish and garnish with the reserved egg slices and a sprinkle of paprika. Cover and refrigerate for at least 2 hours to allow the flavors to meld together. This step is crucial for achieving the best taste and texture.

    Tips and Tricks

    For an extra flavor boost, consider adding a teaspoon of apple cider vinegar to the dressing. It enhances the tanginess without overpowering the other ingredients. If you’re short on time, you can serve the salad immediately, but chilling it is recommended for the best results. For a smoother texture, mash a few potato pieces into the dressing before adding the rest of the ingredients. This creates a creamier base for the salad.

    Recipe Variations

    • Add crispy bacon bits for a smoky flavor and extra crunch.
    • Swap the sweet pickle relish for dill pickle relish if you prefer a more savory profile.
    • Incorporate a teaspoon of curry powder into the dressing for a warm, spicy twist.
    • Use Greek yogurt in place of half the mayonnaise for a lighter version.
    • Add diced red bell pepper for a pop of color and sweetness.

    Frequently Asked Questions

    Can I use a different type of potato?

    Yes, you can use Yukon Gold or red potatoes, but keep in mind that russet potatoes are ideal for their fluffy texture and ability to hold up well in salads. Other types may become too mushy or not absorb the dressing as effectively.

    How long can I store the potato salad?

    Properly stored in an airtight container, the potato salad can last in the refrigerator for up to 3 days. However, it’s best enjoyed within the first 24 hours for optimal freshness and texture.

    Can I make this recipe ahead of time?

    Absolutely! In fact, making it ahead allows the flavors to develop more fully. Just be sure to add the eggs shortly before serving to maintain their texture.

    Summary

    This Southern Potato Salad with Egg is a creamy, tangy delight that’s perfect for any occasion. With simple ingredients and easy steps, it’s a foolproof recipe that’s sure to impress.

  • Zesty Citrus Fruit Salad Recipe: A Burst of Sunshine in Every Bite

    Zesty Citrus Fruit Salad Recipe: A Burst of Sunshine in Every Bite

    Let’s dive into a bowl of sunshine with this zesty citrus fruit salad. Perfect for those days when you need a little brightness, this recipe is a foolproof way to bring a smile to your face and a zing to your palate.

    Why This Recipe Works

    • The combination of sweet and tangy citrus fruits creates a perfect balance of flavors.
    • Adding a hint of mint elevates the freshness, making it irresistible.
    • It’s incredibly versatile, allowing for endless variations based on what’s in season.
    • Quick and easy to prepare, it’s the perfect last-minute dish for any occasion.
    • Packed with vitamins and antioxidants, it’s as healthy as it is delicious.

    Ingredients

    • 2 cups of mixed citrus fruits (oranges, grapefruits, tangerines), peeled and segmented
    • 1 tbsp of honey
    • 1/2 tsp of vanilla extract
    • 1/4 cup of fresh mint leaves, finely chopped
    • 1 tbsp of lime juice

    Equipment Needed

    • Large mixing bowl
    • Sharp knife
    • Measuring spoons
    • Citrus juicer (optional)

    Instructions

    Citrus Fruit Salad Recipe

    Step 1: Prepare Your Citrus Fruits

    Start by peeling and segmenting your citrus fruits. Ensure all the white pith is removed for a sweeter taste. This might take about 10 minutes, but it’s worth the effort for the perfect bite.

    Step 2: Mix the Dressing

    In a small bowl, whisk together the honey, vanilla extract, and lime juice until well combined. This dressing will add a sweet and tangy flavor to your salad.

    Step 3: Combine Fruits and Dressing

    Place the citrus segments in a large mixing bowl. Drizzle the dressing over the fruits and gently toss to ensure every piece is coated. Be careful not to break the fruit segments.

    Step 4: Add the Mint

    Sprinkle the finely chopped mint leaves over the salad. The mint adds a refreshing contrast to the citrus flavors, making the salad even more delightful.

    Step 5: Chill and Serve

    Let the salad chill in the refrigerator for at least 15 minutes before serving. This allows the flavors to meld together beautifully.

    Tips and Tricks

    For an extra burst of flavor, consider adding a pinch of salt to the dressing to enhance the citrus flavors. If you’re serving this salad at a party, prepare it a few hours in advance to let the flavors develop even more. For a more visually appealing dish, use a variety of citrus fruits in different colors. Always taste your citrus fruits before adding them to the salad to ensure they’re sweet enough. If you’re not a fan of mint, basil makes a great substitute.

    Recipe Variations

    • Add sliced strawberries or kiwi for a different flavor profile and extra color.
    • Include a handful of pomegranate seeds for a crunchy texture and a pop of color.
    • Drizzle with a bit of coconut milk for a creamy twist.
    • Top with toasted coconut flakes or nuts for added texture.
    • For a more savory version, add thinly sliced red onion and a sprinkle of chili powder.

    Frequently Asked Questions

    Can I make this salad ahead of time?

    Absolutely! This salad can be prepared up to a day in advance. Just keep it covered in the refrigerator until you’re ready to serve. The flavors will continue to meld, making it even more delicious.

    What’s the best way to segment citrus fruits?

    Start by cutting off the top and bottom of the fruit to create a stable base. Then, using a sharp knife, cut away the peel and pith in downward strokes. Once peeled, hold the fruit over a bowl and cut between the membranes to release the segments.

    Can I use bottled lime juice instead of fresh?

    While fresh lime juice is preferred for its vibrant flavor, bottled lime juice can be used in a pinch. Just be sure to adjust the quantity to taste, as bottled juice can sometimes be more concentrated.

    Summary

    This zesty citrus fruit salad is a refreshing, vibrant, and healthy dish that’s perfect for any occasion. With its perfect balance of sweet and tangy flavors, it’s sure to be a hit. Plus, it’s incredibly easy to customize based on your preferences or what’s in season.

  • Soba Noodle Salad Recipe: A Refreshing Twist on a Classic

    Soba Noodle Salad Recipe: A Refreshing Twist on a Classic

    A absolutely delightful dish that’s perfect for those warm summer days or when you’re craving something light yet satisfying. This soba noodle salad combines the nutty flavors of buckwheat noodles with a tangy dressing and crisp veggies for a meal that’s as nutritious as it is delicious.

    Why This Recipe Works

    • The combination of cold soba noodles and fresh vegetables offers a refreshing contrast to traditional hot noodle dishes.
    • A homemade dressing with soy sauce, sesame oil, and a hint of ginger adds depth and umami to the salad.
    • Quick and easy to prepare, this recipe is perfect for meal prep or a last-minute dinner option.
    • Customizable with your favorite proteins or veggies, making it a versatile dish for any palate.

    Ingredients

    • 8 oz soba noodles
    • 2 tbsp soy sauce
    • 1 tbsp sesame oil
    • 1 tbsp rice vinegar
    • 1 tsp honey
    • 1 clove garlic, minced
    • 1 tsp grated ginger
    • 1 cup shredded carrots
    • 1 cup thinly sliced cucumber
    • 2 green onions, sliced
    • 1 tbsp sesame seeds

    Equipment Needed

    • Large pot
    • Colander
    • Mixing bowls
    • Whisk
    • Measuring cups and spoons

    Instructions

    Soba Noodle Salad Recipe

    Step 1: Cook the Soba Noodles

    Bring a large pot of water to a boil. Add the soba noodles and cook according to package instructions, usually about 4-5 minutes. Drain and rinse under cold water to stop the cooking process and cool the noodles. Tip: Rinsing the noodles removes excess starch, preventing them from sticking together.

    Step 2: Prepare the Dressing

    In a small bowl, whisk together the soy sauce, sesame oil, rice vinegar, honey, minced garlic, and grated ginger until well combined. Taste and adjust the seasoning if necessary. This dressing is the heart of the dish, so don’t skimp on the flavors!

    Step 3: Combine Noodles and Vegetables

    In a large mixing bowl, combine the cooled soba noodles, shredded carrots, sliced cucumber, and green onions. Pour the dressing over the top and toss gently to coat all the ingredients evenly. Tip: Let the salad sit for 10 minutes before serving to allow the flavors to meld together.

    Step 4: Garnish and Serve

    Sprinkle the salad with sesame seeds for an extra crunch and a nutty flavor. Serve chilled or at room temperature. This salad is perfect on its own or as a side dish with grilled chicken or fish.

    Tips and Tricks

    For an extra protein boost, add grilled chicken, shrimp, or tofu to the salad. If you’re short on time, pre-shredded carrots and pre-sliced cucumbers from the grocery store can be a real time-saver. To make the salad ahead of time, prepare the noodles and veggies but wait to add the dressing until just before serving to keep everything crisp. For a spicier kick, add a dash of chili oil or red pepper flakes to the dressing. Finally, don’t forget to toast the sesame seeds before adding them to the salad for an enhanced nutty flavor.

    Recipe Variations

    • Add avocado slices for a creamy texture and healthy fats.
    • Swap out the soba noodles for whole wheat spaghetti or rice noodles for a different twist.
    • Include edamame or snap peas for an extra crunch and protein.
    • For a sweeter version, add mango or pineapple chunks to the salad.
    • Use peanut butter in the dressing for a richer, more decadent flavor.

    Frequently Asked Questions

    Can I make this salad ahead of time?

    Yes, you can prepare the components of the salad ahead of time, but it’s best to add the dressing just before serving to keep the noodles and vegetables from becoming soggy. Store the dressed salad in the refrigerator for up to 2 days.

    Are soba noodles gluten-free?

    Traditional soba noodles are made from buckwheat, which is gluten-free, but many brands mix in wheat flour. If you’re gluten-sensitive, look for 100% buckwheat soba noodles.

    Can I use a different type of vinegar in the dressing?

    Absolutely! While rice vinegar is traditional, apple cider vinegar or white wine vinegar can be used as substitutes. Just adjust the quantity to taste, as different vinegars have varying levels of acidity.

    Summary

    This soba noodle salad is a light, refreshing, and versatile dish that’s perfect for any occasion. With its combination of nutty noodles, crisp vegetables, and a tangy dressing, it’s sure to become a favorite in your recipe collection.

  • Italian Pasta Salad Recipe with Salami: A Flavor Fiesta in Every Bite

    Italian Pasta Salad Recipe with Salami: A Flavor Fiesta in Every Bite

    Buckle up, food lovers! Today, we’re diving into a dish that’s as vibrant as it is delicious. This Italian Pasta Salad with Salami is the perfect blend of hearty, tangy, and fresh, making it an unbeatable choice for picnics, potlucks, or just a sunny day at home.

    Why This Recipe Works

    • The combination of salami and cheese brings a rich, savory depth that’s hard to resist.
    • Fresh veggies add a crisp contrast, making every forkful interesting.
    • The homemade dressing ties everything together with its zesty, herby notes.
    • It’s incredibly versatile, allowing for endless variations based on what you have on hand.
    • Perfect make-ahead dish, as the flavors meld and improve over time.

    Ingredients

    • 1 lb rotini pasta
    • 1/2 lb salami, diced
    • 1 cup cherry tomatoes, halved
    • 1/2 cup black olives, sliced
    • 1/2 cup red onion, finely chopped
    • 1 cup mozzarella cheese, cubed
    • 1/4 cup fresh basil, chopped
    • 1/4 cup olive oil
    • 2 tbsp red wine vinegar
    • 1 tsp dried oregano
    • Salt and pepper to taste

    Equipment Needed

    • Large pot
    • Colander
    • Large mixing bowl
    • Whisk
    • Measuring cups and spoons

    Instructions

    Italian Pasta Salad Recipe With Salami

    Step 1: Cook the Pasta

    Bring a large pot of salted water to a rolling boil. Add the rotini pasta and cook according to package instructions until al dente, about 8-10 minutes. Drain in a colander and rinse under cold water to stop the cooking process. Tip: Salting the water well ensures your pasta is flavorful from the inside out.

    Step 2: Prepare the Dressing

    In a small bowl, whisk together olive oil, red wine vinegar, dried oregano, salt, and pepper until well combined. Taste and adjust seasoning as needed. This dressing is the secret weapon that brings all the flavors together, so don’t skimp on the herbs!

    Step 3: Combine the Salad

    In a large mixing bowl, combine the cooled pasta, diced salami, cherry tomatoes, black olives, red onion, mozzarella cheese, and fresh basil. Drizzle the dressing over the top and toss gently to coat everything evenly. Tip: Letting the salad sit for 10 minutes before serving allows the flavors to meld beautifully.

    Step 4: Serve and Enjoy

    Transfer the salad to a serving dish or keep it in the bowl. Garnish with extra basil if desired. This salad is best enjoyed at room temperature, making it the perfect dish for any occasion.

    Tips and Tricks

    For an extra flavor boost, consider toasting the pasta before boiling. This adds a nutty depth that’s unexpectedly delicious. If you’re making this salad ahead of time, hold off on adding the fresh basil until just before serving to keep it vibrant. And for those who love a bit of heat, a sprinkle of red pepper flakes can add a nice kick. Remember, the key to a great pasta salad is balance, so feel free to adjust the ingredients to suit your taste.

    Recipe Variations

    • Swap the salami for pepperoni or grilled chicken for a different protein twist.
    • Add in some roasted red peppers or artichoke hearts for an extra veggie punch.
    • Use a different pasta shape like farfalle or penne for a fun texture change.
    • For a creamier version, mix in a tablespoon of mayonnaise or Greek yogurt into the dressing.
    • Make it vegetarian by omitting the salami and adding more cheese or chickpeas for protein.

    Frequently Asked Questions

    Can I make this salad ahead of time?

    Absolutely! This salad actually tastes better after the flavors have had time to meld. Just be sure to add the fresh basil right before serving to keep it fresh and vibrant.

    How long does it last in the fridge?

    Stored in an airtight container, this pasta salad will keep for up to 3 days in the refrigerator. After that, the veggies may start to lose their crunch.

    Can I use a different type of pasta?

    Yes, any short pasta will work well in this recipe. Just be sure to cook it al dente so it holds up in the salad.

    Summary

    This Italian Pasta Salad with Salami is a crowd-pleaser that’s easy to make and packed with flavors. Perfect for any occasion, it’s a dish that’s as fun to make as it is to eat.

  • Big Mac Pasta Salad Recipe: A Fun Twist on a Classic

    Big Mac Pasta Salad Recipe: A Fun Twist on a Classic

    Unleash your inner chef with this playful take on the iconic Big Mac, transformed into a pasta salad that’s perfect for picnics, potlucks, or just because. It’s all the flavors you love, in a dish that’s as easy to make as it is delicious.

    Why This Recipe Works

    • Combines the beloved flavors of a Big Mac into a refreshing pasta salad.
    • Uses simple, readily available ingredients for ease of preparation.
    • Perfect for making ahead, as the flavors meld and improve over time.
    • Offers a fun and unexpected twist on traditional pasta salad.
    • Customizable to suit different tastes and dietary needs.

    Ingredients

    • 1 lb elbow macaroni, cooked and cooled
    • 1 cup mayonnaise
    • 1/4 cup ketchup
    • 2 tbsp yellow mustard
    • 1 tbsp white vinegar
    • 1 tsp garlic powder
    • 1 tsp onion powder
    • 1/2 tsp salt
    • 1/2 tsp black pepper
    • 1 cup shredded iceberg lettuce
    • 1/2 cup diced white onion
    • 1/2 cup diced dill pickles
    • 1 cup shredded cheddar cheese
    • 1/2 lb ground beef, cooked and crumbled
    • Sesame seeds for garnish

    Equipment Needed

    • Large mixing bowl
    • Whisk
    • Measuring cups and spoons
    • Large pot for boiling pasta
    • Colander
    • Skillet for cooking beef

    Instructions

    Big Mac Pasta Salad Recipe

    Step 1: Prepare the Dressing

    In a large mixing bowl, whisk together the mayonnaise, ketchup, mustard, white vinegar, garlic powder, onion powder, salt, and black pepper until smooth. This creamy, tangy dressing is the secret to capturing that Big Mac flavor in every bite. Tip: For an extra flavor boost, let the dressing sit for 10 minutes before mixing with the other ingredients.

    Step 2: Combine Pasta and Beef

    Add the cooled elbow macaroni and crumbled ground beef to the bowl with the dressing. Gently toss until everything is evenly coated. The beef adds that signature Big Mac taste and a satisfying texture contrast to the pasta.

    Step 3: Add the Veggies and Cheese

    Fold in the shredded lettuce, diced onion, diced pickles, and shredded cheddar cheese. These ingredients bring freshness, crunch, and creaminess to the salad, mirroring the toppings of a Big Mac. Tip: For the best texture, add the lettuce just before serving.

    Step 4: Chill and Garnish

    Cover the salad and refrigerate for at least 1 hour to allow the flavors to meld. Before serving, sprinkle with sesame seeds for that authentic Big Mac look. Tip: If the salad seems dry after chilling, stir in a little extra mayonnaise to loosen it up.

    Tips and Tricks

    For those looking to elevate their Big Mac Pasta Salad, consider these advanced tips. First, toast the sesame seeds lightly before garnishing to enhance their nutty flavor. Second, use a mix of ground beef and ground pork for a richer taste. Third, for a smokier flavor, try adding a dash of smoked paprika to the dressing. Lastly, if you’re serving this at a gathering, consider setting up a ‘build your own’ station with extra toppings like bacon bits or avocado for guests to customize their servings.

    Recipe Variations

    • For a lighter version, substitute Greek yogurt for half of the mayonnaise.
    • Make it vegetarian by omitting the ground beef and adding chopped mushrooms or a plant-based meat substitute.
    • Spice it up with a dash of hot sauce or cayenne pepper in the dressing.
    • For a gluten-free option, use your favorite gluten-free pasta.
    • Add crunch with extra veggies like bell peppers or cucumbers.

    Frequently Asked Questions

    Q: Can I make this salad ahead of time?
    A: Absolutely! This salad actually tastes better after the flavors have had time to meld in the fridge. Just hold off on adding the lettuce until you’re ready to serve to keep it crisp.

    Q: How long will this pasta salad keep in the refrigerator?
    A: Stored in an airtight container, it will stay fresh for up to 3 days. After that, the pasta may start to soften too much, and the lettuce will lose its crunch.

    Q: Can I use a different type of pasta?
    A: Yes, any short pasta like penne or rotini will work well. Just keep in mind that the cooking time may vary depending on the pasta shape.

    Summary

    This Big Mac Pasta Salad is a fun, flavorful twist on the classic burger, perfect for any occasion. With its creamy dressing, savory beef, and crisp veggies, it’s sure to be a hit. Easy to make and customizable, it’s a recipe you’ll come back to again and again.

  • Raspberry Jello Salad Recipe: A Vibrant and Tasty Delight

    Raspberry Jello Salad Recipe: A Vibrant and Tasty Delight

    Kickstart your summer with this Raspberry Jello Salad that’s as fun to make as it is to eat! Perfect for picnics, potlucks, or just because, this recipe is a guaranteed crowd-pleaser.

    Why This Recipe Works

    • The combination of sweet raspberries and tangy jello creates a refreshing flavor that’s hard to resist.
    • It’s incredibly easy to make, requiring just a few simple ingredients and minimal prep time.
    • The vibrant color and texture make it a standout dish at any gathering.
    • It’s versatile, allowing for numerous variations to suit any taste or occasion.
    • Perfect for making ahead, saving you time on the day of your event.

    Ingredients

    • 2 cups fresh raspberries
    • 1 package (3 oz) raspberry jello
    • 1 cup boiling water
    • 1 cup cold water
    • 1/2 cup whipped cream
    • 1/4 cup chopped nuts (optional)

    Equipment Needed

    • Mixing bowl
    • Whisk
    • Measuring cups
    • Spoon
    • Refrigerator

    Instructions

    Raspberry Jello Salad Recipe

    Step 1: Dissolve the Jello

    In a large mixing bowl, combine the raspberry jello with 1 cup of boiling water. Whisk vigorously for about 2 minutes until the jello is completely dissolved. This ensures a smooth base for your salad.

    Step 2: Add Cold Water

    Stir in 1 cup of cold water into the dissolved jello mixture. This step helps the jello to start setting at the right consistency.

    Step 3: Incorporate Raspberries

    Gently fold in the fresh raspberries, making sure they’re evenly distributed throughout the mixture. The raspberries add a burst of freshness and color.

    Step 4: Chill to Set

    Pour the mixture into a serving dish and refrigerate for at least 4 hours, or until fully set. The waiting is the hardest part, but it’s worth it!

    Step 5: Add Toppings

    Before serving, top with whipped cream and chopped nuts if desired. This adds a creamy texture and a bit of crunch for contrast.

    Tips and Tricks

    For a smoother texture, you can blend the raspberries before adding them to the jello mixture. If you’re in a hurry, placing the jello in the freezer for about 30 minutes can speed up the setting process, but keep an eye on it to prevent freezing. For a more decadent version, mix in some cream cheese with the whipped cream topping. Experimenting with different types of nuts or even adding coconut flakes can introduce new flavors and textures to the dish.

    Recipe Variations

    • Use different flavors of jello and corresponding fruits to match the theme of your event or your personal preference.
    • Incorporate layers by setting one flavor of jello before adding another, creating a stunning visual effect.
    • Add mini marshmallows or fruit pieces for extra sweetness and texture.
    • For a healthier version, substitute the whipped cream with Greek yogurt.
    • Create an adult version by adding a splash of vodka or champagne to the jello mixture for a boozy twist.

    Frequently Asked Questions

    Can I use frozen raspberries instead of fresh?

    Absolutely! Just make sure to thaw and drain them well to prevent excess water from diluting the jello mixture.

    How long can I store the Raspberry Jello Salad?

    It can be stored in the refrigerator for up to 3 days, though it’s best enjoyed within the first 24 hours for optimal texture.

    Can I make this recipe vegan?

    Yes, by using agar-agar instead of gelatin and a plant-based whipped cream, you can easily adapt this recipe to be vegan-friendly.

    Summary

    This Raspberry Jello Salad is a delightful, easy-to-make dish that’s perfect for any occasion. With its vibrant color and refreshing taste, it’s sure to be a hit. Plus, the endless variations mean you can customize it to your heart’s content.

  • Creamy Egg Salad Recipe: The Ultimate Comfort Food Fix

    Creamy Egg Salad Recipe: The Ultimate Comfort Food Fix

    Craving something creamy, dreamy, and utterly satisfying? Look no further! This creamy egg salad recipe is your ticket to comfort food heaven. Perfect for sandwiches, wraps, or just eating by the spoonful, it’s a versatile dish that’s sure to please.

    Why This Recipe Works

    • The combination of creamy mayonnaise and tangy mustard creates a rich, flavorful base.
    • Fresh herbs add a burst of color and freshness that elevates the dish.
    • Perfectly boiled eggs ensure the salad has the ideal texture—not too mushy, not too firm.
    • Simple ingredients come together quickly for a fuss-free meal or snack.
    • It’s customizable, so you can tweak it to suit your taste preferences.

    Ingredients

    • 6 large eggs
    • 1/4 cup mayonnaise
    • 1 tablespoon yellow mustard
    • 1/4 cup finely chopped celery
    • 2 tablespoons finely chopped red onion
    • 1 tablespoon chopped fresh dill
    • Salt and pepper to taste

    Equipment Needed

    • Medium saucepan
    • Slotted spoon
    • Mixing bowl
    • Knife and cutting board
    • Measuring cups and spoons

    Instructions

    Creamy Egg Salad Recipe

    Step 1: Boil the Eggs

    Place the eggs in a single layer at the bottom of a medium saucepan. Cover them with cold water, about an inch above the eggs. Bring the water to a boil over high heat, then cover the pan and remove it from the heat. Let the eggs sit for 12 minutes for perfectly hard-boiled eggs.

    Step 2: Cool and Peel the Eggs

    After the eggs have sat, transfer them to a bowl of ice water using a slotted spoon. Let them cool for at least 5 minutes. This makes peeling easier. Once cooled, peel the eggs under running water to help remove the shells smoothly.

    Step 3: Chop the Eggs

    Chop the peeled eggs into small, bite-sized pieces. For a creamier texture, you can mash some of the eggs with a fork. Transfer the chopped eggs to a mixing bowl.

    Step 4: Mix the Ingredients

    Add the mayonnaise, mustard, celery, red onion, and dill to the bowl with the eggs. Gently stir until all the ingredients are well combined. Season with salt and pepper to taste.

    Step 5: Chill and Serve

    For the best flavor, cover the bowl and refrigerate the egg salad for at least 30 minutes before serving. This allows the flavors to meld together beautifully. Serve chilled on bread, crackers, or as a side dish.

    Tips and Tricks

    For an extra creamy texture, add an additional tablespoon of mayonnaise. If you prefer a bit of crunch, consider adding some chopped pickles or apples. To make the salad ahead of time, store it in an airtight container in the refrigerator for up to 3 days. For a lighter version, substitute Greek yogurt for half of the mayonnaise. Always taste and adjust the seasoning before serving.

    Recipe Variations

    • Add curry powder for a spicy twist.
    • Mix in avocado for a creamy, healthy fat boost.
    • Include crispy bacon bits for a smoky flavor.
    • Swap dill for parsley or cilantro for a different herb profile.
    • Use Greek yogurt instead of mayonnaise for a tangier, healthier version.

    Frequently Asked Questions

    Can I make this recipe ahead of time?

    Absolutely! This egg salad can be made up to 3 days in advance. Just store it in an airtight container in the refrigerator. The flavors actually improve over time, making it a great make-ahead option for meal prep or gatherings.

    How can I make my egg salad creamier?

    If you prefer a creamier texture, you can mash the eggs more thoroughly or add an extra tablespoon of mayonnaise. Some people also like to blend a portion of the salad for a smoother consistency.

    What’s the best way to serve egg salad?

    Egg salad is incredibly versatile. It’s delicious on sandwiches, wraps, or crackers. You can also serve it on a bed of lettuce for a low-carb option or as a dip with vegetables. The possibilities are endless!

    Summary

    This creamy egg salad recipe is a simple, delicious, and versatile dish that’s perfect for any occasion. With its rich flavor and easy preparation, it’s sure to become a staple in your recipe collection.

  • Napa Salad Recipe: A Crunchy, Fresh Delight

    Napa Salad Recipe: A Crunchy, Fresh Delight

    Craving something light yet satisfying? This Napa salad is your go-to dish, blending crisp textures with a tangy dressing that’ll make your taste buds dance. Perfect for summer picnics or a quick weeknight side, it’s a versatile recipe that’s as easy to make as it is delicious.

    Why This Recipe Works

    • The combination of crunchy Napa cabbage and sweet carrots offers a perfect texture contrast.
    • A homemade dressing with just the right balance of tangy and sweet elevates the simple ingredients.
    • It’s incredibly versatile; add your favorite protein to turn it into a main dish.
    • Prep time is minimal, making it ideal for last-minute gatherings.
    • Healthy and refreshing, it’s a guilt-free option that doesn’t skimp on flavor.

    Ingredients

    • 1 head Napa cabbage, thinly sliced
    • 2 large carrots, julienned
    • 1/4 cup rice vinegar
    • 2 tbsp soy sauce
    • 1 tbsp sesame oil
    • 1 tbsp honey
    • 1 tsp grated ginger
    • 1 clove garlic, minced
    • 1/4 cup chopped green onions
    • 1 tbsp sesame seeds

    Equipment Needed

    • Large mixing bowl
    • Whisk
    • Measuring cups and spoons
    • Knife and cutting board

    Instructions

    Napa Salad Recipe

    Step 1: Prepare the Vegetables

    Start by washing the Napa cabbage and carrots thoroughly. Thinly slice the cabbage and julienne the carrots for uniform pieces that will ensure every bite is packed with crunch. Tip: For extra crispness, soak the sliced cabbage in ice water for 10 minutes before draining well.

    Step 2: Make the Dressing

    In a small bowl, whisk together the rice vinegar, soy sauce, sesame oil, honey, grated ginger, and minced garlic until well combined. The honey should be fully dissolved to achieve a smooth dressing. Tip: Adjust the honey or vinegar to suit your taste preference for sweetness or tanginess.

    Step 3: Combine the Salad

    In a large mixing bowl, toss the prepared Napa cabbage and carrots with the dressing until evenly coated. Sprinkle with chopped green onions and sesame seeds for an extra layer of flavor and texture. Tip: Let the salad sit for 5 minutes before serving to allow the flavors to meld together beautifully.

    Tips and Tricks

    For those looking to elevate their Napa salad, consider toasting the sesame seeds before adding them to the salad for a deeper, nuttier flavor. If you’re preparing the salad ahead of time, keep the dressing separate until just before serving to maintain the cabbage’s crunch. For a spicier kick, add a dash of chili oil or red pepper flakes to the dressing. Experiment with adding different vegetables like thinly sliced bell peppers or cucumbers for additional crunch and color.

    Recipe Variations

    • Add grilled chicken or shrimp for a protein-packed main dish.
    • Incorporate mandarin oranges and sliced almonds for a sweet and nutty twist.
    • Swap the honey for maple syrup in the dressing for a different kind of sweetness.
    • Use lime juice instead of rice vinegar for a citrusy dressing variation.
    • Add avocado slices for creaminess and healthy fats.

    Frequently Asked Questions

    Can I use regular cabbage instead of Napa cabbage?

    Absolutely! While Napa cabbage offers a unique texture and mild flavor, regular green cabbage can be a great substitute. Just keep in mind that green cabbage is more robust, so you might want to slice it thinner to mimic Napa cabbage’s tenderness.

    How long does this salad keep in the fridge?

    This salad is best enjoyed fresh but can be stored in an airtight container in the refrigerator for up to 2 days. Note that the cabbage will start to lose its crunch over time, so it’s ideal to eat it sooner rather than later.

    Is there a substitute for sesame oil?

    If you’re out of sesame oil, olive oil can be used as a substitute, though it will change the flavor profile of the dressing. For a closer match, try a small amount of tahini mixed with a neutral oil to mimic sesame oil’s nuttiness.

    Summary

    This Napa salad recipe is a testament to how simple ingredients can come together to create something truly special. With its crisp textures, balanced dressing, and endless customization options, it’s a dish that’s sure to impress. Whether you’re looking for a light side or a hearty main, this salad has you covered.

  • Creamy Tuna Salad Dressing Recipe: A Game-Changer for Your Greens

    Creamy Tuna Salad Dressing Recipe: A Game-Changer for Your Greens

    A amazing way to elevate your salad game is with this creamy tuna salad dressing. It’s packed with flavor, easy to whip up, and transforms any boring salad into a delicious meal. Perfect for those who love a bit of protein with their greens!

    Why This Recipe Works

    • The combination of tuna and creamy ingredients creates a rich, satisfying dressing that’s both flavorful and filling.
    • It’s incredibly versatile, working well with a variety of salad bases from leafy greens to pasta salads.
    • Quick and easy to make, this dressing comes together in just a few minutes with simple ingredients.
    • Perfect for meal prep, as it keeps well in the fridge for several days.
    • A great way to incorporate more omega-3 fatty acids into your diet, thanks to the tuna.

    Ingredients

    • 1 can (5 oz) tuna in water, drained
    • 1/2 cup mayonnaise
    • 1/4 cup sour cream
    • 1 tbsp lemon juice
    • 1 tsp Dijon mustard
    • 1/4 tsp garlic powder
    • Salt and pepper to taste

    Equipment Needed

    • Mixing bowl
    • Whisk
    • Measuring cups and spoons

    Instructions

    Tuna Salad Dressing Recipe

    Step 1: Prepare Your Ingredients

    Start by draining the tuna thoroughly to avoid a watery dressing. Measure out all your ingredients to ensure a smooth preparation process. This mise en place step is crucial for efficiency in the kitchen.

    Step 2: Combine Wet Ingredients

    In a mixing bowl, whisk together the mayonnaise, sour cream, lemon juice, and Dijon mustard until smooth. The acidity from the lemon juice will brighten the flavors, while the mustard adds a subtle depth.

    Step 3: Add the Tuna and Seasonings

    Flake the drained tuna into the bowl with the wet ingredients. Sprinkle in the garlic powder, then season with salt and pepper to taste. Mix gently to combine, ensuring the tuna is evenly distributed without becoming mushy.

    Step 4: Adjust Consistency and Taste

    If the dressing is too thick, you can thin it with a teaspoon of water or more lemon juice until it reaches your desired consistency. Taste and adjust the seasonings as needed.

    Step 5: Chill Before Serving

    For the best flavor, cover the bowl and refrigerate the dressing for at least 30 minutes before serving. This allows the flavors to meld together beautifully.

    Tips and Tricks

    For a lighter version, substitute Greek yogurt for the sour cream. It’ll give you the same creamy texture with fewer calories. If you’re using tuna packed in oil, consider reducing the amount of mayonnaise to balance the richness. For an extra flavor boost, add a pinch of smoked paprika or a handful of chopped fresh herbs like dill or parsley. Always taste as you go to ensure the seasoning is just right.

    Recipe Variations

    • Spicy Tuna Dressing: Add a dash of hot sauce or a finely chopped jalapeño for some heat.
    • Herb-Infused Dressing: Mix in fresh herbs like basil, cilantro, or chives for a fresh twist.
    • Avocado Tuna Dressing: Blend in half an avocado for a creamier, healthier fat option.
    • Egg Tuna Dressing: Add chopped hard-boiled eggs for extra protein and texture.
    • Vegan Option: Use chickpeas instead of tuna and vegan mayo for a plant-based version.

    Frequently Asked Questions

    Can I use canned salmon instead of tuna?

    Absolutely! Canned salmon is a great alternative to tuna in this recipe. It offers a similar texture and is also rich in omega-3 fatty acids. Just make sure to remove any bones and skin before mixing it into the dressing.

    How long can I store this dressing in the fridge?

    This tuna salad dressing can be stored in an airtight container in the refrigerator for up to 3 days. After that, the quality may start to decline, so it’s best enjoyed fresh.

    Can I freeze this dressing?

    Freezing is not recommended for this dressing as the mayonnaise and sour cream may separate upon thawing, resulting in a less desirable texture.

    Summary

    This creamy tuna salad dressing is a quick, easy, and delicious way to add some protein and flavor to your salads. With simple ingredients and endless variations, it’s sure to become a staple in your kitchen.

  • Berry Bliss Fruit Salad Recipe: A Summer Delight

    Berry Bliss Fruit Salad Recipe: A Summer Delight

    Absolutely bursting with flavors, this berry fruit salad is your go-to summer dish. A mix of vibrant berries tossed in a zesty dressing, it’s as pleasing to the eyes as it is to the palate.

    Why This Recipe Works

    • The combination of different berries offers a symphony of flavors, from sweet to tart, ensuring every bite is exciting.
    • Adding a hint of lime zest and honey dressing elevates the natural sweetness of the fruits without overpowering them.
    • It’s incredibly versatile, perfect for breakfast, a snack, or a dessert, making it a must-have recipe in your collection.

    Ingredients

    • 2 cups strawberries, hulled and halved
    • 1 cup blueberries
    • 1 cup raspberries
    • 1 cup blackberries
    • 2 tbsp honey
    • 1 tbsp lime juice
    • 1 tsp lime zest
    • Fresh mint leaves for garnish

    Equipment Needed

    • Large mixing bowl
    • Small bowl for dressing
    • Whisk
    • Serving bowl

    Instructions

    Fruit Berry Salad Recipe

    Prepare the Berries

    Start by gently washing all the berries under cold water. Pat them dry with a clean towel to remove excess moisture. Hull the strawberries and cut them into halves. This ensures all berries are bite-sized and ready to mingle with the dressing.

    Make the Dressing

    In a small bowl, whisk together honey, lime juice, and lime zest until well combined. The lime zest adds a fragrant punch that complements the sweetness of the honey, creating a balanced dressing.

    Toss the Salad

    Place all the berries in a large mixing bowl. Drizzle the dressing over the berries and gently toss to coat. Be careful not to crush the berries; a light hand is key here.

    Chill Before Serving

    Cover the bowl with plastic wrap and refrigerate for at least 30 minutes. This chilling time allows the flavors to meld together beautifully.

    Garnish and Serve

    Transfer the salad to a serving bowl and garnish with fresh mint leaves. The mint adds a refreshing contrast to the sweet and tangy flavors of the salad.

    Tips and Tricks

    For the best flavor, use berries that are in season; they’re sweeter and more flavorful. If you’re making this salad ahead of time, add the dressing just before serving to keep the berries from becoming soggy. For an extra crunch, sprinkle some toasted almonds or walnuts on top. This not only adds texture but also a nutty flavor that pairs wonderfully with the berries.

    Recipe Variations

    • Add a tropical twist by including diced mango or pineapple chunks.
    • For a creamy version, mix in a dollop of Greek yogurt or whipped cream.
    • Incorporate other fruits like sliced kiwi or peaches for additional flavors and textures.
    • For a festive touch, drizzle with chocolate sauce or sprinkle with coconut flakes.

    Frequently Asked Questions

    Can I use frozen berries?

    Yes, you can use frozen berries if fresh ones aren’t available. Just make sure to thaw and drain them well to avoid a watery salad.

    How long can I store this salad?

    This salad is best enjoyed the same day but can be stored in the refrigerator for up to 24 hours. The berries may soften over time, so add the dressing just before serving if possible.

    Can I make this salad vegan?

    Absolutely! Substitute the honey with maple syrup or agave nectar to make it vegan-friendly.

    Summary

    This berry fruit salad is a vibrant, refreshing dish perfect for any summer occasion. Easy to make and customizable, it’s sure to be a hit with everyone.