Blog

  • Oriental Salad Ramen Recipe: A Crunchy Twist on a Classic

    Oriental Salad Ramen Recipe: A Crunchy Twist on a Classic

    Venture into the world of flavors with this Oriental Salad Ramen recipe that combines the crunch of fresh vegetables with the savory depth of ramen. Perfect for a quick lunch or a light dinner, this dish is a delightful way to enjoy ramen beyond the broth.

    Why This Recipe Works

    • Combines the convenience of instant ramen with the freshness of a salad for a balanced meal.
    • The dressing adds a tangy and slightly sweet flavor that elevates the dish.
    • Customizable with your favorite vegetables and proteins for endless variations.

    Ingredients

    • 2 packs of instant ramen noodles (seasoning packets discarded)
    • 2 cups of shredded cabbage
    • 1 cup of shredded carrots
    • 1/2 cup of sliced cucumbers
    • 1/4 cup of chopped green onions
    • 2 tbsp of sesame oil
    • 2 tbsp of soy sauce
    • 1 tbsp of honey
    • 1 tsp of grated ginger
    • 1 clove of garlic, minced

    Equipment Needed

    • Large mixing bowl
    • Small whisk or fork
    • Pot for boiling water
    • Colander

    Instructions

    Oriental Salad Ramen Recipe

    Step 1: Prepare the Noodles

    Bring a pot of water to a boil and cook the ramen noodles according to the package instructions, omitting the seasoning packet. Drain the noodles in a colander and rinse under cold water to stop the cooking process. This ensures your noodles stay firm and don’t turn mushy in the salad.

    Step 2: Mix the Dressing

    In a small bowl, whisk together the sesame oil, soy sauce, honey, grated ginger, and minced garlic until well combined. This dressing is the secret to the salad’s addictive flavor, so make sure it’s thoroughly mixed.

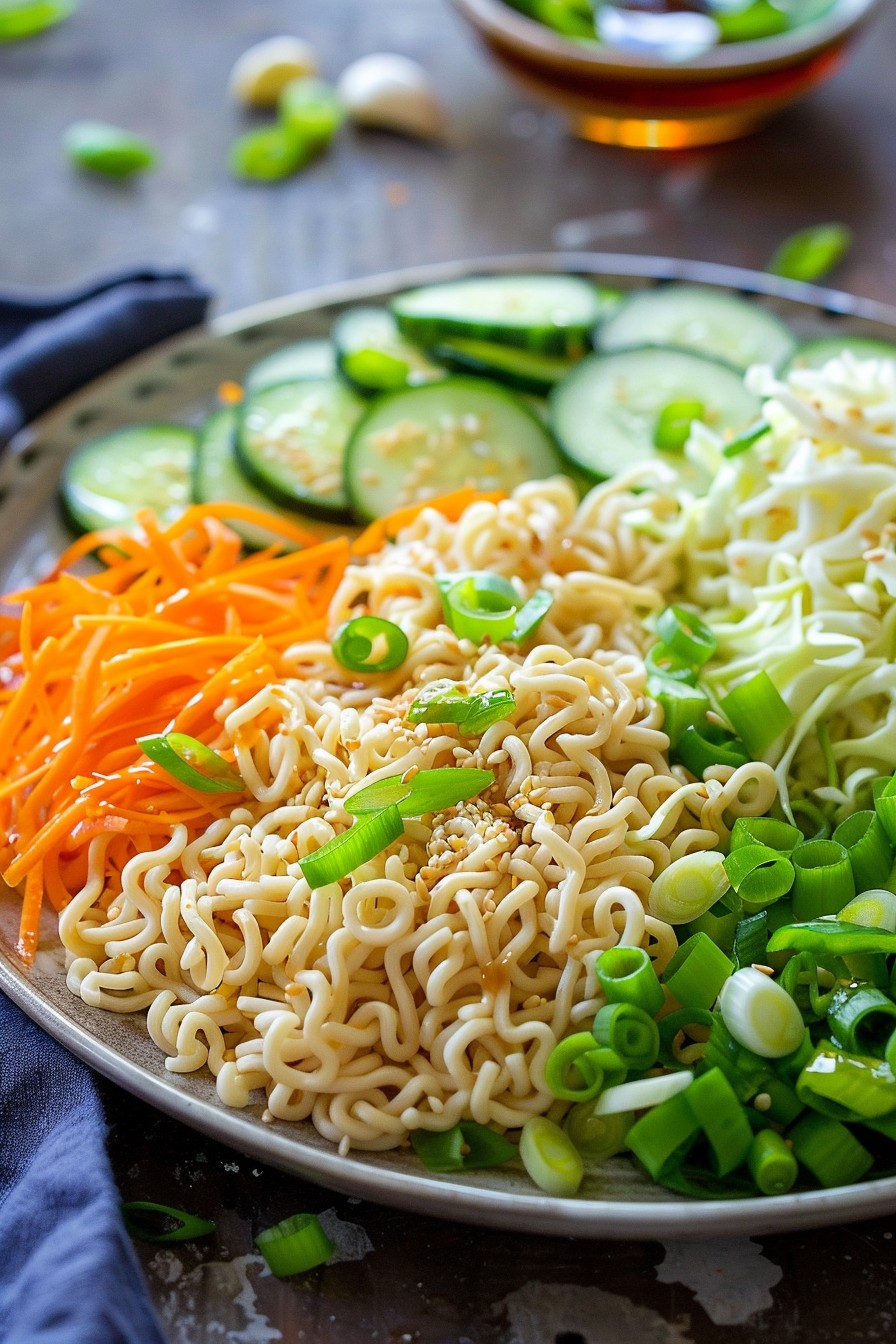
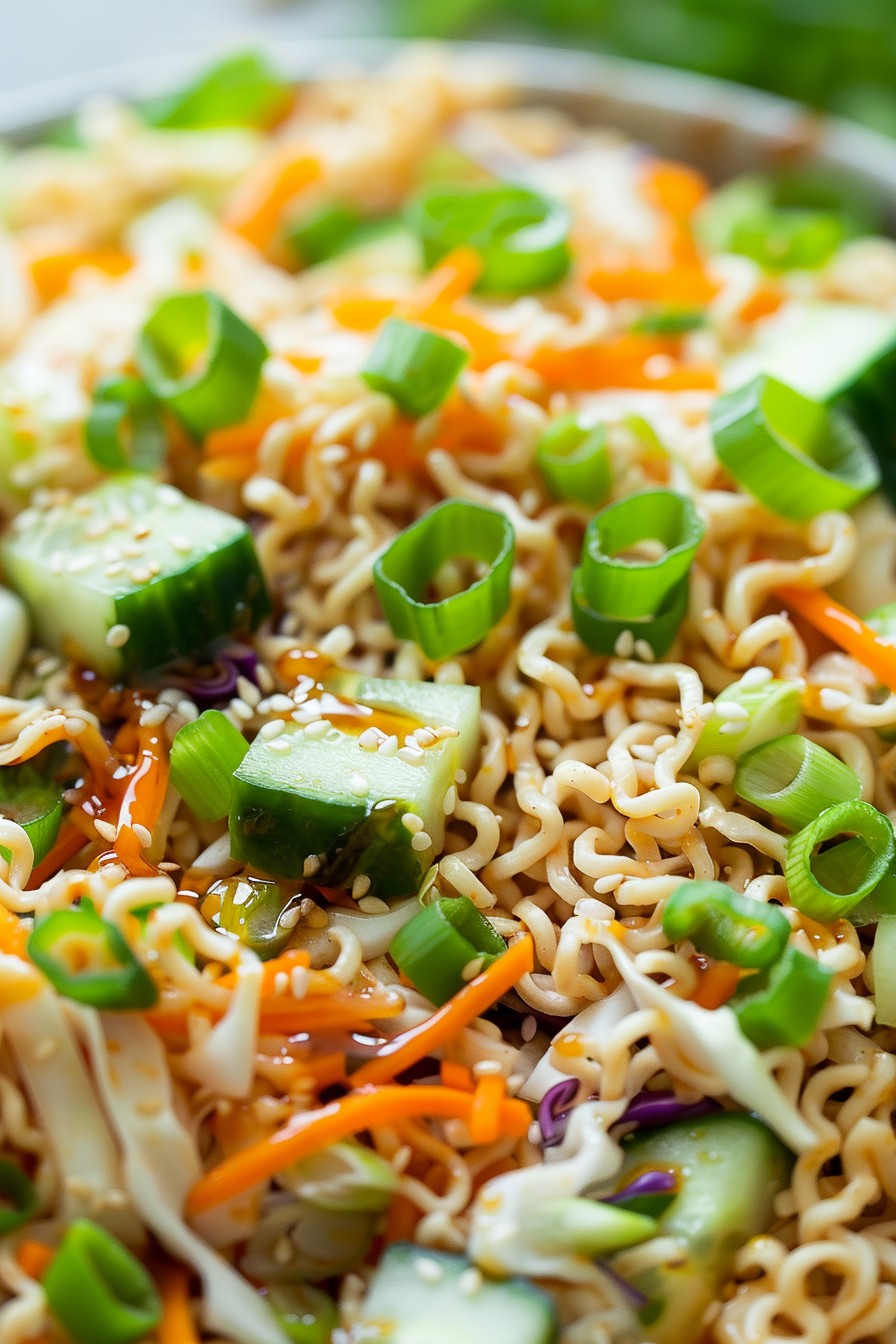
    Step 3: Combine the Salad

    In a large mixing bowl, toss the cooled noodles with the shredded cabbage, carrots, cucumbers, and green onions. Pour the dressing over the salad and toss until everything is evenly coated. The vibrant colors of the vegetables make this dish as visually appealing as it is tasty.

    Step 4: Let It Marinate

    Allow the salad to sit for at least 10 minutes before serving. This brief marinating time lets the flavors meld together beautifully, enhancing the overall taste of the dish.

    Step 5: Serve and Enjoy

    Divide the salad into bowls and serve immediately. For an extra crunch, sprinkle some sesame seeds on top before serving. This dish is best enjoyed fresh but can be refrigerated for a short time if needed.

    Tips and Tricks

    For those looking to take this Oriental Salad Ramen to the next level, consider adding grilled chicken or shrimp for a protein boost. Toasting the sesame seeds before sprinkling them on top can also add a deeper flavor. If you prefer a spicier kick, a dash of chili oil or sriracha can be mixed into the dressing. Remember, the key to a great salad is in the freshness of the ingredients, so try to use the crispest vegetables you can find.

    Recipe Variations

    • Add sliced avocado for a creamy texture and healthy fats.
    • Swap the honey for maple syrup for a vegan-friendly version.
    • Include mandarin orange segments for a sweet and tangy twist.
    • Use rice noodles instead of ramen for a gluten-free option.
    • Top with a soft-boiled egg for added richness.

    Frequently Asked Questions

    Can I make this salad ahead of time?

    Yes, you can prepare the salad a few hours in advance, but it’s best to add the dressing just before serving to keep the vegetables crisp. If you do dress it ahead, the noodles may absorb the dressing and soften, which changes the texture but not necessarily the taste.

    Is there a substitute for sesame oil?

    While sesame oil adds a distinct flavor, you can use olive oil or avocado oil in a pinch. The taste will be different, but the salad will still be delicious. For a closer flavor profile, try adding a teaspoon of tahini to the dressing.

    How can I add more protein to this dish?

    Grilled chicken, shrimp, tofu, or even edamame are great protein additions. Just cook your protein of choice separately and toss it in with the salad for a more filling meal.

    Summary

    This Oriental Salad Ramen recipe is a quick, flavorful, and versatile dish that’s perfect for any occasion. With its combination of crunchy vegetables, savory dressing, and satisfying noodles, it’s a meal that’s sure to please.

  • Barbie Q Chicken Salad Recipe: A Smoky, Sweet Twist on Classic Chicken Salad

    Barbie Q Chicken Salad Recipe: A Smoky, Sweet Twist on Classic Chicken Salad

    Zesty, smoky, and irresistibly sweet, this Barbie Q Chicken Salad is your new go-to for picnics, lunches, and everything in between. It’s a playful twist on the classic chicken salad, infused with barbecue flavors that’ll have you coming back for seconds.

    Why This Recipe Works

    • The combination of smoky barbecue sauce and sweet honey creates a depth of flavor that’s hard to resist.
    • Using both mayonnaise and Greek yogurt ensures the salad is creamy without being overly heavy.
    • The addition of crunchy celery and red onion adds a fresh contrast to the tender chicken.
    • It’s versatile—serve it on bread, over greens, or straight out of the bowl.
    • Perfect for meal prep, as the flavors meld and intensify overnight.

    Ingredients

    • 2 cups cooked chicken, shredded
    • 1/2 cup mayonnaise
    • 1/2 cup Greek yogurt
    • 1/4 cup barbecue sauce
    • 2 tablespoons honey
    • 1/2 cup celery, finely diced
    • 1/4 cup red onion, finely diced
    • Salt and pepper to taste

    Equipment Needed

    • Mixing bowl
    • Whisk
    • Measuring cups and spoons
    • Knife and cutting board

    Instructions

    Barbie Q Chicken Salad Recipe

    Step 1: Combine the Wet Ingredients

    In a large mixing bowl, whisk together the mayonnaise, Greek yogurt, barbecue sauce, and honey until smooth. This creates the creamy, smoky-sweet base of your salad. Tip: For a lighter version, you can adjust the ratio of mayonnaise to Greek yogurt to your liking.

    Step 2: Add the Chicken

    Add the shredded chicken to the bowl and stir until the chicken is evenly coated with the sauce. The chicken should be fully incorporated, ensuring every bite is flavorful. Tip: For extra smoky flavor, use chicken that’s been grilled or smoked.

    Step 3: Incorporate the Veggies

    Fold in the diced celery and red onion, mixing gently to distribute them throughout the salad. These add a necessary crunch and freshness. Tip: Soak the red onion in cold water for 10 minutes before adding to mellow its sharpness.

    Step 4: Season to Taste

    Season the salad with salt and pepper, tasting as you go to adjust the flavors to your preference. Remember, the barbecue sauce and honey already add sweetness and saltiness, so go easy at first.

    Step 5: Chill and Serve

    Cover the bowl and refrigerate the salad for at least an hour before serving. This allows the flavors to meld together beautifully. Serve on bread, over greens, or as a standalone dish.

    Tips and Tricks

    For those looking to elevate their Barbie Q Chicken Salad, consider these advanced tips. First, smoking your own chicken adds an unparalleled depth of flavor. Second, homemade barbecue sauce can tailor the sweetness and smokiness to your exact preference. Third, adding a dash of apple cider vinegar can brighten the overall flavor profile. Lastly, for a crunchier texture, consider adding chopped nuts like pecans or almonds right before serving.

    Recipe Variations

    • Spicy Version: Add diced jalapeños or a teaspoon of cayenne pepper for heat.
    • Fruity Twist: Mix in diced apples or grapes for a sweet contrast.
    • Low-Carb Option: Serve the salad in lettuce wraps instead of bread.
    • Extra Crunch: Add sunflower seeds or chopped walnuts for additional texture.
    • Dairy-Free: Substitute the Greek yogurt with more mayonnaise or a dairy-free alternative.

    Frequently Asked Questions

    Can I use canned chicken for this recipe?

    While you can use canned chicken in a pinch, for the best texture and flavor, we recommend using freshly cooked and shredded chicken. Canned chicken can sometimes be too soft and lacks the depth of flavor that freshly cooked chicken provides.

    How long can I store this chicken salad?

    This chicken salad can be stored in an airtight container in the refrigerator for up to 3 days. The flavors will continue to meld, making it even more delicious over time. Just give it a good stir before serving.

    Can I freeze this chicken salad?

    Freezing is not recommended as the mayonnaise and Greek yogurt can separate and become watery upon thawing, affecting the texture of the salad. It’s best enjoyed fresh or stored in the fridge for a few days.

    Summary

    This Barbie Q Chicken Salad is a delightful twist on the classic, combining smoky, sweet, and creamy elements for a dish that’s sure to impress. Perfect for any occasion, it’s as versatile as it is delicious.

  • Quick Cucumber Salad Recipe: Crisp, Cool, and Crazy Easy

    Quick Cucumber Salad Recipe: Crisp, Cool, and Crazy Easy

    Hello, salad lovers and busy bees! Here’s a recipe that’s as refreshing as a dive into the pool on a hot summer day. Perfect for those who crave something light, crunchy, and bursting with flavor without spending hours in the kitchen.

    Why This Recipe Works

    • It’s incredibly quick to prepare, taking less than 15 minutes from start to finish.
    • The combination of crisp cucumbers and a tangy dressing is irresistibly refreshing.
    • It’s versatile enough to serve as a side dish or a light main course.
    • Requires no cooking, making it perfect for hot days when you don’t want to turn on the stove.
    • It’s a great way to use up those garden-fresh cucumbers.

    Ingredients

    • 2 large cucumbers, thinly sliced
    • 1/4 cup red onion, thinly sliced
    • 2 tbsp fresh dill, chopped
    • 1/4 cup apple cider vinegar
    • 2 tbsp olive oil
    • 1 tsp sugar
    • 1/2 tsp salt
    • 1/4 tsp black pepper

    Equipment Needed

    • Mixing bowl
    • Whisk
    • Measuring cups and spoons
    • Knife and cutting board

    Instructions

    Quick Cucumber Salad Recipe

    Prepare the Cucumbers and Onions

    Start by washing the cucumbers thoroughly. No one likes a gritty salad! Thinly slice the cucumbers and red onion. The thinner, the better for maximum flavor absorption. Toss them into a large mixing bowl. Tip: If you’re not a fan of raw onion’s bite, soak the slices in cold water for 10 minutes before adding them to the salad.

    Whisk Together the Dressing

    In a small bowl, whisk together the apple cider vinegar, olive oil, sugar, salt, and black pepper until the sugar and salt are completely dissolved. This is your salad’s magic potion, so make sure it’s well combined. Tip: For a creamier dressing, add a tablespoon of Greek yogurt or mayonnaise.

    Combine and Toss

    Pour the dressing over the cucumbers and onions. Add the chopped dill. Now, roll up your sleeves and give everything a good toss. You want every slice coated in that tangy, herby goodness. Tip: Let the salad sit for 5 minutes before serving to allow the flavors to meld together beautifully.

    Tips and Tricks

    For an extra crunch, add some toasted sunflower seeds or chopped walnuts. If you’re making this salad ahead of time, hold off on adding the dressing until you’re ready to serve to keep the cucumbers crisp. For a spicy kick, add a pinch of red pepper flakes or a few slices of jalapeño. Experiment with different herbs like mint or parsley for a new flavor profile. And remember, the quality of your cucumbers makes a big difference, so choose fresh, firm ones.

    Recipe Variations

    • Add sliced avocado for a creamy texture and healthy fats.
    • Mix in some cherry tomatoes and feta cheese for a Greek twist.
    • Swap the apple cider vinegar for rice vinegar and add a splash of soy sauce for an Asian-inspired version.
    • Include some sliced radishes for an extra peppery crunch.
    • For a sweeter salad, add some thinly sliced apples or pears.

    Frequently Asked Questions

    Can I make this salad ahead of time?

    Absolutely! You can prepare the ingredients and dressing separately a day in advance. Just combine them when you’re ready to serve to keep the cucumbers crisp and fresh.

    How long does this salad last in the fridge?

    Stored in an airtight container, this salad will stay fresh for up to 2 days. However, the cucumbers may start to lose their crunch after the first day.

    Can I use a different type of vinegar?

    Yes, feel free to experiment with white wine vinegar, balsamic vinegar, or even lemon juice for a different flavor profile. Each will bring its own unique tang to the dish.

    Summary

    This quick cucumber salad is the epitome of summer freshness. With its crisp cucumbers, tangy dressing, and easy preparation, it’s sure to become a staple in your recipe collection. Perfect for picnics, potlucks, or a light weekday lunch.

  • Boiled Potato Salad Recipe: A Classic Side Dish with a Twist

    Boiled Potato Salad Recipe: A Classic Side Dish with a Twist

    Potatoes are the unsung heroes of the culinary world, and this boiled potato salad recipe is here to prove just that. Perfect for picnics, potlucks, or just because, this dish is a crowd-pleaser that’s as easy to make as it is delicious.

    Why This Recipe Works

    • The simplicity of boiled potatoes allows the flavors of the dressing and add-ins to shine.
    • Using a mix of mayonnaise and mustard creates a creamy yet tangy dressing that coats every bite.
    • Adding crunchy celery and onions provides a nice texture contrast to the soft potatoes.
    • This recipe is customizable, so you can adjust the ingredients to suit your taste.
    • It’s a make-ahead dish that tastes even better after the flavors have melded together in the fridge.

    Ingredients

    • 2 pounds of potatoes, peeled and cut into 1-inch cubes
    • 1 cup mayonnaise
    • 2 tablespoons mustard
    • 1/2 cup celery, finely chopped
    • 1/4 cup onion, finely chopped
    • Salt and pepper to taste

    Equipment Needed

    • Large pot
    • Mixing bowl
    • Knife
    • Cutting board
    • Measuring cups and spoons

    Instructions

    Boiled Potato Salad Recipe

    Step 1: Boil the Potatoes

    Fill a large pot with water and bring it to a boil over high heat. Add the potato cubes and cook for about 10-12 minutes, or until they are fork-tender but still hold their shape. Drain the potatoes and let them cool slightly.

    Step 2: Prepare the Dressing

    In a mixing bowl, combine the mayonnaise and mustard. Stir until the mixture is smooth and well blended. This will be the base of your dressing, so make sure it’s thoroughly mixed.

    Step 3: Combine Ingredients

    Add the slightly cooled potatoes to the bowl with the dressing. Gently fold in the celery and onion, making sure not to mash the potatoes. Season with salt and pepper to taste.

    Step 4: Chill the Salad

    Cover the bowl with plastic wrap and refrigerate the salad for at least 1 hour before serving. This allows the flavors to meld together and the salad to chill to the perfect temperature.

    Step 5: Serve and Enjoy

    Give the salad a quick stir before serving to redistribute the dressing. Serve chilled as a side dish to your favorite main courses.

    Tips and Tricks

    For the best texture, don’t overcook the potatoes. They should be tender but still firm enough to hold their shape when mixed with the other ingredients. If you’re in a hurry, you can spread the boiled potatoes on a baking sheet to cool them faster. For extra flavor, consider adding a splash of vinegar or a sprinkle of paprika to the dressing. Always taste and adjust the seasoning before serving, as potatoes can absorb a lot of salt.

    Recipe Variations

    • Add hard-boiled eggs for a protein boost and extra texture.
    • Mix in some chopped pickles or relish for a tangy twist.
    • For a healthier version, substitute Greek yogurt for half of the mayonnaise.
    • Include fresh herbs like dill or parsley for a burst of freshness.
    • For a smoky flavor, add a bit of crumbled bacon on top before serving.

    Frequently Asked Questions

    Can I use red potatoes instead?

    Absolutely! Red potatoes hold their shape well and add a nice color to the salad. Just be sure to cut them into even-sized pieces so they cook uniformly.

    How long can I store the potato salad?

    This potato salad can be stored in an airtight container in the refrigerator for up to 3 days. Just give it a stir before serving again to refresh the flavors.

    Can I make this recipe vegan?

    Yes, you can easily make this recipe vegan by using vegan mayonnaise and omitting any animal-based add-ins like eggs or bacon.

    Summary

    This boiled potato salad recipe is a versatile and delicious side dish that’s perfect for any occasion. With its creamy dressing and customizable add-ins, it’s sure to become a favorite in your recipe collection.

  • Spinach Strawberry Salad Dressing: A Sweet & Tangy Delight

    Spinach Strawberry Salad Dressing: A Sweet & Tangy Delight

    Let’s dive into a dressing that’s as vibrant as your summer salad dreams. This spinach strawberry salad dressing is the perfect blend of sweet, tangy, and utterly refreshing. It’s not just a dressing; it’s a salad game-changer.

    Why This Recipe Works

    • The combination of fresh strawberries and spinach creates a unique flavor profile that’s both sweet and earthy.
    • Apple cider vinegar adds the perfect amount of tanginess to balance the sweetness of the strawberries.
    • Using honey as a natural sweetener enhances the dressing’s flavor without overpowering it.
    • It’s incredibly versatile, pairing well with a variety of salads beyond just spinach and strawberry.
    • This dressing is quick and easy to make, requiring no cooking and just a few minutes of your time.

    Ingredients

    • 1 cup fresh strawberries, hulled and chopped
    • 1/2 cup fresh spinach leaves, packed
    • 1/4 cup apple cider vinegar
    • 1/4 cup olive oil
    • 2 tablespoons honey
    • 1 teaspoon Dijon mustard
    • Salt and pepper to taste

    Equipment Needed

    • Blender or food processor
    • Measuring cups and spoons
    • Knife and cutting board
    • Storage jar or bottle

    Instructions

    Recipe For Spinach Strawberry Salad Dressing

    Step 1: Prepare Your Ingredients

    Start by washing your strawberries and spinach thoroughly under cold water. Hull the strawberries and chop them into smaller pieces to make blending easier. Measure out all your ingredients to ensure a smooth process. Tip: For a smoother dressing, you can slice the strawberries thinly.

    Step 2: Blend the Base

    Add the chopped strawberries, spinach, apple cider vinegar, honey, and Dijon mustard into your blender or food processor. Blend on high until the mixture is smooth. This should take about 1-2 minutes, depending on your blender’s power. Tip: If the mixture is too thick, you can add a tablespoon of water to help it blend more easily.

    Step 3: Emulsify with Olive Oil

    With the blender running on low, slowly drizzle in the olive oil. This process, called emulsification, will help create a smooth and creamy dressing. Continue blending until the oil is fully incorporated and the dressing has a uniform consistency. Tip: For an extra smooth texture, you can strain the dressing through a fine mesh sieve.

    Step 4: Season to Taste

    Transfer the dressing to a bowl or jar and season with salt and pepper to taste. Stir well to combine. Remember, the flavors will meld and intensify as the dressing sits, so it’s okay if it tastes a bit mild at first. Tip: Let the dressing sit in the refrigerator for at least 30 minutes before serving to enhance the flavors.

    Step 5: Serve and Store

    Your spinach strawberry salad dressing is now ready to elevate your salads! Serve it immediately or store it in an airtight container in the refrigerator for up to a week. Shake well before each use as the ingredients may separate over time. Tip: For a fun twist, serve the dressing in a squeeze bottle for easy application.

    Tips and Tricks

    For those looking to take their dressing to the next level, consider these advanced tips. First, roasting the strawberries before blending can deepen the flavor profile, adding a caramelized sweetness. Second, substituting part of the olive oil with avocado oil can introduce a buttery texture. Lastly, adding a pinch of cayenne pepper can give the dressing a subtle kick that contrasts beautifully with the sweetness.

    Recipe Variations

    • For a creamier version, blend in 1/4 cup of Greek yogurt or mayonnaise.
    • Swap out the strawberries for raspberries or blackberries for a different berry flavor.
    • Add a tablespoon of poppy seeds for a crunchy texture and visual appeal.
    • Incorporate fresh herbs like basil or mint for an aromatic twist.
    • For a vegan option, replace the honey with maple syrup or agave nectar.

    Frequently Asked Questions

    Can I use frozen strawberries instead of fresh?

    Absolutely! Frozen strawberries can be a great substitute when fresh ones aren’t in season. Just make sure to thaw them completely and drain any excess liquid before blending to avoid a watery dressing.

    How long can I store this dressing?

    This dressing can be stored in an airtight container in the refrigerator for up to a week. The flavors will continue to develop over time, making it even more delicious after a day or two.

    Can I make this dressing without a blender?

    Yes, you can mash the strawberries and finely chop the spinach, then whisk all the ingredients together in a bowl. However, the texture will be chunkier than if you used a blender.

    Summary

    This spinach strawberry salad dressing is a delightful blend of sweet and tangy flavors, perfect for elevating any salad. With just a few simple ingredients and steps, you can create a dressing that’s as nutritious as it is delicious. Whether you’re a seasoned chef or a kitchen newbie, this recipe is sure to impress.

  • Cucumber Salad California Roll Recipe: A Fresh Twist on a Classic

    Cucumber Salad California Roll Recipe: A Fresh Twist on a Classic

    Yes, you heard it right! We’re taking the beloved California roll and giving it a refreshing cucumber salad twist. Perfect for those hot summer days or when you’re craving something light yet satisfying. Let’s dive into this culinary adventure together!

    Why This Recipe Works

    • Combines the freshness of cucumber salad with the heartiness of a California roll for a perfect balance.
    • Uses simple, accessible ingredients to create a gourmet experience at home.
    • The recipe is versatile, allowing for numerous variations to suit any palate.

    Ingredients

    • 2 cups sushi rice, cooked and cooled
    • 1 large cucumber, thinly sliced
    • 1 avocado, sliced
    • 1/2 cup crab meat, imitation or real
    • 2 tbsp mayonnaise
    • 1 tbsp rice vinegar
    • 1 tsp sugar
    • 1/2 tsp salt
    • Nori sheets, cut into strips

    Equipment Needed

    • Bamboo sushi mat
    • Sharp knife
    • Mixing bowls

    Instructions

    Cucumber Salad California Roll Recipe

    Step 1: Prepare the Cucumber Salad

    In a mixing bowl, combine the thinly sliced cucumber with rice vinegar, sugar, and salt. Let it sit for about 10 minutes to marinate. This step ensures your cucumber salad is perfectly tangy and sweet, adding a burst of flavor to your rolls.

    Step 2: Mix the Crab Salad

    In another bowl, mix the crab meat with mayonnaise until well combined. This creamy mixture will add a rich texture and depth to your California rolls, making them irresistibly delicious.

    Step 3: Assemble the Rolls

    Lay a nori strip on your bamboo mat, spread a thin layer of sushi rice over it, then add a line of cucumber salad, avocado slices, and crab mixture. Carefully roll everything together using the mat to press firmly.

    Step 4: Slice and Serve

    Using a sharp knife, slice the roll into bite-sized pieces. Serve immediately for the best taste and texture. The contrast between the crunchy cucumber and the creamy avocado and crab is simply divine.

    Tips and Tricks

    For the best results, ensure your sushi rice is at room temperature before assembling the rolls. This prevents the nori from getting soggy. Additionally, wetting your knife slightly before slicing the rolls can help achieve cleaner cuts. Experiment with the thickness of your cucumber slices to find your perfect balance between crunch and flavor.

    Recipe Variations

    • Swap the crab meat for cooked shrimp or smoked salmon for a different protein twist.
    • Add a sprinkle of sesame seeds inside the roll or on top for extra crunch and nuttiness.
    • For a vegetarian version, omit the crab and add more avocado or include mango slices for sweetness.

    Frequently Asked Questions

    Can I make these rolls ahead of time?

    Yes, you can prepare the components ahead and assemble the rolls when ready to serve. However, for the best texture, it’s recommended to assemble no more than a few hours in advance to prevent the nori from becoming too soft.

    What can I use instead of a bamboo mat?

    If you don’t have a bamboo mat, a clean kitchen towel or even parchment paper can work in a pinch. The key is to have something that can help you roll the sushi tightly.

    How do I store leftovers?

    Leftover rolls can be stored in an airtight container in the refrigerator for up to a day. Note that the texture may not be as perfect as when freshly made, but they’ll still be tasty.

    Summary

    This Cucumber Salad California Roll recipe is a delightful twist on the classic, offering a refreshing and light option for sushi lovers. With simple ingredients and easy steps, it’s perfect for any occasion.

  • Turkish Shepherd Salad Recipe: A Refreshing Summer Delight

    Turkish Shepherd Salad Recipe: A Refreshing Summer Delight

    Zesty, vibrant, and bursting with fresh flavors, this Turkish Shepherd Salad is the perfect dish to cool down on a hot summer day. Easy to make and requiring no cooking, it’s a hassle-free recipe that brings a taste of the Mediterranean to your table.

    Why This Recipe Works

    • It’s a no-cook recipe, perfect for hot days when you don’t want to turn on the stove.
    • The combination of crisp vegetables and a tangy dressing creates a refreshing and satisfying dish.
    • It’s versatile and can be served as a side dish or a light main course.
    • The ingredients are simple and easily accessible, making it a great last-minute option.
    • It’s healthy, low in calories, and packed with vitamins and minerals.

    Ingredients

    • 2 large cucumbers, diced
    • 4 medium tomatoes, diced
    • 1 large green bell pepper, diced
    • 1 small red onion, finely chopped
    • 1/2 cup fresh parsley, chopped
    • 1/4 cup fresh mint, chopped
    • 1/4 cup olive oil
    • 2 tbsp lemon juice
    • 1 tsp salt
    • 1/2 tsp black pepper

    Equipment Needed

    • Large mixing bowl
    • Sharp knife
    • Cutting board
    • Measuring cups and spoons
    • Whisk

    Instructions

    Turkish Shepherd Salad Recipe

    Step 1: Prepare the Vegetables

    Start by washing all the vegetables thoroughly under cold running water. Dice the cucumbers, tomatoes, and green bell pepper into small, bite-sized pieces. Finely chop the red onion to ensure it distributes evenly throughout the salad. Place all the chopped vegetables into a large mixing bowl.

    Step 2: Add the Herbs

    Chop the fresh parsley and mint finely, then add them to the bowl with the vegetables. The herbs will add a fresh and aromatic flavor to the salad, enhancing its overall taste.

    Step 3: Make the Dressing

    In a small bowl, whisk together the olive oil, lemon juice, salt, and black pepper until well combined. This simple dressing will bring all the flavors of the salad together, adding a tangy and slightly spicy note.

    Step 4: Combine Everything

    Pour the dressing over the vegetables and herbs in the large mixing bowl. Gently toss everything together until all the ingredients are evenly coated with the dressing. Be careful not to mash the vegetables while mixing.

    Step 5: Serve and Enjoy

    Transfer the salad to a serving dish and let it sit for about 10 minutes before serving to allow the flavors to meld together. Serve chilled or at room temperature for the best taste experience.

    Tips and Tricks

    For an extra crunch, you can add some diced radishes or green onions to the salad. If you prefer a spicier kick, a pinch of red pepper flakes or a diced jalapeno can be mixed into the dressing. To make the salad ahead of time, prepare the vegetables and dressing separately and combine them just before serving to maintain the freshness and crunch of the vegetables.

    Recipe Variations

    • Add some crumbled feta cheese for a creamy and salty twist.
    • Include some olives or capers for a briny flavor.
    • Swap the lemon juice with pomegranate molasses for a sweeter and tangier dressing.
    • Add some grilled chicken or shrimp to turn the salad into a hearty main dish.
    • Use quinoa or bulgur wheat to add some grains and make the salad more filling.

    Frequently Asked Questions

    Can I make this salad ahead of time?

    Yes, you can prepare the vegetables and dressing a few hours in advance, but it’s best to combine them just before serving to keep the vegetables crisp and fresh.

    How long does the salad last in the fridge?

    The salad is best enjoyed the day it’s made, but it can be stored in an airtight container in the refrigerator for up to 2 days. Note that the vegetables may soften over time.

    Can I use dried herbs instead of fresh?

    While fresh herbs are recommended for their vibrant flavor, you can use dried herbs in a pinch. Use about one-third the amount of dried herbs as you would fresh, as they are more concentrated.

    Summary

    This Turkish Shepherd Salad is a light, refreshing, and easy-to-make dish that’s perfect for summer. With its crisp vegetables, fresh herbs, and tangy dressing, it’s a healthy and delicious option for any meal.

  • 3 Bean Salad Recipe with Corn: A Summer Delight

    3 Bean Salad Recipe with Corn: A Summer Delight

    Every summer gathering needs a dish that’s as vibrant as the season itself, and this 3 bean salad with corn is just that. Easy to whip up and packed with flavors, it’s the perfect side dish that promises to be a crowd-pleaser.

    Why This Recipe Works

    • It’s a no-cook recipe, making it perfect for hot summer days when you’d rather not turn on the stove.
    • The combination of beans and corn provides a delightful texture contrast and a protein-packed meal.
    • It’s versatile; serve it as a side, a main, or even as a salsa with chips.
    • The dressing is simple yet flavorful, enhancing the natural tastes of the ingredients without overpowering them.
    • It gets better with time, making it a great make-ahead dish for picnics and potlucks.

    Ingredients

    • 1 can (15 oz) black beans, drained and rinsed
    • 1 can (15 oz) kidney beans, drained and rinsed
    • 1 can (15 oz) garbanzo beans, drained and rinsed
    • 1 cup corn kernels (fresh, frozen, or canned)
    • 1/2 red onion, finely diced
    • 1/4 cup cilantro, chopped
    • 1/4 cup olive oil
    • 2 tbsp apple cider vinegar
    • 1 tbsp honey
    • 1 tsp cumin
    • Salt and pepper to taste

    Equipment Needed

    • Large mixing bowl
    • Whisk
    • Measuring cups and spoons
    • Can opener
    • Knife and cutting board

    Instructions

    3 Bean Salad Recipe With Corn

    Step 1: Prep Your Beans and Corn

    Start by draining and rinsing all three types of beans under cold water to remove any excess sodium and canning liquids. If you’re using frozen corn, thaw it by running under warm water. Fresh corn can be used raw or lightly blanched for a minute in boiling water. Add the beans and corn to a large mixing bowl.

    Step 2: Add the Aromatics

    Finely dice the red onion and chop the cilantro. Add them to the bowl with the beans and corn. The red onion adds a nice crunch and a bit of sharpness, while the cilantro brings a fresh, herby note to the salad.

    Step 3: Whisk Together the Dressing

    In a small bowl, whisk together the olive oil, apple cider vinegar, honey, and cumin until well combined. The honey balances the acidity of the vinegar, and the cumin adds a warm, earthy flavor that ties everything together.

    Step 4: Combine and Season

    Pour the dressing over the bean mixture and toss gently to combine. Season with salt and pepper to taste. Let the salad sit for at least 30 minutes before serving to allow the flavors to meld together.

    Step 5: Serve and Enjoy

    Give the salad a final toss before serving. It can be served immediately, but it’s even better if you let it chill in the fridge for a couple of hours. This salad is perfect on its own, as a side, or even as a topping for grilled meats.

    Tips and Tricks

    For an extra burst of flavor, try adding a diced avocado or some crumbled feta cheese right before serving. If you’re making this salad ahead of time, hold off on adding the cilantro until just before serving to keep it fresh and vibrant. For a spicier kick, add a diced jalapeño or a sprinkle of chili flakes. Always taste and adjust the seasoning after the salad has had time to sit, as the flavors will develop and change over time.

    Recipe Variations

    • Swap out the beans for your favorites or what you have on hand. Pinto beans or white beans would work great in this salad.
    • Add some diced bell peppers or cucumbers for extra crunch and color.
    • For a more substantial meal, add some cooked quinoa or farro.
    • Change up the dressing by using lime juice instead of vinegar and adding some chopped mint for a different flavor profile.
    • Make it creamy by stirring in a couple of tablespoons of Greek yogurt or mayonnaise into the dressing.

    Frequently Asked Questions

    Can I use dried beans instead of canned?

    Absolutely! You’ll need to cook them first until tender. About 1/2 cup of dried beans will yield the equivalent of one can. Just make sure to cool them completely before adding to the salad.

    How long does this salad keep?

    Stored in an airtight container in the fridge, this salad will keep for up to 3 days. The flavors will continue to meld, making it even more delicious over time.

    Can I make this salad vegan?

    Yes, this recipe is easily made vegan by substituting the honey with maple syrup or agave nectar. Just make sure all your other ingredients are vegan-friendly as well.

    Summary

    This 3 bean salad with corn is a refreshing, protein-packed dish that’s perfect for summer gatherings. Easy to make and full of flavor, it’s a versatile recipe that can be customized to suit your tastes. Whether you’re looking for a side dish or a light main, this salad is sure to impress.

  • Zucchini Salad Recipe: A Refreshing Summer Delight

    Zucchini Salad Recipe: A Refreshing Summer Delight

    Just when you thought zucchini couldn’t get any more versatile, here comes a salad that’s as refreshing as a dip in the pool on a hot summer day. Perfect for picnics, potlucks, or just because you deserve something light and tasty.

    Why This Recipe Works

    • It’s a fantastic way to use up that summer zucchini bounty.
    • The dressing is a zesty lemon vinaigrette that brings out the best in the zucchini.
    • It’s quick to prepare, making it perfect for last-minute gatherings.
    • The addition of nuts adds a delightful crunch.
    • It’s a healthy, low-calorie option that doesn’t skimp on flavor.

    Ingredients

    • 2 medium zucchinis, thinly sliced
    • 1/4 cup extra virgin olive oil
    • 2 tbsp lemon juice
    • 1 clove garlic, minced
    • 1/4 cup chopped walnuts
    • Salt and pepper to taste

    Equipment Needed

    • Mixing bowl
    • Whisk
    • Knife
    • Cutting board

    Instructions

    Zucchini Salad Recipe

    Prepare the Zucchini

    Start by washing your zucchinis thoroughly under cold water. Using a sharp knife, slice them into thin rounds. If you’re feeling fancy, a mandoline can give you even, paper-thin slices. Tip: Salting the zucchini lightly and letting it sit for 10 minutes can draw out excess moisture, making your salad even crisper.

    Make the Dressing

    In a mixing bowl, whisk together the olive oil, lemon juice, minced garlic, and a pinch of salt and pepper. Taste and adjust the seasoning as needed. This dressing is all about balance, so don’t be shy to tweak it to your liking.

    Combine and Toss

    Add the sliced zucchini to the bowl with the dressing. Gently toss to ensure every piece is lightly coated. The key here is to be gentle to avoid breaking the zucchini slices.

    Add the Crunch

    Sprinkle the chopped walnuts over the dressed zucchini. Toss once more to distribute the nuts evenly throughout the salad. Tip: Toasting the walnuts beforehand can add an extra layer of flavor.

    Serve Immediately

    This salad is best enjoyed fresh, so serve it right away. If you must wait, keep it chilled and add the walnuts just before serving to maintain their crunch.

    Tips and Tricks

    For an extra burst of flavor, consider adding some freshly grated Parmesan cheese or a sprinkle of red pepper flakes for heat. If you’re not a fan of walnuts, almonds or pecans make great substitutes. And for those who love a bit of sweetness, adding some dried cranberries can be a delightful twist. Remember, the key to a great zucchini salad is in the freshness of the ingredients, so always opt for the best you can find.

    Recipe Variations

    • Add some cherry tomatoes for a pop of color and sweetness.
    • Incorporate some sliced avocado for creaminess.
    • Swap the lemon juice for balsamic vinegar for a different flavor profile.
    • Add some cooked quinoa or chickpeas to turn it into a more substantial meal.
    • Use a mix of yellow and green zucchinis for a visually stunning dish.

    Frequently Asked Questions

    Can I make this salad ahead of time? While you can prepare the ingredients ahead, it’s best to dress and assemble the salad just before serving to prevent the zucchini from becoming soggy.

    Is there a substitute for walnuts? Absolutely! Any nut you prefer can work here, or you can omit them entirely if you’re allergic or not a fan.

    Can I grill the zucchini instead of using it raw? Yes, grilling the zucchini can add a smoky flavor to the salad. Just let it cool before adding the dressing and other ingredients.

    Summary

    This zucchini salad is a light, refreshing, and versatile dish that’s perfect for summer. With its simple ingredients and easy preparation, it’s sure to become a staple in your recipe collection.

  • Low Carb Tuna Salad Recipe: A Delightfully Light Lunch Option

    Low Carb Tuna Salad Recipe: A Delightfully Light Lunch Option

    Zesty and refreshing, this low carb tuna salad is your go-to for a quick, nutritious meal. Packed with flavors and easy to make, it’s perfect for those watching their carb intake but not willing to compromise on taste.

    Why This Recipe Works

    • It’s incredibly versatile, allowing you to mix and match ingredients based on what you have in your pantry.
    • The use of Greek yogurt instead of mayonnaise significantly lowers the calorie count while adding a tangy twist.
    • Crunchy celery and cucumbers add texture and freshness, making every bite satisfying.
    • It’s ready in under 15 minutes, making it perfect for meal prep or a quick lunch.
    • This recipe keeps well in the fridge, so you can enjoy it for days.

    Ingredients

    • 2 cans (5 oz each) tuna in water, drained
    • 1/2 cup Greek yogurt
    • 1/4 cup diced celery
    • 1/4 cup diced cucumber
    • 1 tbsp lemon juice
    • 1 tsp Dijon mustard
    • Salt and pepper to taste

    Equipment Needed

    • Mixing bowl
    • Measuring cups and spoons
    • Knife and cutting board

    Instructions

    Low Carb Tuna Salad Recipe

    Step 1: Prepare Your Ingredients

    Start by draining the tuna thoroughly to avoid a watery salad. Dice the celery and cucumber into small, bite-sized pieces to ensure every forkful has a bit of crunch. Measuring out your Greek yogurt, lemon juice, and Dijon mustard beforehand will make the mixing process smoother.

    Step 2: Mix the Dressing

    In your mixing bowl, combine the Greek yogurt, lemon juice, and Dijon mustard. Whisk them together until the mixture is smooth and uniform. This combination not only adds flavor but also keeps the salad light and low in carbs.

    Step 3: Combine All Ingredients

    Add the drained tuna, diced celery, and cucumber to the bowl with the dressing. Gently fold everything together to ensure the ingredients are evenly coated without breaking the tuna too much. Season with salt and pepper to taste.

    Step 4: Chill Before Serving

    For the best flavor, cover the bowl and let the salad chill in the refrigerator for at least 30 minutes. This step allows the flavors to meld together beautifully.

    Step 5: Serve and Enjoy

    Once chilled, give the salad a quick stir and serve it on a bed of greens, in a low-carb wrap, or enjoy it as is. It’s deliciously satisfying and guilt-free!

    Tips and Tricks

    For an extra kick, add a pinch of cayenne pepper or a dash of hot sauce to the dressing. If you’re not a fan of Greek yogurt, avocado makes a great substitute, adding creaminess and healthy fats. To bulk up the salad without adding carbs, toss in some diced bell peppers or radishes for added crunch and color.

    Recipe Variations

    • Swap tuna for canned salmon or chicken for a different protein option.
    • Add chopped nuts or seeds for extra texture and a boost of healthy fats.
    • Incorporate fresh herbs like dill or parsley for a burst of freshness.
    • Use avocado instead of Greek yogurt for a dairy-free version.
    • Mix in some olives or capers for a briny, flavorful twist.

    Frequently Asked Questions

    Can I make this salad ahead of time?

    Absolutely! This tuna salad tastes even better after it’s had time to chill in the fridge, making it a great make-ahead meal. Just be sure to store it in an airtight container to keep it fresh.

    Is this recipe keto-friendly?

    Yes, this low carb tuna salad is keto-friendly, especially if you stick to the recipe as written. Just be mindful of any additions or substitutions to ensure they fit within your keto dietary requirements.

    How long does this salad last in the fridge?

    Stored properly in an airtight container, this tuna salad will last for up to 3 days in the refrigerator. After that, the ingredients may start to lose their freshness and texture.

    Summary

    This low carb tuna salad is a quick, easy, and delicious option for anyone looking for a light meal that doesn’t skimp on flavor. With simple ingredients and straightforward steps, it’s a recipe you’ll come back to again and again.