Blog

  • Sweet Potato and Kale Salad Recipe: A Flavor Fiesta in Every Bite

    Sweet Potato and Kale Salad Recipe: A Flavor Fiesta in Every Bite

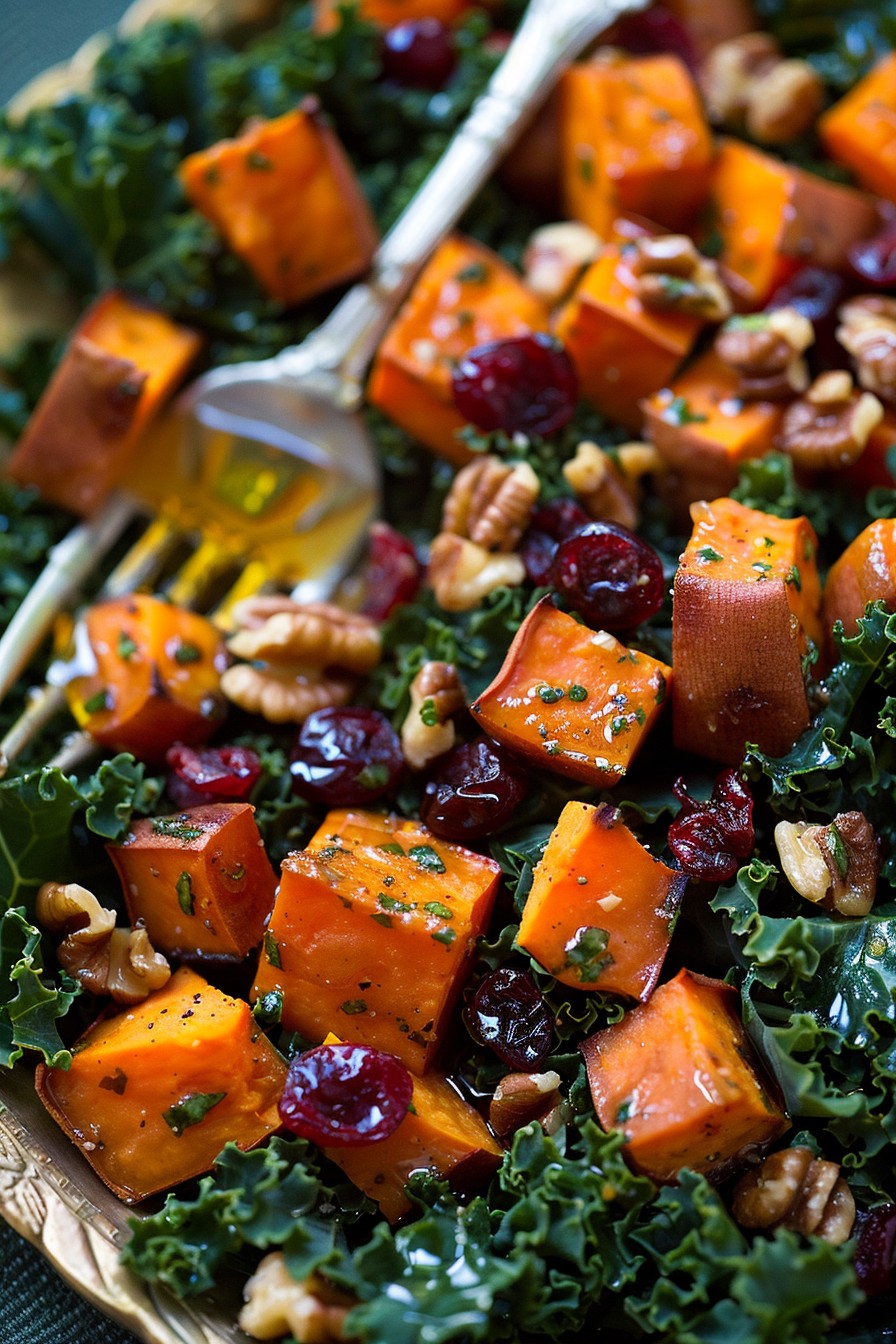
    Welcome to a dish that’s as nutritious as it is delicious! This sweet potato and kale salad is the perfect blend of sweet and savory, with a crunch that’ll have you coming back for more. It’s a crowd-pleaser that’s as easy to make as it is to love.

    Why This Recipe Works

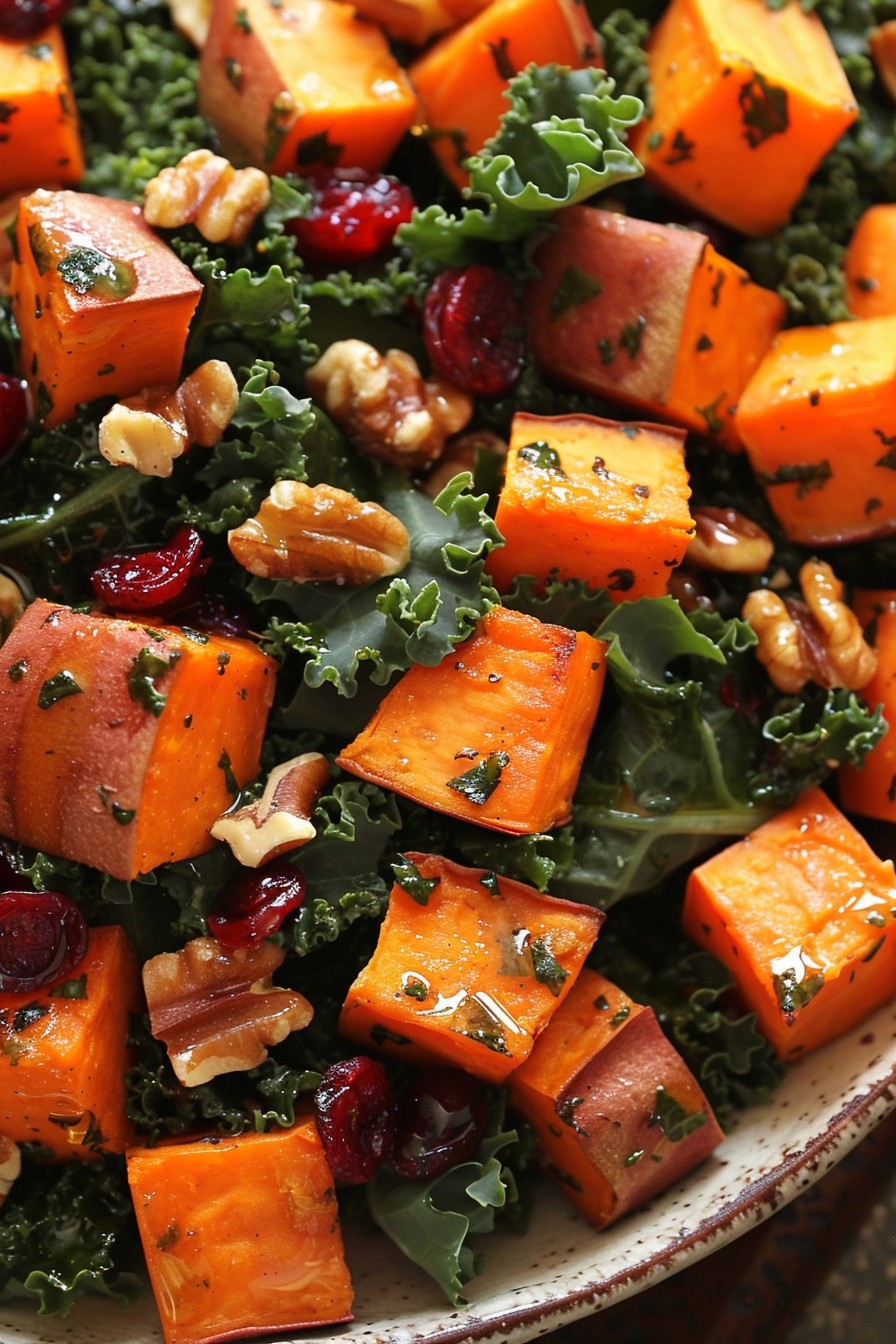
    • The combination of roasted sweet potatoes and fresh kale offers a perfect balance of textures and flavors.
    • A homemade dressing adds a zesty kick that ties all the ingredients together beautifully.
    • It’s packed with nutrients, making it a healthy choice for any meal.
    • This salad is versatile and can be customized to suit any taste preference.
    • It’s quick to prepare, making it ideal for busy weeknights or last-minute gatherings.

    Ingredients

    • 2 medium sweet potatoes, peeled and diced into 1-inch cubes
    • 1 bunch kale, stems removed and leaves chopped
    • 1/4 cup olive oil
    • 2 tbsp apple cider vinegar
    • 1 tbsp honey
    • 1/2 tsp salt
    • 1/4 tsp black pepper
    • 1/4 cup dried cranberries
    • 1/4 cup chopped walnuts

    Equipment Needed

    • Baking sheet
    • Mixing bowls
    • Whisk
    • Knife and cutting board

    Instructions

    Sweet Potato And Kale Salad Recipe

    Preheat and Prepare

    Preheat your oven to 400°F. While the oven heats, toss the diced sweet potatoes with 2 tablespoons of olive oil, salt, and pepper. Spread them out on a baking sheet in a single layer to ensure even roasting.

    Roast to Perfection

    Roast the sweet potatoes for 25-30 minutes, stirring halfway through, until they’re tender and slightly caramelized. This roasting time brings out their natural sweetness and adds a delightful texture to the salad.

    Whisk Up the Dressing

    In a small bowl, whisk together the remaining olive oil, apple cider vinegar, and honey until well combined. This dressing will add a bright and tangy flavor to the salad, perfectly complementing the sweetness of the potatoes.

    Massage the Kale

    Place the chopped kale in a large mixing bowl and drizzle with half of the dressing. Use your hands to gently massage the kale for about 2 minutes. This step softens the kale, making it more tender and easier to eat.

    Combine and Serve

    Add the roasted sweet potatoes, dried cranberries, and chopped walnuts to the bowl with the kale. Drizzle with the remaining dressing and toss everything together until well combined. Serve immediately for the freshest taste.

    Tips and Tricks

    For an extra flavor boost, try adding a sprinkle of feta cheese or goat cheese to the salad before serving. If you’re not a fan of walnuts, pecans or almonds make great substitutes. To save time, you can roast the sweet potatoes ahead of time and store them in the fridge until you’re ready to assemble the salad. For a more substantial meal, add grilled chicken or tofu to the salad. Always taste the dressing before adding it to the salad and adjust the seasoning as needed.

    Recipe Variations

    • Swap the sweet potatoes for butternut squash for a different flavor profile.
    • Use spinach instead of kale for a milder green.
    • Add quinoa or farro to make the salad more filling.
    • Try different nuts like pecans or almonds for a change in texture.
    • Experiment with different dressings, such as balsamic vinaigrette or tahini lemon.

    Frequently Asked Questions

    Can I make this salad ahead of time?

    Yes, you can prepare the components ahead of time, but it’s best to assemble the salad just before serving to keep the kale fresh and crisp. Store the roasted sweet potatoes, chopped kale, and dressing separately in the fridge.

    Is there a substitute for honey in the dressing?

    Absolutely! Maple syrup or agave nectar are great vegan alternatives to honey. They’ll provide a similar sweetness to the dressing without compromising the flavor.

    How can I make this salad more protein-rich?

    Adding grilled chicken, tofu, or chickpeas are excellent ways to boost the protein content of this salad. These additions make it a more balanced and satisfying meal.

    Summary

    This sweet potato and kale salad is a vibrant, flavorful, and nutritious dish that’s perfect for any occasion. With its easy preparation and customizable options, it’s sure to become a staple in your recipe collection.

  • Snickerdoodle Salad Recipe: A Sweet Twist on a Classic

    Snickerdoodle Salad Recipe: A Sweet Twist on a Classic

    Prepare to have your taste buds dazzled with this Snickerdoodle Salad recipe, a delightful concoction that combines the comforting flavors of snickerdoodle cookies with the fresh crispness of a salad. Perfect for potlucks, picnics, or just because, this recipe is sure to be a hit.

    Why This Recipe Works

    • It’s a unique blend of sweet and savory that surprises and delights.
    • The recipe is incredibly easy to make, requiring no baking or complicated steps.
    • It’s versatile, allowing for numerous variations to suit any taste.
    • The combination of textures from the crunchy apples to the soft cookies creates a satisfying eating experience.
    • It’s a great way to enjoy dessert in a slightly healthier, more creative form.

    Ingredients

    • 2 cups of snickerdoodle cookies, crumbled
    • 1 large apple, diced
    • 1 cup of whipped cream
    • 1/2 cup of caramel sauce
    • 1 tsp of cinnamon

    Equipment Needed

    • Mixing bowl
    • Whisk
    • Measuring cups and spoons
    • Serving dish

    Instructions

    Snickerdoodle Salad Recipe

    Step 1: Prepare Your Ingredients

    Start by dicing your apple into small, bite-sized pieces. Crumble your snickerdoodle cookies into chunks, not too fine, to maintain some texture. Measure out your whipped cream and caramel sauce, and have your cinnamon ready. This prep work makes the assembly process smooth and enjoyable.

    Step 2: Mix the Base

    In a large mixing bowl, combine the diced apple and crumbled snickerdoodle cookies. Gently fold in the whipped cream until everything is evenly coated. The key here is to mix gently to keep the cookies from turning into mush.

    Step 3: Add the Flavors

    Drizzle the caramel sauce over the mixture and sprinkle with cinnamon. Fold these in lightly to distribute the flavors without overmixing. The caramel adds a rich sweetness, while the cinnamon brings that classic snickerdoodle warmth.

    Step 4: Chill Before Serving

    Transfer the mixture to a serving dish and chill in the refrigerator for at least 30 minutes. This step allows the flavors to meld together beautifully and the salad to set slightly, making it easier to serve.

    Step 5: Serve and Enjoy

    Once chilled, your Snickerdoodle Salad is ready to serve. Dish it out into bowls or onto plates, and if you’re feeling fancy, a little extra drizzle of caramel and a sprinkle of cinnamon on top won’t hurt.

    Tips and Tricks

    For an extra crunch, consider adding some chopped nuts like pecans or walnuts. If you’re serving this salad at a party, individual servings in small cups or glasses can make for a charming presentation. For a lighter version, substitute the whipped cream with Greek yogurt. Always use fresh apples for the best texture and flavor. And remember, the quality of your snickerdoodle cookies will greatly affect the outcome, so choose your favorite brand or homemade recipe.

    Recipe Variations

    • Swap out the apples for pears or peaches for a different fruit profile.
    • Add a layer of cream cheese mixed with powdered sugar for a cheesecake-like twist.
    • Incorporate some chocolate chips or chunks for a chocolatey surprise.
    • Use ginger snaps instead of snickerdoodles for a spicier version.
    • Top with a sprinkle of granola for added texture and a hint of healthiness.

    Frequently Asked Questions

    Can I make this recipe ahead of time? Absolutely! In fact, making it a few hours ahead allows the flavors to meld together more. Just keep it refrigerated until you’re ready to serve.

    What’s the best way to store leftovers? Store any leftovers in an airtight container in the refrigerator. It’s best enjoyed within a day or two as the cookies will start to soften over time.

    Can I use a different type of cookie? Yes, you can experiment with different cookies, but keep in mind that the flavor profile will change. Snickerdoodles offer a unique cinnamon-sugar flavor that’s hard to beat.

    Summary

    This Snickerdoodle Salad recipe is a fun, easy, and delicious way to enjoy the flavors of your favorite cookie in a new and exciting form. Perfect for any occasion, it’s sure to be a crowd-pleaser.

  • Curry Chicken Salad with Grapes: A Flavor Fiesta in Every Bite

    Curry Chicken Salad with Grapes: A Flavor Fiesta in Every Bite

    Welcome to a culinary adventure where curry meets chicken salad in the most delightful way possible. With the sweet crunch of grapes adding a burst of freshness, this recipe is a game-changer for your lunch routine. Let’s dive into the flavors!

    Why This Recipe Works

    • The combination of creamy mayonnaise and Greek yogurt creates a rich yet light dressing that coats every ingredient perfectly.
    • Curry powder adds a warm, aromatic depth that elevates the chicken salad from good to unforgettable.
    • Grapes introduce a sweet and juicy contrast to the savory chicken, making each bite a balanced flavor experience.
    • This salad is incredibly versatile, serving as a fantastic sandwich filler, a lettuce wrap star, or a standalone dish.
    • Prep is a breeze, making it perfect for meal prep or last-minute gatherings.

    Ingredients

    • 2 cups cooked chicken, shredded or diced
    • 1/2 cup mayonnaise
    • 1/2 cup Greek yogurt
    • 1 tbsp curry powder
    • 1 cup red grapes, halved
    • 1/4 cup celery, finely diced
    • 1/4 cup red onion, finely diced
    • Salt and pepper to taste

    Equipment Needed

    • Mixing bowl
    • Measuring cups and spoons
    • Knife and cutting board
    • Spatula or spoon for mixing

    Instructions

    Curry Chicken Salad Recipe Grapes

    Step 1: Prepare Your Ingredients

    Start by ensuring your chicken is cooked and cooled. If you’re using leftover chicken, that’s perfect. Dice or shred it into bite-sized pieces. Wash your grapes thoroughly, then slice each one in half. Dice the celery and red onion into small, uniform pieces to ensure every forkful has a bit of crunch and flavor.

    Step 2: Mix the Dressing

    In a large mixing bowl, combine the mayonnaise and Greek yogurt. The Greek yogurt adds a tangy lightness to the dressing while keeping it creamy. Sprinkle in the curry powder, and don’t be shy—the curry is the star here. Whisk these together until the mixture is smooth and the curry powder is fully incorporated.

    Step 3: Combine Chicken and Dressing

    Add the shredded or diced chicken to the bowl with the dressing. Use a spatula to fold the chicken into the dressing, making sure each piece is evenly coated. This is where the magic starts to happen, as the chicken absorbs all those delicious flavors.

    Step 4: Add the Grapes and Veggies

    Now, toss in the halved grapes, diced celery, and red onion. The grapes add a juicy sweetness, while the celery and onion bring a necessary crunch and sharpness. Gently fold these ingredients into the chicken mixture to distribute them evenly without crushing the grapes.

    Step 5: Season to Perfection

    Finally, season your salad with salt and pepper to taste. Give it one last gentle mix, then cover and refrigerate for at least 30 minutes before serving. This chilling time allows the flavors to meld together beautifully.

    Tips and Tricks

    For an extra flavor boost, toast the curry powder in a dry skillet over low heat for about a minute before adding it to the dressing. This enhances its aroma and depth. If you’re not a fan of Greek yogurt, sour cream makes a great substitute. For a nutty crunch, consider adding a handful of toasted almonds or walnuts. Always taste your salad before serving and adjust the seasoning if necessary. Remember, the salad tastes even better the next day as the flavors continue to develop.

    Recipe Variations

    • Swap the grapes for diced apples or dried cranberries for a different kind of sweetness.
    • Add a tablespoon of honey or mango chutney to the dressing for a sweeter, more complex flavor profile.
    • Incorporate some chopped fresh herbs like cilantro or parsley for a fresh, herby twist.
    • For a dairy-free version, use all mayonnaise or a vegan mayo substitute.
    • Spice lovers can add a pinch of cayenne pepper or a diced jalapeño for some heat.

    Frequently Asked Questions

    Can I use canned chicken for this recipe?

    While you can use canned chicken in a pinch, the texture and flavor of freshly cooked chicken are far superior. If you’re short on time, a rotisserie chicken from the store is a great alternative that still offers good quality and taste.

    How long does this chicken salad last in the fridge?

    Stored in an airtight container, this curry chicken salad will stay fresh in the refrigerator for up to 3 days. The flavors will continue to meld and develop, making it even more delicious on the second and third days.

    Can I make this recipe ahead of time?

    Absolutely! This salad is perfect for making ahead. In fact, letting it chill for a few hours or overnight before serving allows the flavors to blend together more harmoniously. Just give it a quick stir before serving to refresh the texture.

    Summary

    This Curry Chicken Salad with Grapes is a delightful mix of creamy, crunchy, sweet, and savory flavors. It’s easy to make, versatile, and sure to impress whether you’re serving it at a picnic, as a sandwich, or straight from the bowl. Give it a try and watch it become a new favorite!

  • Cranberry Pineapple Salad Recipe: A Tropical Twist on a Classic

    Cranberry Pineapple Salad Recipe: A Tropical Twist on a Classic

    Ready to dive into a dish that’s as vibrant as your summer playlist? This cranberry pineapple salad is the perfect blend of sweet, tangy, and crunchy, making it a hit at any gathering. Let’s get mixing!

    Why This Recipe Works

    • The combination of tart cranberries and sweet pineapple creates a flavor explosion that’s hard to resist.
    • Adding nuts introduces a satisfying crunch that contrasts beautifully with the soft fruits.
    • It’s incredibly versatile, serving as a side dish, dessert, or even a breakfast topping.
    • Prep is a breeze, requiring no cooking and just a few minutes of your time.
    • It’s a colorful addition to any table, guaranteed to brighten up your meal.

    Ingredients

    • 2 cups fresh cranberries, finely chopped
    • 1 cup pineapple chunks, drained and chopped
    • 1/2 cup pecans, toasted and chopped
    • 1/4 cup sugar
    • 1/2 cup whipped cream
    • 1 tbsp lemon juice

    Equipment Needed

    • Mixing bowl
    • Sharp knife
    • Cutting board
    • Measuring cups and spoons

    Instructions

    Cranberry Pineapple Salad Recipe

    Step 1: Prep Your Fruits

    Start by finely chopping your fresh cranberries and pineapple chunks. The smaller the pieces, the better they’ll meld together in the salad. Tip: If you’re not a fan of the tartness of cranberries, you can soak them in orange juice for an hour before chopping to mellow the flavor.

    Step 2: Toast the Pecans

    Spread the pecans on a baking sheet and toast them in a preheated 350°F oven for about 5 minutes, or until they’re fragrant. Let them cool before chopping. This step brings out the nuts’ natural oils, enhancing their flavor.

    Step 3: Combine Ingredients

    In a large mixing bowl, combine the chopped cranberries, pineapple, and pecans. Sprinkle the sugar over the top and drizzle with lemon juice. Gently toss everything together to ensure the sugar is evenly distributed.

    Step 4: Fold in Whipped Cream

    Add the whipped cream to the bowl and fold it into the fruit mixture until everything is lightly coated. Be gentle to keep the whipped cream fluffy. Tip: For a dairy-free version, coconut whipped cream works beautifully.

    Step 5: Chill and Serve

    Cover the bowl and refrigerate the salad for at least an hour before serving. This chilling time allows the flavors to meld together beautifully. Serve chilled for the best taste and texture.

    Tips and Tricks

    For an extra layer of flavor, consider adding a pinch of cinnamon or nutmeg to the salad. If you’re preparing this dish ahead of time, hold off on adding the whipped cream until just before serving to maintain its texture. Toasting the pecans is a step you shouldn’t skip, as it significantly enhances the salad’s overall flavor profile. For a more decadent version, a drizzle of caramel or honey over the top before serving can add a lovely sweetness.

    Recipe Variations

    • Swap pecans for walnuts or almonds for a different crunch.
    • Add shredded coconut for a tropical twist.
    • Mix in some orange zest for a citrusy kick.
    • Use Greek yogurt instead of whipped cream for a healthier version.
    • Include diced apples or pears for additional texture and flavor.

    Frequently Asked Questions

    Can I use dried cranberries instead of fresh?

    Absolutely! Dried cranberries can be a great substitute if fresh ones aren’t available. Just remember that they’re sweeter and chewier, so you might want to reduce the added sugar slightly to balance the flavors.

    How long can I store this salad?

    This salad is best enjoyed within 24 hours of preparation, especially if you’ve added whipped cream. If you need to store it longer, keep it in an airtight container in the fridge, but note that the texture may change slightly over time.

    Can I make this recipe vegan?

    Yes, you can easily make this recipe vegan by using coconut whipped cream and ensuring your sugar is vegan-friendly. It’s a simple swap that doesn’t compromise on taste or texture.

    Summary

    This cranberry pineapple salad is a delightful mix of flavors and textures, perfect for any occasion. Easy to make and versatile, it’s sure to become a favorite in your recipe collection.

  • Crunchy Raw Cauliflower Salad: A Veggie Delight That’s Anything But Boring

    Crunchy Raw Cauliflower Salad: A Veggie Delight That’s Anything But Boring

    Veggies often get a bad rap for being bland, but this raw cauliflower salad is here to change that narrative. Packed with flavors, textures, and a whole lot of crunch, it’s the perfect side dish or light meal that’ll have even the pickiest eaters coming back for seconds.

    Why This Recipe Works

    • Texture Galore: The combination of raw cauliflower, nuts, and seeds offers an irresistible crunch that makes every bite satisfying.
    • Flavor Bomb: A tangy dressing with a hint of sweetness brings all the ingredients together, creating a harmonious flavor profile.
    • Nutritious & Delicious: Cauliflower is a low-calorie veggie packed with vitamins, making this salad as healthy as it is tasty.
    • Quick & Easy: With no cooking required, this salad comes together in minutes, perfect for busy weeknights.

    Ingredients

    • 1 medium head of cauliflower, cut into small florets
    • 1/2 cup chopped almonds
    • 1/4 cup sunflower seeds
    • 1/4 cup dried cranberries
    • 2 tbsp olive oil
    • 1 tbsp apple cider vinegar
    • 1 tsp honey
    • Salt and pepper to taste

    Equipment Needed

    • Large mixing bowl
    • Small whisk or fork
    • Measuring cups and spoons
    • Knife and cutting board

    Instructions

    Recipe For Raw Cauliflower Salad

    Step 1: Prep Your Cauliflower

    Start by washing your cauliflower head under cold water. Pat it dry, then cut it into small, bite-sized florets. The smaller the pieces, the easier they are to eat and the more they’ll absorb the dressing. Tip: Use a sharp knife for clean cuts and to prevent the cauliflower from crumbling.

    Step 2: Toast the Nuts and Seeds

    In a dry skillet over medium heat, toast the chopped almonds and sunflower seeds for about 3-5 minutes, or until they’re golden and fragrant. Stir frequently to prevent burning. This step enhances their flavor and adds an extra crunch to your salad.

    Step 3: Whisk Together the Dressing

    In a small bowl, whisk together the olive oil, apple cider vinegar, honey, salt, and pepper until well combined. Taste and adjust the seasoning as needed. The dressing should be tangy with a slight sweetness to balance the flavors.

    Step 4: Combine All Ingredients

    In a large mixing bowl, combine the cauliflower florets, toasted nuts and seeds, and dried cranberries. Pour the dressing over the top and toss everything together until evenly coated. Tip: Let the salad sit for 10 minutes before serving to allow the flavors to meld together.

    Step 5: Serve and Enjoy

    Transfer the salad to a serving dish and enjoy immediately for the best texture. If you’re making it ahead, store it in the fridge and give it a quick toss before serving. Tip: Add a sprinkle of fresh herbs like parsley or cilantro for a pop of color and freshness.

    Tips and Tricks

    For those looking to elevate their raw cauliflower salad, consider these advanced tips. First, try roasting the cauliflower lightly for a different texture and depth of flavor. Second, experiment with different nuts and seeds like walnuts or pumpkin seeds for variety. Third, add a pinch of curry powder or smoked paprika to the dressing for an unexpected twist. Lastly, incorporating fresh fruits like diced apples or pears can add a refreshing sweetness that complements the tangy dressing perfectly.

    Recipe Variations

    • Mediterranean Twist: Add chopped Kalamata olives, feta cheese, and a lemon-olive oil dressing for a Mediterranean flair.
    • Asian Inspired: Toss in some shredded carrots, snap peas, and a dressing made with sesame oil, rice vinegar, and a touch of soy sauce.
    • Spicy Kick: Include diced jalapeños or a dash of hot sauce in the dressing for those who like it hot.
    • Protein Packed: Add grilled chicken or chickpeas to turn this salad into a hearty main dish.

    Frequently Asked Questions

    Can I make this salad ahead of time?

    Absolutely! This salad actually gets better as it sits, allowing the flavors to meld together. Just be sure to store it in an airtight container in the fridge and give it a good toss before serving. The nuts may lose a bit of their crunch over time, so you can always add a fresh handful before serving.

    Is there a substitute for honey in the dressing?

    Yes, if you’re looking for a vegan option or just don’t have honey on hand, maple syrup or agave nectar are great substitutes. They’ll provide the same sweetness with a slightly different flavor profile.

    Can I use frozen cauliflower?

    While fresh cauliflower is preferred for its crisp texture, you can use thawed frozen cauliflower in a pinch. Just be sure to pat it very dry to prevent the salad from becoming watery.

    Summary

    This raw cauliflower salad is a crunchy, flavorful, and nutritious dish that’s quick to prepare and versatile enough to suit any taste. Whether you’re looking for a light side or a hearty main, it’s sure to impress.

  • Mediterranean Orzo Pasta Salad Recipe: A Zesty Summer Delight

    Mediterranean Orzo Pasta Salad Recipe: A Zesty Summer Delight

    Greetings, food lovers! Get ready to dive into a bowl of sunshine with this Mediterranean Orzo Pasta Salad. It’s packed with vibrant flavors, fresh ingredients, and a zesty dressing that’ll transport you straight to the Mediterranean coast. Perfect for picnics, potlucks, or a refreshing weeknight dinner.

    Why This Recipe Works

    • Flavor Bomb: The combination of tangy feta, briny olives, and sweet sun-dried tomatoes creates a symphony of flavors in every bite.
    • Texture Heaven: Orzo’s unique shape and texture make it the perfect base for a salad, offering a delightful chewiness that pairs wonderfully with crisp veggies.
    • Quick & Easy: With minimal cooking and prep time, this recipe is a breeze to whip up, making it ideal for busy days.
    • Versatile: Serve it as a main, a side, or even a hearty snack. It’s delicious warm, cold, or at room temperature.

    Ingredients

    • 1 cup orzo pasta
    • 2 cups water
    • 1/2 cup crumbled feta cheese
    • 1/4 cup sliced Kalamata olives
    • 1/4 cup chopped sun-dried tomatoes
    • 1/4 cup chopped red onion
    • 1/4 cup chopped fresh parsley
    • 2 tbsp olive oil
    • 1 tbsp lemon juice
    • 1 tsp dried oregano
    • Salt and pepper to taste

    Equipment Needed

    • Medium saucepan
    • Colander
    • Large mixing bowl
    • Whisk
    • Measuring cups and spoons

    Instructions

    Mediterranean Orzo Pasta Salad Recipe

    Step 1: Cook the Orzo

    Bring 2 cups of water to a boil in a medium saucepan. Add the orzo pasta and a pinch of salt. Cook for 8-10 minutes, stirring occasionally, until the orzo is al dente. Drain the orzo in a colander and rinse under cold water to stop the cooking process. Tip: Rinsing the orzo prevents it from sticking together and cools it down quickly for the salad.

    Step 2: Prepare the Dressing

    In a large mixing bowl, whisk together the olive oil, lemon juice, dried oregano, salt, and pepper. This simple dressing will coat the orzo and veggies beautifully, adding a bright and herby flavor. Tip: Let the dressing sit for a few minutes to allow the flavors to meld together before adding the other ingredients.

    Step 3: Combine the Ingredients

    Add the cooled orzo to the bowl with the dressing. Toss to coat evenly. Then, gently fold in the feta cheese, Kalamata olives, sun-dried tomatoes, red onion, and fresh parsley. The key here is to mix gently to keep the ingredients intact and distribute them evenly throughout the salad.

    Step 4: Chill and Serve

    Cover the bowl with plastic wrap and refrigerate for at least 30 minutes to allow the flavors to develop. This step is crucial for achieving the best taste. Serve chilled or at room temperature, garnished with extra parsley if desired.

    Tips and Tricks

    For an extra flavor boost, consider toasting the orzo in a dry skillet before boiling it. This adds a nutty depth to the pasta. If you’re short on time, you can skip the chilling step, but the salad tastes best when the flavors have had time to marry. For a creamier texture, add a tablespoon of Greek yogurt to the dressing. Always taste and adjust the seasoning before serving, as the saltiness of the feta and olives can vary.

    Recipe Variations

    • Protein Power: Add grilled chicken, shrimp, or chickpeas for a protein-packed meal.
    • Veggie Delight: Toss in cucumbers, bell peppers, or artichoke hearts for extra crunch and color.
    • Cheese Swap: Try goat cheese or mozzarella pearls instead of feta for a different flavor profile.
    • Grain Alternative: Substitute orzo with quinoa or couscous for a gluten-free option.

    Frequently Asked Questions

    Can I make this salad ahead of time?

    Absolutely! This salad actually tastes better the next day as the flavors have more time to meld. Just store it in an airtight container in the fridge for up to 3 days. Give it a quick stir before serving to refresh the ingredients.

    Is there a substitute for orzo?

    Yes, if you can’t find orzo or prefer a different pasta, small shapes like ditalini or even rice can work well. Just adjust the cooking time according to the package instructions for the substitute you choose.

    Can I freeze this salad?

    Freezing is not recommended as the texture of the pasta and vegetables will change upon thawing, resulting in a mushy salad. It’s best enjoyed fresh or stored in the fridge for a few days.

    Summary

    This Mediterranean Orzo Pasta Salad is a vibrant, flavorful dish that’s perfect for any occasion. Easy to make and endlessly customizable, it’s sure to become a staple in your recipe collection. Enjoy the taste of the Mediterranean with every bite!

  • Blueberry Jello Salad: A Refreshing Summer Delight

    Blueberry Jello Salad: A Refreshing Summer Delight

    Welcome to a world where jello isn’t just a wobbly dessert but a star in a refreshing salad that’ll steal the show at your next summer gathering. This blueberry jello salad is the perfect blend of sweet, tangy, and creamy, making it a hit among both kids and adults.

    Why This Recipe Works

    • It’s a no-bake recipe, perfect for those hot summer days when you don’t want to turn on the oven.
    • The combination of creamy and fruity layers offers a delightful contrast in textures and flavors.
    • It’s incredibly versatile; you can easily swap out ingredients based on what you have on hand or your dietary preferences.
    • This salad can be made ahead of time, making it a stress-free option for parties and potlucks.
    • The vibrant colors make it as visually appealing as it is delicious.

    Ingredients

    • 2 cups fresh blueberries, washed and dried
    • 1 package (3 oz) blueberry jello
    • 1 cup boiling water
    • 1 cup cold water
    • 1 cup sour cream
    • 1/2 cup sugar
    • 1 teaspoon vanilla extract

    Equipment Needed

    • Mixing bowls
    • Whisk
    • Measuring cups and spoons
    • Spatula
    • 9×13 inch baking dish

    Instructions

    Recipe For Blueberry Jello Salad

    Step 1: Dissolve the Jello

    In a large mixing bowl, dissolve the blueberry jello in 1 cup of boiling water. Stir continuously for about 2 minutes until the jello is completely dissolved. This ensures a smooth base for your salad. Tip: For an extra burst of flavor, consider using flavored sparkling water instead of cold water in the next step.

    Step 2: Add Cold Water

    After the jello is fully dissolved, add 1 cup of cold water to the mixture. Stir well to combine. This step cools down the jello mixture, preparing it for the next ingredients. Make sure the mixture is at room temperature before proceeding to avoid curdling the sour cream.

    Step 3: Incorporate the Creamy Layer

    In a separate bowl, whisk together the sour cream, sugar, and vanilla extract until smooth. Gradually add this to the jello mixture, stirring gently to create a marbled effect. This adds a creamy texture and rich flavor to the salad. Tip: For a lighter version, you can substitute Greek yogurt for sour cream.

    Step 4: Add the Blueberries

    Gently fold in the fresh blueberries into the jello mixture, ensuring they’re evenly distributed. The blueberries add a fresh, fruity burst to every bite. Avoid overmixing to keep the blueberries intact.

    Step 5: Chill to Set

    Pour the mixture into a 9×13 inch baking dish and refrigerate for at least 4 hours, or until fully set. The salad should be firm to the touch before serving. Tip: For quicker setting, you can place the salad in the freezer for the first hour, then transfer to the fridge.

    Tips and Tricks

    For those looking to elevate their blueberry jello salad, consider these advanced tips. First, toasting the sugar before adding it to the sour cream can deepen the flavors. Second, layering the salad with a clear jello layer on top can create a stunning visual effect. Lastly, incorporating a layer of crushed graham crackers at the bottom can add a delightful crunch. Remember, the key to a perfect jello salad is patience; allow it enough time to set properly.

    Recipe Variations

    • Swap blueberries for strawberries or raspberries for a different berry flavor.
    • Add a layer of cream cheese mixed with whipped cream for an extra creamy texture.
    • Incorporate mini marshmallows or nuts for added texture and sweetness.
    • Use sugar-free jello and substitute the sugar with a sugar alternative for a healthier version.
    • Layer the salad with different colored jello for a rainbow effect.

    Frequently Asked Questions

    Can I use frozen blueberries instead of fresh?

    Yes, you can use frozen blueberries, but make sure to thaw and drain them well to prevent excess water from diluting the jello mixture. This might slightly alter the texture but won’t significantly impact the flavor.

    How long can I store the blueberry jello salad?

    The salad can be stored in the refrigerator for up to 3 days. Ensure it’s covered tightly with plastic wrap to prevent it from absorbing other flavors from the fridge.

    Can I make this recipe vegan?

    Absolutely! Substitute the sour cream with coconut cream and use agar-agar instead of gelatin for a vegan-friendly version. The taste and texture will be slightly different but still delicious.

    Summary

    This blueberry jello salad is a refreshing, easy-to-make dish that’s perfect for summer gatherings. With its vibrant colors and delightful mix of textures, it’s sure to be a crowd-pleaser. Plus, its versatility allows for endless variations to suit any taste or dietary need.

  • Cranberry Celebration Salad: A Festive Delight

    Cranberry Celebration Salad: A Festive Delight

    Ready to add a pop of color and flavor to your holiday table? This Cranberry Celebration Salad is not just a dish; it’s a conversation starter. Rich, tangy, and sweet, it’s the perfect side to balance out your feast.

    Why This Recipe Works

    • The combination of fresh cranberries and oranges offers a refreshing contrast to heavy holiday meals.
    • Toasted pecans add a crunchy texture that elevates the salad to gourmet status.
    • A homemade citrus dressing brings all the flavors together without overpowering them.
    • It’s make-ahead friendly, allowing you to enjoy the festivities stress-free.

    Ingredients

    • 4 cups fresh cranberries, finely chopped
    • 1 cup granulated sugar
    • 2 large oranges, peeled and diced
    • 1 cup toasted pecans, chopped
    • 1/2 cup orange juice
    • 1/4 cup honey
    • 1 tbsp orange zest

    Equipment Needed

    • Large mixing bowl
    • Sharp knife
    • Cutting board
    • Measuring cups and spoons
    • Small saucepan

    Instructions

    Recipe For Cranberry Celebration Salad

    Step 1: Prepare the Cranberries

    Start by finely chopping 4 cups of fresh cranberries. This can be done quickly in a food processor if you’re short on time. Transfer the chopped cranberries to a large mixing bowl and mix in 1 cup of granulated sugar. Let this sit for about 10 minutes to allow the cranberries to macerate and release their natural juices.

    Step 2: Add the Oranges and Pecans

    Peel and dice 2 large oranges, ensuring to remove any seeds. Add the diced oranges and 1 cup of toasted, chopped pecans to the cranberry mixture. Gently fold everything together to distribute the ingredients evenly.

    Step 3: Make the Citrus Dressing

    In a small saucepan over medium heat, combine 1/2 cup of orange juice, 1/4 cup of honey, and 1 tbsp of orange zest. Heat the mixture just until the honey dissolves, about 3-4 minutes, stirring constantly. Remove from heat and let it cool slightly before drizzling over the salad.

    Step 4: Combine and Chill

    Pour the slightly cooled citrus dressing over the cranberry mixture and toss gently to coat. Cover the bowl with plastic wrap and refrigerate for at least 2 hours, or overnight, to allow the flavors to meld together beautifully.

    Step 5: Serve and Enjoy

    Before serving, give the salad a gentle stir to redistribute the dressing. Serve chilled as a vibrant side dish that’s sure to impress your guests with its balance of sweet, tangy, and crunchy elements.

    Tips and Tricks

    For an extra layer of flavor, consider adding a pinch of cinnamon or nutmeg to the citrus dressing. If you’re not a fan of pecans, walnuts or almonds make excellent substitutes. To save time, you can use pre-chopped pecans, but toasting them yourself brings out a deeper flavor. For a smoother texture, you can pulse the cranberries less if you prefer larger pieces. Lastly, this salad tastes even better the next day, making it a perfect make-ahead dish for busy holidays.

    Recipe Variations

    • Add diced apples or pears for a different kind of crunch and sweetness.
    • Incorporate a handful of dried cherries or raisins for added chewiness.
    • For a tropical twist, mix in some diced pineapple or mango.
    • Swap out the pecans for walnuts or almonds depending on your preference.
    • For a more decadent version, fold in some mini marshmallows or a dollop of whipped cream before serving.

    Frequently Asked Questions

    Can I use frozen cranberries? Yes, you can use frozen cranberries, but make sure to thaw and drain them well before chopping to avoid excess moisture in the salad.

    How long does this salad last in the fridge? Stored in an airtight container, the salad can last up to 5 days in the refrigerator, making it great for leftovers.

    Can I make this salad vegan? Absolutely! Just substitute the honey with maple syrup or agave nectar to keep it vegan-friendly.

    Summary

    This Cranberry Celebration Salad is a must-try for anyone looking to add a vibrant, flavorful side to their holiday table. Easy to make and even easier to love, it’s a dish that’s as fun to prepare as it is to eat.

  • Cucumber Crab Salad Recipe: A Refreshing Summer Delight

    Cucumber Crab Salad Recipe: A Refreshing Summer Delight

    Welcome to a dish that combines the crispness of cucumbers with the delicate sweetness of crab meat, creating a salad that’s as refreshing as a summer breeze. Whether you’re looking for a light lunch or a fancy side, this recipe is your ticket to flavor town.

    Why This Recipe Works

    • The combination of crunchy cucumbers and tender crab meat offers a delightful contrast in textures.
    • A light and zesty dressing enhances the natural flavors without overpowering them.
    • It’s incredibly versatile, serving as a perfect appetizer, side, or main dish.
    • Quick and easy to prepare, making it ideal for last-minute gatherings.
    • Healthy and low-calorie, yet satisfying and flavorful.

    Ingredients

    • 2 large cucumbers, thinly sliced
    • 1 pound lump crab meat, picked over for shells
    • 1/4 cup red onion, finely diced
    • 1/4 cup fresh dill, chopped
    • 1/2 cup Greek yogurt
    • 2 tablespoons lemon juice
    • 1 teaspoon Dijon mustard
    • Salt and pepper to taste

    Equipment Needed

    • Large mixing bowl
    • Whisk
    • Sharp knife
    • Cutting board
    • Measuring cups and spoons

    Instructions

    Cucumber Crab Salad Recipe

    Prepare the Cucumbers and Crab

    Start by thinly slicing the cucumbers and placing them in a large mixing bowl. Gently fold in the lump crab meat, being careful not to break up the chunks too much. Add the finely diced red onion and chopped fresh dill to the bowl. Tip: For an extra crunch, leave the skin on the cucumbers.

    Make the Dressing

    In a separate bowl, whisk together the Greek yogurt, lemon juice, and Dijon mustard until smooth. Season with salt and pepper to taste. Tip: For a tangier dressing, add an extra tablespoon of lemon juice.

    Combine and Chill

    Pour the dressing over the cucumber and crab mixture, gently tossing to coat all the ingredients evenly. Cover the bowl with plastic wrap and refrigerate for at least 30 minutes to allow the flavors to meld. Tip: The salad tastes even better if left to chill for an hour or more.

    Serve and Enjoy

    Once chilled, give the salad a final gentle toss and serve it in individual bowls or on a platter. Garnish with additional dill if desired. This salad is best enjoyed cold, making it a perfect dish for warm summer days.

    Tips and Tricks

    For the best texture, use fresh lump crab meat rather than imitation crab. If you’re short on time, you can use English cucumbers which don’t require peeling. To add a bit of heat, include a pinch of cayenne pepper in the dressing. For a creamier texture, substitute half of the Greek yogurt with mayonnaise. Always taste and adjust the seasoning before serving, as the flavors can mellow out after chilling.

    Recipe Variations

    • Add avocado slices for a creamy texture and healthy fats.
    • Substitute crab with cooked shrimp for a different seafood twist.
    • Include cherry tomatoes for a pop of color and acidity.
    • Use cilantro instead of dill for a more vibrant flavor profile.
    • Add a teaspoon of honey to the dressing for a touch of sweetness.

    Frequently Asked Questions

    Can I make this salad ahead of time?

    Absolutely! This salad can be prepared up to a day in advance. Just keep it covered in the refrigerator until you’re ready to serve. The flavors will continue to develop, making it even more delicious.

    Is there a substitute for Greek yogurt?

    Yes, you can use sour cream or mayonnaise as a substitute for Greek yogurt. Each will give the dressing a slightly different texture and flavor, so choose based on your preference.

    How do I pick the best crab meat?

    Look for lump crab meat that’s fresh or pasteurized, with no added fillers. The meat should be firm and smell sweet, not fishy. Avoid any meat that looks discolored or has an off smell.

    Summary

    This cucumber crab salad is a light, refreshing dish perfect for summer. With its crisp cucumbers, sweet crab, and zesty dressing, it’s a crowd-pleaser that’s both easy to make and delicious. Whether served as a side or a main, it’s sure to impress.

  • Juicy Chicken Breast Salad: A Fresh Twist on a Classic

    Juicy Chicken Breast Salad: A Fresh Twist on a Classic

    A delightful salad that combines the lean protein of chicken breast with the crisp freshness of vegetables, all tossed in a zesty dressing. Perfect for a quick lunch or a light dinner, this recipe is sure to become a staple in your meal rotation.

    Why This Recipe Works

    • The chicken breast is marinated and grilled to perfection, ensuring it’s juicy and full of flavor.
    • A mix of fresh greens and vegetables adds crunch and nutrients, making this salad as healthy as it is delicious.
    • The homemade dressing ties all the ingredients together with a balance of tangy and sweet notes.
    • It’s versatile, allowing for endless variations to suit your taste or what you have on hand.
    • Quick and easy to prepare, this salad is perfect for busy weeknights or meal prep.

    Ingredients

    • 2 chicken breasts, boneless and skinless
    • 1 tbsp olive oil
    • 1 tsp garlic powder
    • 1 tsp paprika
    • Salt and pepper to taste
    • 4 cups mixed greens (lettuce, spinach, arugula)
    • 1 cup cherry tomatoes, halved
    • 1/2 cucumber, sliced
    • 1/4 red onion, thinly sliced
    • 1/4 cup feta cheese, crumbled
    • 1/4 cup olives, sliced
    • For the dressing: 3 tbsp olive oil, 1 tbsp lemon juice, 1 tsp honey, 1 tsp Dijon mustard, salt and pepper to taste

    Equipment Needed

    • Grill or grill pan
    • Mixing bowls
    • Whisk
    • Knife and cutting board
    • Measuring cups and spoons

    Instructions

    Recipe For Salad With Chicken Breast

    Marinate the Chicken

    Start by marinating the chicken breasts in olive oil, garlic powder, paprika, salt, and pepper. Let them sit for at least 30 minutes to absorb all the flavors. Tip: For even more flavor, marinate the chicken overnight in the refrigerator.

    Grill the Chicken

    Preheat your grill or grill pan over medium-high heat. Grill the chicken breasts for about 6-7 minutes on each side, or until the internal temperature reaches 165°F. Let them rest for a few minutes before slicing.

    Prepare the Salad

    In a large bowl, combine the mixed greens, cherry tomatoes, cucumber, red onion, feta cheese, and olives. Tip: For added crunch, toss in some toasted nuts or seeds.

    Make the Dressing

    In a small bowl, whisk together olive oil, lemon juice, honey, Dijon mustard, salt, and pepper until well combined. Tip: Adjust the sweetness or tanginess to your liking by adding more honey or lemon juice.

    Assemble the Salad

    Slice the grilled chicken and arrange it on top of the salad. Drizzle with the dressing and toss gently to combine. Serve immediately for the freshest taste.

    Tips and Tricks

    For the juiciest chicken, don’t skip the marinating step. The longer the chicken marinates, the more flavorful it will be. When grilling, avoid pressing down on the chicken, as this will squeeze out the juices. Let the chicken rest after grilling to allow the juices to redistribute. For the salad, feel free to swap out any vegetables for what you have on hand or prefer. The dressing can be made ahead of time and stored in the refrigerator for up to a week. Just give it a good shake or whisk before using.

    Recipe Variations

    • Swap the chicken for grilled shrimp or salmon for a seafood twist.
    • Add quinoa or farro to make the salad more filling.
    • Use a different cheese like goat cheese or blue cheese for a different flavor profile.
    • Try a different dressing, such as balsamic vinaigrette or ranch, to change up the taste.
    • Add fruits like strawberries or apples for a sweet and savory combination.

    Frequently Asked Questions

    Can I use chicken thighs instead of breasts?

    Absolutely! Chicken thighs will work just as well in this recipe. They’re juicier and have more flavor, but also higher in fat. Adjust the cooking time as needed, as thighs may take a bit longer to cook through.

    How can I make this salad ahead of time?

    You can prep all the components ahead of time and store them separately in the refrigerator. Assemble the salad just before serving to keep the greens crisp and the chicken juicy.

    Is there a substitute for honey in the dressing?

    Yes, you can use maple syrup or agave nectar as a natural sweetener alternative. If you’re avoiding sweeteners, you can leave it out altogether and adjust the other flavors to balance the dressing.

    Summary

    This Juicy Chicken Breast Salad is a perfect blend of flavors and textures, offering a healthy and satisfying meal option. With its easy preparation and versatile ingredients, it’s a recipe you’ll come back to again and again.