Blog

  • Quinoa Craisin Salad Recipe: A Nutritious & Delicious Bowl of Joy

    Quinoa Craisin Salad Recipe: A Nutritious & Delicious Bowl of Joy

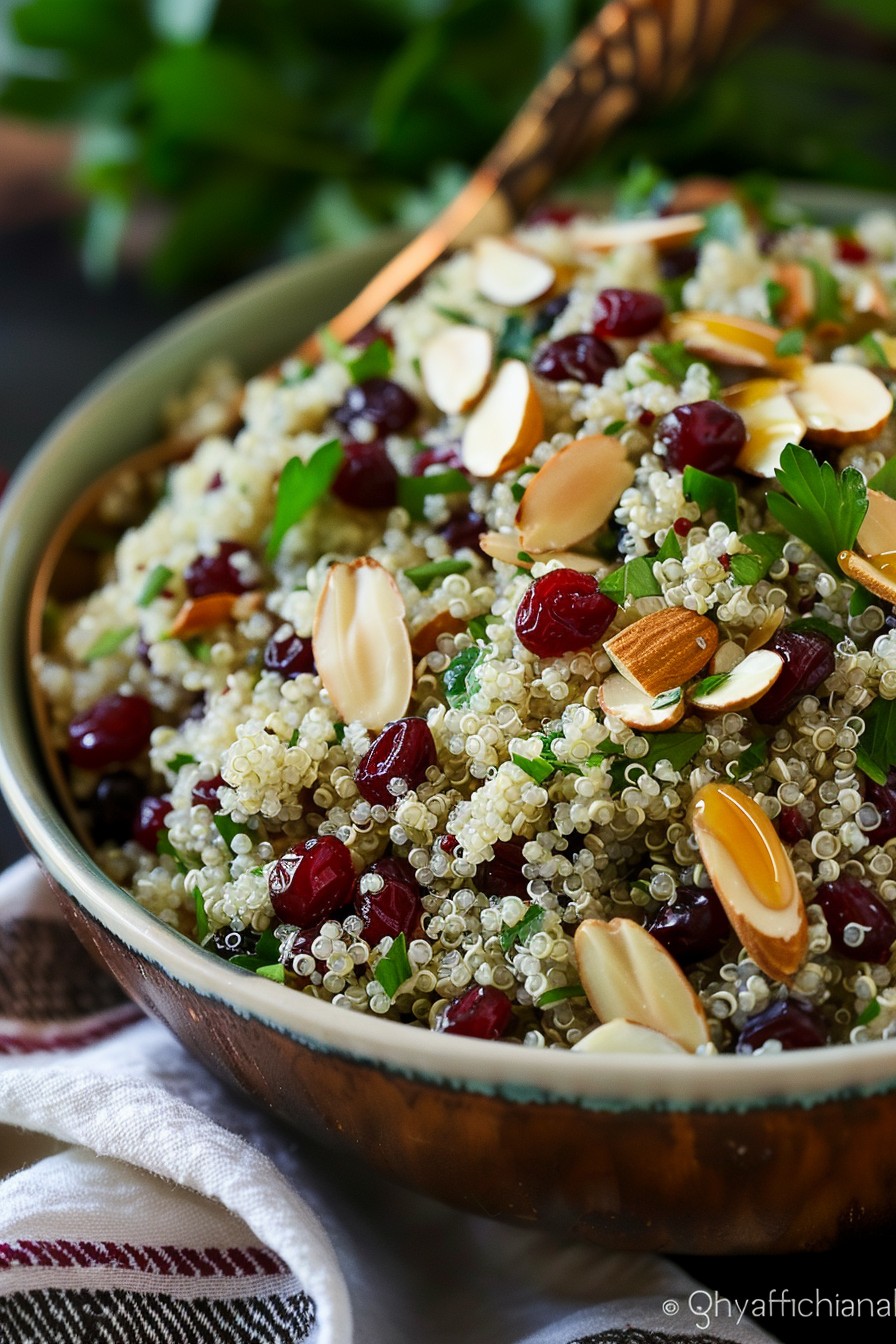
    Today’s the day to shake up your salad game with this quinoa craisin salad that’s as nutritious as it is delicious. Trust me, your taste buds will thank you for this vibrant, flavorful, and utterly satisfying dish that’s perfect for any occasion.

    Why This Recipe Works

    • Quinoa is a powerhouse of protein and fiber, making this salad both filling and nutritious.
    • The sweet and tart craisins add a burst of flavor and a chewy texture that contrasts beautifully with the fluffy quinoa.
    • It’s incredibly versatile, allowing for endless variations to suit your taste or what you have in your pantry.
    • Prep is a breeze, and it keeps well, making it perfect for meal prep or potlucks.
    • The dressing is simple yet packs a punch, tying all the ingredients together harmoniously.

    Ingredients

    • 1 cup quinoa, rinsed and drained
    • 2 cups water
    • 1/2 cup craisins
    • 1/4 cup sliced almonds, toasted
    • 1/4 cup fresh parsley, chopped
    • 2 tbsp olive oil
    • 1 tbsp lemon juice
    • 1 tsp honey
    • Salt and pepper to taste

    Equipment Needed

    • Medium saucepan with lid
    • Mixing bowl
    • Whisk
    • Measuring cups and spoons
    • Knife and cutting board

    Instructions

    Quinoa Craisin Salad Recipe

    Step 1: Cook the Quinoa

    In a medium saucepan, bring the quinoa and water to a boil over high heat. Once boiling, reduce the heat to low, cover, and simmer for 15 minutes, or until the water is absorbed and the quinoa is fluffy. Remove from heat and let it sit covered for 5 minutes, then fluff with a fork. Tip: Rinsing quinoa before cooking removes its natural coating, which can taste bitter.

    Step 2: Toast the Almonds

    While the quinoa cooks, toast the sliced almonds in a dry skillet over medium heat for 3-5 minutes, stirring frequently, until they’re golden and fragrant. Watch them closely to prevent burning. Tip: Toasting nuts enhances their flavor and adds a delightful crunch to the salad.

    Step 3: Prepare the Dressing

    In a small bowl, whisk together the olive oil, lemon juice, honey, salt, and pepper until well combined. Taste and adjust the seasoning as needed. This simple dressing brings a bright and tangy flavor to the salad.

    Step 4: Combine the Salad

    In a large mixing bowl, combine the cooked quinoa, craisins, toasted almonds, and chopped parsley. Drizzle the dressing over the salad and toss gently to combine. Tip: Letting the salad sit for 10 minutes before serving allows the flavors to meld together beautifully.

    Step 5: Serve and Enjoy

    Transfer the salad to a serving dish and enjoy immediately, or refrigerate for up to 3 days. This salad is delicious on its own or as a side dish with grilled chicken or fish.

    Tips and Tricks

    For an extra flavor boost, consider adding a pinch of cinnamon or cumin to the dressing. If you’re not a fan of almonds, try substituting with pecans or walnuts for a different crunch. To make this salad even more nutritious, add some diced avocado or cucumber for extra freshness and texture. Remember, the key to a great salad is balancing flavors and textures, so don’t be afraid to experiment with what you have on hand.

    Recipe Variations

    • Swap craisins for dried cherries or apricots for a different sweet twist.
    • Add some crumbled feta or goat cheese for a creamy, tangy element.
    • Incorporate some fresh mint or basil for an herby freshness.
    • For a heartier salad, mix in some chickpeas or grilled chicken.
    • Try using lime juice instead of lemon for a different citrus note.

    Frequently Asked Questions

    Can I make this salad ahead of time? Absolutely! This salad keeps well in the fridge for up to 3 days, making it perfect for meal prep. Just give it a quick stir before serving to refresh the flavors.

    Is there a substitute for quinoa? If you’re not a fan of quinoa, you can use couscous or bulgur wheat as a substitute. Keep in mind that the cooking times may vary.

    Can I use fresh cranberries instead of craisins? While you can use fresh cranberries, they’ll add a tartness that’s different from the sweet and chewy craisins. If you do use fresh, consider sweetening them slightly before adding to the salad.

    Summary

    This quinoa craisin salad is a delightful mix of textures and flavors, offering a nutritious and delicious option for any meal. Easy to make and versatile, it’s sure to become a staple in your recipe collection.

  • Pinoy Recipe Chicken Macaroni Salad: A Creamy Dreamy Delight

    Pinoy Recipe Chicken Macaroni Salad: A Creamy Dreamy Delight

    Yummy doesn’t even begin to cover it! This Pinoy Recipe Chicken Macaroni Salad is the perfect blend of creamy, tangy, and sweet, with a texture that’ll have you coming back for seconds. It’s a crowd-pleaser that’s as easy to make as it is delicious.

    Why This Recipe Works

    • The combination of creamy mayonnaise and sweetened condensed milk creates a rich, velvety dressing that coats every ingredient perfectly.
    • Adding pineapple chunks introduces a sweet and tangy flavor that balances the creaminess of the dressing.
    • The use of elbow macaroni ensures the salad holds its shape and provides the perfect bite.
    • Chicken adds a protein boost, making the salad more satisfying and hearty.
    • Chilling the salad before serving allows the flavors to meld together beautifully.

    Ingredients

    • 2 cups elbow macaroni, cooked al dente
    • 1 cup cooked chicken, shredded
    • 1 cup pineapple chunks, drained
    • 1/2 cup raisins
    • 1/2 cup carrots, finely diced
    • 1/2 cup sweetened condensed milk
    • 1 cup mayonnaise
    • 1 tbsp white vinegar
    • Salt and pepper to taste

    Equipment Needed

    • Large mixing bowl
    • Pot for boiling macaroni
    • Knife and cutting board
    • Measuring cups and spoons
    • Spatula or large spoon for mixing

    Instructions

    Pinoy Recipe Chicken Macaroni Salad

    Step 1: Cook the Macaroni

    Bring a large pot of salted water to a boil. Add the elbow macaroni and cook according to package instructions until al dente, usually about 8 minutes. Drain and rinse under cold water to stop the cooking process. Tip: Adding a bit of oil to the water can prevent the macaroni from sticking together.

    Step 2: Prepare the Dressing

    In a large mixing bowl, whisk together the mayonnaise, sweetened condensed milk, and white vinegar until smooth. Season with salt and pepper to taste. This creamy dressing is the secret to the salad’s irresistible flavor.

    Step 3: Combine Ingredients

    Add the cooked macaroni, shredded chicken, pineapple chunks, raisins, and diced carrots to the bowl with the dressing. Gently fold everything together until well coated. Tip: For an extra crunch, you can add some chopped celery or bell peppers.

    Step 4: Chill Before Serving

    Cover the bowl with plastic wrap and refrigerate for at least 2 hours, or overnight if possible. This step is crucial as it allows the flavors to meld together and the salad to reach the perfect consistency.

    Step 5: Serve and Enjoy

    Give the salad a quick stir before serving to redistribute the dressing. Serve chilled for the best taste and texture. Tip: Garnish with some extra raisins or pineapple chunks for a beautiful presentation.

    Tips and Tricks

    For those looking to take their Chicken Macaroni Salad to the next level, consider these advanced tips. First, toasting the macaroni lightly before boiling can add a nutty flavor. Second, using homemade mayonnaise can elevate the dressing’s taste significantly. Third, marinating the chicken in a bit of pineapple juice before shredding can add an extra layer of flavor. Lastly, for a lighter version, you can substitute half of the mayonnaise with Greek yogurt.

    Recipe Variations

    • For a seafood twist, replace the chicken with cooked shrimp or crab meat.
    • Add some heat by mixing in a teaspoon of chili flakes or a diced jalapeño.
    • For a vegetarian version, omit the chicken and add more vegetables like cucumbers and bell peppers.
    • Swap the raisins for dried cranberries for a different kind of sweetness.
    • Use whole wheat or gluten-free macaroni for a healthier or dietary-restriction-friendly option.

    Frequently Asked Questions

    Can I make this salad ahead of time?

    Absolutely! In fact, making it a day ahead allows the flavors to develop more fully. Just keep it covered in the refrigerator until you’re ready to serve.

    How long does the salad last in the fridge?

    Stored properly in an airtight container, the salad can last up to 3 days in the refrigerator. However, it’s best enjoyed within the first 48 hours for optimal texture and flavor.

    Can I freeze the Chicken Macaroni Salad?

    Freezing is not recommended as the mayonnaise-based dressing can separate and the vegetables may become watery upon thawing, affecting the salad’s texture and consistency.

    Summary

    This Pinoy Recipe Chicken Macaroni Salad is a creamy, dreamy delight that’s perfect for any occasion. With its perfect balance of flavors and textures, it’s sure to be a hit. Follow the tips and variations to make it your own!

  • Pasta Shrimp Salad Recipe: A Summer Delight

    Pasta Shrimp Salad Recipe: A Summer Delight

    Every summer gathering deserves a dish that’s both refreshing and satisfying, and this pasta shrimp salad is just that. Easy to whip up and packed with flavors, it’s the perfect blend of hearty pasta, succulent shrimp, and crisp vegetables, all tossed in a zesty dressing that’ll have everyone asking for seconds.

    Why This Recipe Works

    • The combination of al dente pasta and juicy shrimp offers a delightful texture contrast.
    • A homemade dressing brings a bright and tangy flavor that elevates the entire dish.
    • It’s versatile, allowing for endless variations based on what’s in your fridge or pantry.
    • Perfect for meal prep, as it tastes even better the next day after the flavors have melded.
    • Quick and easy to make, it’s a lifesaver for last-minute gatherings or weeknight dinners.

    Ingredients

    • 8 oz pasta (your choice, but fusilli or penne work great)
    • 1 lb shrimp, peeled and deveined
    • 1 cup cherry tomatoes, halved
    • 1/2 cucumber, diced
    • 1/4 red onion, thinly sliced
    • 1/4 cup olive oil
    • 2 tbsp lemon juice
    • 1 garlic clove, minced
    • Salt and pepper to taste
    • 1/4 cup fresh parsley, chopped

    Equipment Needed

    • Large pot
    • Colander
    • Mixing bowls
    • Whisk
    • Skillet

    Instructions

    Pasta Shrimp Salad Recipe

    Step 1: Cook the Pasta

    Bring a large pot of salted water to a boil. Add the pasta and cook according to package instructions until al dente, usually about 8-10 minutes. Drain the pasta in a colander and rinse under cold water to stop the cooking process. This ensures your pasta stays perfectly firm and doesn’t turn mushy in the salad.

    Step 2: Prepare the Shrimp

    While the pasta cooks, heat a skillet over medium heat. Add a tablespoon of olive oil, then the shrimp. Cook for about 2-3 minutes per side until they turn pink and opaque. Be careful not to overcook, as shrimp can become rubbery. Once done, set aside to cool slightly before adding to the salad.

    Step 3: Make the Dressing

    In a small bowl, whisk together the remaining olive oil, lemon juice, minced garlic, salt, and pepper. This simple dressing packs a punch and ties all the salad components together beautifully. Taste and adjust the seasoning as needed.

    Step 4: Combine Everything

    In a large mixing bowl, combine the cooled pasta, shrimp, cherry tomatoes, cucumber, and red onion. Pour the dressing over the top and gently toss to ensure everything is evenly coated. The key here is to be gentle to keep the shrimp and pasta intact.

    Step 5: Garnish and Serve

    Sprinkle the chopped parsley over the salad for a fresh, herby finish. You can serve the salad immediately or let it chill in the fridge for an hour to allow the flavors to meld together even more. Either way, it’s delicious!

    Tips and Tricks

    For the best texture, make sure to rinse the pasta under cold water after draining to stop the cooking process immediately. When cooking shrimp, watch them closely as they cook quickly and can go from perfect to overdone in seconds. To save time, you can use pre-cooked shrimp; just thaw them if frozen and add them directly to the salad. For an extra flavor boost, consider adding a pinch of red pepper flakes to the dressing or a handful of crumbled feta cheese to the salad before serving.

    Recipe Variations

    • Swap the shrimp for grilled chicken or salmon for a different protein option.
    • Add avocado slices for extra creaminess and healthy fats.
    • Include other vegetables like bell peppers or olives for more color and flavor.
    • Try using whole wheat or gluten-free pasta if you’re catering to dietary restrictions.
    • For a dairy-free version, skip the cheese or use a vegan alternative.

    Frequently Asked Questions

    Can I make this salad ahead of time?

    Absolutely! This pasta shrimp salad actually tastes better after sitting in the fridge for a few hours as the flavors have time to meld together. Just be sure to add any delicate ingredients like avocado right before serving to prevent them from browning.

    How long will leftovers last in the fridge?

    Stored in an airtight container, the salad will keep for up to 3 days in the refrigerator. The pasta may absorb some of the dressing over time, so you might want to drizzle a little extra olive oil or lemon juice when serving leftovers.

    Can I use frozen shrimp?

    Yes, frozen shrimp work just fine. Thaw them overnight in the fridge or under cold running water before cooking. Just make sure to pat them dry to remove excess moisture, which helps them sear better in the pan.

    Summary

    This pasta shrimp salad is a versatile, flavorful dish perfect for summer gatherings or a quick weeknight meal. With its combination of al dente pasta, succulent shrimp, and fresh vegetables, all tossed in a zesty dressing, it’s sure to be a hit. Plus, it’s easy to customize based on your preferences or what you have on hand.

  • Fresh & Fabulous Salad Greens Recipe: A Crunchy Delight

    Fresh & Fabulous Salad Greens Recipe: A Crunchy Delight

    Unleash the power of greens with this vibrant salad recipe that’s as nutritious as it is delicious. Perfect for a quick lunch or a side dish that steals the show.

    Why This Recipe Works

    • Combines a variety of textures and flavors for a satisfying crunch and taste.
    • Uses fresh, seasonal greens for maximum nutrition and flavor.
    • Easy to customize with your favorite toppings and dressings.
    • Quick to prepare, making it perfect for busy weeknights.
    • A great way to incorporate more vegetables into your diet.

    Ingredients

    • 4 cups mixed salad greens (washed and dried)
    • 1/2 cup cherry tomatoes (halved)
    • 1/4 cup red onion (thinly sliced)
    • 1/4 cup cucumber (sliced)
    • 1/4 cup feta cheese (crumbled)
    • 2 tbsp olive oil
    • 1 tbsp balsamic vinegar
    • Salt and pepper to taste

    Equipment Needed

    • Large salad bowl
    • Salad spinner (optional for drying greens)
    • Knife and cutting board
    • Measuring cups and spoons

    Instructions

    Salad Greens Recipe

    Step 1: Prepare Your Greens

    Start by washing your mixed salad greens thoroughly under cold water. Use a salad spinner to dry them completely, or pat them dry with a clean kitchen towel. This step ensures your salad isn’t watered down and the dressing sticks better.

    Step 2: Chop and Slice Your Veggies

    Halve the cherry tomatoes, thinly slice the red onion, and slice the cucumber into thin rounds. Uniform cuts not only make your salad look more appealing but also ensure every bite has a bit of everything.

    Step 3: Assemble Your Salad

    In a large salad bowl, combine the dried greens, cherry tomatoes, red onion, and cucumber. Toss them gently to mix. This is where your salad starts to come together, so take a moment to admire your handiwork.

    Step 4: Add the Finishing Touches

    Sprinkle the crumbled feta cheese over the top of your salad. The saltiness of the feta will complement the freshness of the greens and veggies beautifully.

    Step 5: Dress and Serve

    Drizzle olive oil and balsamic vinegar over the salad. Season with salt and pepper to taste. Toss everything together right before serving to keep the greens crisp and fresh.

    Tips and Tricks

    For an extra crunch, consider adding toasted nuts or seeds like almonds or sunflower seeds. If you’re not a fan of balsamic vinegar, lemon juice makes a great alternative for a tangy dressing. Always dress your salad right before serving to prevent the greens from wilting. Experiment with different greens like arugula or spinach for varied flavors and textures.

    Recipe Variations

    • Add grilled chicken or shrimp for a protein-packed meal.
    • Swap feta cheese for goat cheese or blue cheese for a different flavor profile.
    • Include fruits like strawberries or apples for a sweet twist.
    • Try different dressings such as honey mustard or ranch for variety.
    • Add avocado slices for a creamy texture and healthy fats.

    Frequently Asked Questions

    Can I make this salad ahead of time? Yes, you can prep the ingredients ahead, but wait to dress the salad until just before serving to keep the greens crisp.

    What other dressings work well with this salad? Almost any vinaigrette or creamy dressing pairs well. Consider a lemon tahini or a classic Caesar for something different.

    How can I make this salad more filling? Adding a protein like grilled chicken, tofu, or beans can turn this side dish into a satisfying main course.

    Summary

    This salad greens recipe is a quick, versatile, and delicious way to enjoy fresh vegetables. With endless customization options, it’s perfect for any occasion.

  • Chinese Ginger Salad Dressing Recipe: A Zesty Twist to Your Greens

    Chinese Ginger Salad Dressing Recipe: A Zesty Twist to Your Greens

    Now, let’s dive into a dressing that’ll make your salads sing with flavor. This Chinese ginger salad dressing is not just a dressing; it’s a game-changer for your greens, offering a perfect balance of tangy, sweet, and spicy notes that’ll have you drizzling it on everything.

    Why This Recipe Works

    • The fresh ginger adds a spicy kick that’s both invigorating and health-boosting.
    • Soy sauce and rice vinegar create a harmonious blend of umami and acidity.
    • A touch of honey balances the flavors, making it irresistibly delicious.
    • It’s versatile enough to dress any salad, from simple greens to more elaborate mixes.
    • Quick and easy to make, it’s a homemade dressing that beats store-bought versions hands down.

    Ingredients

    • 1/4 cup rice vinegar
    • 2 tablespoons soy sauce
    • 1 tablespoon honey
    • 1 tablespoon fresh ginger, grated
    • 1 clove garlic, minced
    • 1/4 cup vegetable oil
    • 1 teaspoon sesame oil
    • 1 tablespoon sesame seeds, toasted

    Equipment Needed

    • Small mixing bowl
    • Whisk
    • Measuring cups and spoons
    • Grater

    Instructions

    Chinese Ginger Salad Dressing Recipe

    Step 1: Combine the Base Ingredients

    In a small mixing bowl, whisk together the rice vinegar, soy sauce, and honey until the honey is fully dissolved. This creates the foundational flavor profile of your dressing, blending sweetness with umami and acidity.

    Step 2: Add the Aromatics

    Grate the fresh ginger and mince the garlic, then add them to the bowl. These ingredients introduce a spicy and pungent depth that’s characteristic of Asian-inspired dressings.

    Step 3: Emulsify with Oils

    Slowly drizzle in the vegetable oil while continuously whisking to create an emulsion. Then, add the sesame oil for a nutty aroma. This step ensures your dressing is smooth and well-integrated.

    Step 4: Toast the Sesame Seeds

    In a dry pan over medium heat, toast the sesame seeds until golden brown, about 2-3 minutes. Stir them constantly to prevent burning. Toasted sesame seeds add a crunchy texture and enhance the dressing’s nutty flavor.

    Step 5: Finalize and Serve

    Stir the toasted sesame seeds into the dressing. Let it sit for at least 10 minutes before serving to allow the flavors to meld. This resting period is crucial for achieving the perfect harmony of flavors.

    Tips and Tricks

    For an even smoother dressing, consider blending all the ingredients except the sesame seeds in a blender. If you prefer a thicker consistency, add a teaspoon of mayonnaise or Greek yogurt. Always taste and adjust the seasoning before serving; sometimes a little extra honey or vinegar can make all the difference. Toasting the sesame seeds is a step you shouldn’t skip—it brings out their flavor dramatically. Lastly, this dressing can be stored in the refrigerator for up to a week, just give it a good shake or stir before using.

    Recipe Variations

    • For a spicier version, add a teaspoon of chili paste or a few drops of chili oil.
    • Substitute maple syrup for honey for a vegan-friendly option.
    • Add a tablespoon of peanut butter for a creamy, nutty twist.
    • Incorporate a splash of orange juice for a citrusy note.
    • Use tamari instead of soy sauce for a gluten-free alternative.

    Frequently Asked Questions

    Can I make this dressing ahead of time?

    Absolutely! This dressing actually tastes better after the flavors have had time to meld. Prepare it up to a week in advance and store it in the refrigerator. Just remember to give it a good stir or shake before using.

    Is there a substitute for rice vinegar?

    If you don’t have rice vinegar, apple cider vinegar or white wine vinegar can be used as substitutes. However, keep in mind that these vinegars have a stronger flavor, so you might want to use a bit less and adjust to taste.

    How can I make the dressing less spicy?

    The spiciness comes from the ginger. To tone it down, you can reduce the amount of ginger or even omit it if you’re sensitive to spice. The dressing will still be flavorful thanks to the other ingredients.

    Summary

    This Chinese ginger salad dressing is a vibrant, flavorful addition to any salad. With its perfect balance of sweet, tangy, and spicy, it’s sure to become a staple in your kitchen. Easy to make and customizable, it’s a dressing that invites creativity.

  • Pizza Pasta Salad Recipe: A Fun Twist on Two Classics

    Pizza Pasta Salad Recipe: A Fun Twist on Two Classics

    How about combining the best of both worlds into one delicious dish? This Pizza Pasta Salad is your answer to those days when you can’t decide between pizza and pasta. It’s a crowd-pleaser that’s perfect for picnics, potlucks, or just a fun family dinner.

    Why This Recipe Works

    • It’s a unique combination of two beloved dishes, offering the flavors of pizza in the form of a refreshing pasta salad.
    • The recipe is versatile, allowing for endless customization based on your favorite pizza toppings.
    • It’s easy to make and can be prepared ahead of time, making it perfect for busy schedules.
    • The dressing doubles as a marinade, infusing the pasta with rich, pizza-like flavors.
    • It’s a great way to sneak in some veggies for the picky eaters in your life.

    Ingredients

    • 1 lb rotini pasta
    • 1 cup pepperoni slices, quartered
    • 1 cup mozzarella cheese, cubed
    • 1/2 cup black olives, sliced
    • 1/2 cup green bell pepper, diced
    • 1/2 cup red onion, thinly sliced
    • 1/4 cup grated Parmesan cheese
    • 1/2 cup Italian dressing
    • 1/4 cup pizza sauce
    • 1 tsp dried oregano
    • 1/2 tsp garlic powder
    • Salt and pepper to taste

    Equipment Needed

    • Large pot
    • Colander
    • Large mixing bowl
    • Measuring cups and spoons
    • Knife and cutting board

    Instructions

    Pizza Pasta Salad Recipe

    Step 1: Cook the Pasta

    Bring a large pot of salted water to a boil. Add the rotini pasta and cook according to package instructions until al dente, usually about 8-10 minutes. Drain the pasta in a colander and rinse under cold water to stop the cooking process. This ensures your salad stays fresh and not mushy.

    Step 2: Prepare the Toppings

    While the pasta cooks, quarter the pepperoni slices, cube the mozzarella cheese, slice the black olives, dice the green bell pepper, and thinly slice the red onion. Having all your toppings prepped and ready makes assembling the salad a breeze.

    Step 3: Make the Dressing

    In a small bowl, whisk together the Italian dressing, pizza sauce, dried oregano, garlic powder, salt, and pepper. This dressing is the secret to giving your pasta salad that unmistakable pizza flavor.

    Step 4: Combine Everything

    In a large mixing bowl, combine the cooled pasta, prepared toppings, and dressing. Toss everything together until well coated. The key here is to ensure every bite is as flavorful as the last.

    Step 5: Chill and Serve

    Cover the bowl and refrigerate the salad for at least an hour before serving. This allows the flavors to meld together beautifully. Just before serving, give it a quick toss and sprinkle with grated Parmesan cheese for an extra flavor boost.

    Tips and Tricks

    For an even more authentic pizza taste, consider adding some sliced mushrooms or jalapeños if you like a bit of heat. If you’re short on time, you can use store-bought Italian dressing, but homemade will always taste better. To make this dish vegetarian, simply omit the pepperoni and add more veggies like cherry tomatoes or artichoke hearts. For a healthier version, use whole wheat pasta and low-fat cheese. Always taste and adjust the seasoning before serving, as pasta tends to absorb flavors.

    Recipe Variations

    • Meat Lover’s Version: Add cooked and crumbled Italian sausage or bacon bits along with the pepperoni.
    • Veggie Delight: Skip the meat and load up on your favorite vegetables like bell peppers, onions, olives, and mushrooms.
    • Cheese Galore: Mix in different types of cheese like cheddar, provolone, or feta for a richer taste.
    • Spicy Kick: Add some red pepper flakes or diced jalapeños to the dressing for a spicy version.
    • BBQ Chicken Pizza Pasta Salad: Use BBQ sauce instead of pizza sauce and add grilled chicken pieces.

    Frequently Asked Questions

    Can I make this salad ahead of time?

    Absolutely! This salad actually tastes better after it’s been chilled for a few hours as the flavors have more time to meld together. Just be sure to add the Parmesan cheese right before serving to keep it fresh.

    How long will this pasta salad last in the fridge?

    Stored in an airtight container, this pasta salad will last for up to 3 days in the refrigerator. After that, the pasta may start to get a bit soggy.

    Can I use a different type of pasta?

    Yes, you can use any short pasta like penne, farfalle, or shells. Just keep in mind that cooking times may vary depending on the pasta shape.

    Summary

    This Pizza Pasta Salad is a fun and delicious twist on two classic dishes. It’s easy to make, customizable, and perfect for any occasion. Whether you’re a meat lover or a veggie enthusiast, there’s a variation for everyone to enjoy.

  • Wedge Salad Recipe Without Blue Cheese – A Crispy, Creamy Delight

    Wedge Salad Recipe Without Blue Cheese – A Crispy, Creamy Delight

    Salads don’t have to be boring, and this wedge salad is proof. Skip the blue cheese but keep all the flavor with this easy, delicious twist on a classic.

    Why This Recipe Works

    • It swaps blue cheese for a creamy, tangy dressing that’s just as satisfying but more universally loved.
    • The crisp iceberg wedge provides the perfect crunch, making every bite refreshing.
    • Customizable toppings mean everyone can make it their own, from bacon bits to cherry tomatoes.
    • It’s quick to assemble, making it perfect for weeknight dinners or impressing guests.
    • The combination of textures and flavors ensures it’s anything but a boring salad.

    Ingredients

    • 1 large head of iceberg lettuce, cut into 4 wedges
    • 1/2 cup mayonnaise
    • 1/4 cup sour cream
    • 2 tbsp lemon juice
    • 1 tsp garlic powder
    • 1 tsp onion powder
    • Salt and pepper to taste
    • 4 strips of bacon, cooked and crumbled
    • 1/2 cup cherry tomatoes, halved
    • 2 tbsp chives, finely chopped

    Equipment Needed

    • Sharp knife
    • Cutting board
    • Mixing bowl
    • Whisk
    • Measuring cups and spoons

    Instructions

    Wedge Salad Recipe Without Blue Cheese

    Prepare the Dressing

    In a mixing bowl, combine the mayonnaise, sour cream, lemon juice, garlic powder, and onion powder. Whisk until smooth. Season with salt and pepper to taste. This creamy dressing is the star of the show, offering a tangy kick without the blue cheese.

    Cut the Lettuce

    Take the head of iceberg lettuce and remove any outer leaves that are wilted or damaged. Cut the lettuce into four equal wedges, ensuring each wedge has a bit of the core to hold it together. This step is crucial for that signature wedge salad presentation.

    Assemble the Salad

    Place each lettuce wedge on a plate. Drizzle generously with the dressing, ensuring each wedge is well-coated. The dressing should cling to the crevices of the lettuce for maximum flavor in every bite.

    Add the Toppings

    Sprinkle the crumbled bacon, halved cherry tomatoes, and chopped chives over each dressed wedge. The bacon adds a smoky crunch, while the tomatoes and chives bring freshness and color.

    Serve Immediately

    This salad is best enjoyed right after assembly to maintain the crispness of the lettuce and the freshness of the toppings. Serve with a knife and fork for easy eating.

    Tips and Tricks

    For an extra crispy lettuce wedge, chill the iceberg lettuce in the fridge for an hour before cutting. If you’re not a fan of mayonnaise, Greek yogurt can be a healthier substitute for the dressing. To add a bit of sweetness, consider drizzling a little honey over the assembled salad. For a vegetarian version, omit the bacon and add avocado slices or nuts for crunch. Always taste your dressing before adding it to the salad to adjust the seasoning to your preference.

    Recipe Variations

    • Swap the iceberg lettuce for romaine hearts for a different crunch.
    • Add crumbled feta or goat cheese for those who miss the cheese element.
    • Include sliced red onions or cucumbers for extra freshness.
    • For a spicy kick, add a dash of hot sauce to the dressing.
    • Use turkey bacon or vegetarian bacon bits for a lighter version.

    Frequently Asked Questions

    Can I make the dressing ahead of time?

    Absolutely! The dressing can be made up to 3 days in advance and stored in the refrigerator. Just give it a good stir before using to recombine any separated ingredients.

    How do I prevent the lettuce from browning?

    Keeping the lettuce cold is key. Store it in the crisper drawer of your fridge and only cut it when you’re ready to assemble the salad. The core helps keep the wedges fresh longer.

    Can I use a different type of lettuce?

    While iceberg is traditional for its crispness and water content, you can experiment with other lettuces. Just keep in mind that softer lettuces won’t hold up as well to the dressing and toppings.

    Summary

    This wedge salad without blue cheese is a refreshing, customizable dish that’s perfect for any occasion. With its creamy dressing and crispy lettuce, it’s a guaranteed crowd-pleaser.

  • Chinese Noodle Salad Recipe Ramen: A Crunchy, Flavorful Adventure

    Chinese Noodle Salad Recipe Ramen: A Crunchy, Flavorful Adventure

    Zesty, vibrant, and packed with textures, this Chinese noodle salad recipe ramen is your ticket to a quick, delicious meal that doesn’t skimp on flavor. Perfect for those who love a bit of crunch with their lunch, this dish is a playful twist on traditional ramen.

    Why This Recipe Works

    • The combination of cold, crunchy vegetables with soft, chewy ramen noodles creates a delightful contrast in textures.
    • A tangy, sweet, and slightly spicy dressing brings all the components together harmoniously.
    • It’s incredibly versatile, allowing for endless variations based on what you have in your fridge.
    • Quick to prepare, making it perfect for busy weeknights or last-minute gatherings.
    • The use of ramen noodles adds an unexpected twist, turning a simple salad into a conversation starter.

    Ingredients

    • 2 packs of ramen noodles (discard the seasoning packets)
    • 1 cup shredded cabbage
    • 1/2 cup shredded carrots
    • 1/4 cup sliced green onions
    • 1/4 cup chopped cilantro
    • 1/4 cup roasted peanuts, chopped
    • For the dressing: 3 tbsp soy sauce, 2 tbsp rice vinegar, 1 tbsp sesame oil, 1 tbsp honey, 1 tsp grated ginger, 1 clove garlic minced, 1/2 tsp red pepper flakes

    Equipment Needed

    • Large mixing bowl
    • Small bowl for dressing
    • Whisk
    • Pot for boiling noodles
    • Colander

    Instructions

    Chinese Noodle Salad Recipe Ramen

    Step 1: Prepare the Noodles

    Bring a pot of water to a rolling boil. Add the ramen noodles and cook for exactly 3 minutes, stirring occasionally to prevent sticking. Drain the noodles in a colander and rinse under cold water to stop the cooking process. Tip: Rinsing the noodles with cold water not only cools them down but also removes excess starch, preventing clumping.

    Step 2: Mix the Dressing

    In a small bowl, whisk together the soy sauce, rice vinegar, sesame oil, honey, grated ginger, minced garlic, and red pepper flakes until well combined. Taste and adjust the seasoning if necessary. Tip: For a smoother dressing, you can blend all the ingredients together in a blender for a few seconds.

    Step 3: Combine the Salad

    In a large mixing bowl, toss the cooled noodles with the shredded cabbage, carrots, green onions, and cilantro. Pour the dressing over the salad and toss until everything is evenly coated. Tip: Let the salad sit for about 10 minutes before serving to allow the flavors to meld together beautifully.

    Step 4: Garnish and Serve

    Sprinkle the chopped roasted peanuts on top for an extra crunch. Serve immediately or chill in the refrigerator for up to an hour for a cooler salad experience.

    Tips and Tricks

    For those looking to elevate their Chinese noodle salad recipe ramen, consider toasting the peanuts before chopping them for a deeper flavor. If you’re not a fan of cilantro, basil or mint can be great substitutes. For a protein boost, add shredded chicken or tofu. The dressing can be made ahead and stored in the fridge for up to a week, making meal prep a breeze. Lastly, if you prefer a sweeter dressing, increase the honey to 2 tablespoons.

    Recipe Variations

    • Add sliced bell peppers or snap peas for extra crunch and color.
    • Swap the peanuts for cashews or almonds for a different nutty flavor.
    • Include a protein like grilled shrimp, chicken, or tofu to make it a more substantial meal.
    • For a spicier kick, add more red pepper flakes or a dash of sriracha to the dressing.
    • Use soba noodles instead of ramen for a whole grain option.

    Frequently Asked Questions

    Can I make this salad ahead of time?

    Absolutely! You can prepare the salad and dressing separately a day in advance. Just combine them and add the peanuts right before serving to maintain the crunch.

    Is there a substitute for ramen noodles?

    Yes, soba noodles, udon, or even spaghetti can work as substitutes. Just adjust the cooking time according to the package instructions.

    How can I make this recipe gluten-free?

    Use gluten-free ramen noodles and ensure your soy sauce is gluten-free. Tamari is a great gluten-free alternative to soy sauce.

    Summary

    This Chinese noodle salad recipe ramen is a quick, flavorful dish that combines crunchy vegetables with chewy noodles and a tangy dressing. It’s versatile, easy to make, and perfect for any occasion.

  • Creamy Cobb Salad Dressing: A Tangy Twist on a Classic

    Creamy Cobb Salad Dressing: A Tangy Twist on a Classic

    A absolutely delightful dressing that brings your Cobb salad to life with its creamy texture and tangy flavor. Perfect for those who love a bit of zest in their salads.

    Why This Recipe Works

    • The combination of mayonnaise and sour cream creates a rich, creamy base that coats every leaf perfectly.
    • Apple cider vinegar adds a tangy kick that balances the richness of the dairy.
    • Fresh herbs and spices bring depth and complexity to the flavor profile.
    • It’s incredibly versatile, pairing well with not just Cobb salad but a variety of greens.
    • Quick and easy to make, requiring no cooking and just a few minutes of your time.

    Ingredients

    • 1 cup mayonnaise
    • 1/2 cup sour cream
    • 2 tablespoons apple cider vinegar
    • 1 teaspoon Dijon mustard
    • 1/2 teaspoon garlic powder
    • 1/2 teaspoon onion powder
    • Salt and pepper to taste
    • 2 tablespoons chopped fresh chives

    Equipment Needed

    • Mixing bowl
    • Whisk
    • Measuring cups and spoons

    Instructions

    Dressing For Cobb Salad Recipe

    Step 1: Combine the Base Ingredients

    In a large mixing bowl, whisk together the mayonnaise and sour cream until smooth. This creates the creamy foundation of your dressing. Tip: For an extra smooth texture, you can use an electric mixer on low speed.

    Step 2: Add the Vinegar and Mustard

    Stir in the apple cider vinegar and Dijon mustard. The vinegar adds a tangy flavor while the mustard gives a slight sharpness that enhances the overall taste.

    Step 3: Season to Perfection

    Sprinkle in the garlic powder, onion powder, salt, and pepper. These seasonings add depth and bring all the flavors together. Tip: Always taste as you go to adjust the seasoning to your preference.

    Step 4: Incorporate the Fresh Herbs

    Fold in the chopped fresh chives. They add a mild onion flavor and a pop of color to the dressing. Tip: For a different flavor profile, try substituting the chives with dill or parsley.

    Step 5: Chill Before Serving

    Cover the bowl with plastic wrap and refrigerate for at least 30 minutes before serving. This allows the flavors to meld together beautifully.

    Tips and Tricks

    For those looking to elevate their Cobb salad dressing, consider these advanced tips. First, using homemade mayonnaise can significantly enhance the flavor and texture of your dressing. Second, experimenting with different types of vinegar, such as white wine or balsamic, can introduce new flavor dimensions. Lastly, adding a teaspoon of honey or maple syrup can balance the tanginess with a subtle sweetness, perfect for those who prefer a milder dressing.

    Recipe Variations

    • For a healthier version, substitute Greek yogurt for the sour cream.
    • Add a dash of hot sauce or cayenne pepper for a spicy kick.
    • Incorporate blue cheese crumbles for a classic Cobb salad twist.
    • Use lemon juice instead of vinegar for a brighter, citrusy flavor.
    • Mix in a tablespoon of ranch seasoning for an herby, savory note.

    Frequently Asked Questions

    Can I make this dressing ahead of time?

    Absolutely! This dressing can be made up to 3 days in advance. Just store it in an airtight container in the refrigerator. The flavors will continue to develop, making it even more delicious.

    Is there a dairy-free alternative?

    Yes, you can use dairy-free mayonnaise and sour cream substitutes. There are many plant-based options available that work well in this recipe.

    How long will the dressing last in the fridge?

    When stored properly, this dressing will last for up to a week in the refrigerator. Just give it a good stir before using it again.

    Summary

    This creamy Cobb salad dressing is a game-changer, offering a perfect balance of tanginess and creaminess. Easy to make and versatile, it’s sure to become a staple in your salad repertoire.

  • Pesto Potato Salad Recipe: A Fresh Twist on a Classic

    Pesto Potato Salad Recipe: A Fresh Twist on a Classic

    Tired of the same old potato salad? This pesto potato salad is here to shake things up with its vibrant flavors and creamy texture. Perfect for picnics, potlucks, or just because, it’s a dish that’ll have everyone asking for seconds.

    Why This Recipe Works

    • The combination of creamy potatoes and fresh pesto creates a harmonious blend of textures and flavors.
    • It’s versatile enough to serve as a side dish or a main course, depending on your mood.
    • The recipe is straightforward, requiring no fancy techniques or hard-to-find ingredients.
    • It’s a great way to use up leftover pesto or potatoes, reducing food waste.
    • The salad can be made ahead of time, making it perfect for meal prep or last-minute gatherings.

    Ingredients

    • 2 pounds of baby potatoes, halved
    • 1 cup of homemade or store-bought pesto
    • 1/2 cup of mayonnaise
    • 1/4 cup of sour cream
    • 1 tablespoon of lemon juice
    • Salt and pepper to taste
    • 1/4 cup of chopped fresh basil for garnish

    Equipment Needed

    • Large pot
    • Mixing bowls
    • Whisk
    • Knife and cutting board
    • Measuring cups and spoons

    Instructions

    Pesto Potato Salad Recipe

    Step 1: Cook the Potatoes

    Fill a large pot with water and bring it to a boil. Add the halved baby potatoes and cook for about 15 minutes, or until they’re tender but still hold their shape. Drain the potatoes and let them cool slightly. Tip: To check for doneness, pierce a potato with a fork; it should slide in easily.

    Step 2: Prepare the Dressing

    In a large mixing bowl, whisk together the pesto, mayonnaise, sour cream, and lemon juice until smooth. Season with salt and pepper to taste. This creamy dressing is the heart of the salad, so make sure it’s well combined.

    Step 3: Combine the Ingredients

    Add the slightly cooled potatoes to the bowl with the dressing. Gently toss until all the potatoes are evenly coated. Be careful not to overmix, as you want to keep the potatoes intact. Tip: For extra flavor, let the salad sit for at least 30 minutes before serving to allow the flavors to meld.

    Step 4: Garnish and Serve

    Just before serving, sprinkle the chopped fresh basil over the top for a pop of color and freshness. Serve the salad at room temperature or chilled, depending on your preference.

    Tips and Tricks

    For the best texture, use baby potatoes with their skins on. The skins add a nice bite and help the potatoes hold their shape after cooking. If you’re making the salad ahead of time, hold off on adding the basil until just before serving to keep it vibrant. For a lighter version, you can substitute Greek yogurt for the mayonnaise and sour cream. And if you’re feeling adventurous, try adding some roasted pine nuts or sun-dried tomatoes for extra texture and flavor.

    Recipe Variations

    • Add grilled chicken or shrimp to turn the salad into a hearty main course.
    • Swap the pesto for a sun-dried tomato pesto for a different flavor profile.
    • Include some steamed green beans or asparagus for added crunch and color.
    • For a vegan version, use vegan mayonnaise and skip the sour cream, or use a dairy-free alternative.
    • Mix in some crumbled feta or goat cheese for a creamy, tangy twist.

    Frequently Asked Questions

    Can I use regular potatoes instead of baby potatoes?

    Yes, you can use regular potatoes, but you’ll need to cut them into bite-sized pieces to ensure they cook evenly. Keep in mind that the texture might be slightly different, as baby potatoes are naturally creamier.

    How long can I store the salad in the fridge?

    The salad can be stored in an airtight container in the fridge for up to 3 days. Just give it a good stir before serving to redistribute the dressing.

    Can I freeze the pesto potato salad?

    Freezing is not recommended, as the mayonnaise and sour cream in the dressing can separate and become grainy when thawed. The potatoes may also become mushy.

    Summary

    This pesto potato salad is a delightful twist on the classic, offering a creamy texture and vibrant flavors that are sure to impress. Easy to make and versatile, it’s perfect for any occasion. Whether you stick to the recipe or try one of the variations, it’s a dish that’s bound to become a favorite.