Blog

  • Thai Peanut Salad Recipe: A Crunchy, Creamy Dream

    Thai Peanut Salad Recipe: A Crunchy, Creamy Dream

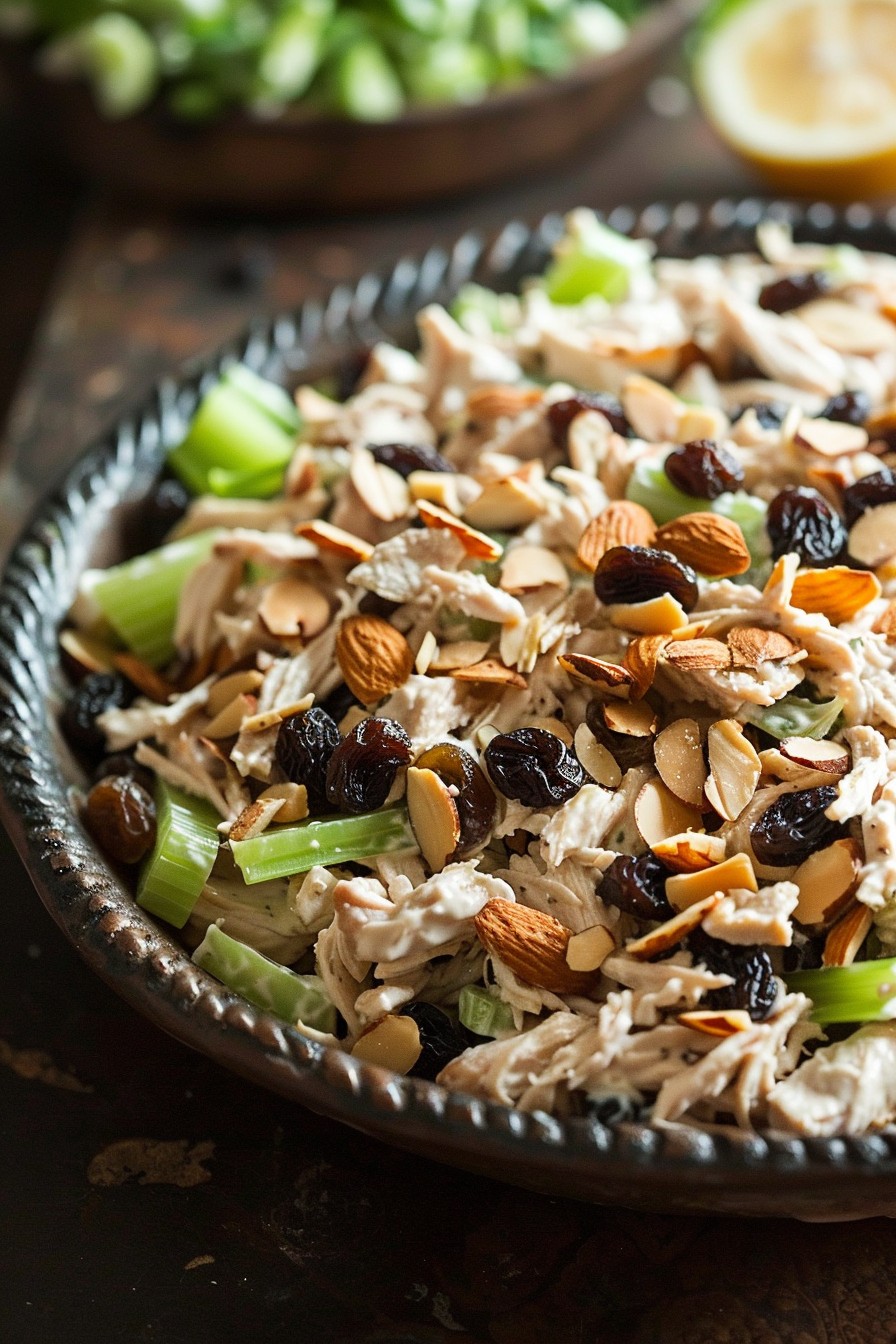
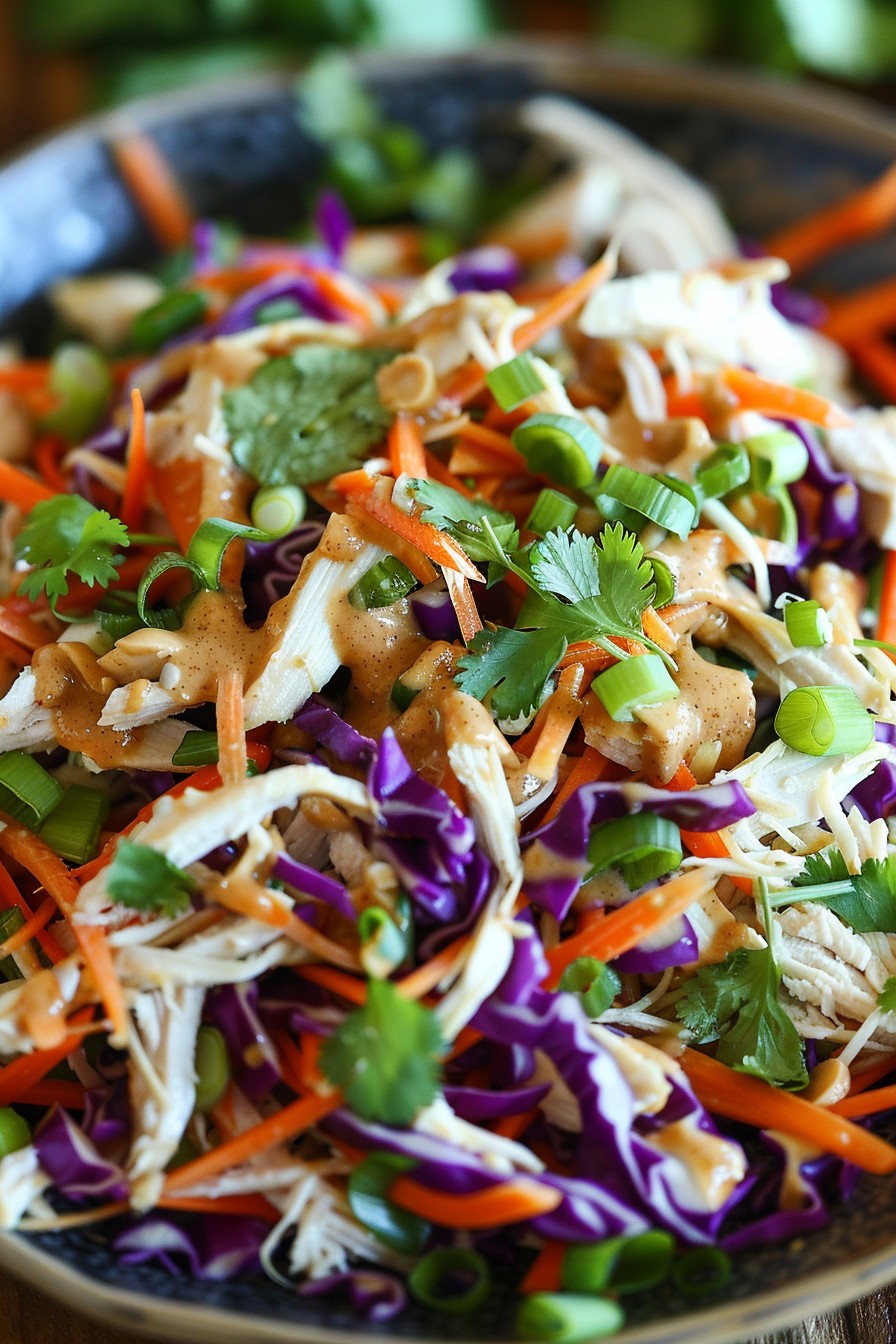
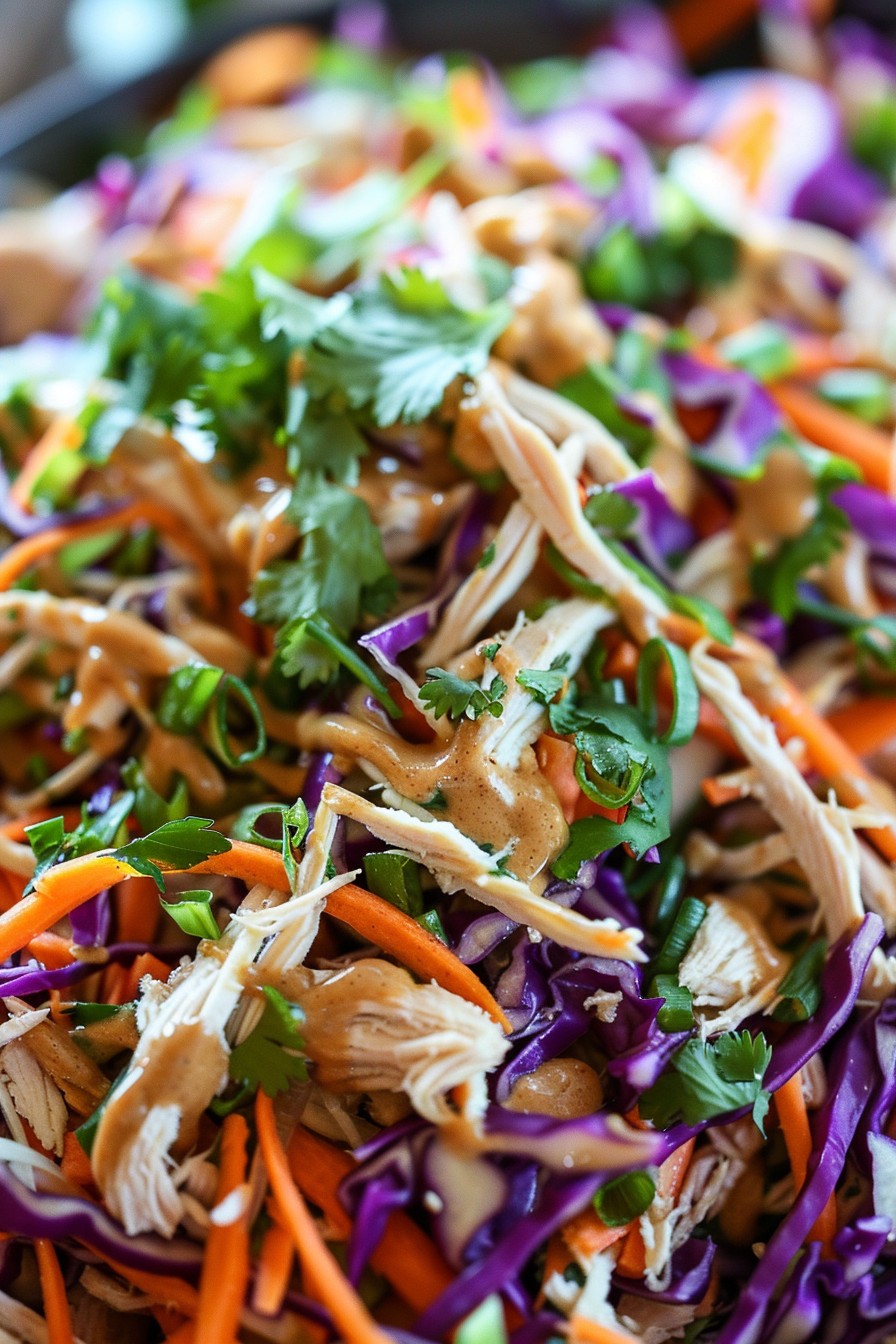
    Forget about boring salads! This Thai Peanut Salad is a vibrant mix of crunchy veggies, tender chicken, and a creamy peanut dressing that’ll have you dreaming of Bangkok street food. Perfect for meal prep or a quick dinner, it’s a flavor explosion in every bite.

    Why This Recipe Works

    • The combination of crunchy vegetables and creamy peanut dressing offers a perfect texture contrast.
    • It’s versatile: easily adaptable for vegetarians or vegans by swapping chicken for tofu.
    • The dressing doubles as a marinade, adding depth to the chicken’s flavor.
    • Quick to prepare, making it ideal for busy weeknights.
    • Packed with protein and veggies, it’s as nutritious as it is delicious.

    Ingredients

    • 2 cups shredded chicken (pre-cooked)
    • 1 cup shredded purple cabbage
    • 1 cup shredded carrots
    • 1/2 cup chopped cilantro
    • 1/4 cup chopped green onions
    • 1/2 cup peanut butter
    • 2 tbsp soy sauce
    • 1 tbsp honey
    • 1 tbsp lime juice
    • 1 tsp grated ginger
    • 1 clove garlic, minced
    • 1/4 tsp red pepper flakes
    • 1/4 cup water (to thin dressing)

    Equipment Needed

    • Large mixing bowl
    • Whisk
    • Measuring cups and spoons
    • Chef’s knife
    • Cutting board

    Instructions

    Thai Peanut Salad Recipe

    Step 1: Prepare the Dressing

    In a large mixing bowl, whisk together peanut butter, soy sauce, honey, lime juice, grated ginger, minced garlic, and red pepper flakes. Gradually add water until the dressing reaches your desired consistency. Tip: For a smoother dressing, warm the peanut butter slightly before mixing.

    Step 2: Combine the Salad Ingredients

    Add the shredded chicken, purple cabbage, carrots, cilantro, and green onions to the bowl with the dressing. Toss until everything is evenly coated. Tip: Let the salad sit for 10 minutes before serving to allow the flavors to meld.

    Step 3: Serve and Enjoy

    Divide the salad among plates or bowls. Garnish with extra cilantro and green onions if desired. Serve immediately for the best texture. Tip: For added crunch, sprinkle with chopped peanuts or crispy wonton strips.

    Tips and Tricks

    To make this salad ahead of time, prepare the dressing and chop the vegetables separately. Store them in the fridge and combine just before serving to maintain the veggies’ crunch. For a vegan version, substitute honey with maple syrup and use tofu instead of chicken. If you’re sensitive to spice, adjust the red pepper flakes to taste. Experiment with adding different vegetables like bell peppers or cucumbers for extra freshness.

    Recipe Variations

    • Swap chicken for shrimp or beef for a different protein option.
    • Add mango or pineapple for a sweet and tangy twist.
    • Use almond butter instead of peanut butter for a different nutty flavor.
    • Incorporate rice noodles to make it more filling.
    • Top with avocado slices for extra creaminess.

    Frequently Asked Questions

    Can I make this salad gluten-free?

    Absolutely! Just substitute the soy sauce with tamari or a gluten-free soy sauce alternative. All other ingredients in this recipe are naturally gluten-free, making it easy to adapt.

    How long does the salad last in the fridge?

    When stored in an airtight container, the salad can last up to 3 days. However, the vegetables may lose some of their crunch over time. For the best experience, enjoy it within 24 hours.

    Can I use crunchy peanut butter?

    Yes, crunchy peanut butter will add an extra texture to the dressing. If you prefer a smoother dressing, stick with creamy peanut butter or blend the crunchy version until smooth.

    Summary

    This Thai Peanut Salad is a delightful mix of textures and flavors, perfect for a quick and healthy meal. With its creamy dressing and crunchy veggies, it’s a dish that’s as fun to eat as it is to make.

  • Zesty Beet Salad Dressing: A Tangy Twist for Your Greens

    Zesty Beet Salad Dressing: A Tangy Twist for Your Greens

    A absolutely delightful dressing that brings your beet salad to life with its vibrant color and tangy flavor. Perfect for those who love a bit of zest in their meals, this recipe is a game-changer for salad enthusiasts.

    Why This Recipe Works

    • The combination of olive oil and lemon juice creates a perfect balance between richness and acidity.
    • Fresh garlic and honey add depth and a subtle sweetness that complements the earthy beets.
    • It’s incredibly versatile, pairing well with not just beets but any salad greens or roasted vegetables.
    • Quick and easy to make, requiring no special equipment or hard-to-find ingredients.
    • The dressing can be made ahead of time, allowing the flavors to meld together beautifully.

    Ingredients

    • 1/2 cup extra virgin olive oil
    • 1/4 cup fresh lemon juice
    • 2 cloves garlic, minced
    • 1 tablespoon honey
    • 1 teaspoon Dijon mustard
    • Salt and pepper to taste

    Equipment Needed

    • Small mixing bowl
    • Whisk
    • Measuring cups and spoons

    Instructions

    Dressing For Beet Salad Recipe

    Step 1: Combine the Wet Ingredients

    In a small mixing bowl, whisk together the olive oil and lemon juice until well combined. This creates the base of your dressing, ensuring a smooth emulsion. Tip: For an extra smooth dressing, you can use a blender instead of a whisk.

    Step 2: Add the Flavor Enhancers

    Stir in the minced garlic, honey, and Dijon mustard. These ingredients add layers of flavor, from the sharpness of the garlic to the sweetness of the honey and the tang of the mustard. Tip: Let the dressing sit for a few minutes to allow the garlic flavor to mellow.

    Step 3: Season to Perfection

    Add salt and pepper to taste. Remember, the dressing should be flavorful but not overpowering, as it will complement the salad. Tip: Always taste as you go to adjust the seasoning according to your preference.

    Step 4: Mix Well

    Whisk all the ingredients together until the dressing is smooth and homogenous. This ensures that every bite of your salad is perfectly dressed.

    Step 5: Serve or Store

    Use immediately over your favorite beet salad, or store in an airtight container in the refrigerator for up to a week. Shake well before using if stored.

    Tips and Tricks

    For those looking to elevate their dressing, consider using infused olive oils, such as garlic or lemon-infused, for an extra flavor boost. If you prefer a creamier texture, adding a tablespoon of Greek yogurt can transform the dressing into a creamy delight. For a nuttier flavor, substitute honey with maple syrup. Always use fresh lemon juice rather than bottled for the brightest flavor. Lastly, if you’re making the dressing ahead, add the garlic just before serving to maintain its sharpness.

    Recipe Variations

    • For a vegan version, replace honey with agave syrup or maple syrup.
    • Add a teaspoon of grated ginger for a spicy kick.
    • Incorporate fresh herbs like dill or parsley for a herby freshness.
    • For a citrusy twist, replace lemon juice with orange or lime juice.
    • Add a pinch of cumin or smoked paprika for a smoky flavor.

    Frequently Asked Questions

    Can I make this dressing without honey?

    Absolutely! If you’re avoiding honey, you can substitute it with agave syrup, maple syrup, or even a bit of sugar dissolved in warm water. The key is to balance the acidity of the lemon juice with a touch of sweetness.

    How long can I store this dressing?

    This dressing can be stored in an airtight container in the refrigerator for up to a week. Just give it a good shake or stir before using it, as the ingredients may separate over time.

    Can I use bottled lemon juice instead of fresh?

    While you can use bottled lemon juice in a pinch, fresh lemon juice is highly recommended for the best flavor. Bottled juice often contains preservatives and lacks the bright, fresh taste of freshly squeezed lemon juice.

    Summary

    This zesty beet salad dressing is a vibrant, flavorful addition to any salad, especially those featuring earthy beets. With its perfect balance of acidity, sweetness, and depth, it’s sure to become a staple in your recipe collection. Quick, easy, and versatile, it’s the ideal way to dress up your greens.

  • The Ultimate Potato Salad Recipe Serious Eats Fans Will Love

    The Ultimate Potato Salad Recipe Serious Eats Fans Will Love

    Welcome to the most talked-about potato salad recipe on the internet. Whether you’re a Serious Eats aficionado or just someone who loves a good potato salad, this recipe is about to become your go-to.

    Why This Recipe Works

    • The secret lies in the perfect balance of creamy and tangy flavors, achieved with a homemade dressing that’s both rich and refreshing.
    • Using Yukon Gold potatoes ensures a buttery texture that holds up well, making every bite satisfying.
    • Incorporating crispy bacon and fresh herbs adds layers of flavor and texture that elevate this dish beyond the ordinary.

    Ingredients

    • 2 pounds Yukon Gold potatoes, cubed
    • 1/2 cup mayonnaise
    • 2 tablespoons Dijon mustard
    • 1 tablespoon apple cider vinegar
    • 4 strips bacon, cooked and crumbled
    • 1/4 cup chopped fresh chives
    • Salt and pepper to taste

    Equipment Needed

    • Large pot
    • Mixing bowl
    • Whisk
    • Knife and cutting board

    Instructions

    Potato Salad Recipe Serious Eats

    Step 1: Cook the Potatoes

    Start by placing your cubed Yukon Gold potatoes in a large pot. Cover them with cold water by about an inch, then bring to a boil over high heat. Once boiling, reduce the heat to medium and let them simmer until tender, about 10-12 minutes. Tip: Test a piece with a fork; it should slide off easily when done.

    Step 2: Prepare the Dressing

    While the potatoes cook, whisk together the mayonnaise, Dijon mustard, and apple cider vinegar in a mixing bowl. Season with salt and pepper to taste. This creates a creamy, tangy base that will coat the potatoes beautifully.

    Step 3: Combine and Chill

    Drain the potatoes well and let them cool slightly. Then, gently fold them into the dressing along with the crumbled bacon and chopped chives. Cover and refrigerate for at least an hour to let the flavors meld together. Tip: For the best flavor, let it chill overnight.

    Tips and Tricks

    For an extra layer of flavor, try roasting the potatoes instead of boiling them. This adds a delightful crispness to the edges. Another tip is to add a teaspoon of sugar to the dressing for a slight sweetness that balances the tanginess. Lastly, if you’re short on time, using pre-cooked bacon can save you a step without sacrificing taste.

    Recipe Variations

    • For a vegetarian version, omit the bacon and add smoked paprika for a similar depth of flavor.
    • Swap out the chives for dill or parsley for a different herbal note.
    • Add hard-boiled eggs for a protein boost and extra creaminess.

    Frequently Asked Questions

    Can I use a different type of potato?

    Yes, but Yukon Golds are recommended for their texture and flavor. If you substitute, waxy potatoes like red potatoes are the next best option.

    How long can I store this potato salad?

    Properly stored in an airtight container, it will last up to 3 days in the refrigerator. The flavors actually improve over time!

    Can I make this recipe vegan?

    Absolutely! Use vegan mayonnaise and skip the bacon or use a plant-based alternative. The dressing will still be creamy and delicious.

    Summary

    This potato salad recipe is a crowd-pleaser, combining creamy, tangy, and crispy elements for a dish that’s anything but ordinary. Perfect for picnics, potlucks, or any day you crave something delicious.

  • Tantalizing Octopus Salad Recipe: A Sea-Inspired Delight

    Tantalizing Octopus Salad Recipe: A Sea-Inspired Delight

    Venture into the culinary depths with this octopus salad recipe that promises to transport your taste buds straight to the Mediterranean. Perfect for summer gatherings or a fancy dinner at home, this dish combines tender octopus with crisp vegetables and a zesty dressing for a refreshing and flavorful experience.

    Why This Recipe Works

    • The octopus is boiled with aromatics to ensure it’s tender and flavorful, not rubbery.
    • A mix of fresh vegetables adds crunch and color, making the salad as visually appealing as it is delicious.
    • The lemon-olive oil dressing brightens the dish, balancing the richness of the octopus.
    • Quick and easy to prepare, this salad is perfect for impressing guests without spending hours in the kitchen.
    • It’s a versatile recipe that can be customized with your favorite ingredients or whatever you have on hand.

    Ingredients

    • 1 lb octopus, cleaned
    • 2 cups water
    • 1 lemon, sliced
    • 2 garlic cloves, smashed
    • 1 bay leaf
    • 1 cup cherry tomatoes, halved
    • 1/2 red onion, thinly sliced
    • 1 cucumber, diced
    • 1/4 cup Kalamata olives, pitted and halved
    • 2 tbsp extra virgin olive oil
    • 1 tbsp lemon juice
    • Salt and pepper to taste

    Equipment Needed

    • Large pot
    • Mixing bowl
    • Sharp knife
    • Cutting board

    Instructions

    Octopus Salad Recipe

    Prepare the Octopus

    In a large pot, combine the octopus, water, lemon slices, garlic, and bay leaf. Bring to a boil over high heat, then reduce to a simmer. Cover and cook for about 45 minutes, or until the octopus is tender when pierced with a fork. Remove from heat and let cool in the cooking liquid for 10 minutes. Drain and slice the octopus into bite-sized pieces.

    Chop the Vegetables

    While the octopus is cooking, prepare your vegetables. Halve the cherry tomatoes, thinly slice the red onion, and dice the cucumber. Place all the vegetables in a large mixing bowl. Add the Kalamata olives for a briny contrast.

    Make the Dressing

    In a small bowl, whisk together the extra virgin olive oil and lemon juice. Season with salt and pepper to taste. This simple dressing will bring all the flavors of the salad together.

    Combine and Toss

    Add the sliced octopus to the bowl with the vegetables. Drizzle the dressing over the top and gently toss to combine. Ensure everything is evenly coated with the dressing for maximum flavor in every bite.

    Serve and Enjoy

    Transfer the salad to a serving dish and let it sit for about 10 minutes to allow the flavors to meld. Serve chilled or at room temperature, garnished with additional lemon slices if desired.

    Tips and Tricks

    For the most tender octopus, consider freezing it before cooking. This breaks down the fibers, resulting in a more tender texture. When boiling the octopus, adding a wine cork to the pot is an old chef’s trick said to tenderize it further, though the science behind this is debated. To save time, you can cook the octopus a day ahead and store it in the refrigerator until you’re ready to make the salad. For an extra burst of flavor, add some chopped fresh herbs like parsley or dill to the salad before serving.

    Recipe Variations

    • Add avocado for creaminess and healthy fats.
    • Include capers for an extra tangy punch.
    • Swap the lemon juice with lime for a different citrus note.
    • Mix in some arugula or spinach for added greens.
    • For a spicy kick, add some chopped chili peppers or a dash of hot sauce to the dressing.

    Frequently Asked Questions

    Can I use frozen octopus?

    Absolutely! Frozen octopus works just as well as fresh, especially since it’s often pre-cleaned, saving you time and effort. Just make sure to thaw it completely in the refrigerator before cooking to ensure even cooking.

    How do I know when the octopus is done?

    The octopus is ready when it’s tender enough to pierce easily with a fork. Overcooking can make it rubbery, so keep an eye on it, especially towards the end of the cooking time.

    Can I make this salad ahead of time?

    Yes, this salad can be assembled a few hours ahead of serving. Just wait to add the dressing until you’re ready to serve to keep the vegetables crisp.

    Summary

    This octopus salad is a refreshing, flavorful dish that’s perfect for any occasion. With tender octopus, crisp vegetables, and a zesty dressing, it’s sure to impress. Plus, it’s customizable to suit your taste preferences.

  • Chicken Salad Recipe with Raisins: A Sweet and Savory Delight

    Chicken Salad Recipe with Raisins: A Sweet and Savory Delight

    Bursting with flavors and textures, this chicken salad recipe with raisins is the perfect blend of sweet and savory. It’s a versatile dish that can be served on a bed of greens, between slices of bread, or even straight out of the bowl. Let’s dive into making this delicious meal that’s sure to impress.

    Why This Recipe Works

    • The combination of tender chicken and sweet raisins creates a delightful contrast in every bite.
    • Greek yogurt adds a creamy texture without the heaviness of mayonnaise, making it a healthier option.
    • Crunchy celery and almonds add a satisfying texture that elevates the dish.
    • Simple ingredients come together quickly for a meal that’s both easy to make and delicious.
    • This recipe is easily customizable, allowing you to adjust ingredients based on your preferences.

    Ingredients

    • 2 cups cooked chicken, shredded or diced
    • 1/2 cup raisins
    • 1/2 cup Greek yogurt
    • 1/4 cup mayonnaise
    • 1/2 cup celery, finely chopped
    • 1/4 cup almonds, sliced
    • 1 tbsp lemon juice
    • 1 tsp Dijon mustard
    • Salt and pepper to taste

    Equipment Needed

    • Mixing bowl
    • Measuring cups and spoons
    • Knife and cutting board
    • Spoon or spatula for mixing

    Instructions

    Chicken Salad Recipe With Raisins

    Step 1: Prepare Your Ingredients

    Start by ensuring your chicken is cooked and cooled. Shred or dice it into bite-sized pieces. Finely chop the celery and measure out your raisins and almonds. Having all your ingredients prepped and ready to go makes the assembly process a breeze.

    Step 2: Mix the Dressing

    In a large mixing bowl, combine the Greek yogurt, mayonnaise, lemon juice, and Dijon mustard. Whisk these together until smooth. This mixture will serve as the creamy base for your chicken salad, adding tanginess and richness.

    Step 3: Combine All Ingredients

    Add the shredded chicken, raisins, chopped celery, and sliced almonds to the bowl with the dressing. Gently fold everything together until the chicken and other ingredients are evenly coated with the dressing. Be careful not to overmix to maintain the texture of the ingredients.

    Step 4: Season to Taste

    Once everything is combined, taste your chicken salad and season with salt and pepper as needed. Remember, you can always add more, but you can’t take it away, so start with a little and adjust accordingly.

    Step 5: Chill Before Serving

    For the best flavor, cover your chicken salad and refrigerate it for at least an hour before serving. This allows the flavors to meld together beautifully. Serve chilled on a bed of greens, in a sandwich, or enjoy it as is.

    Tips and Tricks

    For an extra crunch, toast the almonds before adding them to the salad. This enhances their flavor and adds another layer of texture. If you’re not a fan of Greek yogurt, you can substitute it with more mayonnaise or even sour cream for a different taste profile. To make this dish ahead of time, prepare the salad up to two days in advance, keeping it covered in the refrigerator. The flavors will continue to develop, making it even more delicious.

    Recipe Variations

    • Swap raisins for dried cranberries or chopped apricots for a different sweet element.
    • Add diced apples or grapes for a fresh, fruity crunch.
    • Incorporate curry powder or paprika for a spicy twist.
    • Use walnuts or pecans instead of almonds for a different nutty flavor.
    • For a lighter version, omit the mayonnaise and use all Greek yogurt.

    Frequently Asked Questions

    Can I use canned chicken for this recipe?

    Yes, you can use canned chicken in a pinch, but for the best texture and flavor, freshly cooked chicken is recommended. If using canned chicken, be sure to drain it well and consider giving it a quick rinse to remove any excess sodium.

    How long can I store this chicken salad?

    This chicken salad can be stored in an airtight container in the refrigerator for up to 3 days. Be sure to give it a good stir before serving if the dressing has separated slightly.

    Can I make this recipe dairy-free?

    Absolutely! Simply replace the Greek yogurt with a dairy-free yogurt alternative or use all mayonnaise. Just be sure to check the labels if you’re avoiding dairy for dietary restrictions.

    Summary

    This chicken salad recipe with raisins is a perfect mix of sweet and savory, with a creamy texture and crunchy additions. It’s easy to make, customizable, and delicious served in various ways. Whether you’re looking for a quick lunch or a light dinner, this dish is sure to satisfy.

  • Hello world!

    Welcome to WordPress. This is your first post. Edit or delete it, then start writing!